

已修复:Windows 10 用户帐户未出现在登录屏幕上

''在过去的几周里,我的 Windows 10 计算机出现了问题。每次 Windows 10 启动时,用户帐户不会出现在 Windows 10 登录屏幕上,右下角仅显示三个按钮(互联网、轻松访问和电源)。即使之前设置了许多不同的用户帐户,但这些用户帐户并未列在登录屏幕上,导致无法访问桌面。我尝试了Ctrl+Alt+Delete的方法,并重新启动了几次电脑,但仍然出现同样的问题。就我而言,这是一个非常烦人的问题。有人可以帮助我吗?''

近日,有人反映,启动Windows 10系统时,Windows 10登录界面不显示用户帐户,因此无法访问桌面。遗憾的是,问题的根源尚不清楚,这是人们见过的最糟糕的事情之一。如果您也是此问题的受害者,并且不想在 Windows 10 上重新安装 Windows 10 系统或将计算机恢复出厂设置,那么这篇文章可能会对您有所帮助。
因此,在本文中,我们详细介绍了所有方法,以便您可以轻松解决 Windows 10 用户帐户未出现在登录屏幕上的问题。 我们现在就开始吧。
- 修复 1:执行命令提示符行
- 修复 2:使用注册表编辑器
- 修复3:使用netplwiz设置自动登录
- 修复 4:通过删除 Windows 10 密码
修復1:執行指令提示符號行
如果您因為沒有出現使用者帳戶且登入畫面上也沒有顯示密碼框而無法登入 Windows 10,您應該執行命令提示字元行來解決問題。
第 1 步:點選登入畫面右下角的電源按鈕,然後按住Shift鍵的同時選擇重新啟動。

選擇選項畫面後,點選疑難解答 > 進階選項> 指令提示字元。

net useradministrator /active:yes 指令,然後按 Enter 鍵。

選擇一個選項下的繼續,最後重新啟動電腦。


如果您在歡迎畫面上遇到缺少使用者帳戶和密碼的提示,則應該使用註冊表編輯器來修復該問題。
步驟 1:依照上述固定 1 中的
步驟 1 和 步驟 2 進行操作。 第 2 步:命令提示字元開啟後,輸入
regedit 並按 Enter 鍵啟動登錄編輯程式。

0 設定為 1。 點選確定儲存變更。

繼續重新啟動電腦。 重新啟動後,使用者帳號將出現在登入畫面上並自動登入。
修復3:使用netplwiz設定自動登入您也可以透過使用netplwiz設定自動登入來暫時解決這個問題。啟用自動登入後,您的使用者帳戶將顯示在登入畫面上。但是,這不是一個持久的解決方案,您將需要執行以下提供的解決方案之一。
第1步:點選
電源圖標,然後按住Shift鍵選擇重新啟動選項。 此時,將顯示選擇一個選項畫面。
第 2 步:在選擇選項畫面中,點選疑難解答 > 進階選項 >啟動設定。

重新啟動按鈕。
第四步:重新啟動後,按F4或4鍵開機進入安全模式。
第5步:進入安全模式前,系統會提示您輸入密碼,只要輸入正確的密碼即可。

netplwiz,然後按Enter。

Step 7: The User Accounts dialog box will be displayed, uncheck ''Users must enter a username and password to use this computer'' option. Click the Apply button.

Step 8: When the Automatically sign in window shows up, type and confirm the password in the password input box, click OK to save the changes.

Step 9: Click the Start button on the lower-left of the taskbar and choose the Restart option to reboot the Windows 10.

Notice: If you shut down the computer and then turn it on, the user account still doesn't appear on the login screen.
Step 10: After Windows 10 restarts, your user account appears on the login screen and automatically log on.
Fixed 4: by removing Windows 10 password
After performing the above three methods, if you find that the user account still does not appear on Windows 10 login screen, don't worry, there is an advanced utility that can help you log in to Windows 10 system - iSumsoft Windows Password Refixer software, which is highly recommended by thousands of users. With this software, what you need to do is create a Windows password reset disk on any accessible computer, and boot your computer from the disk to remove Windows 10 password. Now, we will illustrate the specific steps below.
Special instructions: iSumsoft Windows Password Refixer software has three versions, including for Windows, for Mac, and for Android. It is worth mentioning that the user can install the software on a Windows computer, on a Mac, or on an Android phone to create a password reset disk for any Windows computer that does not show user account.
Step 1: Create a Windows password reset disk
1. Install and launch iSumsoft Windows Password Refixer on an accessible computer.
2. Get a writable USB flash drive and insert it into the available computer.
3. Choose the USB device, note your USB drive name, and click Begin burning button. At this point, you will be asked whether you want to format the USB drive or not. Just click Yes button to burn this iSumsoft Windows Password Refixer tool into your USB flash drive.

4. In a few seconds, you will receive a ''Burning Successfully'' notification, which proves that you have successfully created a Windows password reset disk.

Step 2: Boot the computer from the USB reset disk
Plug the Windows password reset disk to the computer that doesn't appear the user account, and boot your the computer from the USB reset disk you have created.
Step 3: Remove Windows 10 password by setting its password to blank
After your computer successfully booting from the USB reset disk, select your user account (local or Microsoft account). Next, tap on Reset Password, and click Yes button to set its password to blank. The Windows 10 user password will be removed ultimately as per your expectation.

Step 4: Restart Windows 10 system
Lastly, tap on Reboot button and exit USB reset disk drive so that your Windows 10 system restarts. After Windows 10 restarts, your user account will appear and automatically sign in.

以上是已修复:Windows 10 用户帐户未出现在登录屏幕上的详细内容。更多信息请关注PHP中文网其他相关文章!

热AI工具

Undresser.AI Undress
人工智能驱动的应用程序,用于创建逼真的裸体照片

AI Clothes Remover
用于从照片中去除衣服的在线人工智能工具。

Undress AI Tool
免费脱衣服图片

Clothoff.io
AI脱衣机

Video Face Swap
使用我们完全免费的人工智能换脸工具轻松在任何视频中换脸!

热门文章
热工具

记事本++7.3.1
好用且免费的代码编辑器

SublimeText3汉化版
中文版,非常好用

禅工作室 13.0.1
功能强大的PHP集成开发环境

Dreamweaver CS6
视觉化网页开发工具

SublimeText3 Mac版
神级代码编辑软件(SublimeText3)


 Windows KB5054979更新信息更新内容列表
Apr 15, 2025 pm 05:36 PM
Windows KB5054979更新信息更新内容列表
Apr 15, 2025 pm 05:36 PM
KB5054979是2025年3月27日发布的Windows 11版本24H2的累积安全更新。它针对.NET框架版本3.5和4.8.1,增强了安全性和整体稳定性。值得注意的是,该更新使用System.io API在UNC共享的文件和目录操作中解决了问题。提供了两种安装方法:一个通过Windows设置通过Windows Update下的更新,另一个通过Microsoft Update Catalog下载手册下载。
 Nanoleaf想要改变您的技术收费
Apr 17, 2025 am 01:03 AM
Nanoleaf想要改变您的技术收费
Apr 17, 2025 am 01:03 AM
Nanoleaf的Pegboard Desk Dock:时尚且功能型的桌子组织者 厌倦了相同的旧充电设置? NanoLeaf的新Pegboard Desk Dock提供了一种时尚且功能性的替代方案。 这款多功能桌配件拥有32个全彩RGB
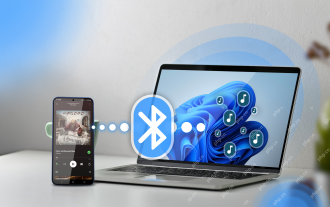 如何将Windows 11用作蓝牙音频接收器
Apr 15, 2025 am 03:01 AM
如何将Windows 11用作蓝牙音频接收器
Apr 15, 2025 am 03:01 AM
将Windows 11 PC变成蓝牙扬声器,并从手机中欣赏您喜欢的音乐!本指南向您展示了如何轻松将iPhone或Android设备连接到计算机进行音频播放。 步骤1:配对蓝牙设备 首先,PA
 华硕' Rog Zephyrus G14 OLED游戏笔记本电脑$ 300折扣
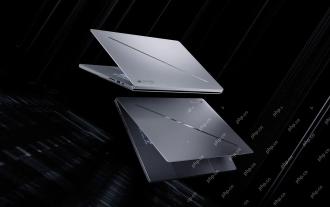
Apr 16, 2025 am 03:01 AM
华硕' Rog Zephyrus G14 OLED游戏笔记本电脑$ 300折扣
Apr 16, 2025 am 03:01 AM
ASUS ROG Zephyrus G14 电竞笔记本电脑特惠! 现在购买ASUS ROG Zephyrus G14 电竞笔记本电脑,即可享受300美元的优惠!原价1999美元,现价仅需1699美元!随时随地畅享沉浸式游戏体验,或将其作为可靠的便携式工作站。 Best Buy目前提供这款2024款14英寸ASUS ROG Zephyrus G14电竞笔记本电脑的优惠活动。其强大的配置和性能令人印象深刻。 这款ASUS ROG Zephyrus G14电竞笔记本电脑在Best Buy的售价为16
 如何自定义Windows 11通知
Apr 14, 2025 am 04:05 AM
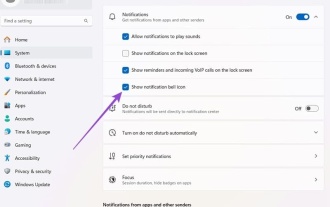
如何自定义Windows 11通知
Apr 14, 2025 am 04:05 AM
Windows 11 通知设置详解:打造个性化通知体验 Windows 11 将通知中心整合到日历中,虽然需要一些时间适应,但通知的频繁程度并未改变。如果您厌倦了不断弹出的系统更新和无用应用通知,本文将指导您自定义 Windows 11 通知,优化工作流程。 全局通知设置 几乎所有与通知相关的选项都位于 Windows 11 的“设置”中。 步骤 1:点击“开始”菜单,选择“设置”(或按“Windows I”)。 步骤 2:选择左侧边栏中的“系统”。 步骤 3:点击“通知”访问所有通知选项。
 您应该使用的5个隐藏窗口功能
Apr 16, 2025 am 12:57 AM
您应该使用的5个隐藏窗口功能
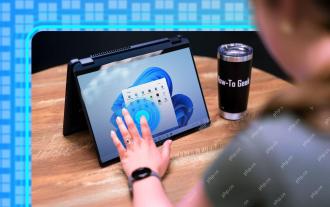
Apr 16, 2025 am 12:57 AM
解锁隐藏的Windows功能,以获得更流畅的体验! 发现令人惊讶的有用的Windows功能,可以显着增强您的计算体验。甚至经验丰富的Windows用户也可能在这里找到一些新技巧。 动态锁:自动
 如何(以及为什么)在Windows 11上关闭鼠标加速度
Apr 15, 2025 am 06:06 AM
如何(以及为什么)在Windows 11上关闭鼠标加速度
Apr 15, 2025 am 06:06 AM
提升鼠标精准度:禁用Windows 11鼠标加速功能 鼠标光标在屏幕上移动过快,即使你只移动了鼠标几厘米?这就是鼠标加速功能导致的。本文将指导你如何禁用此功能,从而更好地控制鼠标移动。 禁用鼠标加速是否明智? Windows 系统中并没有直接的“鼠标加速”选项。取而代之的是“增强指针精度”设置,微软将其视为鼠标加速功能。 启用此功能后,鼠标的DPI(每英寸点数)设置就会生效。它控制着鼠标物理移动速度与光标在屏幕上移动距离之间的关系。缓慢移动鼠标,Windows 会降低有效DPI,光标移动距离较短
 您的键盘需要一个大的OL'音量旋钮
Apr 18, 2025 am 03:04 AM
您的键盘需要一个大的OL'音量旋钮
Apr 18, 2025 am 03:04 AM
在当今的触摸屏世界中,身体控制的令人满意的触觉反馈是一个可喜的变化。 这就是为什么具有较大音量旋钮的键盘令人惊讶地吸引人的原因。我最近亲身经历了这是一个启示。 为了
