等一下...

我们都遇到过这种情况,我们正忙于尝试投入生产,但有很多因素会影响您选择部署平台。 Emmmm 是的,我们将选择 AWS。通常在坚持使用一个平台之后,我们现在可以依赖一些因素,例如:架构、成本、可靠性、可扩展性、可用性和可行性。你猜怎么着!这与可靠性、可扩展性、可用性和可行性无关,因为AWS在所有这些方面都是值得信赖的。在本教程中,我们将确定 Django 应用程序的某些架构的优缺点。
在我们继续之前,让我们先了解一些先决条件,以便完全理解正在发生的事情。
:) 本教程中涉及的所有代码都将作为开源提供。欢迎留下你的足迹。
在继续之前,您需要:
缓存是一种用于将经常访问的数据临时存储在快速访问位置的技术,从而减少检索该数据所需的时间。在 AWS 中,缓存通过最大限度地减少主数据库和 API 上的负载来提高应用程序性能和可扩展性,从而加快最终用户的响应时间。
我们缓存是为了提高效率、减少延迟并降低成本。通过将数据存储在更靠近应用程序的位置,缓存可以降低数据库查询的频率、网络流量和计算负载。这可以加快数据检索速度、改善用户体验并优化资源使用,这对于高流量应用程序至关重要。

EC2:
从其完整含义来看,EC2 是“弹性计算引擎”,是 AWS 数据中心中的 Web 服务器。换句话说,EC2 是虚拟的,您可以从 AWS 获得。凭借所有可用功能,您可以通过“即用即付计划”以非常便宜的月费获得一个。
AWS 应用程序运行器:
这是一项完全托管的服务,可简化 Web 应用程序和 API 的运行和扩展,使开发人员能够从代码存储库或容器映像快速部署,而无需基础设施管理。
芹菜和姜戈芹菜:
Celery是一个开源的分布式任务队列,用于Python中的实时处理。 Django Celery 将 Celery 与 Django 框架集成,支持 Django 应用程序内的异步任务执行、周期性任务和后台作业管理。该技术的用例各不相同。它可以是通信服务(短信、电子邮件)、计划作业(Cron)和后台数据处理任务,例如数据聚合、机器学习模型训练或文件处理。
Amazon RDS(关系数据库服务):
它是一种托管数据库服务,可简化云中关系数据库的设置、操作和扩展。它支持 MySQL、PostgreSQL、Oracle 和 SQL Server 等各种数据库引擎,提供自动备份、修补和高可用性,将用户从数据库管理任务中解放出来。
让我们研究一下应用程序的结构以及部署设置的行为方式。
使用 AWS App Runner (ECR) 进行部署设置
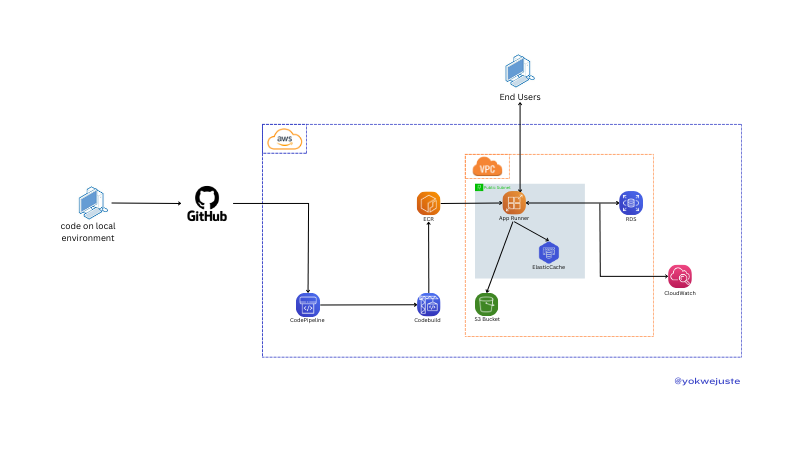
我们将代码推送到 GitHub,触发 CodePipeline 工作流程。 CodePipeline 使用 CodeBuild 创建存储在弹性容器注册表 (ECR) 中的 Docker 映像,以进行版本控制。本教程跳过虚拟私有云 (VPC) 配置。我们通过使用 CloudWatch 持续监控日志来确保应用程序运行状况。另一个好处是可以快速配置项目以使用 AWS RDS 和 S3 提供的 Postgres 来处理静态文件。
使用 AWS EC2 实例部署
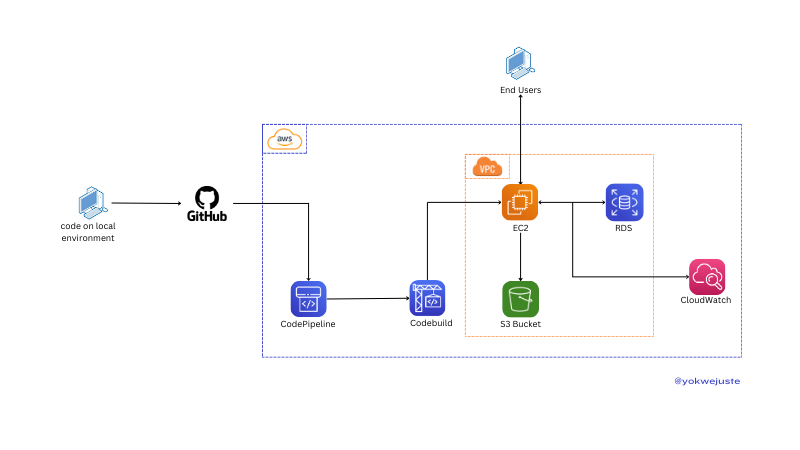
使用类似的过程,省略版本控制和 ECR,我们将代码推送到 GitHub,触发 CodePipeline,后者使用 CodeBuild 创建存储在 ECR 中的 Docker 映像以进行版本控制。 EC2 实例提取这些映像以在 VPC 内部署应用程序,以便最终用户可以访问该应用程序。该应用程序与 RDS 交互以存储数据,并与 S3 交互以存储静态文件,并由 CloudWatch 监控。我们可以选择使用 certbot 等选项将 SSL 配置添加到此实例中。
以下是基于典型使用场景的 EC2 和 App Runner 之间的假设价格比较:
| Service | Component | Cost Breakdown | Example Monthly Cost (Estimate) |
|---|---|---|---|
| EC2 | Instance Usage | t2.micro (1 vCPU, 1 GB RAM) | .50 |
| Storage | 30 GB General Purpose SSD | .00 | |
| Data Transfer | 100 GB Data Transfer | .00 | |
| Total | .50 | ||
| App Runner | Requests | 1 million requests | .00 |
| Compute | 1 vCPU, 2 GB RAM, 30 hours/month | .00 | |
| Data Transfer | 100 GB Data Transfer | .00 | |
| Total | .00 |
让我们快速总结一下如何管理这两种资源。
| Factor | EC2 | App Runner |
|---|---|---|
| Setup | Manual setup required | Fully managed service |
| Management Overhead | High - requires OS updates, security patches, etc. | Low - abstracts infrastructure management |
| Configuration | Extensive control over instance configuration | Limited control, focuses on simplicity |
| Factor | EC2 | App Runner |
|---|---|---|
| Scaling Setup | Manual setup of Auto Scaling groups | Automatic scaling based on traffic |
| Scaling Management | Requires configuration and monitoring | Managed by AWS, seamless scaling |
| Flexibility | High - granular control over scaling policies | Simplified, less flexible |
| Factor | EC2 | App Runner |
|---|---|---|
| Deployment Time | Slower - instance provisioning and configuration | Faster - managed deployment |
| Update Process | May require downtime or rolling updates | Seamless updates |
| Automation | Requires setup of deployment pipelines | Simplified, integrated deployment |
| Factor | EC2 | App Runner |
|---|---|---|
| Customization | Extensive - full control over environment | Limited - managed environment |
| Control | High - choose specific instance types, storage, etc. | Lower - focus on ease of use |
| Flexibility | High - suitable for specialized configurations | Simplified for standard web applications |
| Factor | EC2 | App Runner |
|---|---|---|
| Security Control | High - detailed control over security configurations | Simplified security management |
| Management | Requires manual configuration of security groups, IAM | Managed by AWS, less granular control |
| Compliance | Extensive options for compliance configurations | Simplified compliance management |
鉴于我们项目的比较不依赖于项目设置本身。我们将拥有一个基本的 Django 应用程序,其中包含来自 AWS 的 celery 配置。
我们将使用 Django 进行一个基本项目。
命令应按以下顺序运行:
# Project directory creation
mkdir MySchedular && cd MySchedular

# Creating an isolated space for the project dependencies
python -m venv venv && source venv/bin/activate

# Dependencies installation
pip install django celery redis python_dotenv

# Creating project and app
django-admin startproject my_schedular . && python manage.py startapp crons

# Let's add a few files to the project skeleton
touch my_schedular/celery.py crons/urls.py crons/tasks.py
此时我们可以通过以下方式检查我们的项目框架:
tree -I "venv|__pycache__" .
我们现在就应该拥有这个
    .
    ├── crons
    │   ├── __init__.py
    │   ├── admin.py
    │   ├── apps.py
    │   ├── migrations
    │   │   └── __init__.py
    │   ├── models.py
+   │   ├── tasks.py
    │   ├── tests.py
+   │   ├── urls.py
    │   └── views.py
    ├── manage.py
    └── my_schedular
        ├── __init__.py
        ├── asgi.py
+       ├── celery.py
        ├── settings.py
        ├── urls.py
        └── wsgi.py

    3 directories, 16 files
我们现在可以继续为应用程序的逻辑添加几行,并覆盖该项目的另一个里程碑。
1-设置芹菜
# my_schedular/celery.py

from __future__ import absolute_import, unicode_literals
import os
from celery import Celery

os.environ.setdefault('DJANGO_SETTINGS_MODULE', 'myproject.settings')

app = Celery('myproject')

app.config_from_object('django.conf:settings', namespace='CELERY')

app.autodiscover_tasks()

@app.task(bind=True)
def debug_task(self):
    print(f'Request: {self.request!r}')
2- 让我们覆盖 celery 变量来设置我们的代理
# my_schedular/settings.py

CELERY_BROKER_URL = os.getenv('CELERY_BROKER_URL ')
CELERY_RESULT_BACKEND = os.getenv('CELERY_RESULT_BACKEND')
3- 更新 init.py 以确保 Django 启动时加载应用程序:
# my_schedular/__init__.py
from __future__ import absolute_import, unicode_literals

from .celery import app as celery_app

__all__ = ('celery_app',)
4- 我们创建任务
# crons/tasks.py
from celery import shared_task
import time

@shared_task
def add(x, y):
    time.sleep(10)
    return x + y
5- 现在让我们添加我们的视图,只是一个带有简单 Json 响应的简单视图。
# crons/views.py
from django.http import JsonResponse
from crons.tasks import add

def index(request):
    return JsonResponse({"message": "Hello world, your Django App is Running"})

def add_view(request):
    result = add.delay(4, 6)
    return JsonResponse({'task_id': result.id})
6- 如果没有端点来访问它,我们就无法拥有视图
# crons/urls.py
from django.urls import path

from crons.views import add_view, index

urlpatterns = [
    path('', index, name='index'),
    path('add/', add_view, name='add'),
]
7- 将我们的应用程序 url 添加到整个项目的通用 urls.py。
# my_schedular/urls.py
from django.contrib import admin
from django.urls import include, path

urlpatterns = [
    path('admin/', admin.site.urls),
    path('/', include('crons.urls')),
]
添加环境变量:
# .env
SECRET_KEY=
DEBUG=
CELERY_BROKER_URL=
CELERY_RESULT_BACKEND=
正确执行所有这些步骤后,我们得到以下输出:

由于我们要运送到 AWS,我们需要配置一些资源
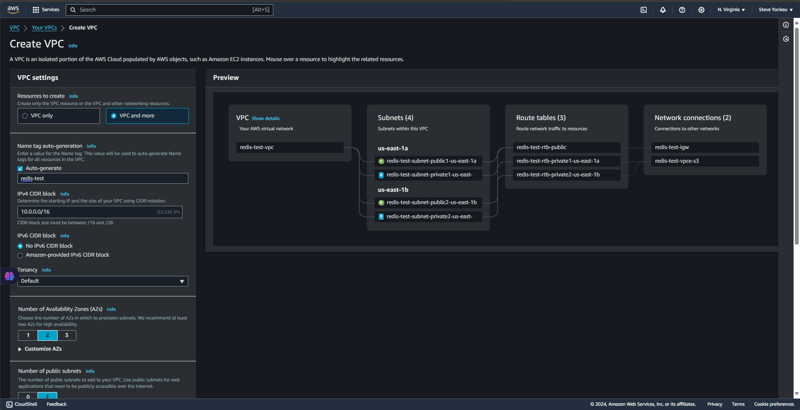
我们创建一个隔离的环境和网络,以便在我们的资源之间进行安全访问和通信。
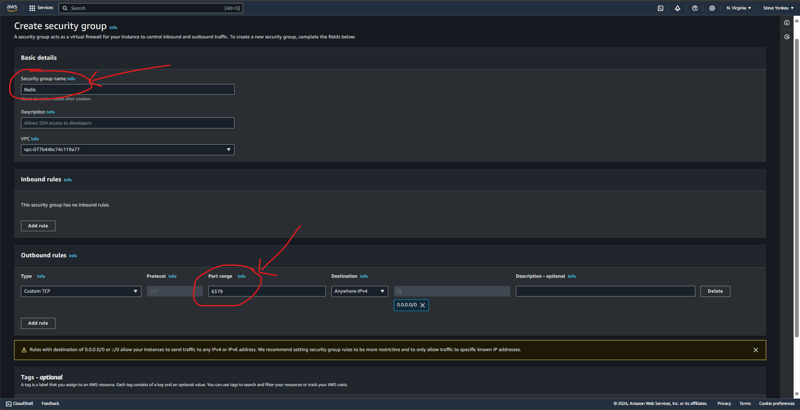
我们在之前制作的VPC下创建一个安全组,并一起添加TCP端口6379(Redis端口)的入站和出站规则。
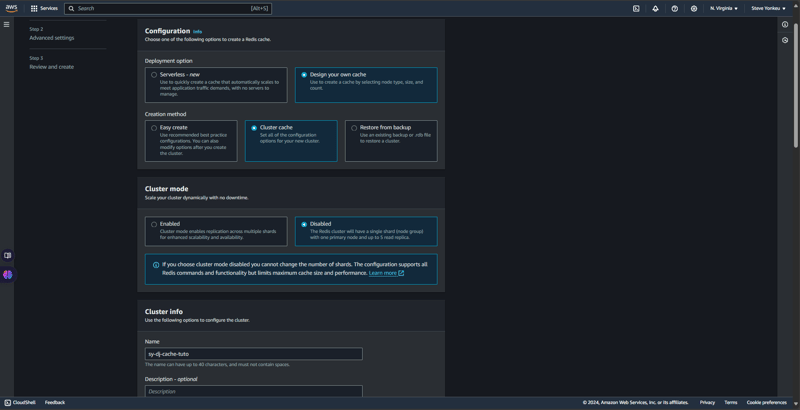
基本上,AWS Elastic Cache 为我们提供了两种缓存类型,即:RedisOSS 和 memCache。 RedisOSS 提供先进的数据结构和持久化功能,而 Memcached 更简单,专注于键值对的高速缓存。与 Memcached 不同,Redis 还支持复制和集群。言归正传,回到Redis。
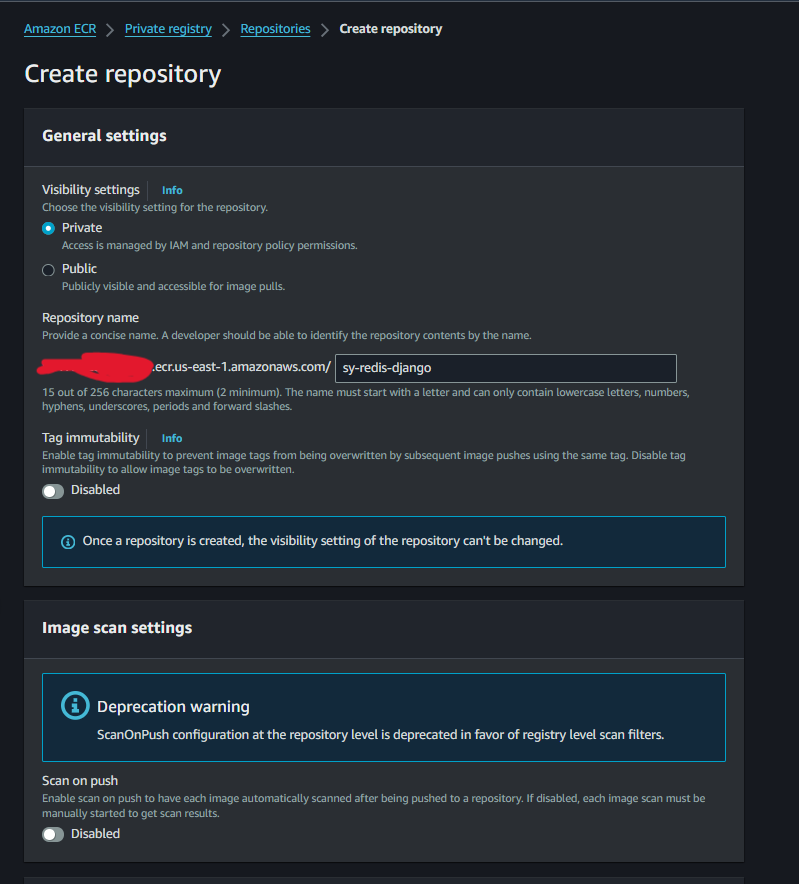
ECR 图像的创建将非常简单且直接。
按照以下步骤运行您的应用运行程序。
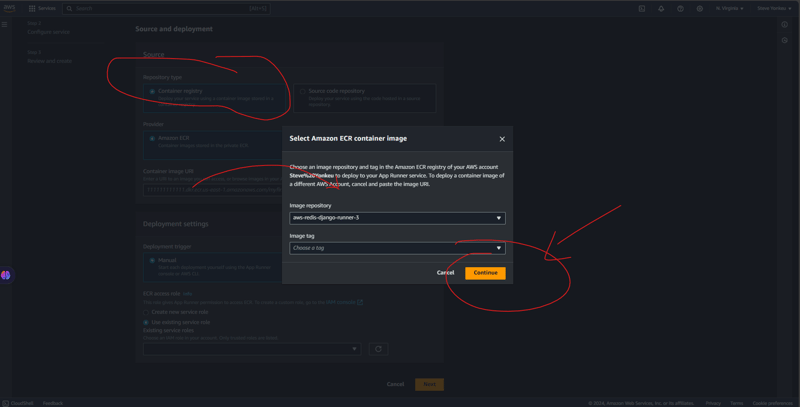
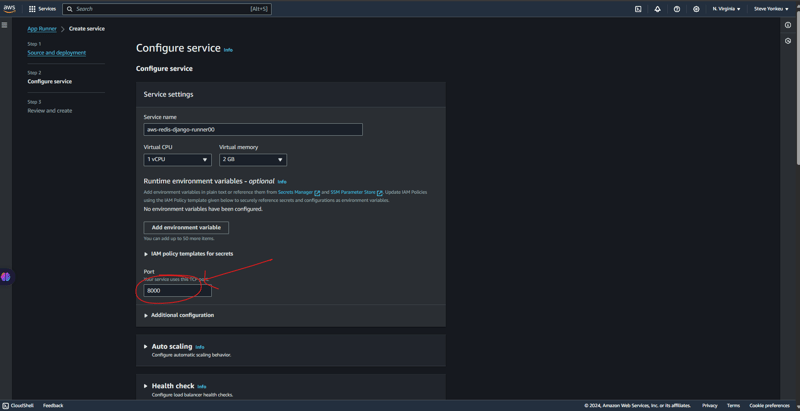
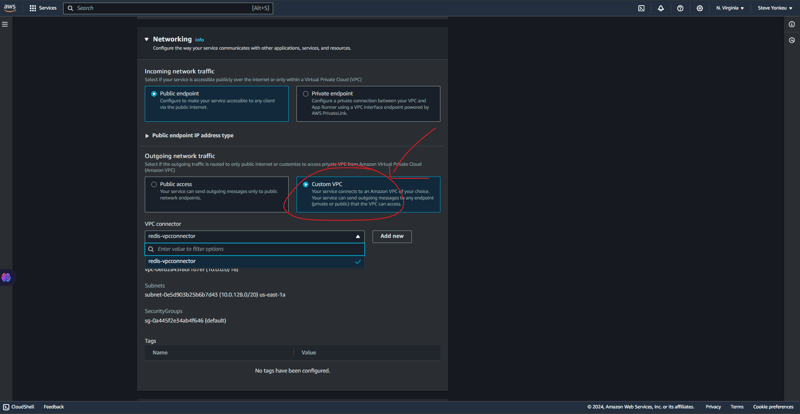
在这里我们需要非常技术化。 VPC 是一个安全的网络,我们的大部分资源都位于其中,由于 VPC 中找不到应用程序运行程序,因此我们需要提供一种安全的方式来在这些资源之间进行通信。
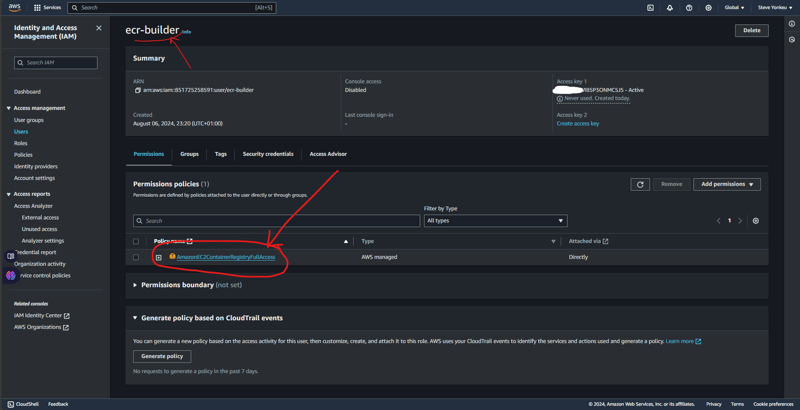
对于本教程,我们需要授权才能将工作流程连接到 ECR。然后我们添加 AmazonEC2ContainerRegistryFullAccess 权限策略,以便它可以将映像推送到我们的 AWS ECR。
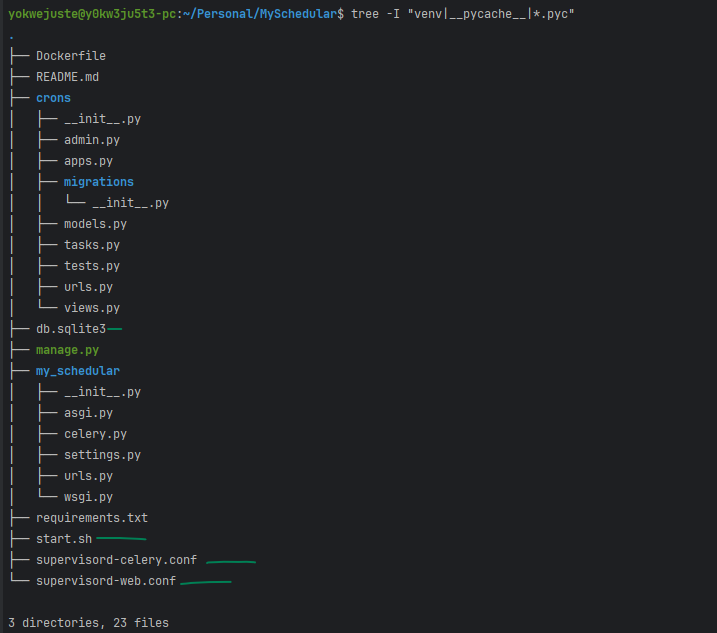
当一切完成后,我们就有了这个树结构。

您可以在我的 GitHub 上获得本教程的完整代码库。
We will go with one the easiest EC2 to setup and the one having a free tier, an ubuntu EC2 instance. And The same code base that was used above is the same we are using here.
![EC2 1]https://dev-to-uploads.s3.amazonaws.com/uploads/articles/rk8waijxkthu1ule91fn.png)
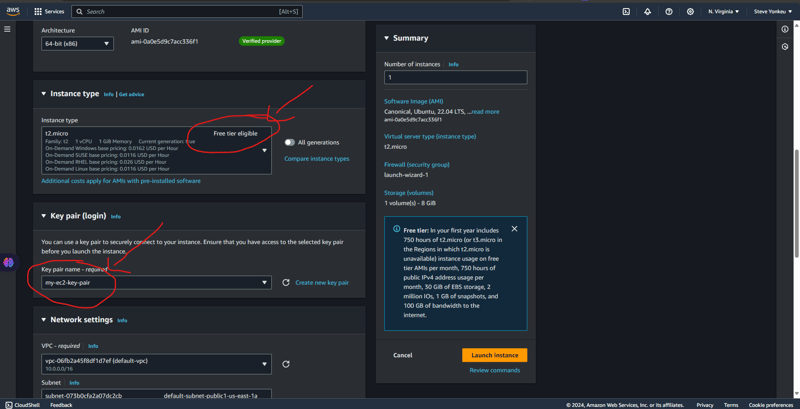
Alternatively, we can setup the security group separately.
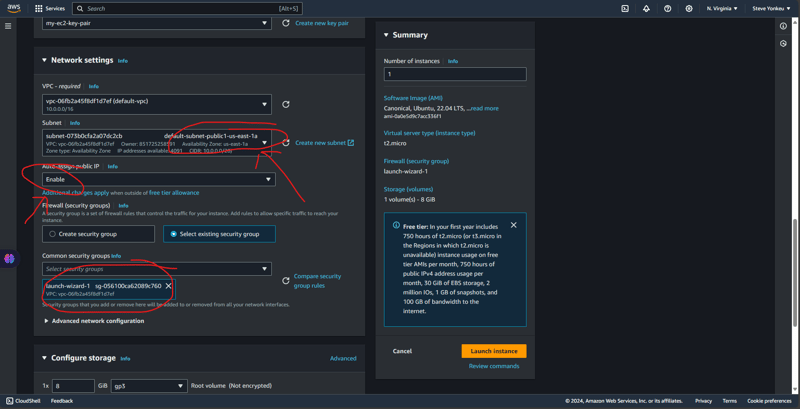
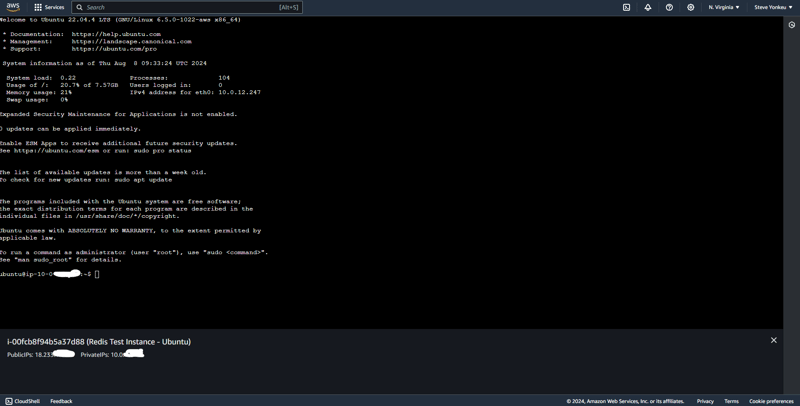


Run this script to install necessary dependencies
#!/bin/bash

# Update the package list and upgrade existing packages
sudo apt-get update
sudo apt-get upgrade -y

# Install Python3, pip, and other essentials
sudo apt-get install -y python3-pip python3-dev libpq-dev nginx curl

# Install Redis
sudo apt-get install -y redis-server

# Start and enable Redis
sudo systemctl start redis.service
sudo systemctl enable redis.service

# Install Supervisor
sudo apt-get install -y supervisor

# Install virtualenv
sudo pip3 install virtualenv

# Setup your Django project directory (adjust the path as needed)
cd ~/aws-django-redis

# Create a virtual environment
virtualenv venv

# Activate the virtual environment
source venv/bin/activate

# Install Gunicorn and other requirements
pip install gunicorn
pip install -r requirements.txt

# Create directories for logs if they don't already exist
sudo mkdir -p /var/log/aws-django-redis
sudo chown -R ubuntu:ubuntu /var/log/aws-django-redis

# Supervisor Configuration for Gunicorn
echo "[program:aws-django-redis]
command=$(pwd)/venv/bin/gunicorn --workers 3 --bind 0.0.0.0:8000 my_schedular.wsgi:application
directory=$(pwd)
autostart=true
autorestart=true
stderr_logfile=/var/log/aws-django-redis/gunicorn.err.log
stdout_logfile=/var/log/aws-django-redis/gunicorn.out.log
user=ubuntu
" | sudo tee /etc/supervisor/conf.d/aws-django-redis.conf

# Supervisor Configuration for Celery
echo "[program:celery]
command=$(pwd)/venv/bin/celery -A my_schedular worker --loglevel=info
directory=$(pwd)
autostart=true
autorestart=true
stderr_logfile=/var/log/aws-django-redis/celery.err.log
stdout_logfile=/var/log/aws-django-redis/celery.out.log
user=ubuntu
" | sudo tee /etc/supervisor/conf.d/celery.conf

# Reread and update Supervisor
sudo supervisorctl reread
sudo supervisorctl update
sudo supervisorctl restart all

# Set up Nginx to proxy to Gunicorn
echo "server {
    listen 80;
    server_name <your_vm_ip>;

    location / {
        proxy_pass http://127.0.01:8000;
        proxy_set_header Host \$host;
        proxy_set_header X-Real-IP \$remote_addr;
        proxy_set_header X-Forwarded-For \$proxy_add_x_forwarded_for;
        proxy_set_header X-Forwarded-Proto \$scheme;
    }

    error_log  /var/log/nginx/aws-django-redis_error.log;
    access_log /var/log/nginx/aws-django-redis_access.log;
}" | sudo tee /etc/nginx/sites-available/aws-django-redis

# Enable the Nginx site configuration
sudo ln -s /etc/nginx/sites-available/aws-django-redis /etc/nginx/sites-enabled/
sudo rm /etc/nginx/sites-enabled/default

# Test Nginx configuration and restart Nginx
sudo nginx -t
sudo systemctl restart nginx
This setup is available on GitHub on the dev branch, have a look and open a PR.
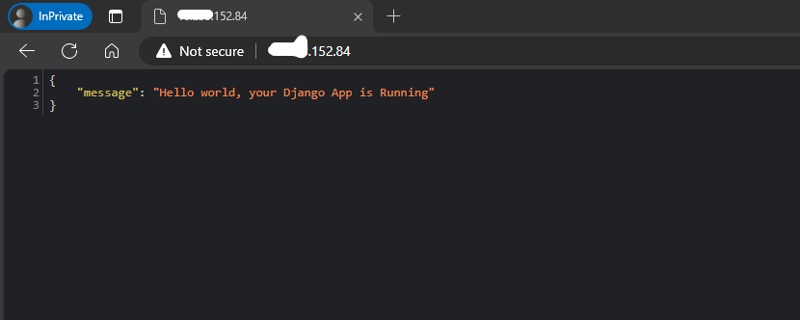
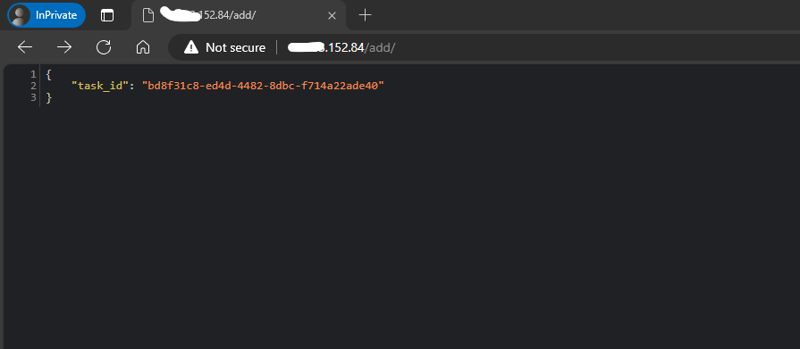
| Feature / Service | Self-Managed on EC2 (Free Tier) | Fully Managed AWS Services |
|---|---|---|
| EC2 Instance | t2.micro - Free for 750 hrs/mo | Not applicable |
| Application Hosting | Self-managed Django & Gunicorn | AWS App Runner (automatic scaling) |
| Database | Self-managed PostgreSQL | Amazon RDS (managed relational DB) |
| In-Memory Cache | Redis on the same EC2 | Amazon ElastiCache (Redis) |
| Task Queue | Celery with Redis | AWS managed queues (e.g., SQS) |
| Load Balancer | Nginx (self-setup) | AWS Load Balancer (integrated) |
| Static Files Storage | Serve via Nginx | Amazon S3 (highly scalable storage) |
| Log Management | Manual setup (Supervisor, Nginx, Redis) | AWS CloudWatch (logs and monitoring) |
| Security | Manual configurations | AWS Security Groups, IAM roles |
| Scaling | Manual scaling | Automatic scaling |
| Maintenance | Manual updates and patches | Managed by AWS |
| Pricing | Minimal (mostly within free tier) | Higher due to managed services |
注意:价格为近似值,可能会根据区域和特定 AWS 定价变化而有所不同。请务必检查当前的 AWS 定价页面,以获得适合您的特定要求的最准确的成本估算。
呐啊啊啊啊!!!不幸的是,没有这方面的总结。是的,回去更好地理解。
学习之路漫长且看似困难,但一次一种资源,不断补充知识可以让我们实现我们的目的和目标。
以上是部署 Django 应用程序:使用外部 Celery 的 ECs 应用程序运行器的详细内容。更多信息请关注PHP中文网其他相关文章!


