

OpenCV 图像压缩完整指南

图像压缩是计算机视觉中的一项关键技术,它使我们能够更有效地存储和传输图像,同时保持视觉质量。理想情况下,我们希望拥有最佳质量的小文件。然而,我们必须做出权衡并决定哪个更重要。
本教程将教授使用 OpenCV 进行图像压缩,涵盖理论和实际应用。最后,您将了解如何为计算机视觉项目(或您可能拥有的任何其他项目)成功压缩照片。
什么是图像压缩?
图像压缩正在减小图像的文件大小,同时保持可接受的视觉质量水平。有两种主要的压缩类型:
- 无损压缩:保留所有原始数据,允许精确的图像重建。
- 有损压缩: 丢弃一些数据以实现更小的文件大小,这可能会降低图像质量。
为什么要压缩图像?
如果正如我们经常听到的那样“磁盘空间很便宜”,那么为什么还要压缩图像呢?在小范围内,图像压缩并不重要,但在大范围内,它至关重要。
例如,如果您的硬盘上有一些图像,您可以压缩它们并保存几兆字节的数据。当硬盘驱动器以 TB 为单位时,这不会产生太大影响。但如果您的硬盘上有 100,000 张图像怎么办?一些基本的压缩可以节省实时时间和金钱。从性能的角度来看,是一样的。如果您的网站包含大量图像,并且每天有 10,000 人访问您的网站,那么压缩就很重要。
这就是我们这样做的原因:
- 减少存储要求:在同一空间中存储更多图像
- 更快的传输:非常适合网络应用程序和带宽受限的场景
- 提高处理速度:较小的图像加载和处理速度更快
图像压缩背后的理论
图像压缩技术利用两种类型的冗余:
- 空间冗余:相邻像素之间的相关性
- 颜色冗余:相邻区域颜色值的相似度
空间冗余利用了相邻像素在大多数自然图像中往往具有相似值的事实。这会产生平滑的过渡。许多照片“看起来很真实”,因为从一个区域到另一个区域有一种自然的流动。当相邻像素具有截然不同的值时,您会得到“嘈杂”的图像。像素发生了变化,通过将像素分组为单一颜色,使这些过渡变得不那么“平滑”,从而使图像更小。

颜色冗余重点关注图像中的相邻区域如何经常共享相似的颜色。想象一下蓝天或绿地——图像的大部分可能具有非常相似的颜色值。它们也可以组合在一起并制成单一颜色以节省空间。

OpenCV 提供了用于处理这些想法的可靠工具。例如,OpenCV 的 cv2.inpaint() 函数利用空间冗余,使用附近像素的信息填充图片中缺失或损坏的区域。 OpenCV 允许开发人员使用 cv2.cvtColor() 在多个关于颜色冗余的颜色空间之间转换图像。这作为许多压缩技术中的预处理步骤可能会有所帮助,因为某些颜色空间在编码特定类型的图像时比其他颜色空间更有效。
我们现在将测试这个理论的一些内容。我们来玩一下吧。
动手实践图像压缩
让我们探索如何使用 OpenCV 的 Python 绑定来压缩图像。写下此代码或复制它:
您也可以在这里获取源代码
import cv2
import numpy as np

def compress_image(image_path, quality=90):
    # Read the image
 img = cv2.imread(image_path)

    # Encode the image with JPEG compression
 encode_param = [int(cv2.IMWRITE_JPEG_QUALITY), quality]
 _, encoded_img = cv2.imencode('.jpg', img, encode_param)

    # Decode the compressed image
 decoded_img = cv2.imdecode(encoded_img, cv2.IMREAD_COLOR)

    return decoded_img

# Example usage
original_img = cv2.imread('original_image.jpg')
compressed_img = compress_image('original_image.jpg', quality=50)

# Display results
cv2.imshow('Original', original_img)
cv2.imshow('Compressed', compressed_img)
cv2.waitKey(0)
cv2.destroyAllWindows()

# Calculate compression ratio
original_size = original_img.nbytes
compressed_size = compressed_img.nbytes
compression_ratio = original_size / compressed_size
print(f"Compression ratio: {compression_ratio:.2f}")
此示例包含一个 compress_image 函数,该函数采用两个参数:
- 图片路径(图片所在的位置)
- 质量(所需图像的质量)
然后,我们将原始图像加载到original_img中。然后,我们将同一图像压缩 50% 并将其加载到新实例压缩图像中。
然后我们将显示原始图像和压缩图像,以便您可以并排查看它们。
然后我们计算并显示压缩比。
此示例演示了如何在 OpenCV 中使用 JPEG 压缩来压缩图像。质量参数控制文件大小和图像质量的权衡。
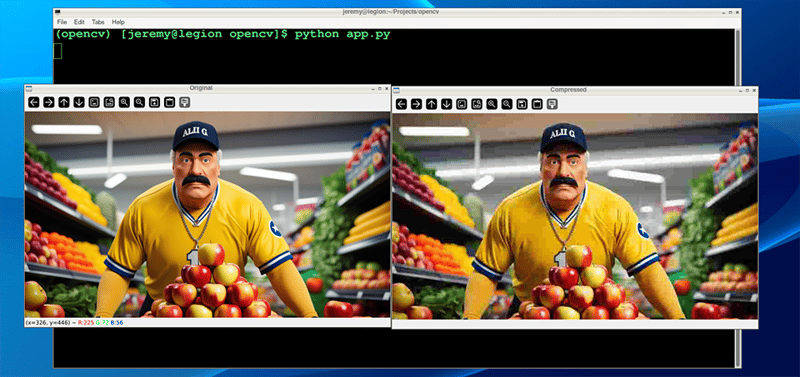
让我们运行它:

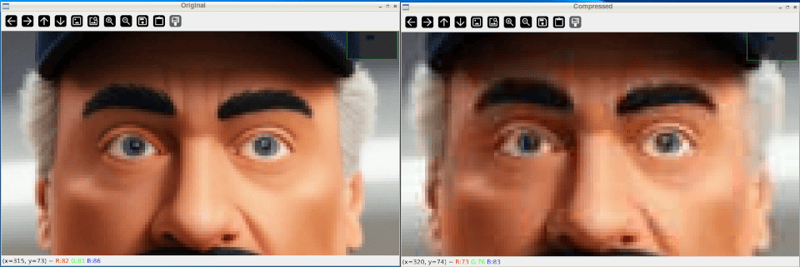
While intially looking at the images, you see little difference. However, zooming in shows you the difference in the quality:
And after closing the windows and looking at the files, we can see the file was reduced in size dramatically:

Also, if we take it down further, we can change our quality to 10%
compressed_img = compress_image('sampleimage.jpg', quality=10)
And the results are much more drastic:
And the file size results are more drastic as well:

You can adjust these parameters quite easily and achieve the desired balance between quality and file size.
Evaluating Compression Quality
To assess the impact of compression, we can use metrics like:
- Mean Squared Error (MSE)
Mean Squared Error (MSE) measures how different two images are from each other. When you compress an image, MSE helps you determine how much the compressed image has changed compared to the original.
It does this by sampling the differences between the colors of corresponding pixels in the two images, squaring those differences, and averaging them. The result is a single number: a lower MSE means the compressed image is closer to the original. In comparison, a higher MSE means there's a more noticeable loss of quality.
Here's some Python code to measure that:
def calculate_mse(img1, img2):
    return np.mean((img1 - img2) ** 2)

mse = calculate_mse(original_img, compressed_img)
print(f"Mean Squared Error: {mse:.2f}")
Here's what our demo image compression looks like:

- Peak Signal-to-Noise Ratio (PSNR)
Peak Signal-to-Noise Ratio (PSNR) is a measure that shows how much an image's quality has degraded after compression. This is often visible with your eyes, but it assigns a set value. It compares the original image to the compressed one and expresses the difference as a ratio.
A higher PSNR value means the compressed image is closer in quality to the original, indicating less loss of quality. A lower PSNR means more visible degradation. PSNR is often used alongside MSE, with PSNR providing an easier-to-interpret scale where higher is better.
Here is some Python code that measures that:
def calculate_psnr(img1, img2):
 mse = calculate_mse(img1, img2)
    if mse == 0:
        return float('inf')
 max_pixel = 255.0
    return 20 * np.log10(max_pixel / np.sqrt(mse))

psnr = calculate_psnr(original_img, compressed_img)
print(f"PSNR: {psnr:.2f} dB")
Here's what our demo image compression looks like:
"Eyeballing" your images after compression to determine quality is fine; however, at a large scale, having scripts do this is a much easier way to set standards and ensure the images follow them.
Let's look at a couple other techniques:
Advanced Compression Techniques
For more advanced compression, OpenCV supports various algorithms:
- PNG Compression:
You can convert your images to PNG format, which has many advantages. Use the following line of code, and you can set your compression from 0 to 9, depending on your needs. 0 means no compression whatsoever, and 9 is maximum. Keep in mind that PNGs are a "lossless" format, so even at maximum compression, the image should remain intact. The big trade-off is file size and compression time.
Here is the code to use PNG compression with OpenCV:
cv2.imwrite('compressed.png', img, [cv2.IMWRITE_PNG_COMPRESSION, 9])
And here is our result:
Note: You may notice sometimes that PNG files are actually larger in size, as in this case. It depends on the content of the image.
- WebP Compression:
You can also convert your images to .webp format. This is a newer method of compression that's gaining in popularity. I have been using this compression on the images on my blog for years.
In the following code, we can write our image to a webp file and set the compression level from 0 to 100. It's the opposite of PNG's scale because 0, because we're setting quality instead of compression. This small distinction matters, because a setting of 0 is the lowest possible quality, with a small file size and significant loss. 100 is the highest quality, which means large files with the best image quality.
Here's the Python code to make that happen:
cv2.imwrite('compressed.webp', img, [cv2.IMWRITE_WEBP_QUALITY, 80])
And here is our result:

These two techniques are great for compressing large amounts of data. You can write scripts to compress thousands or hundreds of thousands of images automatically.
Conclusion
Image compression is fantastic. It's essential for computer vision tasks in many ways, especially when saving space or increasing processing speed. There are also many use cases outside of computer vision anytime you want to reduce hard drive space or save bandwidth. Image compression can help a lot.
By understanding the theory behind it and applying it, you can do some powerful things with your projects.
Remember, the key to effective compression is finding the sweet spot between file size reduction and maintaining acceptable visual quality for your application.
Thanks for reading, and feel free to reach out if you have any comments or questions!
以上是OpenCV 图像压缩完整指南的详细内容。更多信息请关注PHP中文网其他相关文章!

热AI工具

Undresser.AI Undress
人工智能驱动的应用程序,用于创建逼真的裸体照片

AI Clothes Remover
用于从照片中去除衣服的在线人工智能工具。

Undress AI Tool
免费脱衣服图片

Clothoff.io
AI脱衣机

Video Face Swap
使用我们完全免费的人工智能换脸工具轻松在任何视频中换脸!

热门文章
热工具

记事本++7.3.1
好用且免费的代码编辑器

SublimeText3汉化版
中文版,非常好用

禅工作室 13.0.1
功能强大的PHP集成开发环境

Dreamweaver CS6
视觉化网页开发工具

SublimeText3 Mac版
神级代码编辑软件(SublimeText3)


 Python与C:学习曲线和易用性
Apr 19, 2025 am 12:20 AM
Python与C:学习曲线和易用性
Apr 19, 2025 am 12:20 AM
Python更易学且易用,C 则更强大但复杂。1.Python语法简洁,适合初学者,动态类型和自动内存管理使其易用,但可能导致运行时错误。2.C 提供低级控制和高级特性,适合高性能应用,但学习门槛高,需手动管理内存和类型安全。
 学习Python:2小时的每日学习是否足够?
Apr 18, 2025 am 12:22 AM
学习Python:2小时的每日学习是否足够?
Apr 18, 2025 am 12:22 AM
每天学习Python两个小时是否足够?这取决于你的目标和学习方法。1)制定清晰的学习计划,2)选择合适的学习资源和方法,3)动手实践和复习巩固,可以在这段时间内逐步掌握Python的基本知识和高级功能。
 Python vs.C:探索性能和效率
Apr 18, 2025 am 12:20 AM
Python vs.C:探索性能和效率
Apr 18, 2025 am 12:20 AM
Python在开发效率上优于C ,但C 在执行性能上更高。1.Python的简洁语法和丰富库提高开发效率。2.C 的编译型特性和硬件控制提升执行性能。选择时需根据项目需求权衡开发速度与执行效率。
 Python vs. C:了解关键差异
Apr 21, 2025 am 12:18 AM
Python vs. C:了解关键差异
Apr 21, 2025 am 12:18 AM
Python和C 各有优势,选择应基于项目需求。1)Python适合快速开发和数据处理,因其简洁语法和动态类型。2)C 适用于高性能和系统编程,因其静态类型和手动内存管理。
 Python标准库的哪一部分是:列表或数组?
Apr 27, 2025 am 12:03 AM
Python标准库的哪一部分是:列表或数组?
Apr 27, 2025 am 12:03 AM
pythonlistsarepartofthestAndArdLibrary,herilearRaysarenot.listsarebuilt-In,多功能,和Rused ForStoringCollections,而EasaraySaraySaraySaraysaraySaraySaraysaraySaraysarrayModuleandleandleandlesscommonlyusedDduetolimitedFunctionalityFunctionalityFunctionality。
 Python:自动化,脚本和任务管理
Apr 16, 2025 am 12:14 AM
Python:自动化,脚本和任务管理
Apr 16, 2025 am 12:14 AM
Python在自动化、脚本编写和任务管理中表现出色。1)自动化:通过标准库如os、shutil实现文件备份。2)脚本编写:使用psutil库监控系统资源。3)任务管理:利用schedule库调度任务。Python的易用性和丰富库支持使其在这些领域中成为首选工具。
 科学计算的Python:详细的外观
Apr 19, 2025 am 12:15 AM
科学计算的Python:详细的外观
Apr 19, 2025 am 12:15 AM
Python在科学计算中的应用包括数据分析、机器学习、数值模拟和可视化。1.Numpy提供高效的多维数组和数学函数。2.SciPy扩展Numpy功能,提供优化和线性代数工具。3.Pandas用于数据处理和分析。4.Matplotlib用于生成各种图表和可视化结果。
 Web开发的Python:关键应用程序
Apr 18, 2025 am 12:20 AM
Web开发的Python:关键应用程序
Apr 18, 2025 am 12:20 AM
Python在Web开发中的关键应用包括使用Django和Flask框架、API开发、数据分析与可视化、机器学习与AI、以及性能优化。1.Django和Flask框架:Django适合快速开发复杂应用,Flask适用于小型或高度自定义项目。2.API开发:使用Flask或DjangoRESTFramework构建RESTfulAPI。3.数据分析与可视化:利用Python处理数据并通过Web界面展示。4.机器学习与AI:Python用于构建智能Web应用。5.性能优化:通过异步编程、缓存和代码优
