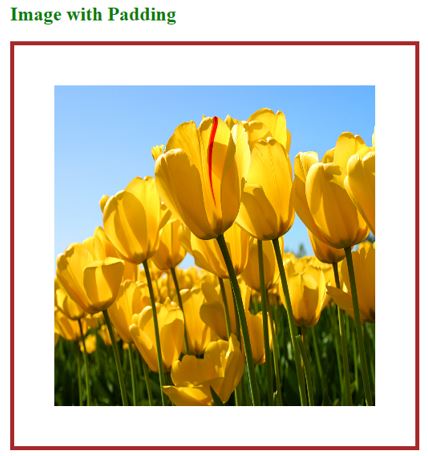
HTML 图像填充
html 中的 padding 属性在盒状结构的最里面元素的内容周围提供了空间。 html 中的 margin 属性在盒状结构的最外层元素的内容周围提供了空间。内边距和边距周围的空间称为边框。
您可以在下面观察到内边距、边距和边框之间的区别:

- 由于我们知道所有页面中的通用样式,因此我们总是更喜欢 CSS 而不是 HTML。
- 所有常见属性仅在 CSS 中实现。
图像填充在 HTML 或 CSS 中如何工作?
- 填充总是在最里面的部分之间创建空间,无论是图像还是内容。
- 图像填充仅由 CSS 中的 img 标签定义。
语法 1:
img
{
Padding: 10px,10px,10px,10px; //padding positions
}语法 1 解释:
如果我们应用 4 个值的填充,则第一个值用于顶部,第二个值用于右侧,第三个值用于底部,第四个值用于左侧应用。
语法 2:
img
{
Padding: 10px,10px,10px; //padding positions
}语法解释:
如果我们应用 3 个值的填充,第一个用于顶部,第二个用于左侧和右侧,第三个用于底部应用。
语法 3:
img
{
Padding: 10px,10px; //padding positions
}语法解释:
如果我们应用两个值的填充,第一个值用于顶部和底部,第二个值分别用于左侧和右侧应用。
语法 4:
img
{
Padding: 10px; //padding positions
}语法解释:
如果我们仅使用单个值应用填充,则对所有四个边均等地使用它。
HTML 图像填充示例
下面给出了 HTML 图像填充的示例:
示例 #1 – 具有 4 个填充值的图像填充
HTML 代码:
<!DOCTYPE html>
<html>
<head>
<title>Image Padding</title>
<link rel="stylesheet" href="ImagePaddingFourSides.css"></link>
</head>
<body>
<font color="green">
<h2>Image without Padding</h2>
</font>
<p>
<img src="Tulips.jpg" class="noPadding">
</p>
<font color="green">
<h2>Image with Padding</h2>
</font>
<p>
<img src="Tulips.jpg" class="padding">
</p>
</body>
</html>
CSS 代码:
.noPadding
{
width:400px;
height:400px;
border: 5px solid brown;
}
.padding
{
width:400px;
height:400px;
padding: 50px 50px 50px 50px;
}输出:
应用填充之前:

应用填充后:

说明:
- 上面代码中第一个图像类名noPadding和第二个图像类名padding已经在HTML代码中取了。
- 在CSS代码中,noPadding类没有填充5px边框。无填充不会在图像周围留出任何空间。它严格遵守边界。您可以在上面的第 1st 图片中看到它。
- padding 类有 padding 50px 和 50px border。由于图像周围的填充,我们在边框上看到了一些空间。您可以在第二张图片中看到它。
示例 #2 – 具有 3 个填充值的图像填充
HTML 代码:
<!DOCTYPE html>
<html>
<head>
<title>Image Padding</title>
<link rel="stylesheet" href="ImagePaddingThreeSides.css"></link>
</head>
<body>
<font color="green">
<h2>Image without Padding</h2>
</font>
<p>
<img src="Koala.jpg" class="noPadding">
</p>
<font color="green">
<h2>Image with Padding</h2>
</font>
<p>
<img src="Tulips.jpg" class="padding">
</p>
</body>
</html>
CSS 代码:
.noPadding
{
width:400px;
height:400px;
border: 5px solid yellow;
}
.padding
{
width:400px;
height:400px;
padding: 50px 20px 50px;
border: 5px solid yellow;
}输出:
应用填充之前:

应用填充后:

说明:
- 在上面的代码中,第一个图像类名称、noPadding 和第二个图像类名称 padding 已在 HTML 代码中获取。
- 在CSS代码中,noPadding类没有填充5px边框。无填充不会在图像周围留出任何空间。它严格遵守边界。您可以在上面的第 1st 图片中看到它。
- padding 类有 padding 50px、20px、50px 和 5px 边框。由于图像顶部周围有 50 像素、左侧和右侧 20 像素以及底部 50 像素的内边距。我们已经从边界看到了一些空间。您可以在第二张图片中看到这一点。
示例 #3 – 具有 3 个填充值的图像填充
HTML 代码:
<!DOCTYPE html> <html> <head> <title>Image Padding</title> <link rel="stylesheet" href="ImagePaddingTwoSides.css"></link> </head> <body> <font color="green"> <h2>Image without Padding</h2> </font> <p> <img src="Desert.jpg" class="noPadding"> </p> <font color="green"> <h2>Image with Padding</h2> </font> <p> <img src="Desert.jpg" class="padding"> </p> </body> </html>
CSS 代码:
.noPadding
{
width:400px;
height:400px;
border: 5px solid yellow;
}
.padding
{
width:400px;
height:400px;
padding: 75px 50px;
border: 5px solid yellow;
}输出:
应用填充之前:

应用填充后:

说明:
- The first image class name, noPadding, and second image class name padding have been taken in HTML code in the above code.
- In CSS code, the noPadding class has without padding with a 5px border. No padding does not give any space around the image. It strictly sticks to the border. You can see it in the above 1st image.
- The padding class has padding 75px 50px and 5px border. Due to this, padding around the image’s top and bottom is 50px, and the left and right are 50px, respectively. We have seen some space from the border. You can see it in the 2nd image.
Example #4 – Image Padding with a Single Padding Value
HTML Code:
<!DOCTYPE html>
<html>
<head>
<title>Image Padding</title>
<link rel="stylesheet" href="ImagePaddingSingleSides.css"></link>
</head>
<body>
<font color="green">
<h2>Image without Padding</h2>
</font>
<p>
<img src="Penguins.jpg" class="noPadding">
</p>
<font color="green">
<h2>Image with Padding</h2>
</font>
<p>
<img src="Penguins.jpg" class="padding">
</p>
</body>
</html>
CSS Code:
.noPadding
{
width:400px;
height:400px;
border: 5px solid blue;
}
.padding
{
width:400px;
height:400px;
padding: 70px;
border: 5px solid blue;
}Output:
Before applying padding:

After applying padding:

Explanation:
- The first image class name, noPadding, and second image class name padding have been taken in HTML code in the above code.
- In CSS code, the noPadding class has without padding with a 5px border. No padding does not give any space around the image. It strictly sticks to the border. You can see it in the above 1st image.
- The padding class has a padding of 70 and a 5px border. Due to this, we were padding around the image top, left, right and bottom 70px around, respectively. We have seen some space from the border. You can see it in the 2nd image.
If we want to apply only particular side padding, then CSS provides predefined properties:
- Padding-left: 10px: apply padding 10px to the left side.
- Padding-right: 10px: apply padding 10px to the right side.
- Padding-top: 10px: apply padding 10px to the top side.
- Padding-bottom: 10px: apply padding 10px bottom side.
Conclusion
Image padding gives space around the innermost portion. We can apply with one, two, three, and four values with padding inside the img tag.
以上是HTML 图像填充的详细内容。更多信息请关注PHP中文网其他相关文章!

热AI工具

Undresser.AI Undress
人工智能驱动的应用程序,用于创建逼真的裸体照片

AI Clothes Remover
用于从照片中去除衣服的在线人工智能工具。

Undress AI Tool
免费脱衣服图片

Clothoff.io
AI脱衣机

Video Face Swap
使用我们完全免费的人工智能换脸工具轻松在任何视频中换脸!

热门文章

热工具

记事本++7.3.1
好用且免费的代码编辑器

SublimeText3汉化版
中文版,非常好用

禅工作室 13.0.1
功能强大的PHP集成开发环境

Dreamweaver CS6
视觉化网页开发工具

SublimeText3 Mac版
神级代码编辑软件(SublimeText3)


