

如何使用 Python 向 DEV 发布文章

介绍
作为一名经常撰写文章的 Obsidian 用户,我发现手动将 Markdown 内容发布到 DEV.to 非常耗时。为了简化这一过程,我开发了一个 Python 脚本,可以自动执行直接发布到 DEV.to 的过程。在本指南中,我将向您展示如何使用 Python 和 DEV.to API 来简化您的文章发布工作流程。
先决条件
在我们深入研究代码之前,您需要以下内容:
• DEV API 密钥:您可以通过登录您的 DEV 帐户并导航到 API 密钥部分来生成此密钥。
• 已安装Python:确保您的系统上安装了Python 3.x。
工作流程
我们将把这个过程分为三个步骤:
- 获取文章的Markdown内容。
- 准备并发送请求发布文章。
- 处理回复以确认文章已发布。
Python 脚本
下面是完整的 Python 脚本,用于自动将文章发布到 DEV 的过程。
import webbrowser
import requests
import json

# API headers including the DEV API key
headers_dev = {
    "Content-Type": "application/json",
    "api-key": API_KEY,  # Replace API_KEY with your actual DEV API key
}

# Function to read markdown content from a file
def get_markdown_content(markdown_path):
    with open(markdown_path, 'r') as file:
        markdown_content = file.read()
    return markdown_content

# Function to publish an article to DEV
def publish_article_dev(markdown_content):
    # Set up the payload with article data
    article_payload = {
        "article": {
            "title": "Your Article Title Here",  # Replace with the actual title
            "body_markdown": markdown_content,
            "published": False,
        }
    }

    # Make a POST request to DEV's API to publish the article
    response = requests.post(
        url='https://dev.to/api/articles',
        headers=headers_dev,
        data=json.dumps(article_payload)
    )

    # Check if the request was successful
    if response.status_code == 201:
        print("Article published successfully!")
        print("Response:", response.json())
        # Open the DEV dashboard in the browser
        webbrowser.open('https://dev.to/dashboard')
    else:
        print(f"Failed to publish article. Status code: {response.status_code}")
        print("Response:", response.json())

# Example usage:
# Replace 'path_to_your_markdown_file.md' with the actual path to your markdown file
markdown_content = get_markdown_content('path_to_your_markdown_file.md')
publish_article_dev(markdown_content)
请记住,如果您设置已发布:True,则该文章将在 DEV 上实时发布并对公众可见。如果要将文章保存为草稿以供以后编辑或审阅,请设置已发布:False。这使您可以灵活地管理帖子。
在 DEV 文章的 body_markdown 中,您可以包含可选的 front Matter 部分,以为文章提供其他元数据。
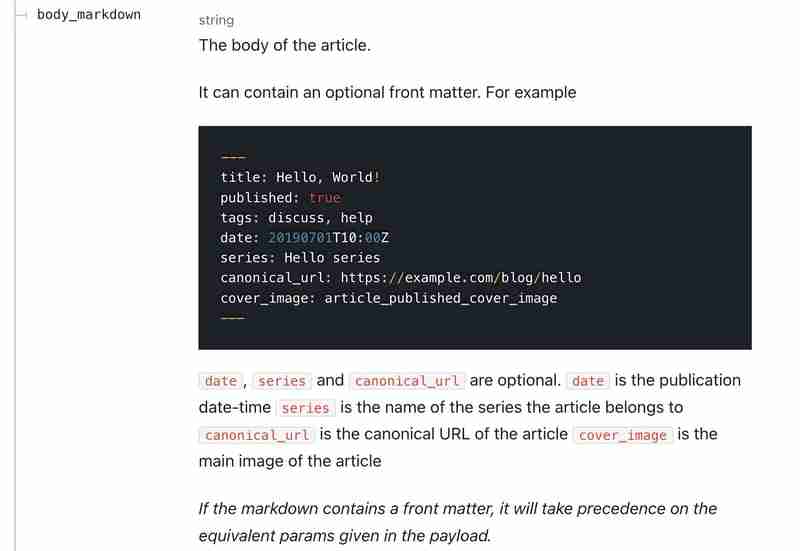
此部分包含在内容开头的 --- 内,可以包含标题、已发布、标签、日期、系列、canonical_url 和 cover_image 等字段。
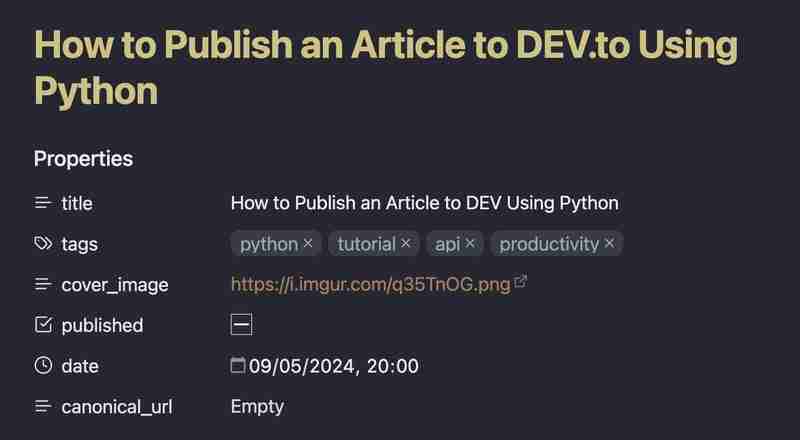
如果你使用像 Obsidian 这样的 Markdown 编辑器,你可以使用 Cmd/Ctrl+ 快速插入这些属性;向注释添加属性。
这是我的 Obsidian 中属性设置的快照:
结论
使用 Python 自动化向 DEV 发布文章的过程可以改变游戏规则,特别是当您发布多篇文章或为团队管理内容时。 DEV API 非常简单,可以轻松集成到您现有的工作流程中。
通过此设置,您就可以开始在 DEV 上自动发布文章了。快乐编码!
探索更多

刘卢卡
感谢您花时间与我一起探索与数据相关的见解。感谢您的参与。
?在 LinkedIn 上与我联系

以上是如何使用 Python 向 DEV 发布文章的详细内容。更多信息请关注PHP中文网其他相关文章!

热AI工具

Undresser.AI Undress
人工智能驱动的应用程序,用于创建逼真的裸体照片

AI Clothes Remover
用于从照片中去除衣服的在线人工智能工具。

Undress AI Tool
免费脱衣服图片

Clothoff.io
AI脱衣机

Video Face Swap
使用我们完全免费的人工智能换脸工具轻松在任何视频中换脸!

热门文章
热工具

记事本++7.3.1
好用且免费的代码编辑器

SublimeText3汉化版
中文版,非常好用

禅工作室 13.0.1
功能强大的PHP集成开发环境

Dreamweaver CS6
视觉化网页开发工具

SublimeText3 Mac版
神级代码编辑软件(SublimeText3)


 Python vs.C:申请和用例
Apr 12, 2025 am 12:01 AM
Python vs.C:申请和用例
Apr 12, 2025 am 12:01 AM
Python适合数据科学、Web开发和自动化任务,而C 适用于系统编程、游戏开发和嵌入式系统。 Python以简洁和强大的生态系统着称,C 则以高性能和底层控制能力闻名。
 您可以在2小时内学到多少python?
Apr 09, 2025 pm 04:33 PM
您可以在2小时内学到多少python?
Apr 09, 2025 pm 04:33 PM
两小时内可以学到Python的基础知识。1.学习变量和数据类型,2.掌握控制结构如if语句和循环,3.了解函数的定义和使用。这些将帮助你开始编写简单的Python程序。
 Python:游戏,Guis等
Apr 13, 2025 am 12:14 AM
Python:游戏,Guis等
Apr 13, 2025 am 12:14 AM
Python在游戏和GUI开发中表现出色。1)游戏开发使用Pygame,提供绘图、音频等功能,适合创建2D游戏。2)GUI开发可选择Tkinter或PyQt,Tkinter简单易用,PyQt功能丰富,适合专业开发。
 2小时的Python计划:一种现实的方法
Apr 11, 2025 am 12:04 AM
2小时的Python计划:一种现实的方法
Apr 11, 2025 am 12:04 AM
2小时内可以学会Python的基本编程概念和技能。1.学习变量和数据类型,2.掌握控制流(条件语句和循环),3.理解函数的定义和使用,4.通过简单示例和代码片段快速上手Python编程。
 Python与C:学习曲线和易用性
Apr 19, 2025 am 12:20 AM
Python与C:学习曲线和易用性
Apr 19, 2025 am 12:20 AM
Python更易学且易用,C 则更强大但复杂。1.Python语法简洁,适合初学者,动态类型和自动内存管理使其易用,但可能导致运行时错误。2.C 提供低级控制和高级特性,适合高性能应用,但学习门槛高,需手动管理内存和类型安全。
 Python:探索其主要应用程序
Apr 10, 2025 am 09:41 AM
Python:探索其主要应用程序
Apr 10, 2025 am 09:41 AM
Python在web开发、数据科学、机器学习、自动化和脚本编写等领域有广泛应用。1)在web开发中,Django和Flask框架简化了开发过程。2)数据科学和机器学习领域,NumPy、Pandas、Scikit-learn和TensorFlow库提供了强大支持。3)自动化和脚本编写方面,Python适用于自动化测试和系统管理等任务。
 Python和时间:充分利用您的学习时间
Apr 14, 2025 am 12:02 AM
Python和时间:充分利用您的学习时间
Apr 14, 2025 am 12:02 AM
要在有限的时间内最大化学习Python的效率,可以使用Python的datetime、time和schedule模块。1.datetime模块用于记录和规划学习时间。2.time模块帮助设置学习和休息时间。3.schedule模块自动化安排每周学习任务。
 Python:多功能编程的力量
Apr 17, 2025 am 12:09 AM
Python:多功能编程的力量
Apr 17, 2025 am 12:09 AM
Python因其简洁与强大而备受青睐,适用于从初学者到高级开发者的各种需求。其多功能性体现在:1)易学易用,语法简单;2)丰富的库和框架,如NumPy、Pandas等;3)跨平台支持,可在多种操作系统上运行;4)适合脚本和自动化任务,提升工作效率。
