
如今,我们生活在一个更加注重安全的环境中,应用程序和平台需要采取适当的安全措施来防止来自第三方的攻击。有相当多的平台提供此类功能。 Arcjet 联系我,询问我是否愿意尝试他们的测试版,然后写下体验。他们支付了我的时间费用,但并没有影响这篇文章。
本文将指导如何使用 Arcjet、Next.js、Auth.js、Prisma、SQLite 和 Tailwind CSS 创建简单的财务管理应用程序。构建具有现代 Web 开发技能、实用功能和强大安全性的个人财务管理应用程序有助于了解整合这些功能的有效性。我们的应用程序将是概念验证,因此不会有实时运行的支付网关。
Arcjet 是一个配备了保护应用程序所需的基本功能的平台。该平台具有很多功能,例如Arcjet Shield,可以防止SQL注入、XSS攻击、CSRF等攻击。 Arcjet Shield 能够防止未经授权访问金融系统中的私人信息。它还具有速率限制,可以控制数据库上发生事务等操作的频率,从而防止发生不必要的利用。
机器人防护可确保您的应用远离使用自动化系统窃取信息或实施诈骗的不良机器人。电子邮件验证有助于留住真实用户,因为它可以确保所有提供的电子邮件地址都是有效的。此外,它还提供了保护注册表单的工具,从而避免欺诈性注册尝试和未经授权的登录。
在本教程结束时,您将创建一个简单的个人理财应用程序,所以让我们开始吧!
在开始处理代码库之前,我们首先需要为我们的项目设置架构。这就是我们应用程序的主页的样子:

我们的应用程序将使用 TypeScript 构建,技术堆栈将是:
您必须在 Arcjet 上创建一个免费帐户并记下您的 Arcjet API 密钥,您应该可以在 SDK 配置部分找到该密钥。我们需要 API 密钥,以便我们的应用程序可以使用 Arcjet 平台,从而使我们能够访问所有安全功能。
您可以在此处在线找到代码库 https://github.com/andrewbaisden/personal-finance-app
让我们从项目文件和文件夹开始。导航到计算机上要在其中创建项目的目录,例如桌面。现在在命令行中运行此命令来构建使用 TypeScript 的样板 Next.js 项目:
npx create-next-app@latest personal-finance-app --ts
此命令将创建一个名为 individual-finance-app 的项目文件夹。确保为 Tailwind CSS 选择 yes,因为我们将使用该 CSS 库进行样式设置。为 App Router 选择 yes,因为我们将使用它进行页面路由。
好吧,让我们安装这个项目所需的所有软件包,然后我们将处理我们的项目结构。首先,cd 进入 individual-finance-app 文件夹并运行以下命令来安装项目的所有包和依赖项:
npm i @arcjet/next @prisma/client arcjet axios bcryptjs jsonwebtoken next-auth prisma sqlite3 @types/bcryptjs @types/jsonwebtoken
接下来,运行这些命令来设置所有文件和文件夹。使用脚本以这种方式设置项目要快得多,因为您不需要自己手动创建所有文件和文件夹,这可能会很乏味:
touch .env.local
cd src/app
mkdir -p api
mkdir -p api/auth
mkdir -p api/auth/"[...nextauth]"
mkdir -p api/{generatejwt,signin,signup,transaction,user}
touch api/auth/"[...nextauth]"/route.ts api/generatejwt/route.ts api/signin/route.ts api/signup/route.ts api/transaction/route.ts api/user/route.ts
mkdir -p components signin signup transaction
touch components/Header.tsx signin/page.tsx signup/page.tsx  transaction/page.tsx middleware.ts
cd ../..
太好了,这就是完成的大部分工作。如果您还没有这样做,请立即在代码编辑器中打开代码库。在下一节中,我们将设置数据库,然后我们可以开始创建代码库。
我们的个人理财应用程序将有一个用于存储用户的 SQLite 数据库。用户将使用注册表单创建一个帐户,然后他们将能够登录他们的帐户,帐户将显示他们的用户信息,例如姓名、电子邮件地址和银行余额。
我们将使用 Prisma 将我们的应用程序连接到数据库。 Prisma 是一个对象关系映射器 (ORM),专门设计用于在数据库和面向对象编程之间转换数据表示。
运行这些命令在我们的项目中设置 Prisma:
npx prisma init
这个命令基本上初始化了我们项目中的 Prisma。我们现在应该有一个位于 prisma/schema.prisma 的文件。将该文件内的代码替换为此数据库架构,这将定义数据的外观:
datasource db {
    provider = "sqlite"
    url = "file:./dev.db"
}

generator client {
    provider = "prisma-client-js"
}

model User {
    id Int @id @default(autoincrement())
    name String
    email String @unique
    accountNumber String @unique
    balance Float @default(0)
    password String
}
Now run these commands to generate a Prisma client and apply the database migrations so that everything gets in sync:
npx prisma generate
npx prisma migrate dev --name init
We should now have a database schema and an empty database file called dev.db. It's time to work on our codebase, which we shall do in the next section.
This section will be split into three parts. First, we will create some configuration files. Then, we will work on the backend API, and finally, we will complete our application by adding the code for our frontend architecture.
In this section, we have three files to work on. Our .env.local, layout.tsx and globals.css files.
We are starting with our .env.local file, which will hold the variables for our Arcject API key and our JWT_SECRET. The JWT_SECRET is a key that we will use to sign and verify the JSON Web Tokens (JWT) in our application. This is an essential step for securing authentication because it ensures that tokens can't be manipulated by people who don't have access.
In our example application, we will use the same JWT_SECRET for all users, as this is just a test application. It is not built for production.
We can generate a secret key using the built-in Node.js crypto module by running this code in the command line:
node -e "console.log(require('crypto').randomBytes(32).toString('hex'))"
Now copy your Arcjet key, which you will find in the SDK CONFIGURATION section on your account, and the JWT_SECRET into the .env.local file. Take a look at the example below:
ARCJET_KEY=your_arcjet_key
JWT_SECRET=your_jwt_secret
Ok, good, let's work on our layout.tsx file now. All you have to do is replace all of the code inside the existing file with this code here. We just added the Kulim_Park font for our application:
import type { Metadata } from 'next';
import { Kulim_Park } from 'next/font/google';
import './globals.css';

const kulim = Kulim_Park({
  subsets: ['latin', 'latin-ext'],
  weight: ['400', '600'],
});

export const metadata: Metadata = {
  title: 'Create Next App',
  description: 'Generated by create next app',
};

export default function RootLayout({
  children,
}: Readonly<{
  children: React.ReactNode;
}>) {
  return (
    <html lang="en">
      <body className={kulim.className}>{children}</body>
    </html>
  );
}
Lastly, go to the globals.css file and replace all of the code inside with this new one. We did some code cleanup and made the default font size 18px:
@tailwind base;
@tailwind components;
@tailwind utilities;

body {
  font-size: 18px;
}
That takes care of our configuration files. In the next section, we can start working on the backend rest API.
In this section, we have seven files to work on, so let's start.
Six of the seven files will be POST routes, and the other one will be a GET route. First, let's add the code for our route.ts file inside of apt/auth/[...nextauth]:
import arcjet, { tokenBucket } from '@arcjet/next';
import { NextResponse } from 'next/server';
import { PrismaClient } from '@prisma/client';
import bcrypt from 'bcryptjs';
import jwt from 'jsonwebtoken';

const prisma = new PrismaClient();

// Initialize Arcjet for the auth route
const aj = arcjet({
  key: process.env.ARCJET_KEY!,
  rules: [
    tokenBucket({
      mode: 'LIVE',
      refillRate: 5, // refill 5 tokens per interval
      interval: 30, // refill every 30 seconds
      capacity: 10, // bucket maximum capacity of 10 tokens
    }),
  ],
});

export async function POST(req: Request) {
  // Apply Arcjet protection to the login route
  const decision = await aj.protect(req, {
    requested: 5,
  });

  if (decision.isDenied()) {
    return NextResponse.json(
      { error: 'Too Many Requests', reason: decision.reason },
      { status: 429 }
    );
  }

  // Proceed with login logic
  const { email, password } = await req.json();

  try {
    const user = await prisma.user.findUnique({
      where: { email },
    });

    if (user && bcrypt.compareSync(password, user.password)) {
      const token = jwt.sign({ userId: user.id }, process.env.JWT_SECRET!, {
        expiresIn: '1h',
      });

      return NextResponse.json({ token });
    } else {
      return NextResponse.json(
        { error: 'Invalid credentials' },
        { status: 401 }
      );
    }
  } catch (error) {
    return NextResponse.json({ error: 'Login failed' }, { status: 500 });
  }
}
This file holds the Arcjet security protection for our login route. Rate limiting is also in place for users who try to sign in too many times in quick succession.
Next, let's add the code for generating JWT tokens in the route inside of api/generatejwt/route.ts:
import { NextRequest, NextResponse } from 'next/server';
import jwt from 'jsonwebtoken';

const JWT_SECRET = process.env.JWT_SECRET!;

export async function POST(request: NextRequest) {
  try {
    const { userId } = await request.json();

    // Validate that userId is a number
    if (typeof userId !== 'number') {
      return NextResponse.json({ error: 'Invalid userId' }, { status: 400 });
    }

    // Generate a JWT token
    const token = jwt.sign({ userId }, JWT_SECRET, { expiresIn: '1h' }); // Token expires in 1 hour

    return NextResponse.json({ token }, { status: 200 });
  } catch (error) {
    return NextResponse.json({ error: 'An error occurred' }, { status: 500 });
  }
}
This route generates JWT tokens for different users and is dependent on their user ID. It is done automatically when we create a user and sign in. Its purpose in this file is to use Curl commands to add money to a user's bank account.
Right lets now add the code for our sign in route at api/signin/route.ts:
import { NextResponse, NextRequest } from 'next/server';
import jwt from 'jsonwebtoken';
import { PrismaClient } from '@prisma/client';
import bcrypt from 'bcryptjs';
import arcjet, { detectBot } from '@arcjet/next';

const prisma = new PrismaClient();

// Initialize Arcjet with bot detection rule
const aj = arcjet({
  key: process.env.ARCJET_KEY!,
  rules: [
    detectBot({
      mode: 'LIVE', // Block automated clients
      block: ['AUTOMATED'], // Specifically block requests identified as automated
    }),
  ],
});

export async function POST(req: NextRequest) {
  const decision = await aj.protect(req);
  console.log('Arcjet decision: ', decision);

  if (decision.isDenied()) {
    // If the request is blocked, return a 403 Forbidden response
    return NextResponse.json(
      { error: 'Forbidden: Automated client detected', ip: decision.ip },
      { status: 403 }
    );
  }

  // Proceed with the usual login logic if not blocked
  const { email, password } = await req.json();

  const user = await prisma.user.findUnique({
    where: { email },
  });

  if (!user || !(await bcrypt.compare(password, user.password))) {
    return NextResponse.json({ error: 'Invalid credentials' }, { status: 401 });
  }

  const token = jwt.sign({ userId: user.id }, process.env.JWT_SECRET!, {
    expiresIn: '1h',
  });

  return NextResponse.json({ token });
}
The logic in this route is used to sign users into their bank accounts. The route has some Arcjet security protection set up to block automated clients.
The next route to work on will be api/signup/route.ts so add this code to the file:
import arcjet, { protectSignup } from '@arcjet/next';
import { NextResponse, NextRequest } from 'next/server';
import { PrismaClient } from '@prisma/client';
import bcrypt from 'bcryptjs';

const prisma = new PrismaClient();

// Initialize Arcjet with the protectSignup rule
const aj = arcjet({
  key: process.env.ARCJET_KEY!,
  rules: [
    protectSignup({
      email: {
        mode: 'LIVE', // Actively block invalid, disposable, or no MX record emails
        block: ['DISPOSABLE', 'INVALID', 'NO_MX_RECORDS'],
      },
      bots: {
        mode: 'LIVE', // Block clients identified as automated
        block: ['AUTOMATED'],
      },
      rateLimit: {
        mode: 'LIVE', // Actively enforce rate limits
        interval: '2m', // Sliding window of 2 minutes
        max: 5, // Maximum 5 submissions in the interval
      },
    }),
  ],
});

export async function POST(req: NextRequest) {
  // Parse the request body
  const { name, email, password } = await req.json();

  // Apply Arcjet protection to the signup route
  const decision = await aj.protect(req, { email });

  if (decision.isDenied()) {
    if (decision.reason.isEmail()) {
      let message: string;

      // Specific email error handling
      if (decision.reason.emailTypes.includes('INVALID')) {
        message = 'Email address format is invalid. Is there a typo?';
      } else if (decision.reason.emailTypes.includes('DISPOSABLE')) {
        message = 'We do not allow disposable email addresses.';
      } else if (decision.reason.emailTypes.includes('NO_MX_RECORDS')) {
        message =
          'Your email domain does not have an MX record. Is there a typo?';
      } else {
        message = 'Invalid email address.';
      }

      return NextResponse.json(
        { message, reason: decision.reason },
        { status: 400 }
      );
    } else if (decision.reason.isRateLimit()) {
      const reset = decision.reason.resetTime;

      if (reset === undefined) {
        return NextResponse.json(
          {
            message: 'Too many requests. Please try again later.',
            reason: decision.reason,
          },
          { status: 429 }
        );
      }

      // Calculate time until the rate limit resets
      const seconds = Math.floor((reset.getTime() - Date.now()) / 1000);
      const minutes = Math.ceil(seconds / 60);

      if (minutes > 1) {
        return NextResponse.json(
          {
            message: `Too many requests. Please try again in ${minutes} minutes.`,
            reason: decision.reason,
          },
          { status: 429 }
        );
      } else {
        return NextResponse.json(
          {
            message: `Too many requests. Please try again in ${seconds} seconds.`,
            reason: decision.reason,
          },
          { status: 429 }
        );
      }
    } else {
      return NextResponse.json({ message: 'Forbidden' }, { status: 403 });
    }
  }

  // Proceed with signup logic
  const hashedPassword = bcrypt.hashSync(password, 10);

  try {
    await prisma.user.create({
      data: {
        name,
        email,
        password: hashedPassword,
        accountNumber: `ACC${Math.floor(Math.random() * 1000000)}`,
      },
    });
    return NextResponse.json({ message: 'User created successfully!' });
  } catch (error) {
    return NextResponse.json({ error: 'User already exists' }, { status: 400 });
  }
}
This route has the logic for letting users sign up for an account on the platform. It also has Arcjet protection for blocking bots and invalid emails. Like before, there is rate limiting, too, as well as various error handling to cater to different use cases.
We are going to add the code for our transaction route now, which you can find in api/transaction/route.ts so add this code to the file:
import { NextResponse } from 'next/server';
import { PrismaClient } from '@prisma/client';
import jwt from 'jsonwebtoken';

const prisma = new PrismaClient();

function getUserIdFromToken(token: string): number | null {
  try {
    const decoded = jwt.verify(token, process.env.JWT_SECRET!) as {
      userId: number;
    };
    return decoded.userId;
  } catch (error) {
    return null;
  }
}

export async function POST(req: Request) {
  const authHeader = req.headers.get('Authorization');
  if (!authHeader || !authHeader.startsWith('Bearer ')) {
    return NextResponse.json({ error: 'Unauthorized' }, { status: 401 });
  }

  const token = authHeader.split(' ')[1];
  const userId = getUserIdFromToken(token);
  if (!userId) {
    return NextResponse.json({ error: 'Invalid token' }, { status: 401 });
  }

  const { recipientAccount, amount } = await req.json();

  const sender = await prisma.user.findUnique({
    where: { id: userId },
  });
  const recipient = await prisma.user.findUnique({
    where: { accountNumber: recipientAccount },
  });

  if (!sender || !recipient) {
    return NextResponse.json({ error: 'Account not found' }, { status: 404 });
  }

  if (sender.balance < amount) {
    return NextResponse.json(
      { error: 'Insufficient balance' },
      { status: 400 }
    );
  }

  await prisma.user.update({
    where: { id: sender.id },
    data: { balance: { decrement: amount } },
  });

  await prisma.user.update({
    where: { id: recipient.id },
    data: { balance: { increment: amount } },
  });

  return NextResponse.json({ message: 'Transaction successful' });
}
This is another one of the POST request routes used for sending money from one user account to another. It can check to see whether an account exists and is valid and tell if a user has enough balance in their account to send. Error handling is set up to check for different scenarios.
Now, we have our user route, which is the only GET route we have for our API. This code will go inside of api/user/route.ts:
import { NextResponse } from 'next/server';
import { PrismaClient } from '@prisma/client';
import jwt from 'jsonwebtoken';

const prisma = new PrismaClient();

function getUserIdFromToken(token: string): number | null {
  try {
    const decoded = jwt.verify(token, process.env.JWT_SECRET!) as {
      userId: number;
    };
    return decoded.userId;
  } catch (error) {
    return null;
  }
}

export async function GET(req: Request) {
  const authHeader = req.headers.get('Authorization');
  if (!authHeader || !authHeader.startsWith('Bearer ')) {
    return NextResponse.json({ error: 'Unauthorized' }, { status: 401 });
  }

  const token = authHeader.split(' ')[1];
  const userId = getUserIdFromToken(token);
  if (!userId) {
    return NextResponse.json({ error: 'Invalid token' }, { status: 401 });
  }

  const user = await prisma.user.findUnique({
    where: { id: userId },
    select: { name: true, email: true, accountNumber: true, balance: true },
  });

  if (!user) {
    return NextResponse.json({ error: 'User not found' }, { status: 404 });
  }

  return NextResponse.json(user);
}
The code in this file is used to find users inside our database. It also lets us know if a user is authorized and has a valid or invalid token for signing in.
Lastly, we need to add the code for our middleware.ts file which is inside our src/app folder:
import { NextResponse } from 'next/server';
import type { NextRequest } from 'next/server';
import arcjet, { shield } from '@arcjet/next';

// Initialize Arcjet with shield protection
const aj = arcjet({
  key: process.env.ARCJET_KEY!,
  rules: [
    shield({
      mode: 'LIVE', // Enforce live protection
    }),
  ],
});

export async function middleware(req: NextRequest) {
  // Apply Arcjet protection
  const decision = await aj.protect(req);

  if (decision.isDenied()) {
    return NextResponse.json(
      { error: 'Forbidden: Suspicious activity detected' },
      { status: 403 }
    );
  }

  // Existing middleware logic for handling sign-in redirection
  const token = req.cookies.get('token');
  const url = req.nextUrl.clone();

  if (token && url.pathname === '/signin') {
    url.pathname = '/transaction';
    return NextResponse.redirect(url);
  }

  return NextResponse.next();
}

export const config = {
  matcher: ['/signin', '/transaction/:path*'], // Apply middleware to these routes
};
The middleware file applies more Arcjet protection to our routes and enforces live protection for the Arcjet shield. We even have sign-in redirection logic for routes which ensures that you can only access pages that you have authentication for.
Our backend is now complete. The only thing left is the front end, and then we can test our application.
The front end is all that remains, and we have five files to add code to. Let's begin.
Our first file will be the Header.tsx file inside of components/Header.tsx and this is the code needed:
import Link from 'next/link';

export default function Header() {
  return (
    <>
      <header className="m-4">
        <nav className="flex flex-wrap justify-around">
          <Link href={'/'} className="font-bold">
            Home
          </Link>
          <Link href={'/signin'} className="font-bold">
            Sign in
          </Link>
          <Link
            href={'/signup'}
            className="bg-rose-400 pt-2 pr-4 pb-2 pl-4 rounded-full font-bold"
          >
            Register
          </Link>
        </nav>
      </header>
    </>
  );
}
This file creates our main navigation component, which will be on every page. It also has the links for our home, sign-in, and register pages.
Now we will add the code for our sign-in page inside of signin/page.tsx:
'use client';
import { useState } from 'react';
import { useRouter } from 'next/navigation';
import Header from '../components/Header';

export default function SignInPage() {
  const [email, setEmail] = useState('');
  const [password, setPassword] = useState('');
  const [error, setError] = useState('');
  const [isLoading, setIsLoading] = useState(false);
  const router = useRouter();

  const handleSubmit = async (e: React.FormEvent) => {
    e.preventDefault();
    setError('');
    setIsLoading(true);

    try {
      const response = await fetch('/api/auth/signin', {
        method: 'POST',
        headers: { 'Content-Type': 'application/json' },
        body: JSON.stringify({ email, password }),
      });

      if (response.ok) {
        const data = await response.json();
        localStorage.setItem('token', data.token);
        router.push('/transaction');
      } else {
        const errorData = await response.json();
        setError(errorData.error || 'Sign in failed');
      }
    } catch (error) {
      console.error('Sign in error:', error);
      setError('Unable to connect to the server. Please try again later.');
    } finally {
      setIsLoading(false);
    }
  };

  return (
    <div>
      <Header />
      <div className="min-h-screen flex items-center justify-center bg-gray-50 py-12 px-4 sm:px-6 lg:px-8">
        <div className="max-w-md w-full space-y-8">
          <div>
            <h2 className="mt-6 text-center text-3xl font-extrabold text-gray-900">
              Sign in to your account
            </h2>
          </div>
          <form className="mt-8 space-y-6" onSubmit={handleSubmit}>
            <input type="hidden" name="remember" value="true" />
            <div className="rounded-md shadow-sm -space-y-px">
              <div>
                <label htmlFor="email-address" className="sr-only">
                  Email address
                </label>
                <input
                  id="email-address"
                  name="email"
                  type="email"
                  autoComplete="email"
                  required
                  className="appearance-none rounded-none relative block w-full px-3 py-2 border border-gray-300 placeholder-gray-500 text-gray-900 rounded-t-md focus:outline-none focus:ring-rose-500 focus:border-rose-500 focus:z-10 sm:text-sm"
                  placeholder="Email address"
                  value={email}
                  onChange={(e) => setEmail(e.target.value)}
                />
              </div>
              <div>
                <label htmlFor="password" className="sr-only">
                  Password
                </label>
                <input
                  id="password"
                  name="password"
                  type="password"
                  autoComplete="current-password"
                  required
                  className="appearance-none rounded-none relative block w-full px-3 py-2 border border-gray-300 placeholder-gray-500 text-gray-900 rounded-b-md focus:outline-none focus:ring-rose-500 focus:border-rose-500 focus:z-10 sm:text-sm"
                  placeholder="Password"
                  value={password}
                  onChange={(e) => setPassword(e.target.value)}
                />
              </div>
            </div>

            {error && <div className="text-red-500 text-sm mt-2">{error}</div>}

            <div>
              <button
                type="submit"
                disabled={isLoading}
                className="group relative w-full flex justify-center py-2 px-4 border border-transparent text-sm font-medium rounded-md text-white bg-rose-400 hover:bg-rose-700 focus:outline-none focus:ring-2 focus:ring-offset-2 focus:ring-rose-500"
              >
                {isLoading ? 'Signing in...' : 'Sign in'}
              </button>
            </div>
          </form>
        </div>
      </div>
    </div>
  );
}
This is our sign-in page, which is pretty straightforward. It has one form for signing users into their accounts after retrieving them from the database. The form also has an error-handling setup.
Ok, we have our sign-in form, so now we should do our sign-up form, which you can find on the signup/page.tsx and this is the code to add to it:
'use client';
import { useState } from 'react';
import axios from 'axios';
import { useRouter } from 'next/navigation';
import Header from '../components/Header';

export default function SignUp() {
  const [formData, setFormData] = useState({
    name: '',
    email: '',
    password: '',
  });

  const [error, setError] = useState<string | null>(null); // State for storing error messages
  const router = useRouter();

  const handleChange = (e: React.ChangeEvent<HTMLInputElement>) => {
    setFormData({ ...formData, [e.target.name]: e.target.value });
    setError(null); // Clear error message when input changes
  };

  const handleSubmit = async (e: React.FormEvent) => {
    e.preventDefault();
    setError(null); // Clear any previous errors

    try {
      await axios.post('/api/signup', formData);
      router.push('/signin');
    } catch (err) {
      if (axios.isAxiosError(err) && err.response) {
        const { status, data } = err.response;

        // Handle specific error messages from the backend
        if (status === 400) {
          setError(data.message || 'Invalid email address.');
        } else if (status === 429) {
          setError('Too many requests. Please try again later.');
        } else {
          setError('An error occurred during sign up. Please try again.');
        }
      } else {
        setError('An unexpected error occurred. Please try again.');
      }
    }
  };

  return (
    <div>
      <Header />

      <div className="min-h-screen flex items-center justify-center bg-gray-50 py-12 px-4 sm:px-6 lg:px-8">
        <div className="max-w-md w-full space-y-8">
          <div>
            <h2 className="mt-6 text-center text-3xl font-extrabold text-gray-900">
              Create an account
            </h2>
          </div>
          <form onSubmit={handleSubmit} className="mt-8">
            <div>
              <input
                type="text"
                name="name"
                placeholder="Name"
                value={formData.name}
                onChange={handleChange}
                className="appearance-none rounded-none relative block w-full px-3 py-2 border border-gray-300 placeholder-gray-500 text-gray-900 rounded-t-md focus:outline-none focus:ring-rose-500 focus:border-rose-500 focus:z-10 sm:text-sm"
              />
            </div>
            <div>
              <input
                type="email"
                name="email"
                placeholder="Email"
                value={formData.email}
                onChange={handleChange}
                className="appearance-none rounded-none relative block w-full px-3 py-2 border border-gray-300 placeholder-gray-500 text-gray-900  focus:outline-none focus:ring-rose-500 focus:border-rose-500 focus:z-10 sm:text-sm"
              />
            </div>
            <div>
              <input
                type="password"
                name="password"
                placeholder="Password"
                value={formData.password}
                onChange={handleChange}
                className="appearance-none rounded-none relative block w-full px-3 py-2 border border-gray-300 placeholder-gray-500 text-gray-900 rounded-b-md focus:outline-none focus:ring-rose-500 focus:border-rose-500 focus:z-10 sm:text-sm"
              />
            </div>
            <div>
              <button
                type="submit"
                className="group relative w-full flex justify-center py-2 px-4 border border-transparent text-sm font-medium rounded-md text-white bg-rose-400 hover:bg-rose-700 focus:outline-none focus:ring-2 focus:ring-offset-2 focus:ring-rose-500 mt-8 mb-8"
              >
                Sign Up
              </button>
            </div>
            {error && <p className="text-red-500 text-center">{error}</p>}{' '}
            {/* Display error message */}
          </form>
        </div>
      </div>
    </div>
  );
}
Our signup form is very similar to our sign-in form. In this case, it creates user accounts, which are then saved in our database. Like our previous form, it also has error handling.
Just two more files left and our application is completed. The file we will work on now is for transactions, and you can find it inside of transaction/page.tsx. Make sure you add this code to the file:
'use client';
import { useEffect, useState } from 'react';
import { useRouter } from 'next/navigation';
import Header from '../components/Header';
interface UserInfo {
  name: string;
  email: string;
  accountNumber: string;
  balance: number;
}

export default function TransactionPage() {
  const [recipientAccount, setRecipientAccount] = useState('');
  const [amount, setAmount] = useState(0);
  const [message, setMessage] = useState('');
  const [userInfo, setUserInfo] = useState<UserInfo | null>(null);
  const router = useRouter();

  useEffect(() => {
    const token = localStorage.getItem('token');
    if (!token) {
      router.push('/signin');
    } else {
      fetchUserInfo(token);
    }
  }, []); // Empty dependency array to run only once on mount

  const fetchUserInfo = async (token: string) => {
    try {
      const res = await fetch('/api/user', {
        headers: {
          Authorization: `Bearer ${token}`,
        },
      });
      if (res.ok) {
        const data = await res.json();
        setUserInfo(data);
      } else {
        // Token might be invalid or expired
        localStorage.removeItem('token');
        router.push('/signin');
      }
    } catch (error) {
      console.error('Error fetching user info:', error);
      setMessage('Error fetching user information');
    }
  };

  const handleSignOut = () => {
    localStorage.removeItem('token');
    router.push('/signin');
  };

  const handleTransaction = async (e: React.FormEvent) => {
    e.preventDefault();
    const token = localStorage.getItem('token');
    if (!token) {
      router.push('/signin');
      return;
    }

    const res = await fetch('/api/transaction', {
      method: 'POST',
      headers: {
        'Content-Type': 'application/json',
        Authorization: `Bearer ${token}`,
      },
      body: JSON.stringify({ recipientAccount, amount }),
    });

    if (res.ok && amount > 0) {
      setMessage('Transaction successful!');
      fetchUserInfo(token); // Refresh user info after successful transaction
      setRecipientAccount('');
      setAmount(0);
    } else if (amount <= 0) {
      setMessage(`Error: The amount you send, needs to be higher than 0`);
    } else {
      const errorData = await res.json();
      setMessage(`Error: ${errorData.error}`);
    }
  };

  if (!userInfo) {
    return <p>Loading...</p>;
  }

  return (
    <div>
      <div>
        <Header />
      </div>
      <div className="container mx-auto p-4">
        <h1 className="text-2xl font-bold mb-4">Transaction Page</h1>
        <div className="mb-4">
          <h1 className="text-2xl">{userInfo.name}</h1>
          <p className="mt-4 mb-4">Email: {userInfo.email}</p>
          <p className="mt-4 mb-4">Account Number: {userInfo.accountNumber}</p>
          <p className="bg-slate-200 p-4">
            Balance: ${userInfo.balance.toFixed(2)}
          </p>
        </div>
        <button
          onClick={handleSignOut}
          className="bg-slate-800 text-white px-4 py-2 rounded mb-4"
        >
          Sign Out
        </button>
        <form onSubmit={handleTransaction} className="space-y-4">
          <input
            type="text"
            value={recipientAccount}
            onChange={(e) => setRecipientAccount(e.target.value)}
            placeholder="Recipient Account Number"
            className="w-full p-2 border rounded"
          />
          <input
            type="number"
            value={amount}
            onChange={(e) => setAmount(Number(e.target.value))}
            placeholder="Amount"
            className="w-full p-2 border rounded"
          />
          <button
            type="submit"
            className="bg-green-400 text-white px-4 py-2 rounded"
          >
            Send
          </button>
        </form>
        {message && <p className="mt-4 text-center font-bold">{message}</p>}
      </div>
    </div>
  );
}
This is our transaction page which all users will use to view their account details and do transactions between accounts.
Lastly, let's complete our application by adding this code to our main page.tsx file inside of the src/app folder:
'use client';
import { useState } from 'react';
import Header from './components/Header';

export default function Home() {
  const [userId, setUserId] = useState<number | ''>('');
  const [token, setToken] = useState<string | null>(null);
  const [error, setError] = useState<string | null>(null);

  const handleSubmit = async (e: React.FormEvent) => {
    e.preventDefault();

    if (typeof userId !== 'number') {
      setError('User ID must be a number');
      return;
    }

    try {
      const response = await fetch('/api/generatejwt', {
        method: 'POST',
        headers: {
          'Content-Type': 'application/json',
        },
        body: JSON.stringify({ userId }),
      });

      const data = await response.json();

      if (response.ok && userId !== 0) {
        setToken(data.token);
        setError(null);
      } else if (userId === 0) {
        setError('Id needs to be higher than zero');
        setToken(null);
      } else {
        setError(data.error || 'Failed to generate token');
        setToken(null);
      }
    } catch (err) {
      setError('An unexpected error occurred');
      setToken(null);
    }
  };

  const curlCommand = `curl -v POST http://localhost:3000/api/transaction \
-H "Authorization: Bearer eyJhbGciOiJIUzI1NiIsInR5cCI6IkpXVCJ9.eyJ1c2VySWQiOjEyLCJpYXQiOjE3MjQ1MDMwMTUsImV4cCI6MTcyNDUwNjYxNX0.h2i9_-PgEq2W76rAABRqTQesBIf1LSugK6_ILE9pKM8" \
-H "Content-Type: application/json" \
-d '{"recipientAccount": "ACC616021", "amount": 1000}'`;

  return (
    <div>
      <Header />
      <main className="flex flex-col flex-wrap justify-center">
        <article className="text-center m-4">
          <h1 className="text-6xl uppercase mb-4">
            A single account for all your money needs worldwide!
          </h1>
          <p className="pt-4 pr-4 pb-4 pl-4 text-2xl md:pl-4 md:pr-4 sm:pl-4 sm:pr-4">
            Sending money should not be difficult. Easily generate income
            worldwide with just a few clicks.
          </p>
        </article>

        <section className="bg-rose-400 p-6 text-white">
          <article className="text-left m-4">
            <h1 className="text-3xl mb-4">
              How to add money to the balance of a user account
            </h1>
            <p className="mt-4 mb-4">
              Sign-in and registration forms work; however, all users start with
              zero balance in their account.
            </p>
            <p>
              We can simulate a bank transfer by using an SQL query to add funds
              to a user's bank balance. We can also simulate bank transfers
              between users by generating a valid JWT Token for a user in the
              database. These methods will let us send money to a user's bank
              account as long as the user who is sending the money has the funds
              available. All users start with a balance of zero when they
              register for an account, and users will need money in their bank
              accounts so that we can test internal bank transactions between
              users.
            </p>
            <h2 className="text-2xl mt-4 mb-4">Add money using SQL</h2>
            <p className="mt-4 mb-4">
              First, register some users and create accounts for them if you
              still need to do so. Now connect to your SQLite database, find a
              user whose account you want to add funds to, and make a note of
              their ID. Now copy this SQL query; you can change the balance if
              you want to. The important thing is that you change the ID to the
              account that you want to credit. Run the SQL query and refresh or
              check your database. The user should now have funds in their
              account under balance.
            </p>
            <textarea className="text-black p-2 h-40 w-full">
              UPDATE User SET balance = 100000000 WHERE id = 10;
            </textarea>
            <h2 className="text-2xl mt-4 mb-4">
              Use a Curl command to add money into a user's account
            </h2>
            <p>
              Remember that users need funds inside their accounts before they
              can make bank transfers. So, you have to do this using an SQL
              query first; otherwise, the user will have insufficient funds to
              send.
            </p>
            <p className="mt-4 mb-4">
              Locate the user's ID inside the SQLite database and then enter the
              ID number into the form input. If you are using VSCode you can use
              the SQLite Viewer extension to view the data inside of the SQLite
              database located inside <code>prisma/dev.db</code>.
            </p>
            <p className="mt-4 mb-4">
              Generate a token and then go to the next step where we create the
              Curl command.
            </p>
          </article>

          <section className="flex justify-center text-center">
            <form
              onSubmit={handleSubmit}
              className="flex flex-col justify-center bg-slate-800 p-4 rounded"
            >
              <div className="flex flex-col">
                <label htmlFor="userId">User Id:</label>
                <input
                  type="number"
                  id="userId"
                  value={userId}
                  onChange={(e) => setUserId(Number(e.target.value))}
                  required
                  className="text-black p-1"
                />
              </div>
              <div className="mt-4">
                <button type="submit" className="bg-slate-600 p-2 rounded">
                  Generate Token
                </button>
              </div>
            </form>
          </section>
          <section className="text-center mt-10">
            {token && (
              <div>
                <p className="font-bold">Generated Token:</p>
                <textarea
                  value={token}
                  className="text-black w-full h-20 mt-4 p-2"
                ></textarea>
              </div>
            )}
            {error && (
              <div>
                <h2>Error:</h2>
                <p>{error}</p>
              </div>
            )}
          </section>
          <section>
            <p className="mt-4 mb-4">
              Now copy the curl command below into your code editor so that you
              can edit it.
            </p>
            <textarea
              value={curlCommand}
              className="text-black p-2 h-40 w-full"
            ></textarea>
            <p className="mt-4 mb-4">
              1. It's crucial to replace the example JWT token with your
              generated token. Next, go to your SQLite database and find the
              account number of a user to whom you want to send money. Make sure
              that you choose a different user from the one you generated a
              token for because obviously a user is not going to be sending
              money to themselves in this case. Its only between different
              users. The user for whom you generated a token should obviously
              have a balance in their account so that they have funds to send.
              Now replace the value for the <code>recipientAccount</code> number
              with the other user you chose.
            </p>
            <p className="mt-4 mb-4">
              2. Next, change the value of the amount to whatever you want. Just
              remember that it can't be higher than the balance the user has
              available in their account; otherwise, you will get the
              insufficient balance error when you run the curl command.
            </p>
            <p className="mt-4 mb-4">
              3. Finally, run the curl command in your command line. This action
              will successfully simulate a bank transfer between users' bank
              accounts, marking a successful completion of the process.
            </p>
          </section>
        </section>
      </main>
    </div>
  );
}
This is our main homepage, and it is essential because it also has instructions for adding money to users' accounts. All users start with a balance of zero, so we have to simulate a bank transfer and add money to their accounts before we can test out the different transactions.
We can do this by using an SQL query like in this example:
UPDATE User SET balance = 100000000 WHERE id = 10;
Essentially, we find a user inside our database and set a number of our choice for their bank account balance. This balance will go up and down when a user sends and receives money from other users, just like it would in a real bank account. In this example, it's just numbers, not real money, because there is no payment gateway in our application.
We should now have a working Minimum Viable Product (MVP). To start the application, run the usual Next.js run command in your terminal:
npm run dev
Let's learn how to use the application. First, you need to create some new users, which can be done by going to the register page. After you have created a user, you should be able to log in with the email and password that you chose.
You should now see the transaction page. You can sign out of your account or send money to another user. Obviously, you will need to create multiple users so that you have accounts to send to. All users start with a balance of zero, so follow the instructions on the home page to add money to a user's account.
If you want to view the data inside your SQLite database, you can use a VS Code extension like SQLite Viewer, although you won't be able to run any SQL queries. Alternatively, you can use the command line by referring to the SQLite Documentation or a database management tool like TablePlus.
Okay, our application is up and running, so now we can test the Arcjet protection we have implemented and see it working in real-time. Our app should have:
If you sign in to your Arcjet account and go to the dashboard, you should be able to see the requests and analytics for your Arcjet protection layer, as seen in this example:

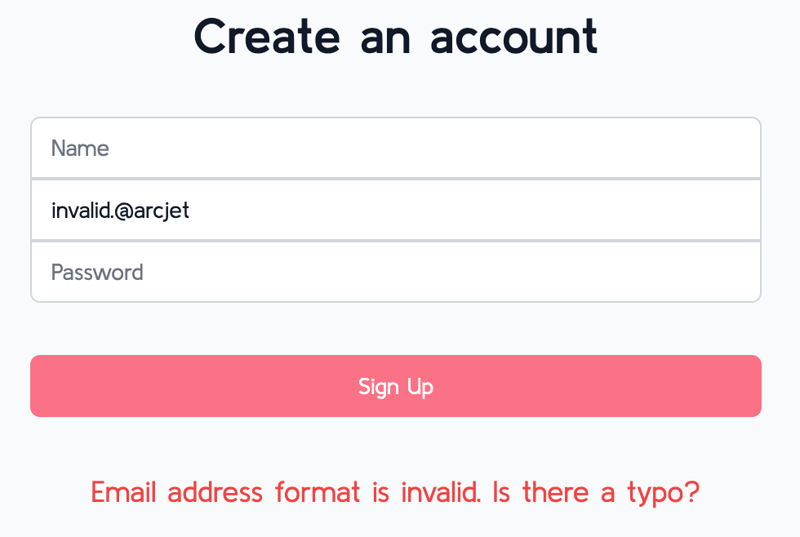
To see the signup form protection in action, go to the Register page and then try these emails to see what happens:
The form should show different errors depending on the type of email address that you use and even if you forget to enter an email address altogether as shown in the examples below:


Send a post request to the sign-in route using the command line with this code here:
curl -v POST http://localhost:3000/api/signin -H "Content-Type: application/json" -d '{"email":"test@example.com","password":"password"}'
You should get an error, like this which confirms that the Arcjet bot protection is working:
* Could not resolve host: POST
* Closing connection
curl: (6) Could not resolve host: POST
* Host localhost:3000 was resolved.
* IPv6: ::1
* IPv4: 127.0.0.1
*   Trying [::1]:3000...
* Connected to localhost (::1) port 3000
> POST /api/signin HTTP/1.1
> Host: localhost:3000
> User-Agent: curl/8.7.1
> Accept: */*
> Content-Type: application/json
> Content-Length: 50
>
* upload completely sent off: 50 bytes
< HTTP/1.1 403 Forbidden
< vary: RSC, Next-Router-State-Tree, Next-Router-Prefetch
< content-type: application/json
< Date: Wed, 28 Aug 2024 12:08:22 GMT
< Connection: keep-alive
< Keep-Alive: timeout=5
< Transfer-Encoding: chunked
<
* Connection #1 to host localhost left intact
{"error":"Forbidden: Automated client detected","ip":{}}%
One example of rate limiting can be seen on the Sign-in page. If you try to sign into user accounts more than twice in quick succession, then you will get a Too Many Requests error as shown here:

This is because users can only sign in two times quickly, and then they have to wait 30 seconds before they can try again.
This number can be adjusted inside of the src/api/auth/[...nextauth] route inside of this code block:
const aj = arcjet({
  key: process.env.ARCJET_KEY!,
  rules: [
    tokenBucket({
      mode: 'LIVE',
      refillRate: 5, // refill 5 tokens per interval
      interval: 30, // refill every 30 seconds
      capacity: 10, // bucket maximum capacity of 10 tokens

      // Users can only sign in two times in quick succession and then they have to wait 30 seconds before they can try again each time
    }),
  ],
});
Well, we are done, our app is complete! You have created a simple personal finance app. In this tutorial, we went through how to set up a simple and user-friendly application that can perform transactions between accounts. In order for your app to not only run smoothly but also maintain some sense of security and reliability, we incorporated Arcjet's powerful tools, such as Arcjet Shield, Rate Limiting, Bot Protection, Email Validation, and Signup Form Protection.
Now that you have a good understanding of these technologies and how they work together, you can leverage their essential construction elements to add more features to your app or scale it up with additional security features. This newfound knowledge gives you the power to take your app to the next level.
If you want more information on this topic, take a look at Arcjet's official documentation.
以上是使用 Arcjet 构建个人理财应用程序的详细内容。更多信息请关注PHP中文网其他相关文章!


