

How to Sync Messages From iPhone to Mac: A Step-By-Step Guide

The interoperability between iPhone and Mac is unparalleled; from using the iPhone as Mac’s webcam to syncing messages from iPhone to Mac. However, there’s stuff to know and settings to enable before you can send and receive messages from Mac. Read along to learn them all.

If you want to send an urgent message, but don’t have your iPhone next to you, or want to continue a conversation while using your Mac, here’s how you can connect iMessage to Mac.
How to Get Messages on Mac
The basic premise of this feature is iCloud. So, you’ll need to:
- Enable iCloud Message sync on iPhone and Mac (basically all the devices you want to use for Messages).
- Use the same Apple ID on all devices, namely the iPhone and Mac.
In addition to iMessage, you can also sync text messages from iPhone to Mac. Once set up, you’ll receive every new message on your iPhone and Mac.
Moreover, you can choose to reply or react from any device. And anything you delete will be deleted from all devices.
Chiefly there are three steps to sync iMessage history and attachments to Mac; so let’s get going.
1. Enable iCloud Sync for Messages on iPhone and iPad
Step 1: Launch Settings and tap your profile (your name and image) from the top.
Step 2: Tap iCloud


Step 3: Select Show All under Apps Using iCloud.
Step 4: Look for Messages and tap it.


Step 5: Turn on the toggle for Sync this iPhone.

Altogether the upload process might take some time depending on the size/number of messages.
Now, your message history will be synced to iCloud. Correspondingly any old messages stored in iCloud will be accessible on this device and all-new conversations will be stored on iCloud for backup.
Tip: Try to do the initial sync with a stable Wi-Fi connection as it can eat up a lot of your cellular data. Also, ensure there’s ample battery life to avoid battery drain before the sync is complete.
2. Allow Mac to Send and Receive Messages From iPhone
To turn on iMessage sync:
Step 1: Go to Setting → Messages.
Step 2: Select Send & Receive.

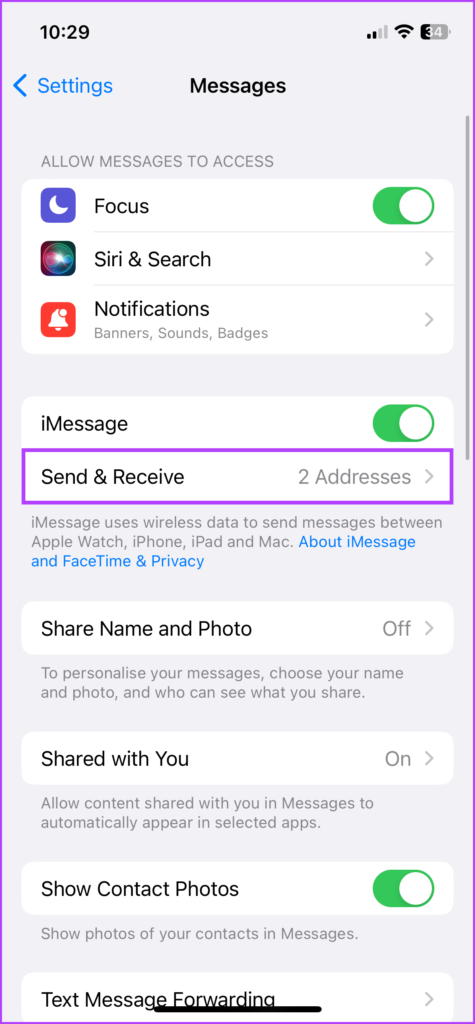
Step 3: Here, check the phone numbers and email addresses you want to send and receive messages from on each device.
Step 4: Check the preferred number or email address under ‘Start New Conversation From.’

To get an SMS on Mac,
Step 1: Go to Settings → Messages.
Step 2: Scroll down to Text Message Forwarding.
Step 3: Turn on the toggle for your Mac.


Note: If you haven’t activated two-factor authentication on your Apple ID, a six-digit activation code will appear on your Mac. Subsequently, enter this code on your iPhone and tap Allow.
3. Sync Messages From iPhone to Mac
Step 1: Launch the Messages app on Mac.
Step 2: Do one of the following, depending on your macOS:
- macOS Ventura: From the menu bar, select Messages → Settings → iMessage tab.
- macOS Monterey or earlier: From the menu bar, select Messages → Preferences → iMessage tab.

Step 3: Check the box next to ‘Enable Messages in iCloud’. Next, select the phone numbers and email addresses you want to send and receive messages from the Mac.
Step 4: Also, click the drop-down menu under ‘Start new conversations from’ and select the number/email ID. (It should match the setting on iPhone)

Thereupon, all messages stored in iCloud will be accessible from your Mac. Reversibly, any message sent and received on your Mac will be synced to your iCloud.
Tip: If the Messages app didn’t auto-sync all messages, you can click Sync Now to do so.

How to Send a Message From Mac
A great thing about enabling messages on Mac is that you are privy to almost all the features available on iPhone. So, alongside texting to an individual or a group, you can also:
- Send audio messages: Similar to sending a voice text on an iPhone, you have to click the Record Audio button (the wavy icon), speak, and click the Send Button.

- Attach and send photos and videos: Click the Apps button (app icon) → Photos → select the photo/video from the library. Additionally, you can copy and paste or drag and drop them in the message field directly.
- Tapback: Click and hold the message and choose the reaction you want to send. To unsend or send a different reaction, repeat the process and de-select or select any other Tapback.


- Scan an image or import a file from iPhone: Go to Files (from the menu bar) → Import from iPhone or iPad → choose between Take Photo, Scan Documents, and Add Sketch.

- Create and use Memoji: Click the Apps button (app icon) → Memoji Stickers → select an already existing Memoji or click plus (+) icon/ three-dot icon → make the Memoji and share it.


- Add Message effects: Type the message or add the emoji, click the Apps button (app icon) → Message Effects → select the effect and send the message. If you want some tricks up your sleeve, check out these iMessage effects like Pew Pew.
- Edit or unsend messages: Remarkably, with iOS 16 and macOS Ventura you can now edit or unsend an iMessage. Right-click on the message and select Edit or Undo Send.
well, that’s how you can set up and send messages from your MacBook. However, if you no longer wish to sync iMessage on Mac, move on to the next section.
How to Stop Getting Messages on Mac From iPhone
To stop receiving messages on your Mac, you’ll need to turn off Messages in iCloud on Mac.
Step 1: Launch Messages.
Step 2: Select Messages from the top bar and select,
- Settings (macOS Ventura and later)
- Preferences (macOS Monterey and earlier)
(Alternatively, you can simply open messages and press Cmd + , to open Settings/Preferences.)
Step 3: Here, uncheck ‘Enable Messages in iCloud.’

Step 4: Choose,
- Disable This Device: To turn off iCloud sync for Messages from Mac.
- Disable All: Turns off iCloud sync for Messages on all devices associated with the Apple ID.

The sync instantly stops when you turn off Messages in iCloud on any device. As for your message history on this device, it will be stored separately in the iCloud backup while the sync of other devices remains intact.

That’s it! You have successfully disconnected iMessage from Mac. Have more queries? Move on to the next section.
FAQs About Syncing Messages From iPhone to Mac
There can be a variety of reasons, from errors in connecting to iCloud to system bugs. Check out these fixes to get your iMessage working again on Mac.
Yes, you can register for iMessage on your Mac with your Apple ID. However, this will be limited to iMessage, you won’t be able to receive and send SMS.
No, you’ll need iCloud/Apple ID to set up messages on Mac and to sync text messages from iPhone to Mac.
There might be a glitch in iMessage sync or something. Albeit to fix it, go to Settings → Messages → Toggle off iMessage → restart device → Toggle on and sign back into iMessage.
Yes, Apple uses end-to-end encryption for all messages stored in iCloud. Whether you’re downloading or uploading messages, iCloud keeps it safe.
Turn on Messages on Mac for Ultimate Ease
Shared messages between your iPhone, iPad, and Mac are remarkably smooth. If used wisely, it can help you achieve work/life balance. Conversely, it can also cause distractions in your workflow.
And while some love the feature and depend on it, some prefer keeping the setting disabled. So, which side are you on, would you prefer keeping it on or off? Share in the comments below.
以上是How to Sync Messages From iPhone to Mac: A Step-By-Step Guide的详细内容。更多信息请关注PHP中文网其他相关文章!

热AI工具

Undresser.AI Undress
人工智能驱动的应用程序,用于创建逼真的裸体照片

AI Clothes Remover
用于从照片中去除衣服的在线人工智能工具。

Undress AI Tool
免费脱衣服图片

Clothoff.io
AI脱衣机

Video Face Swap
使用我们完全免费的人工智能换脸工具轻松在任何视频中换脸!

热门文章
热工具

记事本++7.3.1
好用且免费的代码编辑器

SublimeText3汉化版
中文版,非常好用

禅工作室 13.0.1
功能强大的PHP集成开发环境

Dreamweaver CS6
视觉化网页开发工具

SublimeText3 Mac版
神级代码编辑软件(SublimeText3)


 Apple Watch上的Spotify:如何在2025年使用它
Apr 04, 2025 am 09:55 AM
Apple Watch上的Spotify:如何在2025年使用它
Apr 04, 2025 am 09:55 AM
在苹果设备的互联生态系统加持下,管理和同步你的苹果设备变得轻而易举。用Apple Watch解锁Mac?简单!(如果你还没设置这个解锁方式,真的应该试试,非常省时)。不用iPhone也能用Apple Watch支付?苹果轻松搞定!今天我们将重点介绍如何将Spotify播放列表下载到Apple Watch并在没有iPhone的情况下播放。剧透:这是可行的。 如何在Apple Watch上使用Spotify:快速概述 让我们直接深入探讨关键问题及其解决方案。如果这个表格对您有帮助,那就太好了!如果您
 浮动屏幕记录:如何在Mac上捕获特定的应用程序窗口
Mar 28, 2025 am 09:16 AM
浮动屏幕记录:如何在Mac上捕获特定的应用程序窗口
Mar 28, 2025 am 09:16 AM
Mac 屏幕录制:轻松捕捉窗口、区域及下拉菜单 Mac 系统自带的截图工具 (Command Shift 5) 可以录制全屏或选定区域,但无法单独录制特定应用窗口。这时,就需要更强大的工具来完成任务。本文将介绍几种方法,助您像专业人士一样轻松录制 Mac 窗口。 单独录制应用窗口 录制单个窗口,避免杂乱的桌面背景,能制作出更专业、更突出的图像和视频。以下是一些优秀的屏幕录制应用: 功能对比 Gifox CleanShot X Dropshare 录制特定窗口 ✓ ✓ ✓


 电子邮件不同步?如何在Mac上刷新邮件应用程序
Apr 04, 2025 am 09:45 AM
电子邮件不同步?如何在Mac上刷新邮件应用程序
Apr 04, 2025 am 09:45 AM
Mac邮件同步失败?快速解决方法! 许多Mac用户依赖于自带的Mail应用,因为它简单方便。但即使是可靠的软件也会出现问题。最常见的问题之一是Mail无法同步,导致最近的邮件无法显示。 本文将指导您解决邮件同步问题,并提供一些实用技巧来预防此类问题。 如何刷新Mac上的Mail应用 操作步骤 点击信封图标 打开Mail应用 > 视图 > 显示标签栏 > 点击信封图标刷新。 使用快捷键或菜单选项 按下 Shift Command N。或打开Mail应用
 如何摆脱'屏幕正在观察”错误
Apr 05, 2025 am 10:19 AM
如何摆脱'屏幕正在观察”错误
Apr 05, 2025 am 10:19 AM
看到“您的屏幕正在被监控”的消息时,您首先想到的可能是有人在入侵您的电脑。但情况并非总是如此。让我们尝试找出是否有任何需要您担心的问题。 保护您的Mac 使用Setapp,您无需担心选择保护电脑的工具。您可以快速在Setapp上组建您自己的隐私和安全软件套件。 免费试用 安全测试“您的屏幕正在被监控”是什么意思? 出现“您的屏幕正在被监控”的Mac锁定屏幕消息,原因有很多。 您正在与他人共享屏幕 您正在录制屏幕 您正在使用AirPlay 您正在使用一些试图访问您屏幕的应用程序 您的电脑感染了恶
 如何仅在Mac上的Dock中显示活动应用
Apr 09, 2025 am 11:44 AM
如何仅在Mac上的Dock中显示活动应用
Apr 09, 2025 am 11:44 AM
Mac 坞栏优化指南:仅显示正在运行的应用程序 Mac 的坞栏是系统核心,您可以从中启动访达、废纸篓、最近使用的应用、活跃应用和书签应用,甚至可以添加“文稿”和“下载”等文件夹。默认情况下,Mac 坞栏会显示十几个苹果自带的应用程序。大多数用户还会添加更多应用,却很少删除任何应用,导致坞栏杂乱无章,难以有效使用。 本文将介绍几种方法,帮助您整理和清理 Mac 坞栏,只需几分钟即可完成。 方法一:手动整理坞栏 您可以手动移除未使用的应用程序,只保留常用的应用程序。 移除应用程序: 右键点击应用程

