作者:Abdellah Hallou(LinkedIn、Twitter)
欢迎来到深度学习项目入门指南!本教程为任何想要深入学习令人兴奋的深度学习世界的人提供了全面的资源。无论您是初学者还是经验丰富的开发人员,本指南都将引导您从头到尾完成构建深度学习项目的过程。
在本教程中,您将学习在移动应用程序中创建和部署深度学习模型所涉及的基本步骤。我们将涵盖以下主题:
准备数据:我们将探索各种数据预处理方法,以确保训练数据集稳健可靠。
模型创建:您将了解如何设计和构建 CNN 模型。
训练模型:我们将深入研究使用 TensorFlow 训练深度学习模型的过程。
在移动应用中部署:模型训练完成后,我们将指导您完成使用 TensorFlow Lite 将其集成到移动应用中的步骤。您将了解如何随时随地进行预测!
本教程适合对深度学习概念和 Python 编程有基本了解的初学者和中级开发人员。无论您是数据科学家、机器学习爱好者还是移动应用开发人员,本指南都将为您提供启动深度学习项目所需的知识。
如果您在学习本教程时遇到任何问题、有疑问或需要进一步说明,请随时在此存储库“从数据到部署”中创建 GitHub 问题。我将非常乐意为您提供帮助并提供必要的指导。
要创建问题,请单击此存储库页面顶部的“问题” 选项卡,然后单击“新问题” 按钮。请提供尽可能多的有关您所面临的问题或疑问的背景和详细信息。这将帮助我更好地了解您的疑虑,并为您提供及时、准确的答复。
您的反馈很有价值,也可以帮助其他用户改进本教程。因此,如果您需要任何帮助,请随时与我们联系。让我们一起学习,一起成长!
首先,请确保您已安装所需的依赖项和库。本教程分为几个易于理解的部分,每个部分都涵盖深度学习项目工作流程的特定方面。请随意跳至您最感兴趣的部分或从头到尾阅读。
你准备好了吗?
让我们开始对我们的代码进行必要的导入。我们将在本教程中使用 Fashion Mnist 数据集。
# Import the necessary libraries
from __future__ import print_function
import keras
from google.colab import drive
import os
import numpy as np
from keras.models import Sequential
from keras.layers import Dense, Dropout, Activation, Flatten, BatchNormalization
from keras.layers import Conv2D, MaxPooling2D
from keras.wrappers.scikit_learn import KerasClassifier
from keras import backend as K
from sklearn.model_selection import GridSearchCV
import tensorflow as tf
from keras.utils.vis_utils import plot_model
import matplotlib.pyplot as plt
在任何深度学习项目中,理解数据至关重要。在深入模型创建和训练之前,我们首先加载数据并深入了解其结构、变量和整体特征。
# Load the Fashion MNIST dataset
fashion_mnist = tf.keras.datasets.fashion_mnist
(x_train, y_train), (x_test, y_test) = fashion_mnist.load_data()
现在数据已加载,让我们执行一些探索性数据分析,以更好地了解其特征。
print("Shape of the training data : ",x_train.shape)
print("Shape of the testing data : ",x_test.shape)
Shape of the training data :  (60000, 28, 28)
Shape of the testing data :  (10000, 28, 28)
时尚 MNIST 数据集包含 10 个类别的 70,000 个 灰度图像。这些图像以低分辨率显示单件衣物(28 x 28 像素),如下所示:

60,000 张图像用于训练网络,10,000 张图像用于评估网络学习分类图像的准确性。
# Printing unique values in training data
unique_labels = np.unique(y_train, axis=0)
print("Unique labels in training data:", unique_labels)
Unique labels in training data: [0 1 2 3 4 5 6 7 8 9]
标签是一个整数数组,范围从 0 到 9。它们对应于图像代表的服装类别:
|标签| R类 |
| - |-|
| 0 | T恤/上衣|
| 1 |裤子|
| 2 |套头衫|
| 3 |连衣裙|
| 4 |外套|
| 5 |凉鞋|
| 6 |衬衫|
| 7 |运动鞋 |
| 8 |包|
| 9 | 及踝靴|
由于类名称不包含在数据集中,因此将它们存储在此处以便稍后在绘制图像时使用:
# Numeric labels
numeric_labels = np.sort(np.unique(y_train, axis=0))
# String labels
string_labels = np.array(['T-shirt/top', 'Trouser', 'Pullover', 'Dress', 'Coat','Sandal', 'Shirt', 'Sneaker', 'Bag', 'Ankle boot'])
# Mapping numeric labels to string labels
numeric_to_string = dict(zip(numeric_labels, string_labels))
print("Numeric to String Label Mapping:")
print(numeric_to_string)
Numeric to String Label Mapping:
{0: 'T-shirt/top', 1: 'Trouser', 2: 'Pullover', 3: 'Dress', 4: 'Coat', 5: 'Sandal', 6: 'Shirt', 7: 'Sneaker', 8: 'Bag', 9: 'Ankle boot'}
在训练网络之前必须对数据进行预处理。
我们首先定义数据集中的类数(本例中为 10)和输入图像的尺寸(28x28 像素)。
# Import the necessary libraries
from __future__ import print_function
import keras
from google.colab import drive
import os
import numpy as np
from keras.models import Sequential
from keras.layers import Dense, Dropout, Activation, Flatten, BatchNormalization
from keras.layers import Conv2D, MaxPooling2D
from keras.wrappers.scikit_learn import KerasClassifier
from keras import backend as K
from sklearn.model_selection import GridSearchCV
import tensorflow as tf
from keras.utils.vis_utils import plot_model
import matplotlib.pyplot as plt
这部分负责重塑输入图像数据以匹配神经网络模型的预期格式。格式取决于所使用的后端(例如 TensorFlow 或 Theano)。在此代码片段中,我们使用 K.image_data_format() 检查图像数据格式,并根据结果应用适当的重塑。
# Load the Fashion MNIST dataset
fashion_mnist = tf.keras.datasets.fashion_mnist
(x_train, y_train), (x_test, y_test) = fashion_mnist.load_data()
数据中图像的像素值在0到255的范围内。
在将这些值输入 CNN 模型之前,将它们缩放到 0 到 1 的范围。
print("Shape of the training data : ",x_train.shape)
print("Shape of the testing data : ",x_test.shape)
将类标签(表示为整数)转换为二进制类矩阵格式,这是多类分类问题所需的。
Shape of the training data :  (60000, 28, 28)
Shape of the testing data :  (10000, 28, 28)
在这一步中,我们定义并构建用于图像分类的卷积神经网络(CNN)模型。模型架构由多个层组成,例如卷积层、池化层、dropout 层和密集层。 build_model 函数将类的数量、训练和测试数据作为输入,并返回训练历史记录和构建的模型。
# Printing unique values in training data
unique_labels = np.unique(y_train, axis=0)
print("Unique labels in training data:", unique_labels)
Unique labels in training data: [0 1 2 3 4 5 6 7 8 9]
# Numeric labels
numeric_labels = np.sort(np.unique(y_train, axis=0))
# String labels
string_labels = np.array(['T-shirt/top', 'Trouser', 'Pullover', 'Dress', 'Coat','Sandal', 'Shirt', 'Sneaker', 'Bag', 'Ankle boot'])
# Mapping numeric labels to string labels
numeric_to_string = dict(zip(numeric_labels, string_labels))
print("Numeric to String Label Mapping:")
print(numeric_to_string)
为了评估训练模型的性能,我们根据测试数据对其进行评估。评估方法用于计算测试损失和准确性。然后这些指标将打印到控制台。
Numeric to String Label Mapping:
{0: 'T-shirt/top', 1: 'Trouser', 2: 'Pullover', 3: 'Dress', 4: 'Coat', 5: 'Sandal', 6: 'Shirt', 7: 'Sneaker', 8: 'Bag', 9: 'Ankle boot'}

num_classes = 10
# input image dimensions
img_rows, img_cols = 28, 28
if K.image_data_format() == 'channels_first':
    x_train = x_train.reshape(x_train.shape[0], 1, img_rows, img_cols)
    x_test = x_test.reshape(x_test.shape[0], 1, img_rows, img_cols)
    input_shape = (1, img_rows, img_cols)
else:
    x_train = x_train.reshape(x_train.shape[0], img_rows, img_cols, 1)
    x_test = x_test.reshape(x_test.shape[0], img_rows, img_cols, 1)
    input_shape = (img_rows, img_cols, 1)
训练模型后,我们使用 save 方法将其保存为分层数据格式 (HDF5) 文件格式。然后通过调用 move_to_drive 函数将模型导出到 Google Drive。此外,使用 h52tflite 函数将模型转换为 TensorFlow Lite 格式,并且生成的 TFLite 模型也保存在 Google Drive 中。返回保存的模型和TFLite模型的路径。
x_train = x_train.astype('float32')
x_test = x_test.astype('float32')
x_train /= 255
x_test /= 255
为了可视化模型的预测,我们随机选择一组测试图像。该模型使用预测方法预测这些图像的类标签。然后将预测标签与地面真实标签进行比较,以使用 matplotlib.
显示图像及其相应的预测标签
# convert class vectors to binary class matrices
y_train = keras.utils.to_categorical(y_train, num_classes)
y_test = keras.utils.to_categorical(y_test, num_classes)

有关模型的更多信息,请查看以下资源:
在创建新的 Flutter 项目之前,请确保正确安装 Flutter SDK 和其他 Flutter 应用开发相关的要求:https://docs.flutter.dev/get-started/install/windows
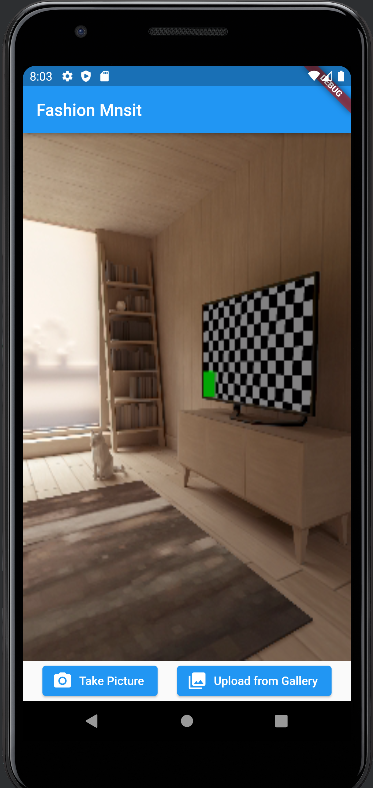
项目建立后,我们将实现 UI 以允许用户拍照或从图库上传图像,并使用导出的 TensorFlow Lite 模型执行对象识别。
首先,我们需要安装这些软件包:
为此,请复制以下代码片段并将其粘贴到项目的 pubspec.yaml 文件中:
# Import the necessary libraries
from __future__ import print_function
import keras
from google.colab import drive
import os
import numpy as np
from keras.models import Sequential
from keras.layers import Dense, Dropout, Activation, Flatten, BatchNormalization
from keras.layers import Conv2D, MaxPooling2D
from keras.wrappers.scikit_learn import KerasClassifier
from keras import backend as K
from sklearn.model_selection import GridSearchCV
import tensorflow as tf
from keras.utils.vis_utils import plot_model
import matplotlib.pyplot as plt
在项目的main.dart文件中导入必要的包
# Load the Fashion MNIST dataset
fashion_mnist = tf.keras.datasets.fashion_mnist
(x_train, y_train), (x_test, y_test) = fashion_mnist.load_data()
为了启用相机功能,我们将使用camera包。首先,导入必要的包并实例化相机控制器。使用 availableCameras() 函数获取可用摄像机的列表。在本教程中,我们将使用列表中的第一个相机。
print("Shape of the training data : ",x_train.shape)
print("Shape of the testing data : ",x_test.shape)
创建一个名为 CameraScreen 的新 StatefulWidget,它将处理相机预览和图像捕获功能。在 initState() 方法中,初始化相机控制器并设置分辨率预设。此外,实现 _takePicture() 方法,该方法使用相机控制器捕获图像。
Shape of the training data :  (60000, 28, 28)
Shape of the testing data :  (10000, 28, 28)
要允许用户从图库上传图像,请导入 image_picker 包。实现 _pickImage() 方法,该方法利用 ImagePicker 类从图库中选择图像。选择图像后,可以使用 _processImage() 方法对其进行处理。
# Printing unique values in training data
unique_labels = np.unique(y_train, axis=0)
print("Unique labels in training data:", unique_labels)
为了执行对象识别,我们将使用 TensorFlow Lite。首先导入 tflite 包。在 _initTensorFlow() 方法中,从资产中加载 TensorFlow Lite 模型和标签。您可以指定模型和标签文件路径并调整线程数和 GPU 委托使用等设置。
# Import the necessary libraries
from __future__ import print_function
import keras
from google.colab import drive
import os
import numpy as np
from keras.models import Sequential
from keras.layers import Dense, Dropout, Activation, Flatten, BatchNormalization
from keras.layers import Conv2D, MaxPooling2D
from keras.wrappers.scikit_learn import KerasClassifier
from keras import backend as K
from sklearn.model_selection import GridSearchCV
import tensorflow as tf
from keras.utils.vis_utils import plot_model
import matplotlib.pyplot as plt
实现 _objectRecognition() 方法,该方法将图像文件路径作为输入并在图像上运行 TensorFlow Lite 模型。该方法返回已识别对象的标签。
# Load the Fashion MNIST dataset
fashion_mnist = tf.keras.datasets.fashion_mnist
(x_train, y_train), (x_test, y_test) = fashion_mnist.load_data()
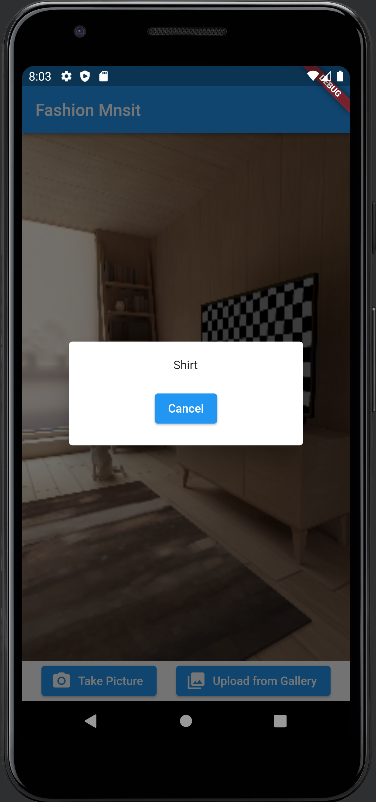
处理图像时,使用 showDialog() 方法在对话框中显示结果。自定义对话框以显示已识别的对象标签并提供取消选项。
print("Shape of the training data : ",x_train.shape)
print("Shape of the testing data : ",x_test.shape)
Shape of the training data :  (60000, 28, 28)
Shape of the testing data :  (10000, 28, 28)


以上是从数据到部署的详细内容。更多信息请关注PHP中文网其他相关文章!


