

从零到店面:我建立汽车租赁网站和移动应用程序的旅程

内容
- 简介
- 技术堆栈
- 快速概览
- API
- 前端
- 移动应用程序
- 管理仪表板
- 兴趣点
- 资源
源代码:https://github.com/aelassas/bookcars
演示:https://bookcars.dynv6.net:3002
介绍
这个想法源于建立无边界的愿望 - 一个完全可定制的汽车租赁网站和移动应用程序,其中每个方面都在您的控制之下:
- 拥有 UI/UX:设计独特的客户体验,而无需克服模板限制
- 控制后端:实现完美匹配需求的自定义业务逻辑和数据结构
- 掌握 DevOps:使用首选工具和工作流程部署、扩展和监控应用程序
- 自由扩展:添加新功能和集成,无需平台限制或额外费用
技术堆栈
这是使其成为可能的技术堆栈:
- 打字稿
- Node.js
- MongoDB
- 反应
- MUI
- React Native
- 世博会
- 条纹
- 码头工人
由于 TypeScript 具有众多优点,因此做出了使用 TypeScript 的关键设计决定。 TypeScript 提供强大的类型、工具和集成,从而产生高质量、可扩展、更具可读性和可维护性的代码,并且易于调试和测试。
我选择React是因为它强大的渲染能力,MongoDB是为了灵活的数据建模,而Stripe是为了安全的支付处理。
通过选择此堆栈,您不仅仅是在构建网站和移动应用程序 - 您正在投资一个可以根据您的需求不断发展的基础,并得到强大的开源技术和不断发展的开发者社区的支持。
React 因其以下优点而成为绝佳选择:
- 基于组件的架构
- 让您将复杂的 UI 分解为更小的、可重复使用的部分
- 使代码更易于维护且更易于测试
- 实现更好的代码组织和可重用性
- 虚拟 DOM 性能
- React 的虚拟 DOM 高效地仅更新必要的内容
- 带来更快的页面加载和更好的用户体验
- 减少不必要的重新渲染
- 丰富的生态系统
- 庞大的预建组件库
- 丰富的工具
- 提供支持和资源的大型社区
- 丰富的开发人员经验
- 热重载以获取即时反馈
- 优秀的调试工具
- JSX 让编写 UI 代码更加直观
- 行业支持
- 由 Meta(以前的 Facebook)支持
- 被许多大公司使用
- 持续开发和改进
- 灵活性
- 适用于小型和大型应用程序
- 可以逐步集成到现有项目中
- 支持多种渲染策略(客户端、服务端、静态)
快速概览
在本部分中,您将看到前端、管理仪表板和移动应用程序的主页。
前端
在前端,用户可以搜索可用的汽车、选择汽车并结账。
下面是前端主页,用户可以选择上下车地点和时间,并搜索可用的车辆。

以下是主页的搜索结果,用户可以在其中选择租车。

下面是结帐页面,用户可以在其中设置租赁选项和结帐。如果用户未注册,可以同时结账和注册。如果他尚未注册,他将收到一封确认和激活电子邮件以设置密码。

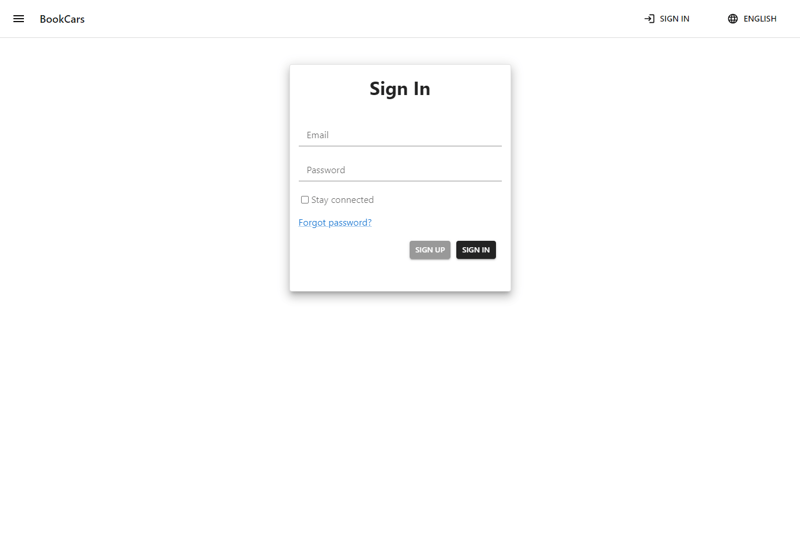
以下是登录页面。在生产中,身份验证 cookie 是 httpOnly、签名的、安全且严格的 sameSite。 这些选项可防止 XSS、CSRF 和 MITM 攻击。 身份验证 cookie 也可以通过自定义中间件免受 XST 攻击。
以下是注册页面。

下面是用户可以查看和管理他的预订的页面。

下面是用户可以查看预订详细信息的页面。

以下是联系页面。

以下是租车地点页面。

下面是客户可以查看和管理他的通知的页面。

还有其他页面,但这些是前端的主要页面。
管理仪表板
用户分为三种类型:
- 管理员:他拥有管理仪表板的完全访问权限。他什么都能做。
- 供应商:他对管理仪表板的访问权限受到限制。他只能管理他的汽车和预订。
- 用户:他只能访问前端和移动应用程序。他无法访问管理仪表板。
该平台旨在与多个供应商合作。每个供应商都可以从管理仪表板管理他的车队和预订。该平台也可以只与一个供应商合作。
通过管理仪表板,管理员用户可以创建和管理供应商、汽车、位置、用户和预订。
当管理员用户创建新供应商时,供应商将收到一封自动电子邮件,用于创建他的帐户以访问管理仪表板,以便他可以管理他的车队和预订。
下面是管理仪表板的登录页面。

下面是管理仪表板的仪表板页面,管理员和供应商可以在其中查看和管理预订。

下面是车队展示和管理的页面。

下面是管理员和供应商可以通过提供图像和汽车信息来创建新车的页面。对于免费包含的汽车选项,请将相应的汽车选项设置为 0。否则,请设置选项的价格,如果您不想包含它,请将其留空。

下面是管理员和供应商可以编辑汽车的页面。

以下是管理员可以管理平台用户的页面。

以下是编辑预订的页面。

还有其他页面,但这些是管理仪表板的主页。
应用程序编程接口

API 公开了管理仪表板、前端和移动应用程序所需的所有功能。 API遵循MVC设计模式。 JWT 用于身份验证。有些功能需要身份验证,例如与管理汽车、预订和客户相关的功能,而其他功能则不需要身份验证,例如为未经过身份验证的用户检索位置和可用汽车:
- ./api/src/models/ 文件夹包含 MongoDB 模型。
- ./api/src/routes/ 文件夹包含 Express 路线。
- ./api/src/controllers/ 文件夹包含控制器。
- ./api/src/middlewares/ 文件夹包含中间件。
- ./api/src/config/env.config.ts 包含配置和 TypeScript 类型定义。
- ./api/src/lang/ 文件夹包含本地化内容。
- ./api/src/app.ts 是加载路由的主服务器。
- ./api/index.ts 是 api 的主要入口点。
index.ts 是 api 的主要入口点:
import 'dotenv/config'
import process from 'node:process'
import fs from 'node:fs/promises'
import http from 'node:http'
import https, { ServerOptions } from 'node:https'
import * as env from './config/env.config'
import * as databaseHelper from './common/databaseHelper'
import app from './app'
import * as logger from './common/logger'

if (
  await databaseHelper.connect(env.DB_URI, env.DB_SSL, env.DB_DEBUG)
  && await databaseHelper.initialize()
) {
  let server: http.Server | https.Server

  if (env.HTTPS) {
    https.globalAgent.maxSockets = Number.POSITIVE_INFINITY
    const privateKey = await fs.readFile(env.PRIVATE_KEY, 'utf8')
    const certificate = await fs.readFile(env.CERTIFICATE, 'utf8')
    const credentials: ServerOptions = { key: privateKey, cert: certificate }
    server = https.createServer(credentials, app)

    server.listen(env.PORT, () => {
      logger.info('HTTPS server is running on Port', env.PORT)
    })
  } else {
    server = app.listen(env.PORT, () => {
      logger.info('HTTP server is running on Port', env.PORT)
    })
  }

  const close = () => {
    logger.info('Gracefully stopping...')
    server.close(async () => {
      logger.info(`HTTP${env.HTTPS ? 'S' : ''} server closed`)
      await databaseHelper.close(true)
      logger.info('MongoDB connection closed')
      process.exit(0)
    })
  }

  ['SIGINT', 'SIGTERM', 'SIGQUIT'].forEach((signal) => process.on(signal, close))
}
这是一个使用 Node.js 和 Express 启动服务器的 TypeScript 文件。它导入了多个模块,包括 dotenv、process、fs、http、https、mongoose 和 app。然后,它检查 HTTPS 环境变量是否设置为 true,如果是,则使用 https 模块以及提供的私钥和证书创建 HTTPS 服务器。否则,它使用 http 模块创建一个 HTTP 服务器。服务器监听 PORT 环境变量中指定的端口。
close 函数被定义为在收到终止信号时优雅地停止服务器。它关闭服务器和 MongoDB 连接,然后以状态码 0 退出进程。最后,它注册当进程收到 SIGINT、SIGTERM 或 SIGQUIT 信号时要调用的 close 函数。
app.ts 是 api 的主要入口点:
import express from 'express'
import compression from 'compression'
import helmet from 'helmet'
import nocache from 'nocache'
import cookieParser from 'cookie-parser'
import i18n from './lang/i18n'
import * as env from './config/env.config'
import cors from './middlewares/cors'
import allowedMethods from './middlewares/allowedMethods'
import supplierRoutes from './routes/supplierRoutes'
import bookingRoutes from './routes/bookingRoutes'
import locationRoutes from './routes/locationRoutes'
import notificationRoutes from './routes/notificationRoutes'
import carRoutes from './routes/carRoutes'
import userRoutes from './routes/userRoutes'
import stripeRoutes from './routes/stripeRoutes'
import countryRoutes from './routes/countryRoutes'
import * as helper from './common/helper'

const app = express()

app.use(helmet.contentSecurityPolicy())
app.use(helmet.dnsPrefetchControl())
app.use(helmet.crossOriginEmbedderPolicy())
app.use(helmet.frameguard())
app.use(helmet.hidePoweredBy())
app.use(helmet.hsts())
app.use(helmet.ieNoOpen())
app.use(helmet.noSniff())
app.use(helmet.permittedCrossDomainPolicies())
app.use(helmet.referrerPolicy())
app.use(helmet.xssFilter())
app.use(helmet.originAgentCluster())
app.use(helmet.crossOriginResourcePolicy({ policy: 'cross-origin' }))
app.use(helmet.crossOriginOpenerPolicy())

app.use(nocache())
app.use(compression({ threshold: 0 }))
app.use(express.urlencoded({ limit: '50mb', extended: true }))
app.use(express.json({ limit: '50mb' }))

app.use(cors())
app.options('*', cors())
app.use(cookieParser(env.COOKIE_SECRET))
app.use(allowedMethods)

app.use('/', supplierRoutes)
app.use('/', bookingRoutes)
app.use('/', locationRoutes)
app.use('/', notificationRoutes)
app.use('/', carRoutes)
app.use('/', userRoutes)
app.use('/', stripeRoutes)
app.use('/', countryRoutes)

i18n.locale = env.DEFAULT_LANGUAGE

await helper.mkdir(env.CDN_USERS)
await helper.mkdir(env.CDN_TEMP_USERS)
await helper.mkdir(env.CDN_CARS)
await helper.mkdir(env.CDN_TEMP_CARS)
await helper.mkdir(env.CDN_LOCATIONS)
await helper.mkdir(env.CDN_TEMP_LOCATIONS)

export default app
首先,我们检索 MongoDB 连接字符串,然后与 MongoDB 数据库建立连接。然后我们创建一个 Express 应用程序并加载 cors、压缩、头盔和 nocache 等中间件。我们使用头盔中间件库设置了各种安全措施。我们还为应用程序的不同部分导入各种路线文件,例如 sellerRoutes、bookingRoutes、locationRoutes、notificationRoutes、carRoutes 和 userRoutes。最后,我们加载 Express 路线并导出应用程序。
api中有8条路由。每条路线都有自己的控制器,遵循 MVC 设计模式和 SOLID 原则。主要路线如下:
- userRoutes:提供与用户相关的REST功能
- supplierRoutes:提供与供应商相关的REST功能
- countryRoutes:提供与国家相关的REST功能
- locationRoutes:提供与位置相关的REST函数
- carRoutes:提供与汽车相关的REST功能
- bookingRoutes:提供与预订相关的REST功能
- notificationRoutes:提供与通知相关的REST功能
- stripeRoutes:提供与Stripe支付网关相关的REST功能
我们不会一一解释每条路线。我们将以 CountryRoutes 为例,看看它是如何制作的:
import express from 'express'
import routeNames from '../config/countryRoutes.config'
import authJwt from '../middlewares/authJwt'
import * as countryController from '../controllers/countryController'

const routes = express.Router()

routes.route(routeNames.validate).post(authJwt.verifyToken, countryController.validate)
routes.route(routeNames.create).post(authJwt.verifyToken, countryController.create)
routes.route(routeNames.update).put(authJwt.verifyToken, countryController.update)
routes.route(routeNames.delete).delete(authJwt.verifyToken, countryController.deleteCountry)
routes.route(routeNames.getCountry).get(authJwt.verifyToken, countryController.getCountry)
routes.route(routeNames.getCountries).get(authJwt.verifyToken, countryController.getCountries)
routes.route(routeNames.getCountriesWithLocations).get(countryController.getCountriesWithLocations)
routes.route(routeNames.checkCountry).get(authJwt.verifyToken, countryController.checkCountry)
routes.route(routeNames.getCountryId).get(authJwt.verifyToken, countryController.getCountryId)

export default routes
首先,我们创建一个 Express Router。然后,我们使用名称、方法、中间件和控制器创建路由。
routeNames 包含countryRoutes 路线名称:
const routes = {
  validate: '/api/validate-country',
  create: '/api/create-country',
  update: '/api/update-country/:id',
  delete: '/api/delete-country/:id',
  getCountry: '/api/country/:id/:language',
  getCountries: '/api/countries/:page/:size/:language',
  getCountriesWithLocations: '/api/countries-with-locations/:language/:imageRequired/:minLocations',
  checkCountry: '/api/check-country/:id',
  getCountryId: '/api/country-id/:name/:language',
}

export default routes
countryController 包含有关国家的主要业务逻辑。我们不会看到控制器的所有源代码,因为它相当大,但我们将以创建控制器函数为例。
以下是国家/地区模型:
import { Schema, model } from 'mongoose'
import * as env from '../config/env.config'

const countrySchema = new Schema<env.Country>(
  {
    values: {
      type: [Schema.Types.ObjectId],
      ref: 'LocationValue',
      required: [true, "can't be blank"],
      validate: (value: any): boolean => Array.isArray(value),
    },
  },
  {
    timestamps: true,
    strict: true,
    collection: 'Country',
  },
)

const Country = model<env.Country>('Country', countrySchema)

export default Country
下面是 env.Country TypeScript 类型:
export interface Country extends Document {
  values: Types.ObjectId[]
  name?: string
}
一个国家有多种价值观。每种语言一个。默认支持英语和法语。
以下是 LocationValue 模型:
import 'dotenv/config'
import process from 'node:process'
import fs from 'node:fs/promises'
import http from 'node:http'
import https, { ServerOptions } from 'node:https'
import * as env from './config/env.config'
import * as databaseHelper from './common/databaseHelper'
import app from './app'
import * as logger from './common/logger'

if (
  await databaseHelper.connect(env.DB_URI, env.DB_SSL, env.DB_DEBUG)
  && await databaseHelper.initialize()
) {
  let server: http.Server | https.Server

  if (env.HTTPS) {
    https.globalAgent.maxSockets = Number.POSITIVE_INFINITY
    const privateKey = await fs.readFile(env.PRIVATE_KEY, 'utf8')
    const certificate = await fs.readFile(env.CERTIFICATE, 'utf8')
    const credentials: ServerOptions = { key: privateKey, cert: certificate }
    server = https.createServer(credentials, app)

    server.listen(env.PORT, () => {
      logger.info('HTTPS server is running on Port', env.PORT)
    })
  } else {
    server = app.listen(env.PORT, () => {
      logger.info('HTTP server is running on Port', env.PORT)
    })
  }

  const close = () => {
    logger.info('Gracefully stopping...')
    server.close(async () => {
      logger.info(`HTTP${env.HTTPS ? 'S' : ''} server closed`)
      await databaseHelper.close(true)
      logger.info('MongoDB connection closed')
      process.exit(0)
    })
  }

  ['SIGINT', 'SIGTERM', 'SIGQUIT'].forEach((signal) => process.on(signal, close))
}
下面是 env.LocationValue TypeScript 类型:
import express from 'express'
import compression from 'compression'
import helmet from 'helmet'
import nocache from 'nocache'
import cookieParser from 'cookie-parser'
import i18n from './lang/i18n'
import * as env from './config/env.config'
import cors from './middlewares/cors'
import allowedMethods from './middlewares/allowedMethods'
import supplierRoutes from './routes/supplierRoutes'
import bookingRoutes from './routes/bookingRoutes'
import locationRoutes from './routes/locationRoutes'
import notificationRoutes from './routes/notificationRoutes'
import carRoutes from './routes/carRoutes'
import userRoutes from './routes/userRoutes'
import stripeRoutes from './routes/stripeRoutes'
import countryRoutes from './routes/countryRoutes'
import * as helper from './common/helper'

const app = express()

app.use(helmet.contentSecurityPolicy())
app.use(helmet.dnsPrefetchControl())
app.use(helmet.crossOriginEmbedderPolicy())
app.use(helmet.frameguard())
app.use(helmet.hidePoweredBy())
app.use(helmet.hsts())
app.use(helmet.ieNoOpen())
app.use(helmet.noSniff())
app.use(helmet.permittedCrossDomainPolicies())
app.use(helmet.referrerPolicy())
app.use(helmet.xssFilter())
app.use(helmet.originAgentCluster())
app.use(helmet.crossOriginResourcePolicy({ policy: 'cross-origin' }))
app.use(helmet.crossOriginOpenerPolicy())

app.use(nocache())
app.use(compression({ threshold: 0 }))
app.use(express.urlencoded({ limit: '50mb', extended: true }))
app.use(express.json({ limit: '50mb' }))

app.use(cors())
app.options('*', cors())
app.use(cookieParser(env.COOKIE_SECRET))
app.use(allowedMethods)

app.use('/', supplierRoutes)
app.use('/', bookingRoutes)
app.use('/', locationRoutes)
app.use('/', notificationRoutes)
app.use('/', carRoutes)
app.use('/', userRoutes)
app.use('/', stripeRoutes)
app.use('/', countryRoutes)

i18n.locale = env.DEFAULT_LANGUAGE

await helper.mkdir(env.CDN_USERS)
await helper.mkdir(env.CDN_TEMP_USERS)
await helper.mkdir(env.CDN_CARS)
await helper.mkdir(env.CDN_TEMP_CARS)
await helper.mkdir(env.CDN_LOCATIONS)
await helper.mkdir(env.CDN_TEMP_LOCATIONS)

export default app
LocationValue 具有语言代码 (ISO 639-1) 和字符串值。
下面是创建控制器函数:
import express from 'express'
import routeNames from '../config/countryRoutes.config'
import authJwt from '../middlewares/authJwt'
import * as countryController from '../controllers/countryController'

const routes = express.Router()

routes.route(routeNames.validate).post(authJwt.verifyToken, countryController.validate)
routes.route(routeNames.create).post(authJwt.verifyToken, countryController.create)
routes.route(routeNames.update).put(authJwt.verifyToken, countryController.update)
routes.route(routeNames.delete).delete(authJwt.verifyToken, countryController.deleteCountry)
routes.route(routeNames.getCountry).get(authJwt.verifyToken, countryController.getCountry)
routes.route(routeNames.getCountries).get(authJwt.verifyToken, countryController.getCountries)
routes.route(routeNames.getCountriesWithLocations).get(countryController.getCountriesWithLocations)
routes.route(routeNames.checkCountry).get(authJwt.verifyToken, countryController.checkCountry)
routes.route(routeNames.getCountryId).get(authJwt.verifyToken, countryController.getCountryId)

export default routes
在此函数中,我们检索请求的正文,迭代正文中提供的值(每种语言一个值)并创建一个 LocationValue。最后,我们根据创建的位置值创建国家/地区。
前端
前端是一个使用 Node.js、React、MUI 和 TypeScript 构建的 Web 应用程序。在前端,客户可以根据接送点和时间搜索可用的汽车,选择汽车并继续结账:
- ./frontend/src/assets/ 文件夹包含 CSS 和图像。
- ./frontend/src/pages/ 文件夹包含 React 页面。
- ./frontend/src/components/ 文件夹包含 React 组件。
- ./frontend/src/services/ 包含 api 客户端服务。
- ./frontend/src/App.tsx 是包含路由的主 React 应用程序。
- ./frontend/src/index.tsx 是前端的主要入口点。
TypeScript 类型定义在包 ./packages/bookcars-types 中定义。
App.tsx 是主要的 React 应用程序:
const routes = {
  validate: '/api/validate-country',
  create: '/api/create-country',
  update: '/api/update-country/:id',
  delete: '/api/delete-country/:id',
  getCountry: '/api/country/:id/:language',
  getCountries: '/api/countries/:page/:size/:language',
  getCountriesWithLocations: '/api/countries-with-locations/:language/:imageRequired/:minLocations',
  checkCountry: '/api/check-country/:id',
  getCountryId: '/api/country-id/:name/:language',
}

export default routes
我们使用 React 延迟加载来加载每个路由。
我们不会涵盖前端的每一页,但如果您愿意,您可以打开源代码并查看每一页。
手机应用程序
该平台提供适用于 Android 和 iOS 的本机移动应用程序。该移动应用程序是使用 React Native、Expo 和 TypeScript 构建的。与前端一样,移动应用程序允许客户根据接送点和时间搜索可用的汽车,选择汽车并继续结账。
如果他的预订从后端更新,客户会收到推送通知。推送通知是使用 Node.js、Expo Server SDK 和 Firebase 构建的。
- ./mobile/assets/ 文件夹包含图像。
- ./mobile/screens/ 文件夹包含主要的 React Native 屏幕。
- ./mobile/components/ 文件夹包含 React Native 组件。
- ./mobile/services/ 包含 api 客户端服务。
- ./mobile/App.tsx 是主要的 React Native 应用程序。
TypeScript 类型定义定义于:
- ./mobile/types/index.d.ts
- ./mobile/types/env.d.ts
- ./mobile/miscellaneous/bookcarsTypes.ts
./mobile/types/ 加载到 ./mobile/tsconfig.json 中,如下所示:
import { Schema, model } from 'mongoose'
import * as env from '../config/env.config'

const countrySchema = new Schema<env.Country>(
  {
    values: {
      type: [Schema.Types.ObjectId],
      ref: 'LocationValue',
      required: [true, "can't be blank"],
      validate: (value: any): boolean => Array.isArray(value),
    },
  },
  {
    timestamps: true,
    strict: true,
    collection: 'Country',
  },
)

const Country = model<env.Country>('Country', countrySchema)

export default Country
App.tsx 是 React Native 应用程序的主要入口点:
导入'react-native-gesture-handler'
从 'react' 导入 React, { useCallback, useEffect, useRef, useState }
从 'react-native-root-siblings' 导入 { RootSiblingParent }
从'@react-navigation/native'导入{NavigationContainer,NavigationContainerRef}
从“expo-status-bar”导入 { StatusBar as ExpoStatusBar }
从 'react-native-safe-area-context' 导入 { SafeAreaProvider }
从 'react-native-paper' 导入 { Provider }
从“expo-splash-screen”导入 * as SplashScreen
导入 * 作为来自“expo-notifications”的通知
从 '@stripe/stripe-react-native' 导入 { StripeProvider }
从 './components/DrawerNavigator' 导入 DrawerNavigator
从 './common/helper' 导入 * 作为助手
从'./services/NotificationService'导入*作为NotificationService
从 './services/UserService' 导入 * 作为 UserService
从 './context/GlobalContext' 导入 { GlobalProvider }
从 './config/env.config' 导入 * 作为 env

通知.setNotificationHandler({
  handlerNotification: async() =>; ({
    应该显示警报:真,
    应该播放声音:真,
    应该设置徽章:真,
  }),
})

//
// 防止本机启动画面在应用程序组件声明之前自动隐藏
//
SplashScreen.preventAutoHideAsync()
  .then((结果) => console.log(`SplashScreen.preventAutoHideAsync() 成功:${result}`))
  .catch(console.warn) // 最好显式捕获并检查任何错误

const App = () =>; {
  const [appIsReady, setAppIsReady] = useState(false)

  const responseListener = useRef<notifications.subscription>()
  const navigationRef = useRef<navigationcontainerref>>(null)

  useEffect(() => {
    const 寄存器 = async() => {
      const LoggedIn = 等待 UserService.loggedIn()
      如果(登录){
        const currentUser = 等待 UserService.getCurrentUser()
        if (当前用户?._id) {
          等待 helper.registerPushToken(currentUser._id)
        } 别的 {
          helper.error()
        }
      }
    }

    //
    // 注册推送通知令牌
    //
    登记()

    //
    // 每当用户点击通知或与通知交互时就会触发此侦听器(当应用程序处于前台、后台或终止时有效)
    //
    responseListener.current = Notifications.addNotificationResponseReceivedListener(async (response) => {
      尝试 {
        如果(navigationRef.current){
          const { 数据 } = 响应.通知.请求.内容

          如果(数据.预订){
            if (data.user && data.notification) {
              等待NotificationService.markAsRead(data.user, [data.notification])
            }
            navigationRef.current.navigate('预订', { id: data.booking })
          } 别的 {
            navigationRef.current.navigate('通知', {})
          }
        }
      } 捕获(错误){
        helper.error(错误,错误)
      }
    })

    返回() => {
      Notifications.removeNotificationSubscription(responseListener.current!)
    }
  }, [])

  setTimeout(() => {
    设置应用程序已就绪(true)
  }, 500)

  const onReady = useCallback(async () => {
    如果(应用程序已就绪){
      //
      // 这告诉启动屏幕立即隐藏!如果我们之后调用这个
      // `setAppIsReady`,那么当应用程序运行时我们可能会看到一个空白屏幕
      // 加载其初始状态并渲染其第一个像素。所以相反,
      // 一旦我们知道根视图已经隐藏了启动屏幕
      // 执行布局。
      //
      等待 SplashScreen.hideAsync()
    }
  }, [应用程序已就绪])

  如果(!appIsReady){
    返回空值
  }

  返回 (
    <全球供应商>

        <提供商>
          <stripeproviderpublishablekey>;
            <rootsiblingparent>
              <NavigationContainer ref={navigationRef} onReady={onReady}>


<p>我们不会涵盖移动应用程序的每个屏幕,但您可以根据需要打开源代码并查看每个屏幕。</p>

<h2>


  管理仪表板
</h2>

<p>管理仪表板是一个使用 Node.js、React、MUI 和 TypeScript 构建的 Web 应用程序。管理员可以从后端创建和管理供应商、汽车、位置、客户和预订。当从后端创建新的供应商时,他们将收到一封电子邮件,提示他们创建一个帐户,以便访问后端并管理他们的车队和预订。</p>

<ul>
<li>./backend/assets/ 文件夹包含 CSS 和图像。</li>
<li>./backend/pages/ 文件夹包含 React 页面。</li>
<li>./backend/components/ 文件夹包含 React 组件。</li>
<li>./backend/services/ 包含 api 客户端服务。</li>
<li>./backend/App.tsx 是包含路由的主要 React 应用程序。</li>
<li>./backend/index.tsx 是管理仪表板的主要入口点。</li>
</ul>

<p>TypeScript 类型定义在包 ./packages/bookcars-types 中定义。</p>

<p>后端的 App.tsx 与前端的 App.tsx 遵循类似的逻辑。</p>

<p>我们不会涵盖管理仪表板的每一页,但您可以根据需要打开源代码并查看每一页。</p>

<h2>


  兴趣点
</h2>

<p>使用 React Native 和 Expo 构建移动应用程序非常简单。 Expo 让使用 React Native 进行移动开发变得非常简单。</p>

<p>后端、前端和移动端开发使用同一种语言(TypeScript)非常方便。</p>

<p>TypeScript 是一门非常有趣的语言,并且有很多优点。通过向 JavaScript 添加静态类型,我们可以避免许多错误并生成高质量、可扩展、更具可读性和可维护性的代码,并且易于调试和测试。</p>

<p>就是这样!我希望您喜欢阅读这篇文章。</p>
<h2>


  资源
</h2>

<ol>
<li>概述</li>
<li>建筑</li>
<li>安装(自托管)</li>
<li>安装(VPS)</li>
<li>
安装(Docker)

<ol>
<li>Docker 镜像</li>
<li>SSL</li>
</ol>


</li>

<li>设置条纹</li>

<li>构建移动应用程序</li>

<li>

演示数据库

<ol>
<li>Windows、Linux 和 macOS</li>
<li>码头工人</li>
</ol>


</li>

<li>从源头运行</li>

<li>

运行移动应用程序

<ol>
<li>先决条件</li>
<li>使用说明</li>
<li>推送通知</li>
</ol>


</li>

<li>更改货币</li>

<li>添加新语言</li>

<li>单元测试和覆盖率</li>

<li>日志</li>

</ol>


</rootsiblingparent></stripeproviderpublishablekey></navigationcontainerref></notifications.subscription>以上是从零到店面:我建立汽车租赁网站和移动应用程序的旅程的详细内容。更多信息请关注PHP中文网其他相关文章!

热AI工具

Undresser.AI Undress
人工智能驱动的应用程序,用于创建逼真的裸体照片

AI Clothes Remover
用于从照片中去除衣服的在线人工智能工具。

Undress AI Tool
免费脱衣服图片

Clothoff.io
AI脱衣机

Video Face Swap
使用我们完全免费的人工智能换脸工具轻松在任何视频中换脸!

热门文章
热工具

记事本++7.3.1
好用且免费的代码编辑器

SublimeText3汉化版
中文版,非常好用

禅工作室 13.0.1
功能强大的PHP集成开发环境

Dreamweaver CS6
视觉化网页开发工具

SublimeText3 Mac版
神级代码编辑软件(SublimeText3)


 神秘的JavaScript:它的作用以及为什么重要
Apr 09, 2025 am 12:07 AM
神秘的JavaScript:它的作用以及为什么重要
Apr 09, 2025 am 12:07 AM
JavaScript是现代Web开发的基石,它的主要功能包括事件驱动编程、动态内容生成和异步编程。1)事件驱动编程允许网页根据用户操作动态变化。2)动态内容生成使得页面内容可以根据条件调整。3)异步编程确保用户界面不被阻塞。JavaScript广泛应用于网页交互、单页面应用和服务器端开发,极大地提升了用户体验和跨平台开发的灵活性。
 谁得到更多的Python或JavaScript?
Apr 04, 2025 am 12:09 AM
谁得到更多的Python或JavaScript?
Apr 04, 2025 am 12:09 AM
Python和JavaScript开发者的薪资没有绝对的高低,具体取决于技能和行业需求。1.Python在数据科学和机器学习领域可能薪资更高。2.JavaScript在前端和全栈开发中需求大,薪资也可观。3.影响因素包括经验、地理位置、公司规模和特定技能。
 如何实现视差滚动和元素动画效果,像资生堂官网那样?
或者:
怎样才能像资生堂官网一样,实现页面滚动伴随的动画效果?
Apr 04, 2025 pm 05:36 PM
如何实现视差滚动和元素动画效果,像资生堂官网那样?
或者:
怎样才能像资生堂官网一样,实现页面滚动伴随的动画效果?
Apr 04, 2025 pm 05:36 PM
实现视差滚动和元素动画效果的探讨本文将探讨如何实现类似资生堂官网(https://www.shiseido.co.jp/sb/wonderland/)中�...
 JavaScript的演变:当前的趋势和未来前景
Apr 10, 2025 am 09:33 AM
JavaScript的演变:当前的趋势和未来前景
Apr 10, 2025 am 09:33 AM
JavaScript的最新趋势包括TypeScript的崛起、现代框架和库的流行以及WebAssembly的应用。未来前景涵盖更强大的类型系统、服务器端JavaScript的发展、人工智能和机器学习的扩展以及物联网和边缘计算的潜力。
 如何使用JavaScript将具有相同ID的数组元素合并到一个对象中?
Apr 04, 2025 pm 05:09 PM
如何使用JavaScript将具有相同ID的数组元素合并到一个对象中?
Apr 04, 2025 pm 05:09 PM
如何在JavaScript中将具有相同ID的数组元素合并到一个对象中?在处理数据时,我们常常会遇到需要将具有相同ID�...
 JavaScript引擎:比较实施
Apr 13, 2025 am 12:05 AM
JavaScript引擎:比较实施
Apr 13, 2025 am 12:05 AM
不同JavaScript引擎在解析和执行JavaScript代码时,效果会有所不同,因为每个引擎的实现原理和优化策略各有差异。1.词法分析:将源码转换为词法单元。2.语法分析:生成抽象语法树。3.优化和编译:通过JIT编译器生成机器码。4.执行:运行机器码。V8引擎通过即时编译和隐藏类优化,SpiderMonkey使用类型推断系统,导致在相同代码上的性能表现不同。
 前端开发中如何实现类似 VSCode 的面板拖拽调整功能?
Apr 04, 2025 pm 02:06 PM
前端开发中如何实现类似 VSCode 的面板拖拽调整功能?
Apr 04, 2025 pm 02:06 PM
探索前端中类似VSCode的面板拖拽调整功能的实现在前端开发中,如何实现类似于VSCode...
