Angular 中的组件生命周期
Angular 生命周期钩子是允许开发人员利用 Angular 组件生命周期的关键时刻的方法,从创建到销毁,包括初始化、更改和销毁。最常用的生命周期钩子是:
- 构造函数:页面第一次加载时调用。只打过一次电话。
- ngOnChanges:执行多次。第一次将在组件创建/加载时执行。当 @input 装饰器的自定义属性发生更改时,每次都会调用此钩子。与争论一起工作 - 简单的改变
- ngOnInit:组件初始化后调用。非常适合设置组件的状态。
- ngDoCheck:用于手动检测更改(在每个更改检测周期调用)。
- ngAfterContentInit:内容投影到组件后调用。
- ngAfterContentChecked:检查投影内容后调用。
- ngAfterViewInit:在视图初始化后调用。
- ngAfterViewChecked:在 Angular 检查组件视图后调用。
- ngOnDestroy:在组件被销毁之前调用。用它来清理资源,比如取消订阅 observables。

在深入之前,让我们创建先决项目:
我们将需要父组件和子组件。我们将在父组件中有输入字段,并将输入的值传递给子组件,并将显示在子组件中。
parent.component.ts
1 2 3 4 5 6 7 8 9 10 11 12 13 14 15 16 17 18 19 20 |
|
parent.component.html
1 2 3 4 5 6 7 |
|
child.component.ts
1 2 3 4 5 6 7 8 9 10 11 12 13 14 15 16 17 |
|
child.component.html
1 2 3 |
|
我们将得到如下输出:

1.构造函数
- 构造函数是用于初始化组件的 TypeScript 类方法。它在任何 Angular 生命周期钩子之前调用。
- 主要用途:初始化依赖注入并设置变量。
1 2 3 4 5 6 7 8 9 10 11 |
|

2.ngOnChanges
- 当组件的任何输入属性更改时调用。
- 提供一个 SimpleChanges 对象,其中包含输入属性的先前值和当前值。
- 用法:更新父组件的数据输入属性来触发此钩子。
1 2 3 4 5 6 7 8 9 10 11 12 13 14 15 16 17 18 19 20 |
|

我再次输入了值,并再次调用了 ngOnChanges,但构造函数只调用了一次。

让我们看看更改参数中有什么:
1 2 3 4 5 6 7 |
|

让我们输入一些值来看看:

3.ngOnInit
- 在第一个 ngOnChanges 之后调用一次。
- 主要用途:初始化组件并设置渲染所需的任何数据。
1 2 3 4 5 6 7 8 9 10 11 12 13 14 15 16 17 |
|

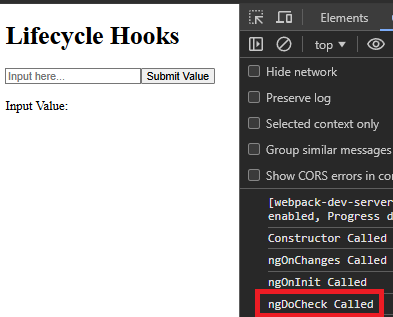
4.ngDoCheck
- 每次 Angular 检测到组件或其子组件发生更改时运行。
- 将其用于自定义更改检测逻辑。
1 2 3 |
|

5.ngAfterContentInit
- 内容(例如,
)投影到组件后调用一次。
child.component.html
1 2 3 4 5 6 7 8 9 10 11 |
|
parent.component.html
1 2 3 4 5 6 7 8 9 10 11 12 13 14 15 |
|
child.component.ts
1 2 3 |
|

6.ngAfterContentChecked
- 每次检查投影内容后调用。
- 谨慎使用以避免性能问题。
1 2 3 4 5 6 7 8 9 10 11 12 13 14 15 16 |
|

让我们来玩一下这个:
1 2 3 4 5 6 7 8 9 10 11 12 13 14 15 16 17 18 19 20 |
|
当 ng-content 再次发生变化时,ngAfterContentChecked 被调用。

7.ngAfterViewInit
- 组件视图及其子视图初始化后调用一次。
- 对于初始化第三方库或 DOM 操作很有用。

8.ngAfterViewChecked
- 每次检查组件视图及其子视图后调用。

9.ngOnDestroy
- 在组件被销毁之前调用。
- 将其用于清理任务,例如取消订阅 Observables 或分离事件侦听器。
ngOnDestroy 仅在我们销毁任何组件时才会调用,因此让我们尝试在单击“销毁组件”按钮时删除子组件。
让我们安排一下:
parent.component.ts
1 2 3 4 5 6 7 8 9 10 11 12 13 14 15 16 17 18 19 20 |
|
parent.component.html
1 2 3 4 5 6 7 |
|
在我们单击“销毁组件”按钮之前:

单击“销毁组件”按钮后:

生命周期挂钩序列:
- 构造函数
- ngOnChanges(如果 @Input 属性存在)
- ngOnInit
- ngDoCheck
- ngAfterContentInit
- ngAfterContentChecked
- ngAfterViewInit
- ngAfterViewChecked
- ngOnDestroy
通过有效地理解和使用这些钩子,您可以管理组件在其生命周期的不同阶段的行为。
以上是Angular 中的组件生命周期的详细内容。更多信息请关注PHP中文网其他相关文章!

热AI工具

Undresser.AI Undress
人工智能驱动的应用程序,用于创建逼真的裸体照片

AI Clothes Remover
用于从照片中去除衣服的在线人工智能工具。

Undress AI Tool
免费脱衣服图片

Clothoff.io
AI脱衣机

Video Face Swap
使用我们完全免费的人工智能换脸工具轻松在任何视频中换脸!

热门文章

热工具

记事本++7.3.1
好用且免费的代码编辑器

SublimeText3汉化版
中文版,非常好用

禅工作室 13.0.1
功能强大的PHP集成开发环境

Dreamweaver CS6
视觉化网页开发工具

SublimeText3 Mac版
神级代码编辑软件(SublimeText3)
 神秘的JavaScript:它的作用以及为什么重要
Apr 09, 2025 am 12:07 AM
JavaScript是现代Web开发的基石,它的主要功能包括事件驱动编程、动态内容生成和异步编程。1)事件驱动编程允许网页根据用户操作动态变化。2)动态内容生成使得页面内容可以根据条件调整。3)异步编程确保用户界面不被阻塞。JavaScript广泛应用于网页交互、单页面应用和服务器端开发,极大地提升了用户体验和跨平台开发的灵活性。
 JavaScript的演变:当前的趋势和未来前景
Apr 10, 2025 am 09:33 AM
JavaScript的最新趋势包括TypeScript的崛起、现代框架和库的流行以及WebAssembly的应用。未来前景涵盖更强大的类型系统、服务器端JavaScript的发展、人工智能和机器学习的扩展以及物联网和边缘计算的潜力。
 JavaScript引擎:比较实施
Apr 13, 2025 am 12:05 AM
不同JavaScript引擎在解析和执行JavaScript代码时,效果会有所不同,因为每个引擎的实现原理和优化策略各有差异。1.词法分析:将源码转换为词法单元。2.语法分析:生成抽象语法树。3.优化和编译:通过JIT编译器生成机器码。4.执行:运行机器码。V8引擎通过即时编译和隐藏类优化,SpiderMonkey使用类型推断系统,导致在相同代码上的性能表现不同。
 JavaScript:探索网络语言的多功能性
Apr 11, 2025 am 12:01 AM
JavaScript是现代Web开发的核心语言,因其多样性和灵活性而广泛应用。1)前端开发:通过DOM操作和现代框架(如React、Vue.js、Angular)构建动态网页和单页面应用。2)服务器端开发:Node.js利用非阻塞I/O模型处理高并发和实时应用。3)移动和桌面应用开发:通过ReactNative和Electron实现跨平台开发,提高开发效率。
 Python vs. JavaScript:学习曲线和易用性
Apr 16, 2025 am 12:12 AM
Python更适合初学者,学习曲线平缓,语法简洁;JavaScript适合前端开发,学习曲线较陡,语法灵活。1.Python语法直观,适用于数据科学和后端开发。2.JavaScript灵活,广泛用于前端和服务器端编程。
 如何使用Next.js(前端集成)构建多租户SaaS应用程序
Apr 11, 2025 am 08:22 AM
本文展示了与许可证确保的后端的前端集成,并使用Next.js构建功能性Edtech SaaS应用程序。 前端获取用户权限以控制UI的可见性并确保API要求遵守角色库
 从C/C到JavaScript:所有工作方式
Apr 14, 2025 am 12:05 AM
从C/C 转向JavaScript需要适应动态类型、垃圾回收和异步编程等特点。1)C/C 是静态类型语言,需手动管理内存,而JavaScript是动态类型,垃圾回收自动处理。2)C/C 需编译成机器码,JavaScript则为解释型语言。3)JavaScript引入闭包、原型链和Promise等概念,增强了灵活性和异步编程能力。
 使用Next.js(后端集成)构建多租户SaaS应用程序
Apr 11, 2025 am 08:23 AM
我使用您的日常技术工具构建了功能性的多租户SaaS应用程序(一个Edtech应用程序),您可以做同样的事情。 首先,什么是多租户SaaS应用程序? 多租户SaaS应用程序可让您从唱歌中为多个客户提供服务


