

使用 LangGraph、CopilotKit、Tavily 和 Next.js 构建 Perplexity 的克隆

人工智能驱动的应用程序正在不断发展,不仅仅是执行任务的自主代理。一种涉及人机交互的新方法允许用户提供反馈、审查结果并决定人工智能的后续步骤。这些运行时代理称为 CoAgent。
长话短说
在本教程中,您将学习如何使用 LangGraph、CopilotKit 和 Tavily 构建 Perplexity 克隆。
是时候开始建造了!
什么是特工副驾驶?
代理副驾驶是 CopilotKit 将 LangGraph 代理引入您的应用程序的方式。
CoAgents 是 CopilotKit 构建代理体验的方法!
简而言之,它将通过执行多个搜索查询来处理用户请求,并将搜索状态和结果实时传输回客户端。
查看 CopilotKit ⭐️
先决条件
要完全理解本教程,您需要对 React 或 Next.js 有基本的了解。
我们还将利用以下内容:
- Python - 一种流行的编程语言,用于使用 LangGraph 构建 AI 代理;确保您的计算机上已安装它。
- LangGraph - 用于创建和部署人工智能代理的框架。它还有助于定义代理要执行的控制流和操作。
- OpenAI API 密钥 - 使我们能够使用 GPT 模型执行各种任务;对于本教程,请确保您有权访问 GPT-4 模型。
- Tavily AI - 一个搜索引擎,使人工智能代理能够在应用程序中进行研究并访问实时知识。
- CopilotKit - 一个开源副驾驶框架,用于构建自定义 AI 聊天机器人、应用内 AI 代理和文本区域。
- Shad Cn UI - 提供应用程序内可重用 UI 组件的集合。
如何使用 LangGraph 和 CopilotKit 创建 AI 代理
在本节中,您将学习如何使用 LangGraph 和 CopilotKit 创建 AI 代理。
首先,克隆 CopilotKit CoAgents 入门存储库。 ui 目录包含 Next.js 应用程序的前端,agent 目录包含应用程序的 CoAgent。
在 agent 目录中,使用 Poetry 安装项目依赖项。
cd agent
poetry install
在代理文件夹中创建 .env 文件,并将 OpenAI 和 Tavily AI API 密钥复制到该文件中:
OPENAI_API_KEY=
TAVILY_API_KEY=

将下面的代码片段复制到agent.py文件中:
"""
This is the main entry point for the AI.
It defines the workflow graph and the entry point for the agent.
"""
# pylint: disable=line-too-long, unused-import
from langgraph.graph import StateGraph, END
from langgraph.checkpoint.memory import MemorySaver

from ai_researcher.state import AgentState
from ai_researcher.steps import steps_node
from ai_researcher.search import search_node
from ai_researcher.summarize import summarize_node
from ai_researcher.extract import extract_node

def route(state):
    """Route to research nodes."""
    if not state.get("steps", None):
        return END

    current_step = next((step for step in state["steps"] if step["status"] == "pending"), None)

    if not current_step:
        return "summarize_node"

    if current_step["type"] == "search":
        return "search_node"

    raise ValueError(f"Unknown step type: {current_step['type']}")

# Define a new graph
workflow = StateGraph(AgentState)
workflow.add_node("steps_node", steps_node)
workflow.add_node("search_node", search_node)
workflow.add_node("summarize_node", summarize_node)
workflow.add_node("extract_node", extract_node)
# Chatbot
workflow.set_entry_point("steps_node")

workflow.add_conditional_edges(
    "steps_node",
    route,
    ["summarize_node", "search_node", END]
)

workflow.add_edge("search_node", "extract_node")

workflow.add_conditional_edges(
    "extract_node",
    route,
    ["summarize_node", "search_node"]
)

workflow.add_edge("summarize_node", END)

memory = MemorySaver()
graph = workflow.compile(checkpointer=memory)
上面的代码片段定义了 LangGraph 代理工作流程。它从steps_node开始,搜索结果,总结结果,提取关键点。

接下来创建一个 demo.py 文件,其中包含以下代码片段:
cd agent
poetry install
上面的代码创建了一个 FastAPI 端点,用于托管 LangGraph 代理并将其连接到 CopilotKit SDK。
您可以从 GitHub 存储库复制用于创建 CoAgent 的剩余代码。在以下部分中,您将学习如何为 Perplexity 克隆构建用户界面并使用 CopilotKit 处理搜索请求。
使用 Next.js 构建应用程序界面
在本节中,我将引导您完成构建应用程序用户界面的过程。
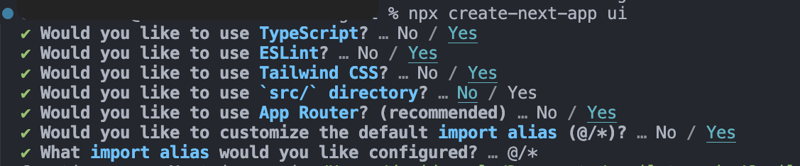
首先,通过运行以下代码片段创建一个 Next.js Typescript 项目:
OPENAI_API_KEY=
TAVILY_API_KEY=
通过运行以下代码片段将 ShadCn UI 库安装到新创建的项目中:
"""
This is the main entry point for the AI.
It defines the workflow graph and the entry point for the agent.
"""
# pylint: disable=line-too-long, unused-import
from langgraph.graph import StateGraph, END
from langgraph.checkpoint.memory import MemorySaver

from ai_researcher.state import AgentState
from ai_researcher.steps import steps_node
from ai_researcher.search import search_node
from ai_researcher.summarize import summarize_node
from ai_researcher.extract import extract_node

def route(state):
    """Route to research nodes."""
    if not state.get("steps", None):
        return END

    current_step = next((step for step in state["steps"] if step["status"] == "pending"), None)

    if not current_step:
        return "summarize_node"

    if current_step["type"] == "search":
        return "search_node"

    raise ValueError(f"Unknown step type: {current_step['type']}")

# Define a new graph
workflow = StateGraph(AgentState)
workflow.add_node("steps_node", steps_node)
workflow.add_node("search_node", search_node)
workflow.add_node("summarize_node", summarize_node)
workflow.add_node("extract_node", extract_node)
# Chatbot
workflow.set_entry_point("steps_node")

workflow.add_conditional_edges(
    "steps_node",
    route,
    ["summarize_node", "search_node", END]
)

workflow.add_edge("search_node", "extract_node")

workflow.add_conditional_edges(
    "extract_node",
    route,
    ["summarize_node", "search_node"]
)

workflow.add_edge("summarize_node", END)

memory = MemorySaver()
graph = workflow.compile(checkpointer=memory)
接下来,在 Next.js 项目的根目录下创建一个 components 文件夹,然后将 ui 文件夹从此 GitHub 存储库复制到该文件夹中。 Shadcn 允许您通过命令行安装各种组件,轻松地将它们添加到您的应用程序中。
除了 Shadcn 组件之外,您还需要创建一些代表应用程序界面不同部分的组件。在 components 文件夹中运行以下代码片段,将这些组件添加到 Next.js 项目中:
"""Demo"""

import os
from dotenv import load_dotenv
load_dotenv()

from fastapi import FastAPI
import uvicorn
from copilotkit.integrations.fastapi import add_fastapi_endpoint
from copilotkit import CopilotKitSDK, LangGraphAgent
from ai_researcher.agent import graph

app = FastAPI()
sdk = CopilotKitSDK(
    agents=[
        LangGraphAgent(
            name="ai_researcher",
            description="Search agent.",
            graph=graph,
        )
    ],
)

add_fastapi_endpoint(app, sdk, "/copilotkit")

# add new route for health check
@app.get("/health")
def health():
    """Health check."""
    return {"status": "ok"}

def main():
    """Run the uvicorn server."""
    port = int(os.getenv("PORT", "8000"))
    uvicorn.run("ai_researcher.demo:app", host="0.0.0.0", port=port, reload=True)
将下面的代码片段复制到 app/page.tsx 文件中:
# ?? Navigate into the ui folder
npx create-next-app ./
在上面的代码片段中,ResearchProvider 是一个自定义的 React 上下文提供程序,它共享用户的搜索查询和结果,使应用程序中的所有组件都可以访问它们。 ResearchWrapper 组件包含核心应用程序元素并管理 UI。
在 Next.js 项目的根目录下创建一个 lib 文件夹,其中包含 research-provider.tsx 文件,并将以下代码复制到该文件中:
npx shadcn@latest init
状态被声明并保存到ResearchContext以确保它们在应用程序内的多个组件之间得到正确的管理。
创建一个ResearchWrapper组件,如下所示:
cd agent
poetry install
ResearchWrapper 组件将 HomeView 组件呈现为默认视图,并在提供搜索查询时显示 ResultView。 useResearchContext 钩子使我们能够访问 researchQuery 状态并相应地更新视图。
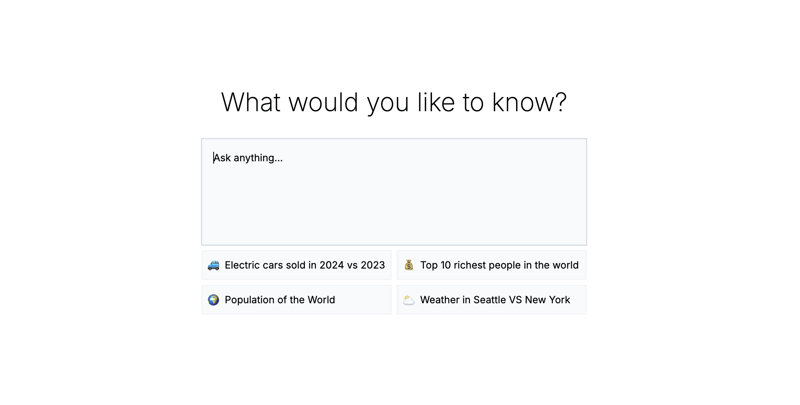
最后,创建HomeView组件来渲染应用首页界面。
OPENAI_API_KEY=
TAVILY_API_KEY=
如何将 CoAgent 连接到 Next.js 应用程序
在本部分中,您将了解如何将 CopilotKit CoAgent 连接到 Next.js 应用程序,以使用户能够在应用程序中执行搜索操作。
安装以下 CopilotKit 软件包和 OpenAI Node.js SDK。 CopilotKit 包允许协同代理与 React 状态值交互并在应用程序内做出决策。
"""
This is the main entry point for the AI.
It defines the workflow graph and the entry point for the agent.
"""
# pylint: disable=line-too-long, unused-import
from langgraph.graph import StateGraph, END
from langgraph.checkpoint.memory import MemorySaver

from ai_researcher.state import AgentState
from ai_researcher.steps import steps_node
from ai_researcher.search import search_node
from ai_researcher.summarize import summarize_node
from ai_researcher.extract import extract_node

def route(state):
    """Route to research nodes."""
    if not state.get("steps", None):
        return END

    current_step = next((step for step in state["steps"] if step["status"] == "pending"), None)

    if not current_step:
        return "summarize_node"

    if current_step["type"] == "search":
        return "search_node"

    raise ValueError(f"Unknown step type: {current_step['type']}")

# Define a new graph
workflow = StateGraph(AgentState)
workflow.add_node("steps_node", steps_node)
workflow.add_node("search_node", search_node)
workflow.add_node("summarize_node", summarize_node)
workflow.add_node("extract_node", extract_node)
# Chatbot
workflow.set_entry_point("steps_node")

workflow.add_conditional_edges(
    "steps_node",
    route,
    ["summarize_node", "search_node", END]
)

workflow.add_edge("search_node", "extract_node")

workflow.add_conditional_edges(
    "extract_node",
    route,
    ["summarize_node", "search_node"]
)

workflow.add_edge("summarize_node", END)

memory = MemorySaver()
graph = workflow.compile(checkpointer=memory)
在 Next.js app 文件夹中创建 api 文件夹。在 api 文件夹中,创建一个 copilotkit 目录,其中包含 route.ts 文件。这将创建一个 API 端点 (/api/copilotkit),将前端应用程序连接到 CopilotKit CoAgent。
"""Demo"""

import os
from dotenv import load_dotenv
load_dotenv()

from fastapi import FastAPI
import uvicorn
from copilotkit.integrations.fastapi import add_fastapi_endpoint
from copilotkit import CopilotKitSDK, LangGraphAgent
from ai_researcher.agent import graph

app = FastAPI()
sdk = CopilotKitSDK(
    agents=[
        LangGraphAgent(
            name="ai_researcher",
            description="Search agent.",
            graph=graph,
        )
    ],
)

add_fastapi_endpoint(app, sdk, "/copilotkit")

# add new route for health check
@app.get("/health")
def health():
    """Health check."""
    return {"status": "ok"}

def main():
    """Run the uvicorn server."""
    port = int(os.getenv("PORT", "8000"))
    uvicorn.run("ai_researcher.demo:app", host="0.0.0.0", port=port, reload=True)
将下面的代码片段复制到 api/copilotkit/route.ts 文件中:
# ?? Navigate into the ui folder
npx create-next-app ./
上面的代码片段在 /api/copilotkit API 端点设置 CopilotKit 运行时,允许 CopilotKit 通过 AI 协同代理处理用户请求。
最后,通过使用 CopilotKit 组件包装整个应用程序来更新 app/page.tsx,该组件为所有应用程序组件提供副驾驶上下文。
npx shadcn@latest init
CopilotKit 组件包装了整个应用程序并接受两个 props - runtimeUrl 和 agent。 runtimeUrl 是托管 AI 代理的后端 API 路由,agent 是执行操作的代理的名称。
接受请求并将响应流式传输到前端
为了使 CopilotKit 能够访问和处理用户输入,它提供了 useCoAgent 挂钩,该挂钩允许从应用程序内的任何位置访问代理的状态。
例如,下面的代码片段演示了如何使用 useCoAgent 钩子。 state 变量允许访问代理的当前状态,setState 用于修改状态,run 函数使用代理执行指令。 start 和 stop 函数启动和停止代理的执行。
cd agent
poetry install
更新 HomeView 组件以在提供搜索查询时执行代理。
OPENAI_API_KEY=
TAVILY_API_KEY=
接下来,您可以通过访问 useCoAgent 挂钩中的状态变量将搜索结果流式传输到 ResultsView。将下面的代码片段复制到 ResultsView 组件中。
"""
This is the main entry point for the AI.
It defines the workflow graph and the entry point for the agent.
"""
# pylint: disable=line-too-long, unused-import
from langgraph.graph import StateGraph, END
from langgraph.checkpoint.memory import MemorySaver

from ai_researcher.state import AgentState
from ai_researcher.steps import steps_node
from ai_researcher.search import search_node
from ai_researcher.summarize import summarize_node
from ai_researcher.extract import extract_node

def route(state):
    """Route to research nodes."""
    if not state.get("steps", None):
        return END

    current_step = next((step for step in state["steps"] if step["status"] == "pending"), None)

    if not current_step:
        return "summarize_node"

    if current_step["type"] == "search":
        return "search_node"

    raise ValueError(f"Unknown step type: {current_step['type']}")

# Define a new graph
workflow = StateGraph(AgentState)
workflow.add_node("steps_node", steps_node)
workflow.add_node("search_node", search_node)
workflow.add_node("summarize_node", summarize_node)
workflow.add_node("extract_node", extract_node)
# Chatbot
workflow.set_entry_point("steps_node")

workflow.add_conditional_edges(
    "steps_node",
    route,
    ["summarize_node", "search_node", END]
)

workflow.add_edge("search_node", "extract_node")

workflow.add_conditional_edges(
    "extract_node",
    route,
    ["summarize_node", "search_node"]
)

workflow.add_edge("summarize_node", END)

memory = MemorySaver()
graph = workflow.compile(checkpointer=memory)
上面的代码片段从代理的状态检索搜索结果,并使用 useCoAgent 挂钩将它们流式传输到前端。搜索结果以 Markdown 格式返回,并传递到 AnswerMarkdown 组件,该组件在页面上呈现内容。
最后,将下面的代码片段复制到 AnswerMarkdown 组件中。这将使用 React Markdown 库将 Markdown 内容呈现为格式化文本。
"""Demo"""

import os
from dotenv import load_dotenv
load_dotenv()

from fastapi import FastAPI
import uvicorn
from copilotkit.integrations.fastapi import add_fastapi_endpoint
from copilotkit import CopilotKitSDK, LangGraphAgent
from ai_researcher.agent import graph

app = FastAPI()
sdk = CopilotKitSDK(
    agents=[
        LangGraphAgent(
            name="ai_researcher",
            description="Search agent.",
            graph=graph,
        )
    ],
)

add_fastapi_endpoint(app, sdk, "/copilotkit")

# add new route for health check
@app.get("/health")
def health():
    """Health check."""
    return {"status": "ok"}

def main():
    """Run the uvicorn server."""
    port = int(os.getenv("PORT", "8000"))
    uvicorn.run("ai_researcher.demo:app", host="0.0.0.0", port=port, reload=True)
恭喜!您已完成本教程的项目。您也可以在这里观看视频录制:
完整的网络研讨会录制
把它包起来
LLM 智能与人类智能协同工作时最为有效,而 CopilotKit CoAgents 允许您在短短几分钟内将 AI 代理、副驾驶和各种类型的助手集成到您的软件应用程序中。
如果您需要构建 AI 产品或将 AI 代理集成到您的应用程序中,您应该考虑 CopilotKit。
本教程的源代码可在 GitHub 上获取:
https://github.com/CopilotKit/CopilotKit/tree/main/examples/coagents-ai-researcher
感谢您的阅读!
以上是使用 LangGraph、CopilotKit、Tavily 和 Next.js 构建 Perplexity 的克隆的详细内容。更多信息请关注PHP中文网其他相关文章!

热AI工具

Undresser.AI Undress
人工智能驱动的应用程序,用于创建逼真的裸体照片

AI Clothes Remover
用于从照片中去除衣服的在线人工智能工具。

Undress AI Tool
免费脱衣服图片

Clothoff.io
AI脱衣机

Video Face Swap
使用我们完全免费的人工智能换脸工具轻松在任何视频中换脸!

热门文章
热工具

记事本++7.3.1
好用且免费的代码编辑器

SublimeText3汉化版
中文版,非常好用

禅工作室 13.0.1
功能强大的PHP集成开发环境

Dreamweaver CS6
视觉化网页开发工具

SublimeText3 Mac版
神级代码编辑软件(SublimeText3)


 Python vs. JavaScript:学习曲线和易用性
Apr 16, 2025 am 12:12 AM
Python vs. JavaScript:学习曲线和易用性
Apr 16, 2025 am 12:12 AM
Python更适合初学者,学习曲线平缓,语法简洁;JavaScript适合前端开发,学习曲线较陡,语法灵活。1.Python语法直观,适用于数据科学和后端开发。2.JavaScript灵活,广泛用于前端和服务器端编程。
 从C/C到JavaScript:所有工作方式
Apr 14, 2025 am 12:05 AM
从C/C到JavaScript:所有工作方式
Apr 14, 2025 am 12:05 AM
从C/C 转向JavaScript需要适应动态类型、垃圾回收和异步编程等特点。1)C/C 是静态类型语言,需手动管理内存,而JavaScript是动态类型,垃圾回收自动处理。2)C/C 需编译成机器码,JavaScript则为解释型语言。3)JavaScript引入闭包、原型链和Promise等概念,增强了灵活性和异步编程能力。
 JavaScript和Web:核心功能和用例
Apr 18, 2025 am 12:19 AM
JavaScript和Web:核心功能和用例
Apr 18, 2025 am 12:19 AM
JavaScript在Web开发中的主要用途包括客户端交互、表单验证和异步通信。1)通过DOM操作实现动态内容更新和用户交互;2)在用户提交数据前进行客户端验证,提高用户体验;3)通过AJAX技术实现与服务器的无刷新通信。
 JavaScript在行动中:现实世界中的示例和项目
Apr 19, 2025 am 12:13 AM
JavaScript在行动中:现实世界中的示例和项目
Apr 19, 2025 am 12:13 AM
JavaScript在现实世界中的应用包括前端和后端开发。1)通过构建TODO列表应用展示前端应用,涉及DOM操作和事件处理。2)通过Node.js和Express构建RESTfulAPI展示后端应用。
 了解JavaScript引擎:实施详细信息
Apr 17, 2025 am 12:05 AM
了解JavaScript引擎:实施详细信息
Apr 17, 2025 am 12:05 AM
理解JavaScript引擎内部工作原理对开发者重要,因为它能帮助编写更高效的代码并理解性能瓶颈和优化策略。1)引擎的工作流程包括解析、编译和执行三个阶段;2)执行过程中,引擎会进行动态优化,如内联缓存和隐藏类;3)最佳实践包括避免全局变量、优化循环、使用const和let,以及避免过度使用闭包。
 Python vs. JavaScript:社区,图书馆和资源
Apr 15, 2025 am 12:16 AM
Python vs. JavaScript:社区,图书馆和资源
Apr 15, 2025 am 12:16 AM
Python和JavaScript在社区、库和资源方面的对比各有优劣。1)Python社区友好,适合初学者,但前端开发资源不如JavaScript丰富。2)Python在数据科学和机器学习库方面强大,JavaScript则在前端开发库和框架上更胜一筹。3)两者的学习资源都丰富,但Python适合从官方文档开始,JavaScript则以MDNWebDocs为佳。选择应基于项目需求和个人兴趣。
 Python vs. JavaScript:开发环境和工具
Apr 26, 2025 am 12:09 AM
Python vs. JavaScript:开发环境和工具
Apr 26, 2025 am 12:09 AM
Python和JavaScript在开发环境上的选择都很重要。1)Python的开发环境包括PyCharm、JupyterNotebook和Anaconda,适合数据科学和快速原型开发。2)JavaScript的开发环境包括Node.js、VSCode和Webpack,适用于前端和后端开发。根据项目需求选择合适的工具可以提高开发效率和项目成功率。
 C/C在JavaScript口译员和编译器中的作用
Apr 20, 2025 am 12:01 AM
C/C在JavaScript口译员和编译器中的作用
Apr 20, 2025 am 12:01 AM
C和C 在JavaScript引擎中扮演了至关重要的角色,主要用于实现解释器和JIT编译器。 1)C 用于解析JavaScript源码并生成抽象语法树。 2)C 负责生成和执行字节码。 3)C 实现JIT编译器,在运行时优化和编译热点代码,显着提高JavaScript的执行效率。
