
>对比特币或其价格波动了解不多,而是想做出投资决定来获利吗?该机器学习模型有您的支持。它可以比占星家更好地预测价格。在本文中,我们将使用ZenML和MLFlow构建一个用于预测和预测比特币价格的ML模型。因此,让我们开始我们的旅程,了解任何人如何使用ML和MLOPS工具来预测未来。
学习目标>本文是> > data Science Blogathon的一部分。 内容表>
问题语句>项目实施
让我们从访问API开始。
我们为什么要这样做?您可以从不同的数据集中获取历史比特币价格数据,但是使用API,我们可以访问Live Market Data。
 >步骤1:访问API
>注册API访问:
import requests
import pandas as pd
from dotenv import load_dotenv
import os

# Load the .env file
load_dotenv()

def fetch_crypto_data(api_uri):
    response = requests.get(
        api_uri,
        params={
            "market": "cadli",
            "instrument": "BTC-USD",
            "limit": 5000,
            "aggregate": 1,
            "fill": "true",
            "apply_mapping": "true",
            "response_format": "JSON"
        },
        headers={"Content-type": "application/json; charset=UTF-8"}
    )

    if response.status_code == 200:
        print('API Connection Successful! \nFetching the data...')

        data = response.json()
        data_list = data.get('Data', [])

        df = pd.DataFrame(data_list)

        df['DATE'] = pd.to_datetime(df['TIMESTAMP'], unit='s')

        return df  # Return the DataFrame
    else:
raise Exception(f"API Error: {response.status_code} - {response.text}")此代码连接到MongoDB,通过API检索比特币价格数据,并在最新记录日期后使用所有新条目更新数据库。
介绍Zenml⚠️如果您是Windows用户,请尝试在系统上安装WSL。 Zenml不支持Windows。
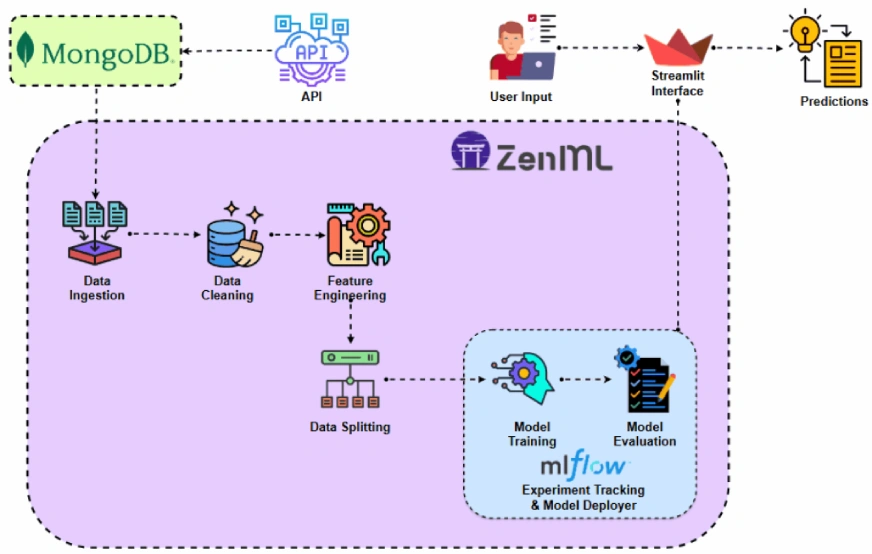
在此项目中,我们将实施使用Zenml的传统管道,并将MLFlow与Zenml集成进行实验跟踪。python 3.12或更高:
您可以从这里获得:https://www.python.org/downloads/import os
from pymongo import MongoClient
from dotenv import load_dotenv
from data.management.api import fetch_crypto_data # Import the API function
import pandas as pd
load_dotenv()
MONGO_URI = os.getenv("MONGO_URI")
API_URI = os.getenv("API_URI")
client = MongoClient(MONGO_URI, ssl=True, ssl_certfile=None, ssl_ca_certs=None)
db = client['crypto_data']
collection = db['historical_data']
try:
latest_entry = collection.find_one(sort=[("DATE", -1)]) # Find the latest date
if latest_entry:
last_date = pd.to_datetime(latest_entry['DATE']).strftime('%Y-%m-%d')
else:
last_date = '2011-03-27' # Default start date if MongoDB is empty
print(f"Fetching data starting from {last_date}...")
new_data_df = fetch_crypto_data(API_URI)
if latest_entry:
new_data_df = new_data_df[new_data_df['DATE'] > last_date]
if not new_data_df.empty:
data_to_insert = new_data_df.to_dict(orient='records')
result = collection.insert_many(data_to_insert)
print(f"Inserted {len(result.inserted_ids)} new records into MongoDB.")
else:
print("No new data to insert.")
except Exception as e:
print(f"An error occurred: {e}")我们正在使用MLFlow进行实验跟踪,以跟踪我们的模型,工件,指标和超参数值。我们正在注册MLFLOW以进行实验跟踪和模型部署者:
#create a virtual environment python3 -m venv venv #Activate your virtual environmnent in your project folder source venv/bin/activate
#Install zenml pip install zenml #To Launch zenml server and dashboard locally pip install "zenml[server]" #To check the zenml Version: zenml version #To initiate a new repository zenml init #To run the dashboard locally: zenml login --local #To know the status of our zenml Pipelines zenml show #To shutdown the zenml server zenml clean
>
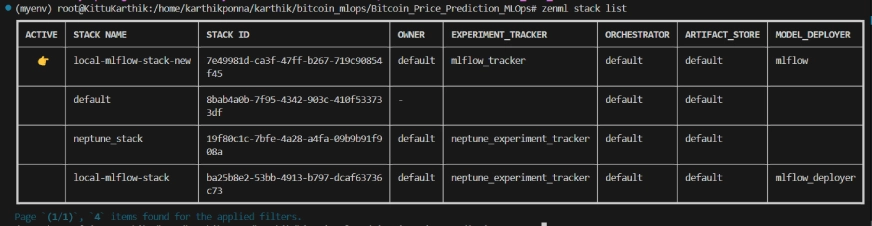
#Integrating mlflow with ZenML zenml integration install mlflow -y #Register the experiment tracker zenml experiment-tracker register mlflow_tracker --flavor=mlflow #Registering the model deployer zenml model-deployer register mlflow --flavor=mlflow #Registering the stack zenml stack register local-mlflow-stack-new -a default -o default -d mlflow -e mlflow_tracker --set #To view the stack list zenml stack --list
> ingest_data()
函数中,以将其声明为我们训练管道的一步。以同样的方式,我们将在项目体系结构中为每个步骤编写代码并创建管道。bitcoin_price_prediction_mlops/ # Project directory ├── data/ │ └── management/ │ ├── api_to_mongodb.py # Code to fetch data and save it to MongoDB │ └── api.py # API-related utility functions │ ├── pipelines/ │ ├── deployment_pipeline.py # Deployment pipeline │ └── training_pipeline.py # Training pipeline │ ├── saved_models/ # Directory for storing trained models ├── saved_scalers/ # Directory for storing scalers used in data preprocessing │ ├── src/ # Source code │ ├── data_cleaning.py # Data cleaning and preprocessing │ ├── data_ingestion.py # Data ingestion │ ├── data_splitter.py # Data splitting │ ├── feature_engineering.py # Feature engineering │ ├── model_evaluation.py # Model evaluation │ └── model_training.py # Model training │ ├── steps/ # ZenML steps │ ├── clean_data.py # ZenML step for cleaning data │ ├── data_splitter.py # ZenML step for data splitting │ ├── dynamic_importer.py # ZenML step for importing dynamic data │ ├── feature_engineering.py # ZenML step for feature engineering │ ├── ingest_data.py # ZenML step for data ingestion │ ├── model_evaluation.py # ZenML step for model evaluation │ ├── model_training.py # ZenML step for training the model │ ├── prediction_service_loader.py # ZenML step for loading prediction services │ ├── predictor.py # ZenML step for prediction │ └── utils.py # Utility functions for steps │ ├── .env # Environment variables file ├── .gitignore # Git ignore file │ ├── app.py # Streamlit user interface app │ ├── README.md # Project documentation ├── requirements.txt # List of required packages ├── run_deployment.py # Code for running deployment and prediction pipeline ├── run_pipeline.py # Code for running training pipeline └── .zen/ # ZenML directory (created automatically after ZenML initialization)
@Step 装饰器,请查看下面的github链接(步骤文件夹)以浏览管道其他步骤的代码,即数据清洁,功能工程,数据拆分,模型培训和模型评估。>>>>>>>>。
步骤5:数据清洁
在此步骤中,我们将创建清洁摄入数据的不同策略。我们将在数据中删除不需要的列和缺失值。>import requests
import pandas as pd
from dotenv import load_dotenv
import os
# Load the .env file
load_dotenv()
def fetch_crypto_data(api_uri):
response = requests.get(
api_uri,
params={
"market": "cadli",
"instrument": "BTC-USD",
"limit": 5000,
"aggregate": 1,
"fill": "true",
"apply_mapping": "true",
"response_format": "JSON"
},
headers={"Content-type": "application/json; charset=UTF-8"}
)
if response.status_code == 200:
print('API Connection Successful! \nFetching the data...')
data = response.json()
data_list = data.get('Data', [])
df = pd.DataFrame(data_list)
df['DATE'] = pd.to_datetime(df['TIMESTAMP'], unit='s')
return df # Return the DataFrame
else:
raise Exception(f"API Error: {response.status_code} - {response.text}")>步骤6:功能工程
>此步骤从较早的data_cleaning步骤中获取已清洁的数据。我们正在创建新功能,例如简单的移动平均值(SMA),指数移动平均值(EMA)以及滞后和滚动统计数据,以捕获趋势,减少噪声并从时间序列数据中做出更可靠的预测。此外,我们使用MinMax缩放缩放特征和目标变量。
import os
from pymongo import MongoClient
from dotenv import load_dotenv
from data.management.api import fetch_crypto_data  # Import the API function
import pandas as pd

load_dotenv()

MONGO_URI = os.getenv("MONGO_URI")
API_URI = os.getenv("API_URI")

client = MongoClient(MONGO_URI, ssl=True, ssl_certfile=None, ssl_ca_certs=None)
db = client['crypto_data']
collection = db['historical_data']

try:
    latest_entry = collection.find_one(sort=[("DATE", -1)])  # Find the latest date
    if latest_entry:
        last_date = pd.to_datetime(latest_entry['DATE']).strftime('%Y-%m-%d')
    else:
        last_date = '2011-03-27'  # Default start date if MongoDB is empty

    print(f"Fetching data starting from {last_date}...")
    new_data_df = fetch_crypto_data(API_URI)

    if latest_entry:
        new_data_df = new_data_df[new_data_df['DATE'] > last_date]

    if not new_data_df.empty:
        data_to_insert = new_data_df.to_dict(orient='records')
        result = collection.insert_many(data_to_insert)
        print(f"Inserted {len(result.inserted_ids)} new records into MongoDB.")
    else:
        print("No new data to insert.")
except Exception as e:
    print(f"An error occurred: {e}")
#create a virtual environment
python3 -m venv venv

#Activate your virtual environmnent in your project folder
source venv/bin/activate
#Install zenml
pip install zenml

#To Launch zenml server and dashboard locally
pip install "zenml[server]"

#To check the zenml Version:
zenml version

#To initiate a new repository
zenml init

#To run the dashboard locally:
zenml login --local

#To know the status of our zenml Pipelines
zenml show

#To shutdown the zenml server
zenml clean
>在这里,
#Integrating mlflow with ZenML
zenml integration install mlflow -y

#Register the experiment tracker
zenml experiment-tracker register mlflow_tracker --flavor=mlflow

#Registering the model deployer
zenml model-deployer register mlflow --flavor=mlflow

#Registering the stack
zenml stack register local-mlflow-stack-new -a default -o default -d mlflow -e mlflow_tracker --set

#To view the stack list
zenml stack --list
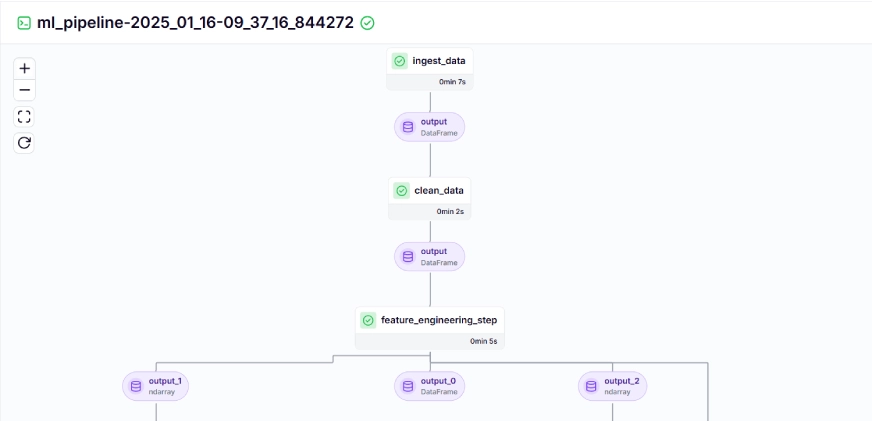
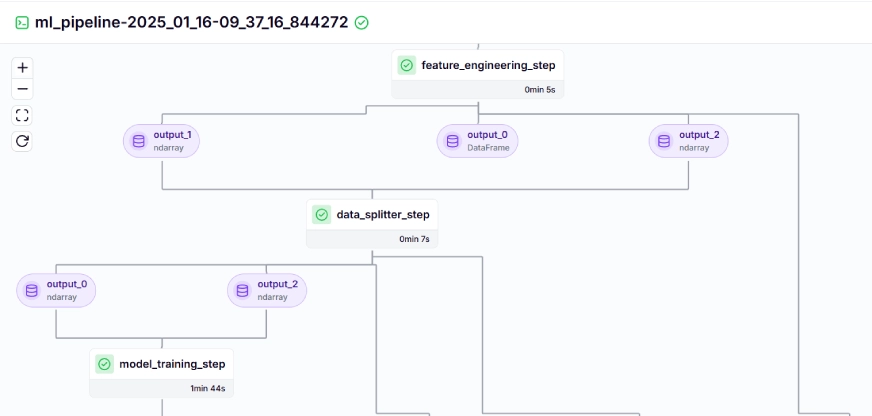
decorator用于将functionml_pipeline()定义为zenml中的管道。
要查看训练管道的仪表板,只需运行run_pipeline.py脚本即可。让我们创建一个run_pipeline.py文件。bitcoin_price_prediction_mlops/ # Project directory ├── data/ │ └── management/ │ ├── api_to_mongodb.py # Code to fetch data and save it to MongoDB │ └── api.py # API-related utility functions │ ├── pipelines/ │ ├── deployment_pipeline.py # Deployment pipeline │ └── training_pipeline.py # Training pipeline │ ├── saved_models/ # Directory for storing trained models ├── saved_scalers/ # Directory for storing scalers used in data preprocessing │ ├── src/ # Source code │ ├── data_cleaning.py # Data cleaning and preprocessing │ ├── data_ingestion.py # Data ingestion │ ├── data_splitter.py # Data splitting │ ├── feature_engineering.py # Feature engineering │ ├── model_evaluation.py # Model evaluation │ └── model_training.py # Model training │ ├── steps/ # ZenML steps │ ├── clean_data.py # ZenML step for cleaning data │ ├── data_splitter.py # ZenML step for data splitting │ ├── dynamic_importer.py # ZenML step for importing dynamic data │ ├── feature_engineering.py # ZenML step for feature engineering │ ├── ingest_data.py # ZenML step for data ingestion │ ├── model_evaluation.py # ZenML step for model evaluation │ ├── model_training.py # ZenML step for training the model │ ├── prediction_service_loader.py # ZenML step for loading prediction services │ ├── predictor.py # ZenML step for prediction │ └── utils.py # Utility functions for steps │ ├── .env # Environment variables file ├── .gitignore # Git ignore file │ ├── app.py # Streamlit user interface app │ ├── README.md # Project documentation ├── requirements.txt # List of required packages ├── run_deployment.py # Code for running deployment and prediction pipeline ├── run_pipeline.py # Code for running training pipeline └── .zen/ # ZenML directory (created automatically after ZenML initialization)
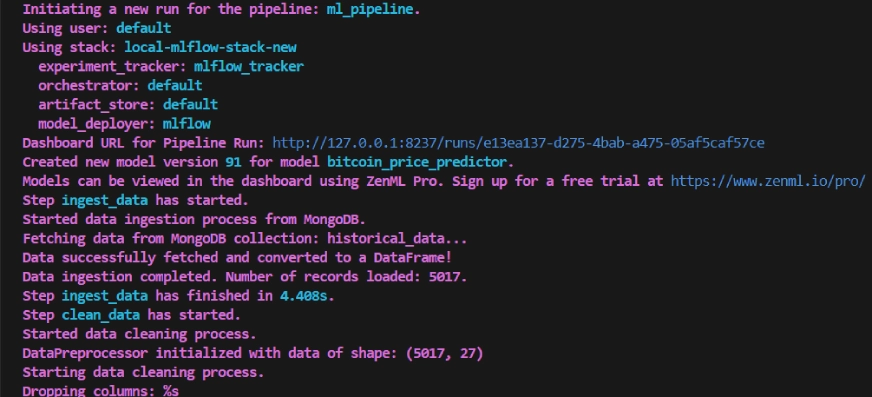
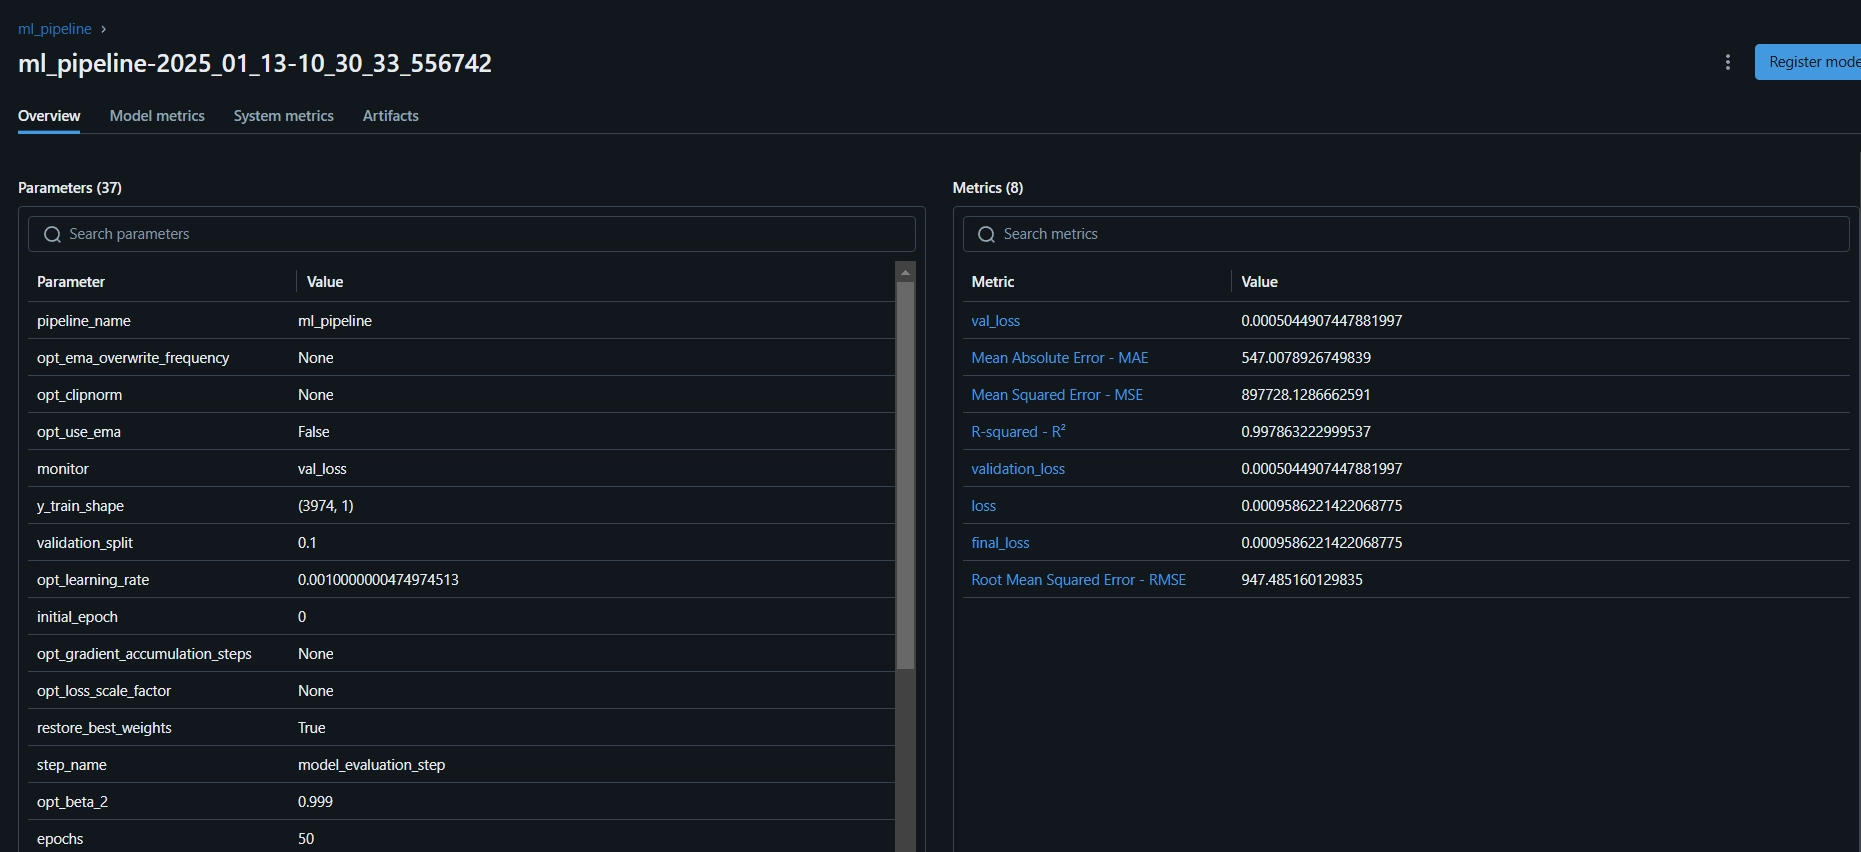
>现在我们已经完成了创建管道。在下面运行命令以查看管道仪表板。
在运行上述命令后,它将返回跟踪仪表板URL,看起来像这样。
import os
import logging
from pymongo import MongoClient
from dotenv import load_dotenv
from zenml import step
import pandas as pd
# Load the .env file
load_dotenv()
# Get MongoDB URI from environment variables
MONGO_URI = os.getenv("MONGO_URI")
def fetch_data_from_mongodb(collection_name:str, database_name:str):
"""
Fetches data from MongoDB and converts it into a pandas DataFrame.
collection_name:
Name of the MongoDB collection to fetch data.
database_name:
Name of the MongoDB database.
return:
A pandas DataFrame containing the data
"""
# Connect to the MongoDB client
client = MongoClient(MONGO_URI)
db = client[database_name] # Select the database
collection = db[collection_name] # Select the collection
# Fetch all documents from the collection
try:
logging.info(f"Fetching data from MongoDB collection: {collection_name}...")
data = list(collection.find()) # Convert cursor to a list of dictionaries
if not data:
logging.info("No data found in the MongoDB collection.")
# Convert the list of dictionaries into a pandas DataFrame
df = pd.DataFrame(data)
# Drop the MongoDB ObjectId field if it exists (optional)
if '_id' in df.columns:
df = df.drop(columns=['_id'])
logging.info("Data successfully fetched and converted to a DataFrame!")
return df
except Exception as e:
logging.error(f"An error occurred while fetching data: {e}")
raise e
@step(enable_cache=False)
def ingest_data(collection_name: str = "historical_data", database_name: str = "crypto_data") -> pd.DataFrame:
logging.info("Started data ingestion process from MongoDB.")
try:
# Use the fetch_data_from_mongodb function to fetch data
df = fetch_data_from_mongodb(collection_name=collection_name, database_name=database_name)
if df.empty:
logging.warning("No data was loaded. Check the collection name or the database content.")
else:
logging.info(f"Data ingestion completed. Number of records loaded: {len(df)}.")
return df
except Exception as e:
logging.error(f"Error while reading data from {collection_name} in {database_name}: {e}")
raise e
class DataPreprocessor:
def __init__(self, data: pd.DataFrame):
self.data = data
logging.info("DataPreprocessor initialized with data of shape: %s", data.shape)
def clean_data(self) -> pd.DataFrame:
"""
Performs data cleaning by removing unnecessary columns, dropping columns with missing values,
and returning the cleaned DataFrame.
Returns:
pd.DataFrame: The cleaned DataFrame with unnecessary and missing-value columns removed.
"""
logging.info("Starting data cleaning process.")
# Drop unnecessary columns, including '_id' if it exists
columns_to_drop = [
'UNIT', 'TYPE', 'MARKET', 'INSTRUMENT',
'FIRST_MESSAGE_TIMESTAMP', 'LAST_MESSAGE_TIMESTAMP',
'FIRST_MESSAGE_VALUE', 'HIGH_MESSAGE_VALUE', 'HIGH_MESSAGE_TIMESTAMP',
'LOW_MESSAGE_VALUE', 'LOW_MESSAGE_TIMESTAMP', 'LAST_MESSAGE_VALUE',
'TOTAL_INDEX_UPDATES', 'VOLUME_TOP_TIER', 'QUOTE_VOLUME_TOP_TIER',
'VOLUME_DIRECT', 'QUOTE_VOLUME_DIRECT', 'VOLUME_TOP_TIER_DIRECT',
'QUOTE_VOLUME_TOP_TIER_DIRECT', '_id' # Adding '_id' to the list
]
logging.info("Dropping columns: %s")
self.data = self.drop_columns(self.data, columns_to_drop)
# Drop columns where the number of missing values is greater than 0
logging.info("Dropping columns with missing values.")
self.data = self.drop_columns_with_missing_values(self.data)
logging.info("Data cleaning completed. Data shape after cleaning: %s", self.data.shape)
return self.data
def drop_columns(self, data: pd.DataFrame, columns: list) -> pd.DataFrame:
"""
Drops specified columns from the DataFrame.
Returns:
pd.DataFrame: The DataFrame with the specified columns removed.
"""
logging.info("Dropping columns: %s", columns)
return data.drop(columns=columns, errors='ignore')
def drop_columns_with_missing_values(self, data: pd.DataFrame) -> pd.DataFrame:
"""
Drops columns with any missing values from the DataFrame.
Parameters:
data: pd.DataFrame
The DataFrame from which columns with missing values will be removed.
Returns:
pd.DataFrame: The DataFrame with columns containing missing values removed.
"""
missing_columns = data.columns[data.isnull().sum() > 0]
if not missing_columns.empty:
logging.info("Columns with missing values: %s", missing_columns.tolist())
else:
logging.info("No columns with missing values found.")
return data.loc[:, data.isnull().sum() == 0]>
步骤10:模型部署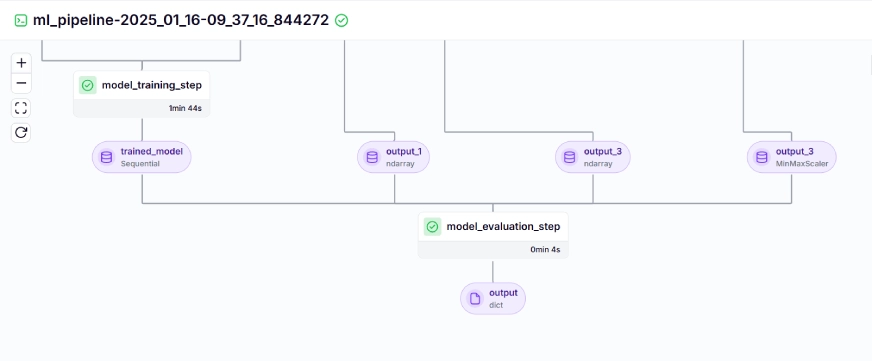 到目前为止,我们已经构建了模型和管道。现在,让我们将管道推入用户可以做出预测的生产中。
连续部署管道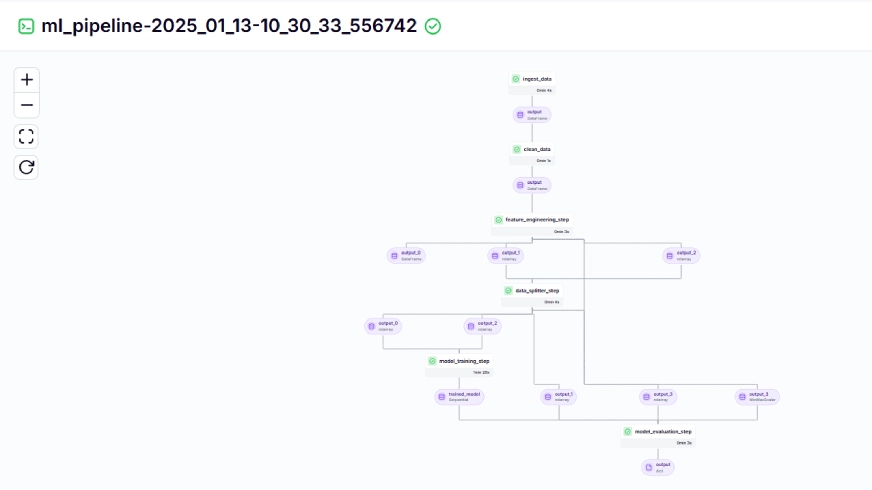
文件训练模型,然后使用
mlflow模型exployer>我们使用推理管道使用已部署的模型对新数据进行预测。让我们看一下我们如何在项目中实施该管道的方式。
>import requests
import pandas as pd
from dotenv import load_dotenv
import os
# Load the .env file
load_dotenv()
def fetch_crypto_data(api_uri):
response = requests.get(
api_uri,
params={
"market": "cadli",
"instrument": "BTC-USD",
"limit": 5000,
"aggregate": 1,
"fill": "true",
"apply_mapping": "true",
"response_format": "JSON"
},
headers={"Content-type": "application/json; charset=UTF-8"}
)
if response.status_code == 200:
print('API Connection Successful! \nFetching the data...')
data = response.json()
data_list = data.get('Data', [])
df = pd.DataFrame(data_list)
df['DATE'] = pd.to_datetime(df['TIMESTAMP'], unit='s')
return df # Return the DataFrame
else:
raise Exception(f"API Error: {response.status_code} - {response.text}")>让我们查看下面的推理管道中调用的每个功能:
dynamic_importer()
此功能加载新数据,执行数据处理并返回数据。
import os
from pymongo import MongoClient
from dotenv import load_dotenv
from data.management.api import fetch_crypto_data # Import the API function
import pandas as pd
load_dotenv()
MONGO_URI = os.getenv("MONGO_URI")
API_URI = os.getenv("API_URI")
client = MongoClient(MONGO_URI, ssl=True, ssl_certfile=None, ssl_ca_certs=None)
db = client['crypto_data']
collection = db['historical_data']
try:
latest_entry = collection.find_one(sort=[("DATE", -1)]) # Find the latest date
if latest_entry:
last_date = pd.to_datetime(latest_entry['DATE']).strftime('%Y-%m-%d')
else:
last_date = '2011-03-27' # Default start date if MongoDB is empty
print(f"Fetching data starting from {last_date}...")
new_data_df = fetch_crypto_data(API_URI)
if latest_entry:
new_data_df = new_data_df[new_data_df['DATE'] > last_date]
if not new_data_df.empty:
data_to_insert = new_data_df.to_dict(orient='records')
result = collection.insert_many(data_to_insert)
print(f"Inserted {len(result.inserted_ids)} new records into MongoDB.")
else:
print("No new data to insert.")
except Exception as e:
print(f"An error occurred: {e}")>此功能以
@Step装饰。我们加载了基于pipeline_name的部署服务W.R.T和step_name,我们的部署模型可以处理新数据的预测查询。 > line 现有_services = mlflow_model_deployer_component.find_model_server()
>>基于诸如pipeline名称和管道名称的给定参数,搜索可用的部署服务。如果没有可用的服务,则表明部署管道要么没有进行或遇到部署管道问题,因此它会抛出RuntimeError。
preditionor()#create a virtual environment python3 -m venv venv #Activate your virtual environmnent in your project folder source venv/bin/activate
该函数通过MLFlowDeploymentservice和新数据采用MLFlow部署模型。进一步处理数据以匹配模型的预期格式以进行实时推断。 为了可视化连续部署和推理管道,我们需要运行run_deployment.py脚本,在此将定义部署和预测配置。 (请在下面给出的github中检查run_deployment.py代码)。>
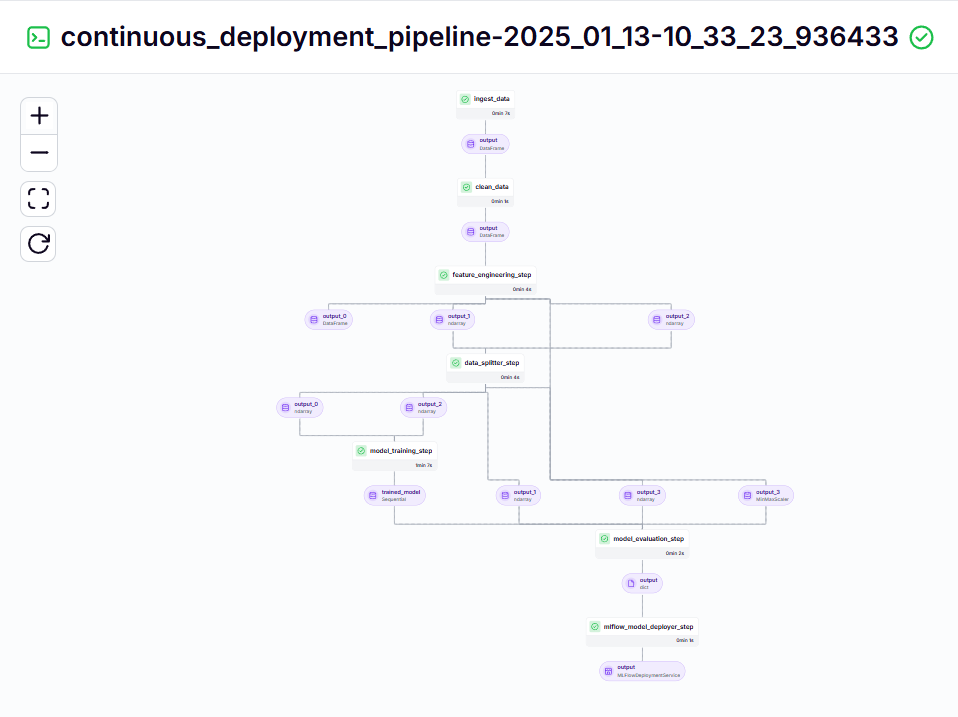
现在,让我们运行run_deployment.py文件以查看连续部署管道和推理管道的仪表板。
#Install zenml pip install zenml #To Launch zenml server and dashboard locally pip install "zenml[server]" #To check the zenml Version: zenml version #To initiate a new repository zenml init #To run the dashboard locally: zenml login --local #To know the status of our zenml Pipelines zenml show #To shutdown the zenml server zenml clean
连续部署管道 - 输出
#Integrating mlflow with ZenML zenml integration install mlflow -y #Register the experiment tracker zenml experiment-tracker register mlflow_tracker --flavor=mlflow #Registering the model deployer zenml model-deployer register mlflow --flavor=mlflow #Registering the stack zenml stack register local-mlflow-stack-new -a default -o default -d mlflow -e mlflow_tracker --set #To view the stack list zenml stack --list
bitcoin_price_prediction_mlops/        # Project directory
├── data/
│   └── management/
│       ├── api_to_mongodb.py          # Code to fetch data and save it to MongoDB
│       └── api.py                     # API-related utility functions
│
├── pipelines/
│   ├── deployment_pipeline.py         # Deployment pipeline
│   └── training_pipeline.py           # Training pipeline
│
├── saved_models/                      # Directory for storing trained models
├── saved_scalers/                     # Directory for storing scalers used in data preprocessing
│
├── src/                               # Source code
│   ├── data_cleaning.py               # Data cleaning and preprocessing
│   ├── data_ingestion.py              # Data ingestion
│   ├── data_splitter.py               # Data splitting
│   ├── feature_engineering.py         # Feature engineering
│   ├── model_evaluation.py            # Model evaluation
│   └── model_training.py              # Model training
│
├── steps/                             # ZenML steps
│   ├── clean_data.py                  # ZenML step for cleaning data
│   ├── data_splitter.py               # ZenML step for data splitting
│   ├── dynamic_importer.py            # ZenML step for importing dynamic data
│   ├── feature_engineering.py         # ZenML step for feature engineering
│   ├── ingest_data.py                 # ZenML step for data ingestion
│   ├── model_evaluation.py            # ZenML step for model evaluation
│   ├── model_training.py              # ZenML step for training the model
│   ├── prediction_service_loader.py   # ZenML step for loading prediction services
│   ├── predictor.py                   # ZenML step for prediction
│   └── utils.py                       # Utility functions for steps
│
├── .env                               # Environment variables file
├── .gitignore                         # Git ignore file
│
├── app.py                             # Streamlit user interface app
│
├── README.md                          # Project documentation
├── requirements.txt                   # List of required packages
├── run_deployment.py                  # Code for running deployment and prediction pipeline
├── run_pipeline.py                    # Code for running training pipeline
└── .zen/                              # ZenML directory (created automatically after ZenML initialization)
现在,您需要在命令行中复制并粘贴上述MLFLOW UI链接并运行它。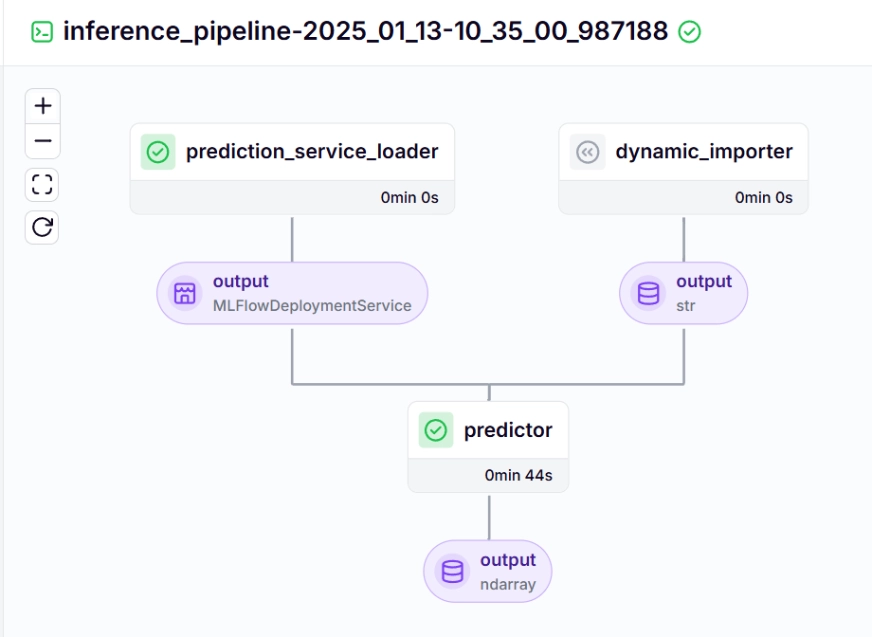
import os
import logging
from pymongo import MongoClient
from dotenv import load_dotenv
from zenml import step
import pandas as pd

# Load the .env file
load_dotenv()

# Get MongoDB URI from environment variables
MONGO_URI = os.getenv("MONGO_URI")

def fetch_data_from_mongodb(collection_name:str, database_name:str):
    """
    Fetches data from MongoDB and converts it into a pandas DataFrame.

    collection_name:
        Name of the MongoDB collection to fetch data.
    database_name:
        Name of the MongoDB database.
    return:
        A pandas DataFrame containing the data
    """
    # Connect to the MongoDB client
    client = MongoClient(MONGO_URI)
    db = client[database_name]  # Select the database
    collection = db[collection_name]  # Select the collection

    # Fetch all documents from the collection
    try:
        logging.info(f"Fetching data from MongoDB collection: {collection_name}...")
        data = list(collection.find())  # Convert cursor to a list of dictionaries

        if not data:
            logging.info("No data found in the MongoDB collection.")


        # Convert the list of dictionaries into a pandas DataFrame
        df = pd.DataFrame(data)

        # Drop the MongoDB ObjectId field if it exists (optional)
        if '_id' in df.columns:
            df = df.drop(columns=['_id'])

        logging.info("Data successfully fetched and converted to a DataFrame!")
        return df

    except Exception as e:
        logging.error(f"An error occurred while fetching data: {e}")
        raise e


@step(enable_cache=False)
def ingest_data(collection_name: str = "historical_data", database_name: str = "crypto_data") -> pd.DataFrame:

    logging.info("Started data ingestion process from MongoDB.")

    try:
        # Use the fetch_data_from_mongodb function to fetch data
        df = fetch_data_from_mongodb(collection_name=collection_name, database_name=database_name)

        if df.empty:
            logging.warning("No data was loaded. Check the collection name or the database content.")
        else:
            logging.info(f"Data ingestion completed. Number of records loaded: {len(df)}.")

        return df

    except Exception as e:
        logging.error(f"Error while reading data from {collection_name} in {database_name}: {e}")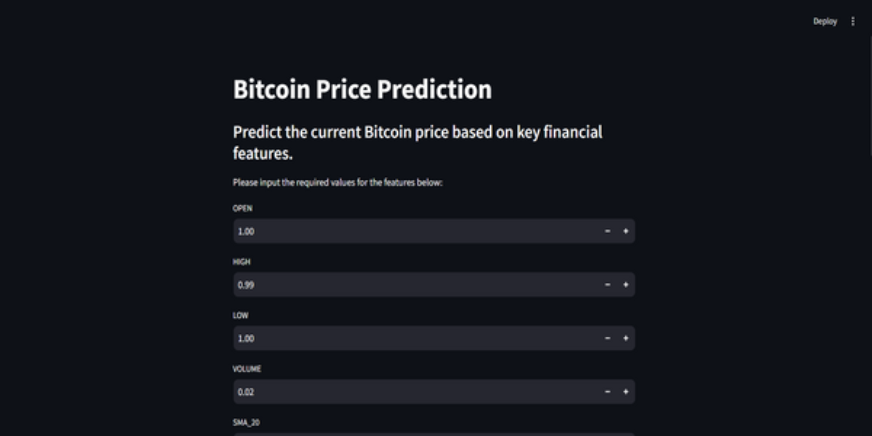
raise e >步骤11:构建简易应用
> Sparlit是一个令人惊叹的开源,基于Python的框架,用于创建Interactive UI,我们可以使用Sparlit快速构建Web应用程序,而无需知道后端或前端开发。首先,我们需要在系统上安装精简。
>这是对项目的GitHub代码和视频说明,以便您更好地理解。
钥匙要点
以上是使用MLOPS的比特币价格预测的详细内容。更多信息请关注PHP中文网其他相关文章!


