

在新Outlook和Web中有条件格式以突出电子邮件

Master the art of email organization with Outlook's conditional formatting! This guide shows you how to color-code your emails in the new Outlook app and Outlook on the web, ensuring important messages stand out.
Classic Outlook users have long enjoyed conditional formatting; now, this powerful feature is available in the new Outlook and web versions, bringing enhanced organization and personalization.
Key Features Covered:
- Conditional formatting in new Outlook and web
- Highlighting emails using conditional formats
- Editing conditional formatting rules
- Deleting conditional formatting rules
- Enabling/disabling conditional formatting rules
- Reordering rules for priority control
- Practical conditional formatting examples
- Understanding limitations and differences
(Note: This tutorial focuses on the new Outlook app and web version. For classic Outlook, please refer to [link to classic Outlook guide]. )
Conditional Formatting: Highlighting What Matters
Conditional formatting helps you prioritize emails based on user-defined criteria (sender, subject, presence of your name, etc.). Different colors instantly flag important messages, reducing time spent sifting through less urgent emails.

Setting Up Conditional Formatting Rules
The process is similar for both the new Outlook app and the web version. Minor interface differences may exist, but the core steps remain consistent:
- Access Settings: Click the settings gear icon (top-right), then navigate to Mail > Conditional Formatting.
- Select Account (if necessary): If you have multiple accounts, choose the correct one. Single-account users or web users can skip this step.
- Add a New Rule: Click "+ Create new conditional formatting rule".
- Name Your Rule: Give your rule a descriptive name.
- Define Conditions: Use the Condition dropdown to select criteria (e.g., "From specific people," "Your name is on the To or Cc line," "Subject includes certain text"). Add multiple conditions using "+ Add another condition".

- Choose Formatting: Select a font color using the Choose Color button. The Preview section shows the effect.
- Save the Rule: Click Save to apply and save your new rule.

Editing, Deleting, and Toggling Rules
Modifying or removing rules is simple:
- Editing: Access settings, select the rule, make changes (name, conditions, formatting), and save. Discard changes to cancel.

- Deleting: Access settings, locate the rule, and click "Delete rule," confirming the deletion.

- Enabling/Disabling: Use the toggle switch in the settings to quickly turn rules on or off without deleting them.

Rule Order and Priority
Rules are applied sequentially; higher rules override lower ones. Use the "Move Up" and "Move Down" buttons to adjust the order and control priority.

Conditional Formatting Examples
- Highlight VIP client emails in red.
- Highlight emails with specific keywords (e.g., project names) in the subject.
- Color-code emails from your manager or team members.
- Mark emails with deadlines or events.

Limitations
- Available only for Microsoft 365 work/school accounts in the new Outlook and web versions.
- Applies to read and unread emails in all folders (except Drafts).
- Fewer conditions than classic Outlook.
- Currently only for emails (not calendar or tasks).
- Only font color formatting is supported.
This guide empowers you to effectively manage your inbox, ensuring important emails never get overlooked.
以上是在新Outlook和Web中有条件格式以突出电子邮件的详细内容。更多信息请关注PHP中文网其他相关文章!

热AI工具

Undresser.AI Undress
人工智能驱动的应用程序,用于创建逼真的裸体照片

AI Clothes Remover
用于从照片中去除衣服的在线人工智能工具。

Undress AI Tool
免费脱衣服图片

Clothoff.io
AI脱衣机

Video Face Swap
使用我们完全免费的人工智能换脸工具轻松在任何视频中换脸!

热门文章
热工具

记事本++7.3.1
好用且免费的代码编辑器

SublimeText3汉化版
中文版,非常好用

禅工作室 13.0.1
功能强大的PHP集成开发环境

Dreamweaver CS6
视觉化网页开发工具

SublimeText3 Mac版
神级代码编辑软件(SublimeText3)


 如何将日历添加到Outlook:共享,Internet日历,ICAL文件
Apr 03, 2025 am 09:06 AM
如何将日历添加到Outlook:共享,Internet日历,ICAL文件
Apr 03, 2025 am 09:06 AM
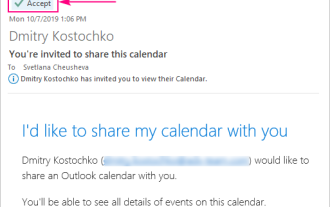
本文介绍了如何在Outlook Desktop应用程序中访问和利用共享日历,包括导入Icalendar文件。 以前,我们介绍了分享您的Outlook日历。 现在,让我们探索如何查看与之共享的日历
 如何使用示例使用Flash Fill ofecl
Apr 05, 2025 am 09:15 AM
如何使用示例使用Flash Fill ofecl
Apr 05, 2025 am 09:15 AM
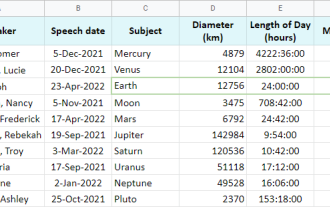
本教程为Excel的Flash Fill功能提供了综合指南,这是一种可自动化数据输入任务的强大工具。 它涵盖了从定义和位置到高级用法和故障排除的各个方面。 了解Excel的FLA

 如何将联系人导入Outlook(从CSV和PST文件)
Apr 02, 2025 am 09:09 AM
如何将联系人导入Outlook(从CSV和PST文件)
Apr 02, 2025 am 09:09 AM
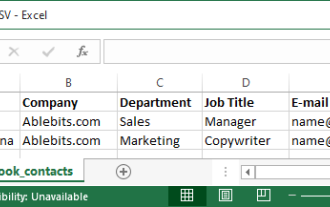
本教程演示了将联系人导入Outlook的两种方法:使用CSV和PST文件,还涵盖了将联系人转移到Outlook Online。 无论您是从外部来源合并数据,都从另一个电子邮件pro迁移
 如何在Excel中启用和禁用宏
Apr 02, 2025 am 09:05 AM
如何在Excel中启用和禁用宏
Apr 02, 2025 am 09:05 AM
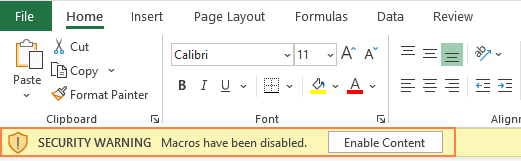
本文探讨了如何在Excel中启用宏,涵盖宏观安全基础知识和安全VBA代码执行。 像任何技术一样,宏具有双重潜力 - 具有脱皮自动化或恶意使用。 Excel的默认设置禁用SA的宏
 如何使用Google表查询功能 - 标准条款和替代工具
Apr 02, 2025 am 09:21 AM
如何使用Google表查询功能 - 标准条款和替代工具
Apr 02, 2025 am 09:21 AM
该综合指南解锁了Google Shays的查询功能的功能,通常被称为最有效的电子表格功能。 我们将剖析其语法并探讨其各种条款以掌握数据操纵。 了解Google表格
 Excel共享工作簿:如何为多个用户共享Excel文件
Apr 11, 2025 am 11:58 AM
Excel共享工作簿:如何为多个用户共享Excel文件
Apr 11, 2025 am 11:58 AM
本教程提供了共享Excel工作簿,涵盖各种方法,访问控制和冲突解决方案的综合指南。 现代Excel版本(2010年,2013年,2016年及以后)简化了协作编辑,消除了M的需求
 如何使用Google表滤波功能
Apr 02, 2025 am 09:19 AM
如何使用Google表滤波功能
Apr 02, 2025 am 09:19 AM
解锁Google Sheats的过滤功能的功能:综合指南 厌倦了基本的Google表格过滤? 本指南揭示了过滤器功能的功能,为标准过滤工具提供了强大的替代方案。我们将利用
