

如何在Outlook中创建电子邮件组 /联系人列表

In this guide, we’ll walk you through the process of creating, using and managing email groups in Outlook.
Ever wish there was a better way to keep in touch with your favorite people? Outlook email groups can facilitate your communication with work pals, project partners, or your weekend squad. Just create a group, add your contacts, and boom – you're ready to send emails with a single click. No more tedious typing, no more missed messages, no more excuses. Let's dive into the details and make your messaging game a whole lot simpler!
What is an email group in Outlook?
Email group in Outlook is a convenient feature designed to simplify the process of sending messages to multiple recipients simultaneously. Instead of manually entering individual email addresses for each message, you create a predefined collection of email addresses to make your communication smoother and more organized. This is particularly useful in professional environments, team collaborations, or any scenario where you frequently communicate with the same set of individuals. For example, you can create an email group for a project team, a department, a club, or any other group of people who regularly collaborate.
While the term email group is commonly used, the actual name of the feature varies depending on your Outlook version: a contact group (in modern versions), a contact list (in the new Outlook and Outlook web app), or a distribution list (in older versions).
It's important to note that Outlook Email Group is not the same as Microsoft 365 Group, which extends beyond emails to include a SharePoint site, Teams, Planner, and more. Unlike Microsoft 365 Groups, members of an Outlook email group do not share a common inbox, they don’t even have to belong to the same organization. This means you can add anyone to your contact list, regardless of their email address or affiliation, and communicate with a diverse range of people in a single email!

Here are some key advantages of using email groups in Outlook:
- Time-saving: The primary advantage of using email groups is the time saved when sending emails. Instead of typing individual email addresses every time, you simply use the name of the group, and Outlook will automatically distribute the email to all members. This is especially handy when you need to share information, updates, or announcements with a specific group of individuals.
- Organization: You can create email groups based on specific criteria, such as project teams, departments, or any other category that makes sense for your needs. This helps in organizing your contacts and keeping track of your communication history.
- Consistency: Email groups ensure consistency in communication, as everyone in the group receives the same information simultaneously. This is particularly important in situations where keeping everyone informed and on the same page is crucial.
- Easy maintenance: Outlook makes it really easy to update and manage email groups. Whether you need to add or remove members or change the group's name, these adjustments can be made in no time.
In summary, an email group in Outlook is a valuable tool for anyone who frequently communicates with a specific set of contacts. It simplifies the email-sending process, saves your time, and helps you avoid forgetting anyone when you send an email.
Note. It’s not recommended to use email groups for mass mailings, because everyone can see who else got the email. This can compromise privacy and professionalism. For large-scale distributions, consider alternative methods, such as mailing list services and mail merge, that let you reach a lot of people without sharing their addresses.
How to create an email group in Outlook
To make an email group, follow the steps below as illustrated in Outlook 365. This is also applicable to all modern versions of Outlook from 2021 through 2013.
- On the Outlook Navigation bar, click People.
- Under My Contacts in the left pane, choose the folder where you want to save your email group. Typically, you'll select the Contacts folder.

- On the Home tab of the ribbon, click New Contact Group.
- Name your group. In a new window that appears, type a descriptive name for your group in the Name field.
-
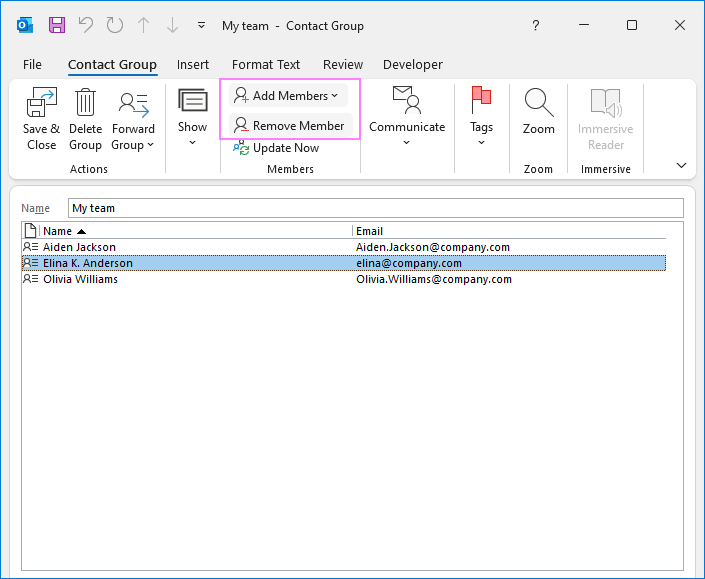
Add members. Click the Add Members button on the ribbon. Then, depending on your source, choose one of these options:
- From Outlook Contacts for personal contacts.
- From Address Book for Global Address List (GAL) members.
- New Email Contact for individuals not in your contacts list.
-
Select members. If you are adding existing contacts from Outlook or Global Address List, you can select multiple entries by holding down the Ctrl key and clicking on their names. Then click on Members and then OK.
If you are adding a new contact, then type the name and email address in the corresponding fields and click OK. Repeat this step for each new contact you want to add to your group.
-
Review and save. Review the list of members to ensure all necessary contacts are included, and then click the Save & Close button on the ribbon to save your newly created email group.


That’s it! You have successfully created a contact group in Outlook. To use it, simply type the name of your group in the To, Cc or Bcc field when composing a new message.
How to make a contact group from email
If you often find yourself communicating with the same group of individuals, Outlook offers a quick way to create a contact list based on an email you’ve have sent to them before. Here’s how:
- Navigate to your Sent Items folder and locate an email you sent to the individuals you wish to include in the contact group.
- In the To, Cc or Bcc box, select the recipients /addresses.
- Right-click your selection and choose Copy from the context menu, or use the Ctrl + C shortcut.
- Return to the main Outlook window and click People on the Navigation bar.
- On the ribbon, click the New Contact Group button.
- In the new window, type a name for your contact list in the designated field.
- Click Add Members > From Outlook Contacts.
- In the window that appears, right-click within the Members box and select Paste from the context menu, or use the paste shortcut Ctrl + V. Once done, click OK.
- The selected people from the email now appear as members of your contact group. Click the Save & Close button on the ribbon to confirm your settings and save the email group.


Congratulations! You've successfully created a contact group from a previous email, and you can use it for any communications with the same group of people in the future.
Create a contact list in new Outlook and web app
Creating an email list in Outlook on the web and the new Outlook for Windows is an even more straightforward process. Here are the steps to follow:
- Launch the new Outlook application on your computer or use your preferred browser to access Outlook on the web.
- On the Navigation bar on the left, click People to access the contact management section.
- Click the dropdown arrow next to New contact, and then pick the New contact list option.
- In a new window that appears, do the following:
- Enter some meaningful name for your contact list.
- Add contacts by typing names or email addresses in the Add box, then select from the displayed matches.
- Optionally, add a description for the group.
- When finished, click Create.


Your newly created email group can now be found under your Contact lists in the Outlook web app or in the new Outlook for Windows.

For future adjustments, you can easily add or remove contacts by clicking the Edit button on the right of your contact list.

How to send a group email in Outlook
Sending emails to a group in Outlook is a breeze. There are three simple ways to get it done:
Type the group name in the To field
This is the easiest way if you know the name of the group. While composing your email, simply type the name of your email group directly in the To field. Outlook will recognize it, and you're all set.

Select the group name from the Contacts list
This method of emailing to a group is useful if you cannot recall the group name or if you want to browse your contacts. To do this, follow these steps:
- In the message you are composing, click the To button.
- In the Select Names dialog, choose Contacts from the Address book dropdown menu.
- Look for your email group in the Name column (groups are in bold font).
- Select the target group and click the To, Cc, or Bcc button.
- Hit OK.

Tip. You can also use the Search functionality to find your email group faster. Just type a few characters of the group name in the Search box and press Enter to get a list of matches.
Use Outlook email groups to send a message
This is another way to access your email groups without opening a new message. The steps are:
- On the Navigation bar, choose People.
- Open the Contacts folder (or wherever you saved your group).
- In the list of contacts, find your email group, select it and click Send email.

As you see, sending emails to a group is as easy as pie in Outlook. Just choose the method that suits you best and enjoy user-friendly communication with your contacts.
How to reply to group email in Outlook
When you get an email sent to a group, all the recipients are visible in the To field. Here's how to respond:
- To reply only to the sender, click Reply.
- To reply to the entire group, hit Reply All.
It's as straightforward as that! 😊

How to edit email groups in Outlook
If you need to tweak your email groups in Outlook, no worries – it's a straightforward process. Here's your step-by-step guide:
- On the Navigation bar, choose People.
- Open Contacts or another folder where you have your email group stored.
- Right-click the group you want to modify and choose Edit Contact from the context menu. Alternatively, you can double-click the group name to open it.
- A new dialog window will pop up, offering various editing options.
- To add a new contact to the email group, click the Add Members button on the ribbon, and then select where you want to add the contact from: From Outlook Contacts, From Address Book, or New Email Contact.
- To remove a person / email from a group, select it in the list and click the Remove Member button on the ribbon.
- After you finish editing, click the Save & Close button to save your changes.
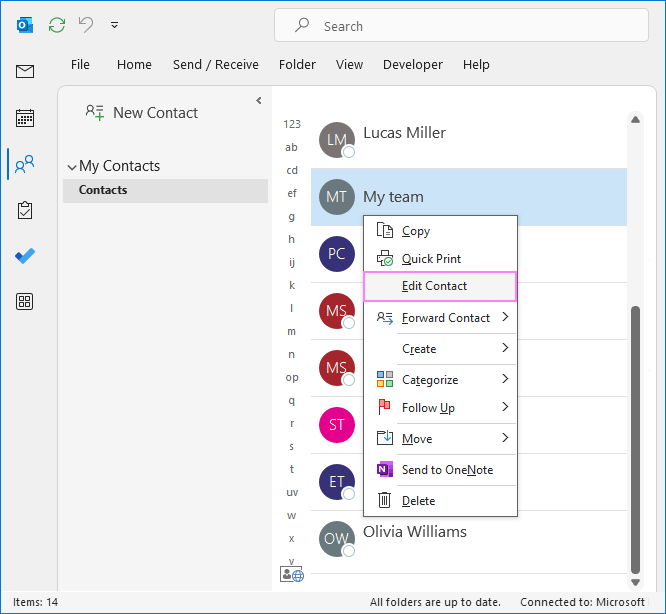
That's it! Editing email groups in Outlook is as simple as these five steps.
How to delete email group in Outlook
To permanently delete an email group that has served its purpose and is no longer needed, follow these steps:
- Click People on the Navigation bar.
- Open the folder where you've stored your group.
- Right-click the specific group you wish to remove and choose Delete from the context menu.

Alternatively, you can double-click the contact group to open it in a new window, ensuring you review the group settings and contents thoroughly to avoid a mistake. If you've opened the right group, click on the Delete Group button on the ribbon.
Note. Deleting an email group is irreversible, so it may be a good idea to back up your contacts by exporting to CSV or PST file.
In conclusion, creating, using and managing email groups in Outlook is a handy skill that empowers you to communicate with precision and ease. Whether it's for work or staying in touch with friends, Outlook's email group feature helps you stay organized. Just follow the steps we've covered, and you'll be a pro at it 😊
以上是如何在Outlook中创建电子邮件组 /联系人列表的详细内容。更多信息请关注PHP中文网其他相关文章!

热AI工具

Undresser.AI Undress
人工智能驱动的应用程序,用于创建逼真的裸体照片

AI Clothes Remover
用于从照片中去除衣服的在线人工智能工具。

Undress AI Tool
免费脱衣服图片

Clothoff.io
AI脱衣机

Video Face Swap
使用我们完全免费的人工智能换脸工具轻松在任何视频中换脸!

热门文章
热工具

记事本++7.3.1
好用且免费的代码编辑器

SublimeText3汉化版
中文版,非常好用

禅工作室 13.0.1
功能强大的PHP集成开发环境

Dreamweaver CS6
视觉化网页开发工具

SublimeText3 Mac版
神级代码编辑软件(SublimeText3)


 如何将日历添加到Outlook:共享,Internet日历,ICAL文件
Apr 03, 2025 am 09:06 AM
如何将日历添加到Outlook:共享,Internet日历,ICAL文件
Apr 03, 2025 am 09:06 AM
本文介绍了如何在Outlook Desktop应用程序中访问和利用共享日历,包括导入Icalendar文件。 以前,我们介绍了分享您的Outlook日历。 现在,让我们探索如何查看与之共享的日历
 如何使用示例使用Flash Fill ofecl
Apr 05, 2025 am 09:15 AM
如何使用示例使用Flash Fill ofecl
Apr 05, 2025 am 09:15 AM
本教程为Excel的Flash Fill功能提供了综合指南,这是一种可自动化数据输入任务的强大工具。 它涵盖了从定义和位置到高级用法和故障排除的各个方面。 了解Excel的FLA

 Excel共享工作簿:如何为多个用户共享Excel文件
Apr 11, 2025 am 11:58 AM
Excel共享工作簿:如何为多个用户共享Excel文件
Apr 11, 2025 am 11:58 AM
本教程提供了共享Excel工作簿,涵盖各种方法,访问控制和冲突解决方案的综合指南。 现代Excel版本(2010年,2013年,2016年及以后)简化了协作编辑,消除了M的需求
 如何在Excel中拼写检查
Apr 06, 2025 am 09:10 AM
如何在Excel中拼写检查
Apr 06, 2025 am 09:10 AM
该教程展示了在Excel中进行拼写检查的各种方法:手动检查,VBA宏和使用专用工具。 学习检查单元格,范围,工作表和整个工作簿中的拼写。 虽然Excel不是文字处理器,但它的spel
 Excel中的绝对值:ABS功能与公式示例
Apr 06, 2025 am 09:12 AM
Excel中的绝对值:ABS功能与公式示例
Apr 06, 2025 am 09:12 AM
本教程解释了绝对价值的概念,并演示了ABS函数的实用Excel应用,以计算数据集中的绝对值。 数字可能是正面的或负数的,但有时只有正值是需要的
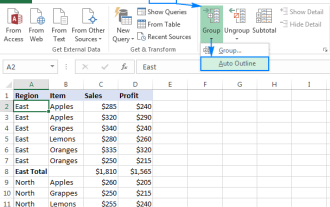 Excel:组行自动或手动,崩溃并扩展行
Apr 08, 2025 am 11:17 AM
Excel:组行自动或手动,崩溃并扩展行
Apr 08, 2025 am 11:17 AM
本教程演示了如何通过对行进行分组来简化复杂的Excel电子表格,从而使数据易于分析。学会快速隐藏或显示行组,并将整个轮廓崩溃到特定的级别。 大型的详细电子表格可以是
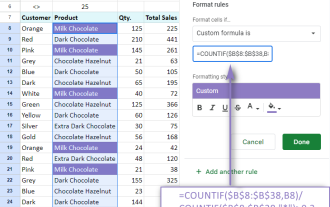 Google电子表格Countif函数带有公式示例
Apr 11, 2025 pm 12:03 PM
Google电子表格Countif函数带有公式示例
Apr 11, 2025 pm 12:03 PM
Google主张Countif:综合指南 本指南探讨了Google表中的多功能Countif函数,展示了其超出简单单元格计数的应用程序。 我们将介绍从精确和部分比赛到Han的各种情况
