

JQuery实现简单时尚快捷的气泡提示插件_jquery

在程序提交后,我们需要验证并提示出错的位置,利用JQuery我们可以轻松实现气泡提示,先看效果图:

具体调用代码:
其实现过程如下:
1、首先我们在Photoshop中设计出提示框的形状及背景。
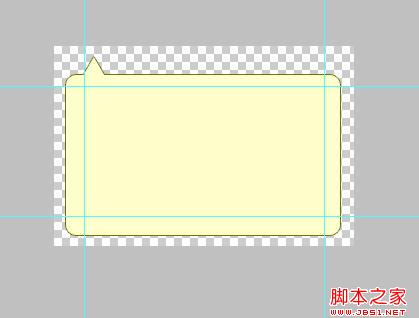
2、我们将背景切成三个部分,top、main、bottom
top:
main:
bottom:
3、定义提示框的CSS文件
.tooltip{
position:absolute; height:200px;
width:300px;
padding:10px;
}
.tooltip_main{
background-image:url(images/tooltip_main.png);
background-position:center;
background-repeat:repeat-y;
padding-left:30px;
padding-right:30px;
color:#C00;
font-weight:bold;
}
.tooltip_top{
width:300px;
height:40px;
background-image:url(images/tooltip_top.png);
background-repeat:no-repeat;
background-position:bottom;
}
.tooltip_bottom{
width:300px;
height:20px;
background-image:url(images/tooltip_bottom.png);
background-repeat:no-repeat;
background-position:top;
}
4、创建Tooltip类,其实现如下:
var Tooltip = {};
Tooltip.show = function(msg,obj){
$('#'+obj).after('
+''
+'
+''
+'
//调整位置
var objOffset = $('#'+obj).offset();
objOffset.left-=25;
objOffset.top-=10;
$('#tooltip_'+obj).offset(objOffset);
//点击消失
$('#tooltip_'+obj).click(function(){
$(this).hide();
$('#'+obj).focus();
});
}

热AI工具

Undresser.AI Undress
人工智能驱动的应用程序,用于创建逼真的裸体照片

AI Clothes Remover
用于从照片中去除衣服的在线人工智能工具。

Undress AI Tool
免费脱衣服图片

Clothoff.io
AI脱衣机

AI Hentai Generator
免费生成ai无尽的。

热门文章
热工具

记事本++7.3.1
好用且免费的代码编辑器

SublimeText3汉化版
中文版,非常好用

禅工作室 13.0.1
功能强大的PHP集成开发环境

Dreamweaver CS6
视觉化网页开发工具

SublimeText3 Mac版
神级代码编辑软件(SublimeText3)


 PyCharm新手指南:全面了解插件安装!
Feb 25, 2024 pm 11:57 PM
PyCharm新手指南:全面了解插件安装!
Feb 25, 2024 pm 11:57 PM
PyCharm是一款功能强大且受欢迎的Python集成开发环境(IDE),提供了丰富的功能和工具,使得开发者们可以更加高效地编写代码。而PyCharm的插件机制更是其功能扩展的利器,通过安装不同的插件,可以为PyCharm增加各种功能和定制化的特性。因此,对于PyCharm新手来说,了解并熟练安装插件是至关重要的。本文将为你详细介绍PyCharm插件安装的全
![在Illustrator中加载插件时出错[修复]](https://img.php.cn/upload/article/000/465/014/170831522770626.jpg?x-oss-process=image/resize,m_fill,h_207,w_330) 在Illustrator中加载插件时出错[修复]
Feb 19, 2024 pm 12:00 PM
在Illustrator中加载插件时出错[修复]
Feb 19, 2024 pm 12:00 PM
启动AdobeIllustrator时是否会弹出加载插件时出错的消息?一些Illustrator用户在打开该应用程序时遇到了此错误。消息后面紧跟着一系列有问题的插件。该错误提示表明已安装的插件存在问题,但也可能是由于VisualC++DLL文件损坏或首选项文件受损等其他原因引起。如果遇到此错误,我们将在本文中指导您修复问题,请继续阅读以下内容。在Illustrator中加载插件时出错如果您在尝试启动AdobeIllustrator时收到“加载插件时出错”的错误消息,您可以使用以下用途:以管理员身
 Chrome的插件扩展程序安装目录是什么
Mar 08, 2024 am 08:55 AM
Chrome的插件扩展程序安装目录是什么
Mar 08, 2024 am 08:55 AM
Chrome的插件扩展程序安装目录是什么?正常情况下,Chrome插件扩展程序的默认安装目录如下:1、windowsxp中chrome插件默认安装目录位置:C:\DocumentsandSettings\用户名\LocalSettings\ApplicationData\Google\Chrome\UserData\Default\Extensions2、windows7中chrome插件默认安装目录位置:C:\Users\用户名\AppData\Local\Google\Chrome\User
 分享Edge浏览器不支持此插件的三种解决办法
Mar 13, 2024 pm 04:34 PM
分享Edge浏览器不支持此插件的三种解决办法
Mar 13, 2024 pm 04:34 PM
用户使用Edge浏览器的过程中可能会添加一些插件来满足自己更多的使用需求。但是在添加插件时显示不支持此插件,这该如何解决?今日小编就来给大家分享三种解决办法,快来试试吧。 方法一:尝试用其他的浏览器。 方法二:浏览器上的FlashPlayer可能过时或者丢失,导致此插件不受支持状态,可在官网下载最新版本。 方法三:同时按下“Ctrl+Shift+Delete”键。 点击“清除数据”,重新打开浏览器即可。
 PyCharm社区版支持的插件足够吗?
Feb 20, 2024 pm 04:42 PM
PyCharm社区版支持的插件足够吗?
Feb 20, 2024 pm 04:42 PM
PyCharm社区版支持的插件足够吗?需要具体代码示例随着Python语言在软件开发领域的应用越来越广泛,PyCharm作为一款专业的Python集成开发环境(IDE),备受开发者青睐。PyCharm分为专业版和社区版两个版本,其中社区版是免费提供的,但其插件支持相对专业版有所限制。那么问题来了,PyCharm社区版支持的插件足够吗?本文将通过具体的代码示例
 如何为WordPress插件添加微信小程序功能
Sep 06, 2023 am 09:03 AM
如何为WordPress插件添加微信小程序功能
Sep 06, 2023 am 09:03 AM
如何为WordPress插件添加微信小程序功能随着微信小程序的普及和流行,越来越多的网站和应用程序开始考虑将其与微信小程序进行集成。对于使用WordPress作为内容管理系统的网站来说,添加微信小程序功能可以为用户提供更便捷的访问体验和更多的功能选择。本文将介绍如何为WordPress插件添加微信小程序功能。步骤1:注册微信小程序账号首先,您需要在微信开放平
 如何使用WordPress插件实现即时定位功能
Sep 05, 2023 pm 04:51 PM
如何使用WordPress插件实现即时定位功能
Sep 05, 2023 pm 04:51 PM
如何使用WordPress插件实现即时定位功能随着移动设备的普及,越来越多的网站开始提供基于地理位置的服务。在WordPress网站中,我们可以通过使用插件来实现即时定位功能,为访问者提供与地理位置相关的服务。一、选择适合的插件在WordPress插件库中有很多提供地理位置服务的插件可供选择。根据需求和要求,选择适合的插件是实现即时定位功能的关键。以下是几个
 如何使用WordPress插件实现视频播放功能
Sep 05, 2023 pm 12:55 PM
如何使用WordPress插件实现视频播放功能
Sep 05, 2023 pm 12:55 PM
如何使用WordPress插件实现视频播放功能一、介绍视频在网站和博客中的应用越来越普遍。为了提供优质的用户体验,我们可以使用WordPress插件来实现视频播放功能。本文将介绍如何使用WordPress插件来实现视频播放功能,并提供代码示例。二、选择插件WordPress拥有众多视频播放插件可供选择。在选择插件时,我们需要考虑以下几个方面:兼容性:确保插件
