

一个超级强大的图片加水印的类_PHP教程

下午没事干,就写了个图片加水印处理的类,本类实现了给图片加文字水印,加图片水印,并且实现了透明度的功能,以供各位网友学习和交流
/**
* 加水印类,支持文字、图片水印以及对透明度的设置、水印图片背景透明。
* @author litx date:2011-12-05下午3点于迈科龙快播研发中心
*/
class WaterMask
{
/**
* 水印类型
* @var int $waterType 0为文字水印 ;1为图片水印
*/
private $waterType = 1;
/**
* 水印位置 类型
* @var int $pos 默认为9(右下角)
*/
private $pos = 9;
/**
* 水印透明度
* @var int $transparent 水印透明度(值越小越透明)
*/
private $transparent = 20;
/**
* 如果是文字水印,则需要加的水印文字
* @var string $waterStr 默认值 (李铁雄个人作品集)
*/
private $waterStr = '个人作品集';
/**
* 文字字体大小
* @var int $fontSize 字体大小
*/
private $fontSize = 14;
/**
* 水印文字颜色(RGB)
* @var array $fontColor 水印文字颜色(RGB)
*/
private $fontColor = array ( 255, 255, 255 );
/**
* 字体文件
* @var unknown_type
*/
private $fontFile = 'AHGBold.ttf';
/**
* 水印图片
* @var string $waterImg
*/
private $waterImg = 'logo.png';
/**
* 需要添加水印的图片
* @var string $srcImg
*/
private $srcImg = '';
/**
* 图片句柄
* @var string $im
*/
private $im = '';
/**
* 水印图片句柄
* @var string $water_im
*/
private $water_im = '';
/**
* 图片信息
* @var array $srcImg_info
*/
private $srcImg_info = '';
/**
* 水印图片信息
* @var array $waterImg_info
*/
private $waterImg_info = '';
/**
* 水印文字宽度
* @var int $str_w
*/
private $str_w = '';
/**
* 水印文字高度
* @var int $str_h
*/
private $str_h = '';
/**
* 水印X坐标
* @var int $x
*/
private $x = '';
/**
* 水印y坐标
* @var int $y
*/
private $y = '';
/**
* 构造函数,通过传入需要加水印的源图片初始化源图片
* @param string $img 需要加水印的源图片
*/
public function __construct ($img)
{
if(file_exists($img)){//源文件存在
$this -> srcImg = $img ;
}else{//源文件不存在
echo '源文件'.$img.'不存在,请检查看文件路径是否正确';
exit();
}
}
/**
* 获取需要添加水印的图片的信息,并载入图片
*/
public function imginfo ()
{
$this -> srcImg_info = getimagesize($this -> srcImg);
var_dump($this -> srcImg_info);exit();
switch ($this -> srcImg_info[2]) {
case 3 ://png
$this -> im = imagecreatefrompng($this -> srcImg);
break 1;
case 2 : // jpeg/jpg
$this -> im = imagecreatefromjpeg($this -> srcImg);
break 1;
case 1 : //gif
$this -> im = imagecreatefromgif($this -> srcImg);
break 1;
default :
echo '源图片文件'. $this -> srcImg .'格式不正确,目前本函数只支持PNG、JPEG、GIF图片水印功能';
exit();
}
}
/**
* 获取水印图片的信息,并载入图片
*/
private function waterimginfo ()
{
$this -> waterImg_info = getimagesize($this -> waterImg);
switch ($this -> waterImg_info[2]) {
case 3 :
$this -> water_im = imagecreatefrompng($this -> waterImg);
break 1;
case 2 :
$this -> water_im = imagecreatefromjpeg($this -> waterImg);
break 1;
case 1 :
$this -> water_im = imagecreatefromgif($this -> waterImg);
break 1;
default :
echo '源图片文件'. $this -> srcImg .'格式不正确,目前本函数只支持PNG、JPEG、GIF图片水印功能';
exit();
}
}
/**
* 水印位置算法
*/
private function waterpos ()
{
switch ($this -> pos) {
case 0 : //随机位置
$this -> x = rand(0, $this -> srcImg_info[0] - $this -> waterImg_info[0]);
$this -> y = rand(0, $this -> srcImg_info[1] - $this -> waterImg_info[1]);
break 1;
case 1 : //上左
$this -> x = 20;
$this -> y = 20;
break 1;
case 2 : //上中
$this -> x = ($this -> srcImg_info[0] - $this -> waterImg_info[0]) / 2;
$this -> y = 20;
break 1;
case 3 : //上右
$this -> x = $this -> srcImg_info[0] - $this -> waterImg_info[0];
$this -> y = 20;
break 1;
case 4 : //中左
$this -> x = 20;
$this -> y = ($this -> srcImg_info[1] - $this -> waterImg_info[1]) / 2;
break 1;
case 5 : //中中
$this -> x = ($this -> srcImg_info[0] - $this -> waterImg_info[0]) / 2;
$this -> y = ($this -> srcImg_info[1] - $this -> waterImg_info[1]) / 2;
break 1;
case 6 : //中右
$this -> x = $this -> srcImg_info[0] - $this -> waterImg_info[0] - 20;
$this -> y = ($this -> srcImg_info[1] - $this -> waterImg_info[1]) / 2;
break 1;
case 7 : //下左
$this -> x = 20;
$this -> y = $this -> srcImg_info[1] - $this -> waterImg_info[1] - 20;
break 1;
case 8 : //下中 www.2cto.com
$this -> x = ($this -> srcImg_info[0] - $this -> waterImg_info[0]) / 2;
$this -> y = $this -> srcImg_info[1] - $this -> waterImg_info[1] - 20;
break 1;
case 9 : //下右
$this -> x = $this -> srcImg_info[0] - $this -> waterImg_info[0] - 20;
$this -> y = $this -> srcImg_info[1] - $this -> waterImg_info[1] - 20;
break 1;
default : //下右
$this -> x = $this -> srcImg_info[0] - $this -> waterImg_info[0] - 20;
$this -> y = $this -> srcImg_info[1] - $this -> waterImg_info[1] - 20;
break 1;
}
}
/**
* 加图片水印
*/
private function waterimg ()
{
if ($this -> srcImg_info[0] waterImg_info[0] || $this -> srcImg_info[1] waterImg_info[1]) {
echo '图片尺寸太小,无法加水印,请上传一张大图片';
exit();
}
//计算水印位置
$this->waterpos();
$cut = imagecreatetruecolor($this -> waterImg_info[0], $this -> waterImg_info[1]);
imagecopy($cut, $this -> im, 0, 0, $this -> x, $this -> y, $this -> waterImg_info[0],
$this -> waterImg_info[1]);
$pct = $this -> transparent;
imagecopy($cut, $this -> water_im, 0, 0, 0, 0, $this -> waterImg_info[0],
$this -> waterImg_info[1]);
//将图片与水印图片合成
imagecopymerge($this -> im, $cut, $this -> x, $this -> y, 0, 0, $this -> waterImg_info[0], $this -> waterImg_info[1], $pct);
}
/**
* 加文字水印
*/
private function waterstr ()
{
$rect = imagettfbbox($this -> fontSize, 0, $this -> fontFile, $this -> waterStr);
$w = abs($rect[2] - $rect[6]);
$h = abs($rect[3] - $rect[7]);
$fontHeight = $this -> fontSize;
$this -> water_im = imagecreatetruecolor($w, $h);
imagealphablending($this -> water_im, false);
imagesavealpha($this -> water_im, true);
$white_alpha = imagecolorallocatealpha($this -> water_im, 255, 255, 255, 127);
imagefill($this -> water_im, 0, 0, $white_alpha);
$color = imagecolorallocate($this -> water_im, $this -> fontColor[0], $this -> fontColor[1],
$this -> fontColor[2]);
imagettftext($this -> water_im, $this -> fontSize, 0, 0, $this -> fontSize, $color,
$this -> fontFile, $this -> waterStr);
$this -> waterImg_info = array (
0 => $w, 1 => $h
);
$this->waterimg();
}
/**
* 水印图片输出
*/
public function output ()
{
$this->imginfo();
if ($this -> waterType == 0) {
$this->waterstr();
} else {
$this->waterimginfo();
$this->waterimg();
}
switch ($this -> srcImg_info[2]) {
case 3 :
imagepng($this -> im, $this -> srcImg);
break 1;
case 2 :
imagejpeg($this -> im, $this -> srcImg);
break 1;
case 1 :
imagegif($this -> im, $this -> srcImg);
break 1;
default :
die('添加水印失败!');
break;
}
//图片合成后的后续销毁处理
imagedestroy($this -> im);
imagedestroy($this -> water_im);
}
}
使用方法示例:
//实例化对象
$obj = new WaterMask('img/10451.jpg');
//类型:0为文字水印、1为图片水印
$obj->waterType = 0;
//水印透明度,值 越小透明度越高
$obj->transparent = 15;
//水印文字
//$obj->waterStr = '生日快乐';
//水印图片
//$obj->waterImg = '';//水印图片
//文字字体大小
$obj->fontSize = 14;
//水印文字颜色(RGB)
$obj->fontColor = array(255,255,100);
//字体文件
$obj->fontFile = 'STCAIYUN.ttf';
//输出水印图片文件覆盖到输入的图片文件
$obj->output();
使用方式比较简单,也很实用。
作者 ltx851201

热AI工具

Undresser.AI Undress
人工智能驱动的应用程序,用于创建逼真的裸体照片

AI Clothes Remover
用于从照片中去除衣服的在线人工智能工具。

Undress AI Tool
免费脱衣服图片

Clothoff.io
AI脱衣机

AI Hentai Generator
免费生成ai无尽的。

热门文章
热工具

记事本++7.3.1
好用且免费的代码编辑器

SublimeText3汉化版
中文版,非常好用

禅工作室 13.0.1
功能强大的PHP集成开发环境

Dreamweaver CS6
视觉化网页开发工具

SublimeText3 Mac版
神级代码编辑软件(SublimeText3)


 小红书发布自动保存图片怎么解决?发布自动保存图片在哪里?
Mar 22, 2024 am 08:06 AM
小红书发布自动保存图片怎么解决?发布自动保存图片在哪里?
Mar 22, 2024 am 08:06 AM
随着社交媒体的不断发展,小红书已经成为越来越多年轻人分享生活、发现美好事物的平台。许多用户在发布图片时遇到了自动保存的问题,这让他们感到十分困扰。那么,如何解决这个问题呢?一、小红书发布自动保存图片怎么解决?1.清除缓存首先,我们可以尝试清除小红书的缓存数据。步骤如下:(1)打开小红书,点击右下角的“我的”按钮;(2)在个人中心页面,找到“设置”并点击;(3)向下滚动,找到“清除缓存”选项,点击确认。清除缓存后,重新进入小红书,尝试发布图片看是否解决了自动保存的问题。2.更新小红书版本确保你的小
 美图秀秀怎么加水印呢?分享美图秀秀添加水印方法!
Mar 16, 2024 pm 09:55 PM
美图秀秀怎么加水印呢?分享美图秀秀添加水印方法!
Mar 16, 2024 pm 09:55 PM
想知道美图秀秀怎么加水印吗?美图秀秀是一款非常好用的修图p图软件,提供抠图放在另一个图、改图片大小kb、去水印、换证件照底色、全屏加时间日期地点水印等功能,可以帮助用户快速的完成图片的制作。有用户制作了自己的图片不想被别人盗图想要铺满自己的水印,但不知道如何操作?小编现在为大家分享美图秀秀添加水印方法!喜欢就快来下载吧!一、美图秀秀怎么加水印呢?分享美图秀秀添加水印方法!1.打开在本站下载的美图秀秀2023版。美图秀秀2023版类别:拍摄美化下载美图秀秀2023版是一款功能丰富的图片美化和编辑软
 抖音评论里怎么发图片?评论区图片入口在哪里?
Mar 21, 2024 pm 09:12 PM
抖音评论里怎么发图片?评论区图片入口在哪里?
Mar 21, 2024 pm 09:12 PM
随着抖音短视频的火爆,用户们在评论区互动变得更加丰富多彩。有些用户希望在评论中分享图片,以更好地表达自己的观点或情感。那么,抖音评论里怎么发图片呢?本文将为你详细解答这个问题,并为你提供一些相关的技巧和注意事项。一、抖音评论里怎么发图片?1.打开抖音:首先,你需要打开抖音APP,并登录你的账号。2.找到评论区:在浏览或发布短视频时,找到想要评论的地方,点击“评论”按钮。3.输入评论内容:在评论区输入你的评论内容。4.选择发送图片:在输入评论内容的界面,你会看到一个“图片”按钮或者“+”号按钮,点
 小米14怎么设置拍照水印?
Mar 18, 2024 am 11:00 AM
小米14怎么设置拍照水印?
Mar 18, 2024 am 11:00 AM
为了让拍摄出的照片更具个性和独特性,小米14提供了拍照水印设置。通过设置拍照水印,用户可以在拍摄的照片上添加图案、文字和标志,使得每一张照片都能更好地记录下珍贵的时刻和回忆。接下来,我们将介绍如何在小米14中设置拍照水印,让您的照片更加个性化和生动。小米14怎么设置拍照水印?1、首先点击“相机”。2、然后点击“设置”。3、接着找到水印,随后就可以开始拍摄了。
 WIN10服务主机太占cpu的处理操作过程
Mar 27, 2024 pm 02:41 PM
WIN10服务主机太占cpu的处理操作过程
Mar 27, 2024 pm 02:41 PM
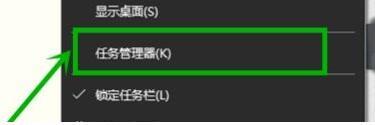
1、首先我们右击任务栏空白处,选择【任务管理器】选项,或者右击开始徽标,然后再选择【任务管理器】选项。2、在打开的任务管理器界面,我们点击最右端的【服务】选项卡。3、在打开的【服务】选项卡,点击下方的【打开服务】选项。4、在打开的【服务】窗口,右击【InternetConnectionSharing(ICS)】服务,然后选择【属性】选项。5、在打开的属性窗口,将【打开方式】修改为【禁用】,点击【应用】后点击【确定】。6、点击开始徽标,然后点击关机按钮,选择【重启】,完成电脑重启就行了。
 win11 24H2右下角的评估副本水印怎么去掉? 去除win11右下角评估副本技巧
Jun 01, 2024 pm 09:52 PM
win11 24H2右下角的评估副本水印怎么去掉? 去除win11右下角评估副本技巧
Jun 01, 2024 pm 09:52 PM
win1124H2如何消除右下角的评估副本文字?我们在使用系统的时候有时候桌面会在右下角的屏幕显示一个透明的水印,那么这个透明的水印要怎么去掉?用户们可以直接的利用第三方软件来进行操作就可以了。下面就让本站来为用户们来仔细的介绍一下消除win1124H2评估副本水印的方法吧。消除win1124H2评估副本水印的方法下载UniversalWatermarkDisabler工具,运行后会显示出当前系统的版本以及水印状态,「Status」中显示「Readyforinstallation」即已经可以去除
 ppt怎么让图片一张一张出来
Mar 25, 2024 pm 04:00 PM
ppt怎么让图片一张一张出来
Mar 25, 2024 pm 04:00 PM
在PowerPoint中,让图片逐一显示是一种常用的技巧,可以通过设置动画效果来实现。本指南详细介绍了实现这一技巧的步骤,包括基本设置、图片插入、添加动画、调整动画顺序和时间。此外,还提供了高级设置和调整,例如使用触发器、调整动画速度和顺序,以及预览动画效果。通过遵循这些步骤和技巧,用户可以轻松地在PowerPoint中设置图片逐一出现,从而提升演示文稿的视觉效果并吸引观众的注意力。
 WPS编辑水印的方法介绍
Mar 27, 2024 pm 02:06 PM
WPS编辑水印的方法介绍
Mar 27, 2024 pm 02:06 PM
1、我们用WPS打开一篇文档,里面带有水印,看起来比较乱,怎么去掉呢?往下看。2、菜单栏找到插入选项卡,选择此选项卡底下的页眉和页脚图标,用鼠标左键在上面点击一下。3、这时页面文字变成灰色的不可编辑状态,但是此时文字背面的水印就可以编辑了。4、点击水印,可以看到这是一张图片水印,因为在这张图片周围出现几个小方块,此时图片为可以编辑状态。5、用键盘delete键删除图片,可以看到水印不见了。6、页面双击鼠标,退出页眉页脚编辑模式,页面文字又变成正常色可以编辑状态,但此时页面上的水印已经不见了。7、
