GUI之 事件处理基础
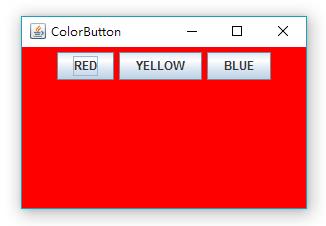
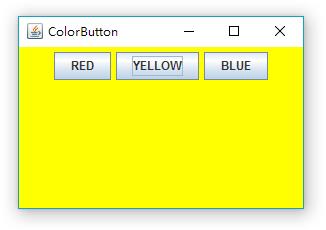
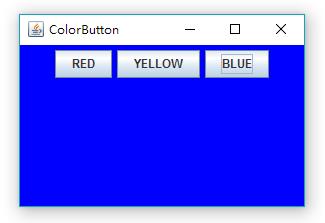
事件处理可以简单地这么理解,当有一个事件产生,程序要根据这个事件做出响应。比如,我们做了一个可以通过按钮改变背景颜色的窗口,当我们点击按钮时便产生了一个事件,程序会根据这个事件来做出响应,也就是去改变背景的颜色。
那么程序是怎样做出响应的呢?这就需要事件监听器ActionListener,这是一个接口,里面包含了actionPerformed方法(也就是根据事件去执行的操作),所以我们要实现这个接口(实现接口里的actionPerformed方法)做出一个监听器对象出来,并且用按钮来注册这个监听器对象,这样当按钮被点击的时候,就会调用这个监听器来执行响应了。


运行结果
代码(第42行开始为实现接口):
package buttonPanel;

import java.awt.*;
import java.awt.event.*; //事件监听器接口ActionListener的位置。
import javax.swing.*;

public class ButtonFrame extends JFrame {
    private ButtonPanel buttonPanel;
    private static final int DEFAULT_WIDTH = 300;
    private static final int DEFAULT_HEIGHT = 200;

    public ButtonFrame() {
        setSize(DEFAULT_WIDTH,DEFAULT_HEIGHT);
        setLocationByPlatform(true);

        //构造按钮
        JButton redButton = new JButton("RED");
        JButton yellowButton = new JButton("YELLOW");
        JButton blueButton = new JButton("BLUE");

        buttonPanel = new ButtonPanel();

        //添加按钮到面板
        buttonPanel.add(redButton);
        buttonPanel.add(yellowButton);
        buttonPanel.add(blueButton);

        add(buttonPanel);

        //构造对应颜色的动作监听器
        ColorAction redAction = new ColorAction(Color.red);
        ColorAction yellowAction = new ColorAction(Color.yellow);
        ColorAction blueAction = new ColorAction(Color.blue);

        //每个按钮注册对应的监听器
        redButton.addActionListener(redAction);
        yellowButton.addActionListener(yellowAction);
        blueButton.addActionListener(blueAction);
    }

    //为了方便调用buttonPanel,将ColorAction作为ButtonFrame的内部类。
    private class ColorAction implements ActionListener {
        private Color backgroundColor;
        public ColorAction(Color c) {
            backgroundColor = c;
        }
        public void actionPerformed(ActionEvent event) {
            buttonPanel.setBackground(backgroundColor);
        }
    }

    public static void main(String[] args) {
        EventQueue.invokeLater(new Runnable() {
            public void run() {
                JFrame frame = new ButtonFrame();
                frame.setTitle("ColorButton");
                frame.setDefaultCloseOperation(EXIT_ON_CLOSE);
                frame.setVisible(true);
            }
        });
    }
}

class ButtonPanel extends JPanel {
    private static final int DEFAUT_WIDTH = 300;
    private static final int DEFAUT_HEIGHT = 200;

    @Override
    protected void paintComponent(Graphics g) {
        g.create();
        super.paintComponent(g);
    }

    @Override
    public Dimension getPreferredSize() {
        return new Dimension(DEFAUT_WIDTH,DEFAUT_HEIGHT);
    }
}在上述代码中,为了方便监听器调用buttonPanel,将ColorAction作为ButtonFrame的内部类。如果将ColorAction类独立出去,需要将buttonPanel传递到ColorAction,实现如下:
package buttonPanel2;

import java.awt.*;
import java.awt.event.*;
import javax.swing.*;

public class ButtonFrame2 extends JFrame {
    private ButtonPanel buttonPanel;
    private static final int DEFAULT_WIDTH = 300;
    private static final int DEFAULT_HEIGHT = 200;

    public ButtonFrame2() {
        setSize(DEFAULT_WIDTH,DEFAULT_HEIGHT);
        setLocationByPlatform(true);

        JButton redButton = new JButton("RED");
        JButton yellowButton = new JButton("YELLOW");
        JButton blueButton = new JButton("BLUE");

        buttonPanel = new ButtonPanel();

        buttonPanel.add(redButton);
        buttonPanel.add(yellowButton);
        buttonPanel.add(blueButton);

        add(buttonPanel);

        //将此对象通过this传到ColorAction的构造器。
        ColorAction redAction = new ColorAction(this,Color.red);
        ColorAction yellowAction = new ColorAction(this,Color.yellow);
        ColorAction blueAction = new ColorAction(this,Color.blue);

        redButton.addActionListener(redAction);
        yellowButton.addActionListener(yellowAction);
        blueButton.addActionListener(blueAction);
    }

    public void setButtonPanelsBackground(Color backgroundColor) {
        buttonPanel.setBackground(backgroundColor);
    }

    public static void main(String[] args) {
        EventQueue.invokeLater(new Runnable() {
            public void run() {
                JFrame frame = new ButtonFrame2();
                frame.setTitle("ColorButton");
                frame.setDefaultCloseOperation(EXIT_ON_CLOSE);
                frame.setVisible(true);
            }
        });
    }
}

class ColorAction implements ActionListener {
    private ButtonFrame2 buttonFrame;
    private Color backgroundColor;

    //通过构造器的方法把ButtonFrame2对象传过来,这个对象包含了成员变量buttonPanel,以便对其更换背景色。
    public ColorAction(ButtonFrame2 buttonFrame,Color c) {
        this.buttonFrame = buttonFrame; //this.buttonFrame只是对象管理者,管理的还是ButtonFrame的对象frame。
        backgroundColor = c;
    }
    public void actionPerformed(ActionEvent event) {
        buttonFrame.setButtonPanelsBackground(backgroundColor);
        //这是我们在ButtonFrame2中添加的新方法。
    }
}

class ButtonPanel extends JPanel {
    private static final int DEFAUT_WIDTH = 300;
    private static final int DEFAUT_HEIGHT = 200;

    public ButtonPanel() {
        setBackground(Color.pink);
    }

    @Override
    protected void paintComponent(Graphics g) {
        g.create();
        super.paintComponent(g);
    }

    @Override
    public Dimension getPreferredSize() {
        return new Dimension(DEFAUT_WIDTH,DEFAUT_HEIGHT);
    }
}

ButtonFrame2代码存在一个缺陷,就是在构造按钮、添加按钮到面板、构造相应颜色的监听器和注册监听器的时候有代码复制的情况,为了避免代码复制,我们可以创建一个makeButton方法,把这些重复的操作包含在内,实现如下:
package buttonPanel3;

import java.awt.*;
import java.awt.event.*;
import javax.swing.*;

public class ButtonFrame3 extends JFrame {
    private ButtonPanel buttonPanel;
    private static final int DEFAULT_WIDTH = 300;
    private static final int DEFAULT_HEIGHT = 200;

    public ButtonFrame3() {
        setSize(DEFAULT_WIDTH,DEFAULT_HEIGHT);
        setLocationByPlatform(true);

        buttonPanel = new ButtonPanel();
        add(buttonPanel);

        makeButton("RED",Color.red);
        makeButton("YELLOW",Color.yellow);
        makeButton("BLUE",Color.blue);
    }

    //为了避免代码重复,我们将重复的操作放在这个函数里。
    public void makeButton(String name,final Color bg) {
        JButton button = new JButton(name);
        buttonPanel.add(button);
        button.addActionListener(new ActionListener() { //可以new一个接口出来,但是后面必须接花括号实现内部方法。
            public void actionPerformed(ActionEvent event) {
                buttonPanel.setBackground(bg);
            }
        });
    }

    public static void main(String[] args) {
        EventQueue.invokeLater(new Runnable() {
            public void run() {
                JFrame frame = new ButtonFrame3();
                frame.setTitle("ColorButton");
                frame.setDefaultCloseOperation(EXIT_ON_CLOSE);
                frame.setVisible(true);
            }
        });
    }
}

class ButtonPanel extends JPanel {
    private static final int DEFAUT_WIDTH = 300;
    private static final int DEFAUT_HEIGHT = 200;

    @Override
    protected void paintComponent(Graphics g) {
        g.create();
        super.paintComponent(g);
    }

    @Override
    public Dimension getPreferredSize() {
        return new Dimension(DEFAUT_WIDTH,DEFAUT_HEIGHT);
    }
}

ButtonFrame3在代码中,监听器只被调用了一次,也就是在addActionListener()时。所以我们没有必要为监听器单独做一个类出来,而是只需在用到监听器时直接new一个ActionListener接口出来,并在花括号里实现接口方法即可。

热AI工具

Undresser.AI Undress
人工智能驱动的应用程序,用于创建逼真的裸体照片

AI Clothes Remover
用于从照片中去除衣服的在线人工智能工具。

Undress AI Tool
免费脱衣服图片

Clothoff.io
AI脱衣机

Video Face Swap
使用我们完全免费的人工智能换脸工具轻松在任何视频中换脸!

热门文章

热工具

记事本++7.3.1
好用且免费的代码编辑器

SublimeText3汉化版
中文版,非常好用

禅工作室 13.0.1
功能强大的PHP集成开发环境

Dreamweaver CS6
视觉化网页开发工具

SublimeText3 Mac版
神级代码编辑软件(SublimeText3)
 突破或从Java 8流返回?
Feb 07, 2025 pm 12:09 PM
Java 8引入了Stream API,提供了一种强大且表达力丰富的处理数据集合的方式。然而,使用Stream时,一个常见问题是:如何从forEach操作中中断或返回? 传统循环允许提前中断或返回,但Stream的forEach方法并不直接支持这种方式。本文将解释原因,并探讨在Stream处理系统中实现提前终止的替代方法。 延伸阅读: Java Stream API改进 理解Stream forEach forEach方法是一个终端操作,它对Stream中的每个元素执行一个操作。它的设计意图是处
 Java程序查找胶囊的体积
Feb 07, 2025 am 11:37 AM
胶囊是一种三维几何图形,由一个圆柱体和两端各一个半球体组成。胶囊的体积可以通过将圆柱体的体积和两端半球体的体积相加来计算。本教程将讨论如何使用不同的方法在Java中计算给定胶囊的体积。 胶囊体积公式 胶囊体积的公式如下: 胶囊体积 = 圆柱体体积 两个半球体体积 其中, r: 半球体的半径。 h: 圆柱体的高度(不包括半球体)。 例子 1 输入 半径 = 5 单位 高度 = 10 单位 输出 体积 = 1570.8 立方单位 解释 使用公式计算体积: 体积 = π × r2 × h (4
 创造未来:面向零基础的 Java 编程
Oct 13, 2024 pm 01:32 PM
Java是热门编程语言,适合初学者和经验丰富的开发者学习。本教程从基础概念出发,逐步深入讲解高级主题。安装Java开发工具包后,可通过创建简单的“Hello,World!”程序实践编程。理解代码后,使用命令提示符编译并运行程序,控制台上将输出“Hello,World!”。学习Java开启了编程之旅,随着掌握程度加深,可创建更复杂的应用程序。


