1.canvas绘制
步骤
添加canvas元素,定义id和范围
js里获取canvas元素
通过getContext()方法获取2D绘制环境
通过不同的函数进行图形绘制
坐标定位
绘制的图形定位都是以canvas的左上角为(0,0)原点
绘制直线
moveTo(): 规定起始点
lineTo(): 从起点绘制到规定坐标的直线
stroke(): 实现绘制直线的功能
fill(): 实现填充功能
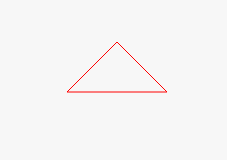
实例:绘制一个三角形
html代码
<body> <canvas id="canvas"></canvas> </body>
js代码
window.onload = function(){ var canvas = document.getElementById("canvas");
  canvas.width = 800;
  canvas.height = 800; var context  = canvas.getContext('2d');
  context.strokeStyle = "red";
  context.moveTo(100, 100);
  context.lineTo(200, 100);
  context.lineTo(150,50);
  context.lineTo(100,100);
  context.stroke();
};
绘制矩形
fillStyle():设置矩形填充颜色。
fillRect(x,y,width,height)。
strokeStyle():设置矩形轮廓颜色。
strokeRect(x,y,width,height)。
绘制圆形(弧形)
beginPath():开始绘制路线
arc(x,y,radius,startAngle,endAngle,anticlockwise)
设置绘制的中心点,半径,起始角度,结束角度和绘制方向。
贝塞尔曲线
二次贝塞尔曲线
quadraticCurveTo(cp1x,cp1y,x,y)
cp1x,cp1y 表示一个控制点坐标;x,y代表终点坐标。
三次贝塞尔曲线
bezierCurveTo(cp1x,cp1y,cp2x,cp2y,x,y)
cp1x,cp1y和cp2x,cp2y分别代表
两个控制点。
实例1:绘制一个五角星
window.onload = function() { var canvas = document.getElementById("canvas"); var context = canvas.getContext('2d');
    drawStar(context, 120, 120, 80, 30, 10, "yellow", 0);
} function drawStar(context, x, y, R, r, width, color, rotation) {
    context.beginPath(); for (var i = 0; i < 5; i++) {
        context.lineTo(Math.cos((18 + i * 72 - rotation) / 180 * Math.PI) * R + x, -Math.sin((18 + i * 72 - rotation) / 180 * Math.PI) * R + y);
        context.lineTo(Math.cos((54 + i * 72 - rotation) / 180 * Math.PI) * r + x, -Math.sin((54 + i * 72 - rotation) / 180 * Math.PI) * r + y);
    }
    context.closePath();
    context.lineWidth = width;
    context.fillStyle = color;
    context.fill();
}
实例2:绘制宝马标志
window.onload = function() { var canvas = document.getElementById("canvas");
    canvas.width = 800;
    canvas.height = 800; var context = canvas.getContext('2d'); //圆心坐标x,y  内圆半径r  外圆半径R var x = 100; var y = 100; var r = 100; var R = r + 50; var colors = Array("#87CEFA", "#FAFAFA", "#000");
    context.beginPath();
    context.translate(100, 100);
    context.arc(x, y, R, 0, Math.PI * 2);
    line_gra = context.createLinearGradient(-10, -10,20, 50);
    line_gra.addColorStop(0, "#ddd");
    line_gra.addColorStop(1, "#262626");
    context.lineWidth = 3;
    context.strokeStyle = "#000";
    context.fillStyle = line_gra;
    context.closePath();
    context.stroke();
    context.fill();
    drawBigRound(context, x, y, r, 53, "#ADD8E6", 7);
    drawBm(context, x, y, r, colors);
    drawBigRound(context, x, y, r, 3, "#9FB6CD", 5);
    context.beginPath();
    context.fillStyle = "#fff";
    context.font = "bold 40px verdana";
    context.fillText("M", 80, -10);
    context.rotate(Math.PI / 6);
    context.fillText("W", 125, -75);
    context.rotate(-(Math.PI / 2));
    context.fillText("B", 0, 35);
    context.restore();
} function drawBm(context, x, y, r, colors) { var color; for (var i = 0; i < 4; i++) {
        context.beginPath();
        context.moveTo(x, y);
        context.arc(x, y, r, Math.PI * i / 2, Math.PI * (i + 1) / 2); if (i == 0 || i == 2) {
            color = colors[0];
        } else {
            color = colors[1];
        }
        context.fillStyle = color;
        context.lineWidth = 2;
        context.strokeStyle = colors[2];
        context.closePath();
        context.fill();
        context.stroke();
    }
} function drawBigRound(context, x, y, r, addr, color, lineWidth) {
    context.beginPath();
    context.arc(x, y, r + addr, 0, Math.PI * 2);
    context.lineWidth = lineWidth;
    context.strokeStyle = color;
    context.closePath();
    context.stroke();
}
2.CSS3 阴影 box-shadow
box-shadow: h-shadow v-shadow blur spread color inset;
h-shadow 必需。水平阴影的位置。允许负值。
v-shadow 必需。垂直阴影的位置。允许负值。
blur 可选。模糊距离。
spread 可选。阴影的尺寸。
color 可选。阴影的颜色。请参阅 CSS 颜色值。
inset 可选。将外部阴影 (outset) 改为内部阴影。
3.CSS3 transform属性
transform: none|transform-functions;
transform:rotate(): 旋转,deg是度的意思
transform: rotate(-10deg);
transform:skew(): 倾斜
transform:skew(20deg);
transform:scale(): 缩放,x方向2倍,y方向1.5倍
transform: scale(2, 1.5);
transform:translate(): 平移,x方向平移120px,y方向平移10px
transform:translate(120px,10px);
4.CSS3 transtion属性
transition: property duration timing-function delay;
transition-property 规定设置过渡效果的 CSS 属性的名称。
transition-duration 规定完成过渡效果需要多少秒或毫秒。
transition-timing-function 规定速度效果的速度曲线。
transition-delay 定义过渡效果何时开始。
div { width:100px; transition: width 2s; -moz-transition: width 2s; /* Firefox 4 */ -webkit-transition: width 2s; /* Safari 和 Chrome */ -o-transition: width 2s; /* Opera */ }


