css折叠样式(4)――div+css布局
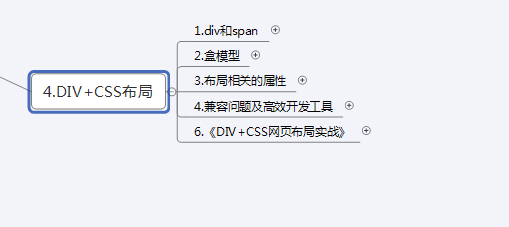
内容概要:
一、div和span
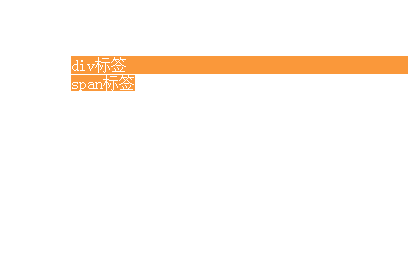
(1)块级标签:div
(2)内联标签:span
如图所示:
二、盒模型(重要)
注:可用浏览器的调试工具可查看盒子
(1)margin:盒子外边距

(2)padding:盒子内边距(会改变块的大小)

(3)border:盒子边框宽度
(4)width:盒子宽度
(5)height:盒子高度
例子:
①:外边距和内边距区别:

demo.html
<!doctype html>
<html>
    <head>
        <title>Div+Css布局(div+span以及盒模型)</title>
        <meta charset="utf-8">
        <style type="text/css">

            body{
                margin:0;
                padding:0;
                background:#C5C1AA;
            }
            div{
                height:500px;
                margin:60px;
                padding:o;
                border:solid 2px black;
                background-color:rgba(255,0,0,0.7);
                }
            div.div1{
                height:400px;
                margin:0 audio;
                border:solid 3px black;
                background-color:rgba(0,0,255,0.7);
            }


        </style>
    </head>
    <body>
        <div>
            <div class="div1">
                <h1 style="text-align:center;">欢迎登录系统</h1>
                <h4 style="text-align:center;">账号:<input style="text"></h4>
                <h4 style="text-align:center;">密码:<input style="text"></h4>
            </div>
        </div>
    </body>
</html>②:盒子模型div摆放例子:
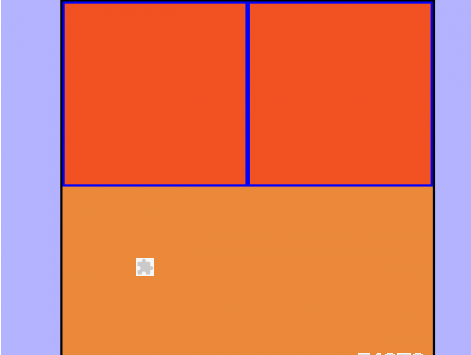
demo.html
<!doctype html>
<html>
    <head>
        <title>Div+Css布局(div+span以及盒模型)</title>
        <meta charset="utf-8">
        <style type="text/css">
        body{
            margin:0;
            padding:0;
            background-color:rgba(0,0,255,0.3);
        }
        div{
            width:500px;
            height:500px;
            background-color:rgba(250,128,10,0.8);
            margin:0 auto;   /* 使div居中*/

            border:solid black;
        }
        div.div1{
            float:left;   /* 向左排列/*
            background-color:rgba(255,0,0,0.4);
            border:solid blue;
            height:244px;
            width:244px;
            margin:0;
            padding:0;
        }

        </style>
    </head>
    <body>
        <div>
        <div class="div1"></div>
        <div class="div1"></div>

        </div>
    </body>
</html>三、布局相关的属性(重要)
(1)position 定位方式 ①.正常定位:relative②.根据父元素进行定位 :absolute③.根据浏览器窗口进行定位 : fixed④.没有定位 :static⑤.继承 :inherit(2)定位①.left:XXpx(左)离页面顶点的距离②.right:XXpx(右)离页面顶点的距离③.top:XXpx(上)离页面顶点的距离④.bottom:XXpx(下)离页面顶点的距离(3)z-index 层覆盖先后顺序(优先级)①.-1,0,1,2,3;当为-1时,该图层为最底层
(4)display 显示属性(块级标签和内联标签之间的切换)
①.display:none 层不显示
②.display:block 块状显示,在元素后面换行,显示下一个块元素
③.display:inline 内联显示,多个块可以显示在一行内
(5)float 浮动属性
①.left:左浮动
②.right:右浮动
[b](6)clear 清除浮动[/b]
①.clear:both
[b](7)overflow 溢出处理[/b]
①.hidden 隐藏超出层大小的内容
②.scroll无论内容是否超出层大小都添加滚动条
③.auto 超出时自动添加滚动条
[b]例子:[/b]
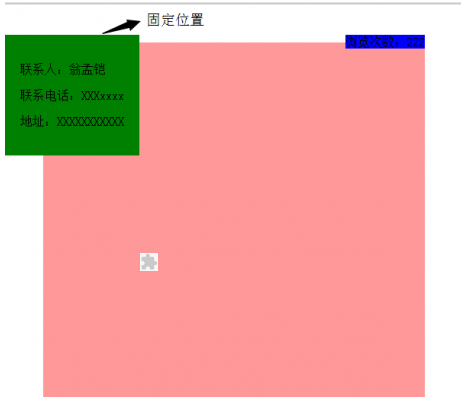
①:固定位置与布局demo
<!doctype html>
<html>
    <head>
        <title>Div+Css布局(布局相关的属性)</title>
        <meta charset="utf-8">
        <style type="text/css">
            body{
            padding:0;
            margin:0;
            }

            div.diva{
                position:relative;   /* 一定要添加,如没添加其子元素则不生效*/
                margin:50px;
                width:500px;
                height:500px;
                background-color:rgba(255,0,0,0.4);

            }
            .spanb{

                position:absolute;
                background-color:blue;
                color:black;
                top:-10px;
                right:0;

                }

            .fixed{
                padding:20px;
                background:green;
                position:fixed;
                left:0;
                top:40px;
                z-index:1;   /* z-index的value值可为-1,0,1,2;当为-1时,该图层为最底层 */
            }


        </style>
    </head>
    <body>

        <div class="fixed">
            <p>联系人:翁孟铠</p>
            <p>联系电话:XXXxxxx</p>
            <p>地址:XXXXXXXXXXX</p>
        </div>

        <div class="diva">
            <span class="spanb">浏览次数:222</spn>
        </div>


        <br/>
        <br/>
        <br/>
        <br/>
        <br/>
        <br/>
        <br/>
        <br/>
        <br/>
        <br/>
        <br/>
        <br/>
        <br/>
        <br/>
        <br/>
        <br/>
        <br/>
        <br/>
        <br/>
        <br/>
        <br/>
        <br/>
        <br/>
        <br/>
        <br/>
        <br/>
        <br/>
        <br/>
    </body>
</html>②:浮动与溢出效果demo
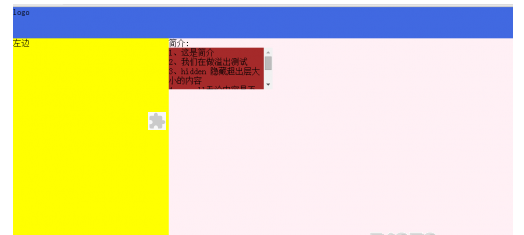
<!doctype html>
<html>
   <head>
      <title>Div+Css布局(浮动以及溢出处理)</title>
      <meta charset="utf-8">
      <style type="text/css">
         body{
         padding:0;
         margin:0;
         }
         .div{
            width:auto;
            height:auto;
            background:#f1f1f1;
            margin:0 auto;
            color: black;
         }

         .left{
            width: 300px;
            height: 400px;
            position: inherit;
            top: 60px;
            background:yellow;
            float: left;
            color: black;
         }
         .right{
            float: left;
            width: 1049px;
            height: 400px;
            position: inherit;
            top: 60px;
            background:lavenderblush;
            color: black;
         }

         .top{
            width: auto;
            height: 60px;
            background: royalblue;
            position: inherit;
            top:0;
         }
         .bottom{
            clear: both;
            margin-top:20px;
            width: 960px;
            height: 20px;
            background: red;
         }

         .jianjie{
            height: 80px;
            width: 200px;
            background: brown;
            overflow: auto;

         }

      </style>
   </head>
   <body>
      <div class="div">
         <div class="top">logo</div>
         <div class="left">左边</div>
         <div class="right">
            简介:<br>
            <div class="jianjie">
               1、这是简介<br>
               2、我们在做溢出测试<br>
               3、hidden 隐藏超出层大小的内容<br>
               4、scroll无论内容是否超出层大小都添加滚动条<br>
               5、auto 超出时自动添加滚动条
            </div>

         </div>
         <div class="bottom"></div>
      </div>
   </body>
</html>以上就是css折叠样式(4)――div+css布局的内容,更多相关内容请关注PHP中文网(www.php.cn)!

热AI工具

Undresser.AI Undress
人工智能驱动的应用程序,用于创建逼真的裸体照片

AI Clothes Remover
用于从照片中去除衣服的在线人工智能工具。

Undress AI Tool
免费脱衣服图片

Clothoff.io
AI脱衣机

AI Hentai Generator
免费生成ai无尽的。

热门文章

热工具

记事本++7.3.1
好用且免费的代码编辑器

SublimeText3汉化版
中文版,非常好用

禅工作室 13.0.1
功能强大的PHP集成开发环境

Dreamweaver CS6
视觉化网页开发工具

SublimeText3 Mac版
神级代码编辑软件(SublimeText3)

热门话题
 bootstrap按钮怎么用
Apr 07, 2025 pm 03:09 PM
如何使用 Bootstrap 按钮?引入 Bootstrap CSS创建按钮元素并添加 Bootstrap 按钮类添加按钮文本
 bootstrap怎么调整大小
Apr 07, 2025 pm 03:18 PM
要调整 Bootstrap 中元素大小,可以使用尺寸类,具体包括:调整宽度:.col-、.w-、.mw-调整高度:.h-、.min-h-、.max-h-
 bootstrap怎么插入图片
Apr 07, 2025 pm 03:30 PM
在 Bootstrap 中插入图片有以下几种方法:直接插入图片,使用 HTML 的 img 标签。使用 Bootstrap 图像组件,可以提供响应式图片和更多样式。设置图片大小,使用 img-fluid 类可以使图片自适应。设置边框,使用 img-bordered 类。设置圆角,使用 img-rounded 类。设置阴影,使用 shadow 类。调整图片大小和位置,使用 CSS 样式。使用背景图片,使用 background-image CSS 属性。
 bootstrap怎么看日期
Apr 07, 2025 pm 03:03 PM
答案:可以使用 Bootstrap 的日期选择器组件在页面中查看日期。步骤:引入 Bootstrap 框架。在 HTML 中创建日期选择器输入框。Bootstrap 将自动为选择器添加样式。使用 JavaScript 获取选定的日期。
 bootstrap怎么写分割线
Apr 07, 2025 pm 03:12 PM
创建 Bootstrap 分割线有两种方法:使用 标签,可创建水平分割线。使用 CSS border 属性,可创建自定义样式的分割线。
 bootstrap怎么设置框架
Apr 07, 2025 pm 03:27 PM
要设置 Bootstrap 框架,需要按照以下步骤:1. 通过 CDN 引用 Bootstrap 文件;2. 下载文件并将其托管在自己的服务器上;3. 在 HTML 中包含 Bootstrap 文件;4. 根据需要编译 Sass/Less;5. 导入定制文件(可选)。设置完成后,即可使用 Bootstrap 的网格系统、组件和样式创建响应式网站和应用程序。
 bootstrap日期怎么验证
Apr 07, 2025 pm 03:06 PM
在 Bootstrap 中验证日期,需遵循以下步骤:引入必需的脚本和样式;初始化日期选择器组件;设置 data-bv-date 属性以启用验证;配置验证规则(如日期格式、错误消息等);集成 Bootstrap 验证框架,并在表单提交时自动验证日期输入。
 vue中怎么用bootstrap
Apr 07, 2025 pm 11:33 PM
在 Vue.js 中使用 Bootstrap 分为五个步骤:安装 Bootstrap。在 main.js 中导入 Bootstrap。直接在模板中使用 Bootstrap 组件。可选:自定义样式。可选:使用插件。


