Android使用DrawerLayout实现仿QQ双向侧滑菜单
1、概述
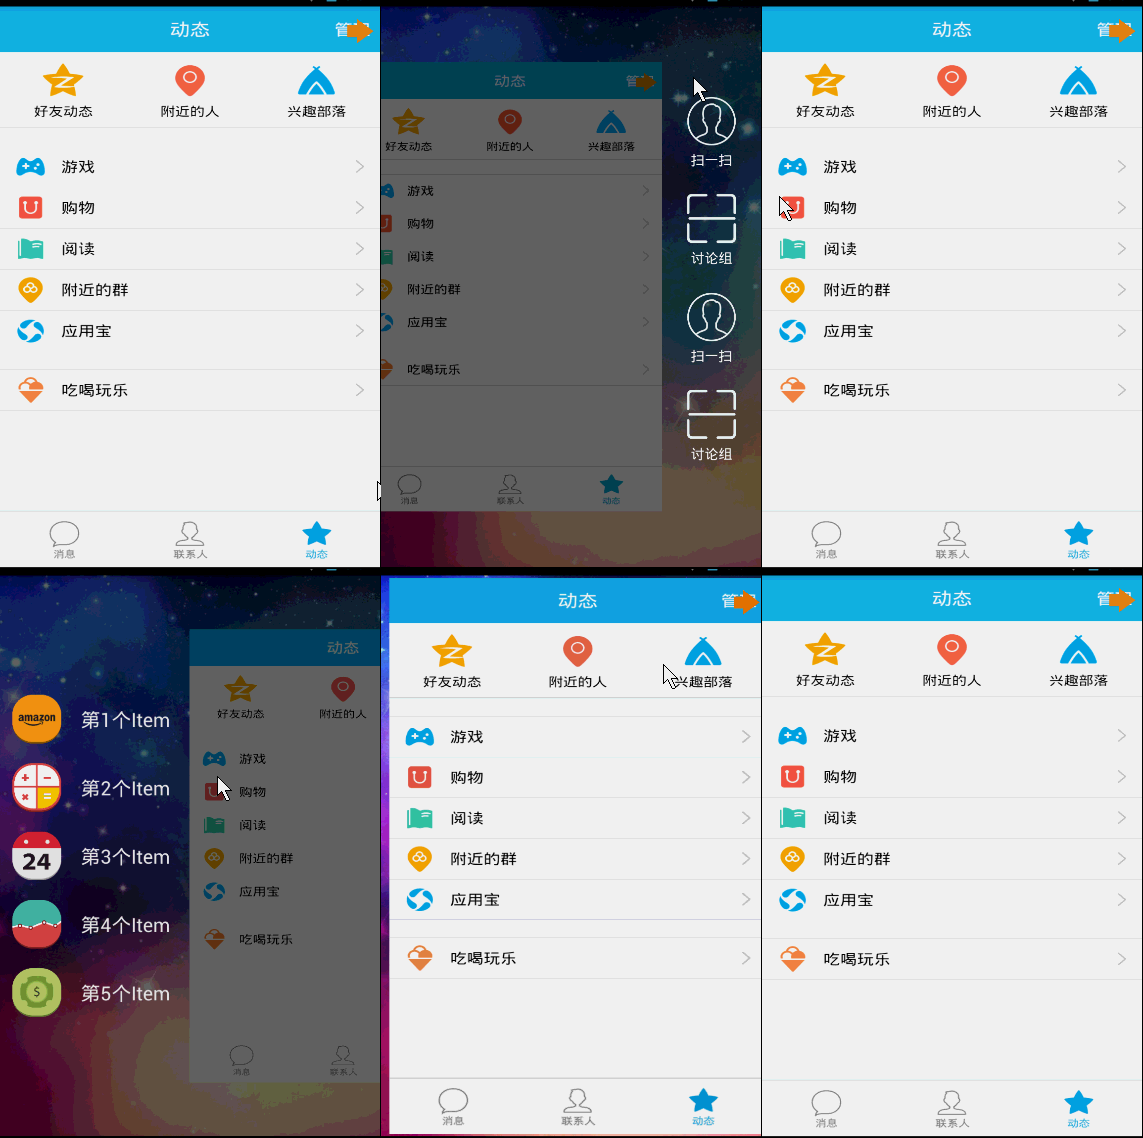
之前写了一个Android 高仿 QQ5.0 侧滑菜单效果 自定义控件来袭 ,恰逢QQ5.2又加了一个右侧菜单,刚好看了下DrawerLayout,一方面官方的东西,我都比较感兴趣;另一方面,这玩意用起来的确方便,于是简单写了个demo,高仿QQ5.2双向侧滑,分享给大家。
首先看看效果图:

DrawerLayout用起来真的很方便,下面一起看看用法~
2、DrawerLayout的使用
直接将DrawerLayout作为根布局,然后其内部第一个View为内容区域,第二个View为左侧菜单,第三个View为右侧侧滑菜单,当前第三个是可选的。
第一个View的宽高应当设置为match_parent,当然了,这也理所当然。
第二、三个View需要设置android:layout_gravity="left",和android:layout_gravity="right"且一搬高度设置为match_parent,宽度为固定值,即侧滑菜单的宽度。
按照上面的描述写个布局文件,然后设置给Activity就添加好了左右侧滑了,是不是很简单~~~
比如我们的布局文件:
<android.support.v4.widget.DrawerLayout xmlns:android="http://schemas.android.com/apk/res/android"
  xmlns:tools="http://schemas.android.com/tools"
  android:id="@+id/id_drawerLayout"
  android:layout_width="match_parent"
  android:layout_height="match_parent"
  android:background="@drawable/img_frame_background" >

  <RelativeLayout
    android:layout_width="match_parent"
    android:layout_height="match_parent"
    android:background="@drawable/qq" >

    <Button
      android:layout_width="40dp"
      android:layout_height="30dp"
       android:layout_marginTop="10dp"
      android:layout_alignParentRight="true"
      android:background="@drawable/youce"
      android:onClick="OpenRightMenu" />
  </RelativeLayout>

  <fragment
    android:id="@+id/id_left_menu"
    android:name="com.zhy.demo_zhy_17_drawerlayout.MenuLeftFragment"
    android:layout_width="200dp"
    android:layout_height="match_parent"
    android:layout_gravity="left"
    android:tag="LEFT" />

  <fragment
    android:id="@+id/id_right_menu"
    android:name="com.zhy.demo_zhy_17_drawerlayout.MenuRightFragment"
    android:layout_width="100dp"
    android:layout_height="match_parent"
    android:layout_gravity="right"
    android:tag="RIGHT" />

</android.support.v4.widget.DrawerLayout>这里我们的主内容区域为RelativeLayout
菜单用的两个Fragment,左侧为200dp,右侧为100dp;
好了,看了我们的布局文件,接下来看下我们的详细代码。
3、代码是最好的老师
1、MenuLeftFragment
package com.zhy.demo_zhy_17_drawerlayout;

import android.os.Bundle;
import android.support.v4.app.Fragment;
import android.view.LayoutInflater;
import android.view.View;
import android.view.ViewGroup;

public class MenuLeftFragment extends Fragment
{

  @Override
  public View onCreateView(LayoutInflater inflater, ViewGroup container,
      Bundle savedInstanceState)
  {
    return inflater.inflate(R.layout.layout_menu, container, false);
  }
}对应的布局文件:
<?xml version="1.0" encoding="utf-8"?>
<RelativeLayout xmlns:android="http://schemas.android.com/apk/res/android"
  android:layout_width="match_parent"
  android:layout_height="match_parent"
  android:background="#00000000" >

  <LinearLayout
    android:layout_width="match_parent"
    android:layout_height="wrap_content"
    android:layout_centerVertical="true"
    android:orientation="vertical" >

    <RelativeLayout
      android:layout_width="match_parent"
      android:layout_height="wrap_content" >

      <ImageView
        android:id="@+id/one"
        android:layout_width="50dp"
        android:layout_height="50dp"
        android:layout_centerVertical="true"
        android:layout_marginLeft="20dp"
        android:layout_marginTop="20dp"
        android:src="@drawable/img_1" />

      <TextView
        android:layout_width="fill_parent"
        android:layout_height="wrap_content"
        android:layout_centerVertical="true"
        android:layout_marginLeft="20dp"
        android:layout_toRightOf="@id/one"
        android:text="第1个Item"
        android:textColor="#f0f0f0"
        android:textSize="20sp" />
    </RelativeLayout>

    <RelativeLayout
      android:layout_width="match_parent"
      android:layout_height="wrap_content" >

      <ImageView
        android:id="@+id/two"
        android:layout_width="50dp"
        android:layout_height="50dp"
        android:layout_centerVertical="true"
        android:layout_marginLeft="20dp"
        android:layout_marginTop="20dp"
        android:src="@drawable/img_2" />

      <TextView
        android:layout_width="fill_parent"
        android:layout_height="wrap_content"
        android:layout_centerVertical="true"
        android:layout_marginLeft="20dp"
        android:layout_toRightOf="@id/two"
        android:text="第2个Item"
        android:textColor="#f0f0f0"
        android:textSize="20sp" />
    </RelativeLayout>

    <RelativeLayout
      android:layout_width="match_parent"
      android:layout_height="wrap_content" >

      <ImageView
        android:id="@+id/three"
        android:layout_width="50dp"
        android:layout_height="50dp"
        android:layout_centerVertical="true"
        android:layout_marginLeft="20dp"
        android:layout_marginTop="20dp"
        android:src="@drawable/img_3" />

      <TextView
        android:layout_width="fill_parent"
        android:layout_height="wrap_content"
        android:layout_centerVertical="true"
        android:layout_marginLeft="20dp"
        android:layout_toRightOf="@id/three"
        android:text="第3个Item"
        android:textColor="#f0f0f0"
        android:textSize="20sp" />
    </RelativeLayout>

    <RelativeLayout
      android:layout_width="match_parent"
      android:layout_height="wrap_content" >

      <ImageView
        android:id="@+id/four"
        android:layout_width="50dp"
        android:layout_height="50dp"
        android:layout_centerVertical="true"
        android:layout_marginLeft="20dp"
        android:layout_marginTop="20dp"
        android:src="@drawable/img_4" />

      <TextView
        android:layout_width="fill_parent"
        android:layout_height="wrap_content"
        android:layout_centerVertical="true"
        android:layout_marginLeft="20dp"
        android:layout_toRightOf="@id/four"
        android:text="第4个Item"
        android:textColor="#f0f0f0"
        android:textSize="20sp" />
    </RelativeLayout>

    <RelativeLayout
      android:layout_width="match_parent"
      android:layout_height="wrap_content" >

      <ImageView
        android:id="@+id/five"
        android:layout_width="50dp"
        android:layout_height="50dp"
        android:layout_centerVertical="true"
        android:layout_marginLeft="20dp"
        android:layout_marginTop="20dp"
        android:src="@drawable/img_5" />

      <TextView
        android:layout_width="fill_parent"
        android:layout_height="wrap_content"
        android:layout_centerVertical="true"
        android:layout_marginLeft="20dp"
        android:layout_toRightOf="@id/five"
        android:text="第5个Item"
        android:textColor="#f0f0f0"
        android:textSize="20sp" />
    </RelativeLayout>
  </LinearLayout>

</RelativeLayout>其实就是堆出来的布局~~没撒意思~
2、MenuRightFragment
package com.zhy.demo_zhy_17_drawerlayout;

import android.os.Bundle;
import android.support.v4.app.Fragment;
import android.view.LayoutInflater;
import android.view.View;
import android.view.ViewGroup;

public class MenuRightFragment extends Fragment
{

  @Override
  public View onCreateView(LayoutInflater inflater, ViewGroup container,
      Bundle savedInstanceState)
  {
    return inflater.inflate(R.layout.menu_layout_right, container, false);
  }
}对应布局文件:
<?xml version="1.0" encoding="utf-8"?>
<LinearLayout xmlns:android="http://schemas.android.com/apk/res/android"
  android:layout_width="match_parent"
  android:layout_height="match_parent"
  android:gravity="center_vertical"
  android:orientation="vertical" >

  <LinearLayout
    android:layout_width="match_parent"
    android:layout_height="wrap_content"
    android:layout_centerVertical="true"
    android:layout_gravity="center_vertical"
    android:layout_marginBottom="20dp"
    android:orientation="vertical" >

    <ImageView
      android:layout_width="60dp"
      android:layout_height="60dp"
      android:layout_gravity="center"
      android:src="@drawable/wode" />

    <TextView
      android:layout_width="fill_parent"
      android:layout_height="wrap_content"
      android:gravity="center"
      android:text="扫一扫"
      android:textColor="#ffffff" />
  </LinearLayout>

  <LinearLayout
    android:layout_width="match_parent"
    android:layout_height="wrap_content"
    android:layout_centerVertical="true"
    android:layout_gravity="center_vertical"
    android:layout_marginBottom="20dp"
    android:orientation="vertical" >

    <ImageView
      android:layout_width="60dp"
      android:layout_height="60dp"
      android:layout_gravity="center"
      android:src="@drawable/saoma" />

    <TextView
      android:layout_width="fill_parent"
      android:layout_height="wrap_content"
      android:gravity="center"
      android:text="讨论组"
      android:textColor="#ffffff" />
  </LinearLayout>

  <LinearLayout
    android:layout_width="match_parent"
    android:layout_height="wrap_content"
    android:layout_centerVertical="true"
    android:layout_gravity="center_vertical"
    android:layout_marginBottom="20dp"
    android:orientation="vertical" >

    <ImageView
      android:layout_width="60dp"
      android:layout_height="60dp"
      android:layout_gravity="center"
      android:src="@drawable/wode" />

    <TextView
      android:layout_width="fill_parent"
      android:layout_height="wrap_content"
      android:gravity="center"
      android:text="扫一扫"
      android:textColor="#ffffff" />
  </LinearLayout>

  <LinearLayout
    android:layout_width="match_parent"
    android:layout_height="wrap_content"
    android:layout_centerVertical="true"
    android:layout_gravity="center_vertical"
    android:layout_marginBottom="20dp"
    android:orientation="vertical" >

    <ImageView
      android:layout_width="60dp"
      android:layout_height="60dp"
      android:layout_gravity="center"
      android:src="@drawable/saoma" />

    <TextView
      android:layout_width="fill_parent"
      android:layout_height="wrap_content"
      android:gravity="center"
      android:text="讨论组"
      android:textColor="#ffffff" />
  </LinearLayout>

</LinearLayout>依旧很简单,除了图标比较难找以外~~
3、MainActivity
MainActivity的布局文件已经贴过了~~
package com.zhy.demo_zhy_17_drawerlayout;

import android.os.Bundle;
import android.support.v4.app.FragmentActivity;
import android.support.v4.widget.DrawerLayout;
import android.support.v4.widget.DrawerLayout.DrawerListener;
import android.view.Gravity;
import android.view.View;
import android.view.Window;

import com.nineoldandroids.view.ViewHelper;

public class MainActivity extends FragmentActivity
{

  private DrawerLayout mDrawerLayout;

  @Override
  protected void onCreate(Bundle savedInstanceState)
  {
    super.onCreate(savedInstanceState);
    requestWindowFeature(Window.FEATURE_NO_TITLE);
    setContentView(R.layout.activity_main);

    initView();
    initEvents();

  }

  public void OpenRightMenu(View view)
  {
    mDrawerLayout.openDrawer(Gravity.RIGHT);
    mDrawerLayout.setDrawerLockMode(DrawerLayout.LOCK_MODE_UNLOCKED,
        Gravity.RIGHT);
  }

  private void initEvents()
  {
    mDrawerLayout.setDrawerListener(new DrawerListener()
    {
      @Override
      public void onDrawerStateChanged(int newState)
      {
      }

      @Override
      public void onDrawerSlide(View drawerView, float slideOffset)
      {
        View mContent = mDrawerLayout.getChildAt(0);
        View mMenu = drawerView;
        float scale = 1 - slideOffset;
        float rightScale = 0.8f + scale * 0.2f;

        if (drawerView.getTag().equals("LEFT"))
        {

          float leftScale = 1 - 0.3f * scale;

          ViewHelper.setScaleX(mMenu, leftScale);
          ViewHelper.setScaleY(mMenu, leftScale);
          ViewHelper.setAlpha(mMenu, 0.6f + 0.4f * (1 - scale));
          ViewHelper.setTranslationX(mContent,
              mMenu.getMeasuredWidth() * (1 - scale));
          ViewHelper.setPivotX(mContent, 0);
          ViewHelper.setPivotY(mContent,
              mContent.getMeasuredHeight() / 2);
          mContent.invalidate();
          ViewHelper.setScaleX(mContent, rightScale);
          ViewHelper.setScaleY(mContent, rightScale);
        } else
        {
          ViewHelper.setTranslationX(mContent,
              -mMenu.getMeasuredWidth() * slideOffset);
          ViewHelper.setPivotX(mContent, mContent.getMeasuredWidth());
          ViewHelper.setPivotY(mContent,
              mContent.getMeasuredHeight() / 2);
          mContent.invalidate();
          ViewHelper.setScaleX(mContent, rightScale);
          ViewHelper.setScaleY(mContent, rightScale);
        }

      }

      @Override
      public void onDrawerOpened(View drawerView)
      {
      }

      @Override
      public void onDrawerClosed(View drawerView)
      {
        mDrawerLayout.setDrawerLockMode(
            DrawerLayout.LOCK_MODE_LOCKED_CLOSED, Gravity.RIGHT);
      }
    });
  }

  private void initView()
  {
    mDrawerLayout = (DrawerLayout) findViewById(R.id.id_drawerLayout);
    mDrawerLayout.setDrawerLockMode(DrawerLayout.LOCK_MODE_LOCKED_CLOSED,
        Gravity.RIGHT);
  }

}嗯,代码基本没什么注释~~维撒呢?是因为的确没什么好注释的。
提几点:
1、为了模拟QQ的右侧菜单需要点击才能出现,所以在初始化DrawerLayout的时候,使用了mDrawerLayout.setDrawerLockMode(DrawerLayout.LOCK_MODE_LOCKED_CLOSED,Gravity.RIGHT);意思是只有编程才能将其弹出。
然后在弹出以后,需要让手势可以滑动回去,所以在OpenRightMenu中又编写了:
mDrawerLayout.setDrawerLockMode(DrawerLayout.LOCK_MODE_UNLOCKED,Gravity.RIGHT); UNLOCK了一下。
最后在onDrawerClosed回调中,继续设置mDrawerLayout.setDrawerLockMode(DrawerLayout.LOCK_MODE_LOCKED_CLOSED,Gravity.RIGHT);
2、动画效果
动画用了nineoldandroids,关于动画各种偏移量、缩放比例的计算请参考Android 高仿 QQ5.0 侧滑菜单效果 自定义控件来袭 基本是一致的,唯一的不同的地方,给Content设置了ViewHelper.setTranslationX(mContent, mMenu.getMeasuredWidth() * (1 - scale));让Content在菜单的右侧,默认情况下Menu在菜单之上,所以我们根据菜单划出的距离给Content设置X方向的偏移量。
好了,其实看到可以这么做,基本上任何的侧滑菜单效果都能写出来了。有兴趣的话,可以拿DrawerLayout实现这篇博客的所有效果:Android 实现形态各异的双向侧滑菜单 自定义控件来袭 。
3、setDrawerListener
通过代码也能看出来,可以使用setDrawerListener监听菜单的打开与关闭等等。这里对于当前操作是哪个菜单的判断是通过TAG判断的,我觉得使用gravity应该也能判断出来~~
好了,没撒了,由于DrawerLayout默认只能从边界划出菜单,但是QQ划出菜单的手势区域比较大,大家有兴趣,可以重写Activity的onTouchEvent,在里面判断,如果是左右滑动手势神马的,弹出菜单,应该不麻烦~~~
更多Android使用DrawerLayout实现仿QQ双向侧滑菜单相关文章请关注PHP中文网!

热AI工具

Undresser.AI Undress
人工智能驱动的应用程序,用于创建逼真的裸体照片

AI Clothes Remover
用于从照片中去除衣服的在线人工智能工具。

Undress AI Tool
免费脱衣服图片

Clothoff.io
AI脱衣机

Video Face Swap
使用我们完全免费的人工智能换脸工具轻松在任何视频中换脸!

热门文章

热工具

记事本++7.3.1
好用且免费的代码编辑器

SublimeText3汉化版
中文版,非常好用

禅工作室 13.0.1
功能强大的PHP集成开发环境

Dreamweaver CS6
视觉化网页开发工具

SublimeText3 Mac版
神级代码编辑软件(SublimeText3)
 公司安全软件导致应用无法运行?如何排查和解决?
Apr 19, 2025 pm 04:51 PM
公司安全软件导致部分应用无法正常运行的排查与解决方法许多公司为了保障内部网络安全,会部署安全软件。...
 如何使用MapStruct简化系统对接中的字段映射问题?
Apr 19, 2025 pm 06:21 PM
系统对接中的字段映射处理在进行系统对接时,常常会遇到一个棘手的问题:如何将A系统的接口字段有效地映�...
 如何优雅地获取实体类变量名构建数据库查询条件?
Apr 19, 2025 pm 11:42 PM
在使用MyBatis-Plus或其他ORM框架进行数据库操作时,经常需要根据实体类的属性名构造查询条件。如果每次都手动...
 IntelliJ IDEA是如何在不输出日志的情况下识别Spring Boot项目的端口号的?
Apr 19, 2025 pm 11:45 PM
在使用IntelliJIDEAUltimate版本启动Spring...
 如何将姓名转换为数字以实现排序并保持群组中的一致性?
Apr 19, 2025 pm 11:30 PM
将姓名转换为数字以实现排序的解决方案在许多应用场景中,用户可能需要在群组中进行排序,尤其是在一个用...
 Java对象如何安全地转换为数组?
Apr 19, 2025 pm 11:33 PM
Java对象与数组的转换:深入探讨强制类型转换的风险与正确方法很多Java初学者会遇到将一个对象转换成数组的�...
 使用TKMyBatis进行数据库查询时,如何优雅地获取实体类变量名构建查询条件?
Apr 19, 2025 pm 09:51 PM
在使用TKMyBatis进行数据库查询时,如何优雅地获取实体类变量名以构建查询条件,是一个常见的难题。本文将针...
 为什么Spring项目启动时会因为循环依赖导致随机性问题?
Apr 19, 2025 pm 11:21 PM
理解Spring项目启动中循环依赖的随机性在进行Spring项目开发时,可能会遇到项目启动时由于循环依赖导致的随机...


