PS网页设计教程——小贴士:五步在PS中创建倒计时数字牌
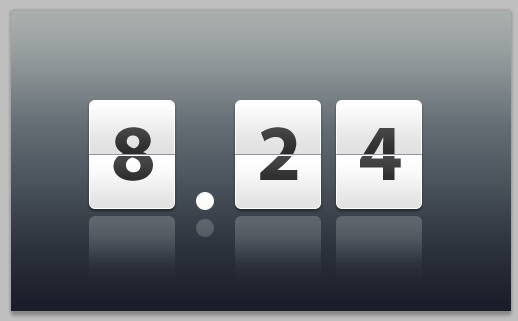
本教程展示如何在PS中设计倒计时数字牌,如下图所示

这种数字牌目前在很多场合都能看到,尤其是现在很流行的Android手机系统上也能看到一二
1. Setting up the Photoshop file
1、配置Photoshop文件
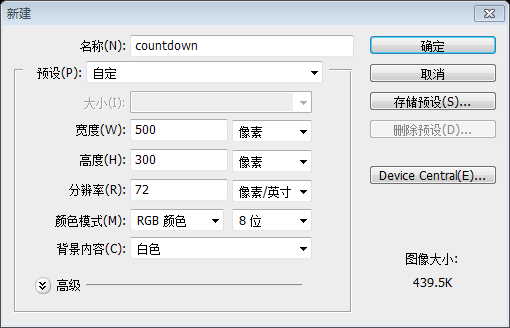
1.1. Create a new file (Ctrl + N). In the New file dialog box, set the Width and Height units to pixels (if it isn't already). Set the width to 500 and the height to 300 pixels. We're creating a graphic element for web, as mentioned above, so set the Resolution to 72 pixels/inch, color mode to RGB color, 8 bit and background contents to white.
1.1新建文件(Ctrl+N)。在新建文件的窗口上,设置宽度和高度的单位为pixels(如果不是pixels的话)。设置宽度为500,高度为300。要创建网页上用的图片元素,如上提及,分辨率设置为72像素/英寸,颜色模式设置为RGB颜色,8位。背景内容为白色
1.2. To unlock the layer, currently titled "background", double click on it and on appearance of a dialog window showing title as Layer 0, press ok.
1.2解锁该图层,当前的标题“背景”,双击该图层,在出现的对话窗口上显示的标题改为“图层”,按确定

2. Adding color to the background (Layer)
2、添加背景颜色(图层)
2.1. Select Layer 0 (if not already selected) and go to Layer > Layer Style > Gradient Overlay.
2.1选择“图层”(如果没有被选中),然后点击:图层 > 图层样式 > 渐变叠加
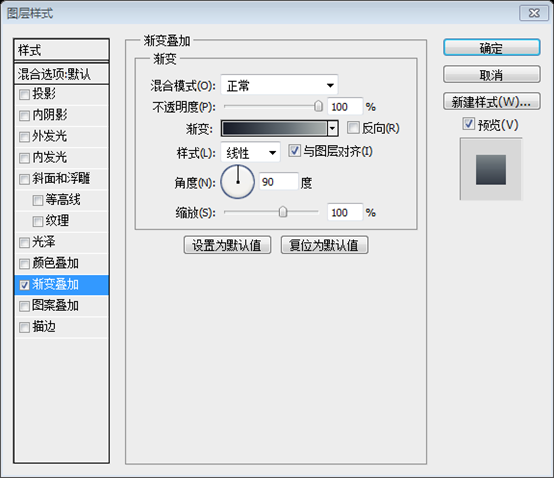
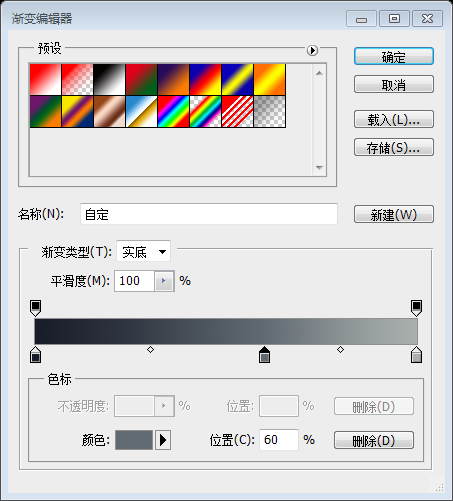
2.2. Make sure the opacity is 100%, style is linear and angle is 90 degrees. Click on the gradient and in the Gradient Editor, add color stops in this order: #191d29 at 0% location, #616a71 at 60% and #a9afab at 100% location.
2.2如下图设置图层样式,不透明度100%,样式选择线性,角度设置为90度。点击渐变,在渐变编辑器窗口里,按顺序设置颜色:在0%的位置上为#191d29,在60%的位置上为#616a71,在100%的位置上为#a9afab
3. Adding a white box
3、添加白色的方块
3.1. Click and hold (without releasing) the Rectangle Tool to select Rounded Rectangle Tool.
3.1点击并按住(不要松开)矩形工具,选择圆角矩形工具
3.2. Choosing radius as 6 px, as shown above, create a rectangular box like the one shown below and rename it as "white-box" after double clicking the "shape 1” layer.
3.2设置半径为6px,如上所示,创建一个圆角矩形(198,89,86,109),如下所示,改名为“白色方块”,在双击形状1图层之后

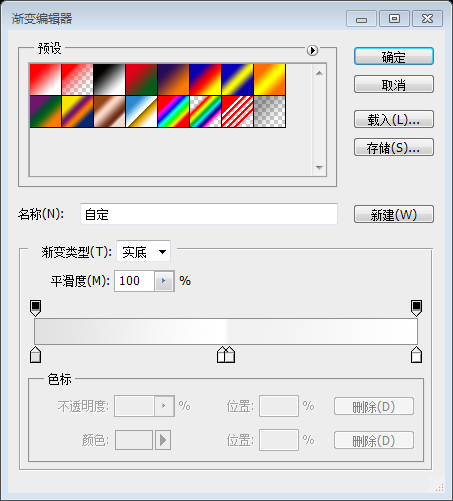
3.3. With white box as selection, go to gradient overlay (as explained in step 2.1). Again, make sure the opacity is 100%, style is linear and angle is 90 degrees. Click on the gradient and in the Gradient Editor, add color stops in this order: #e1e1e1 at 0% location, #ffffff at 49%, #e1e1e1 at 51% location and finally, #ffffff at 100% location.
3.3在白色的方块选中的时候,设置渐变叠加(像之前的步骤2.1)。再次,不透明度设置为100%,样式设置为线性,角度为90度。点击渐变,在渐变编辑器窗口里,按顺序设置颜色:在0%的位置上为#e1e1e1,在49%的位置上为#ffffff,在51%的位置上为#e1e1e1,在100%的位置上设置为#ffffff。
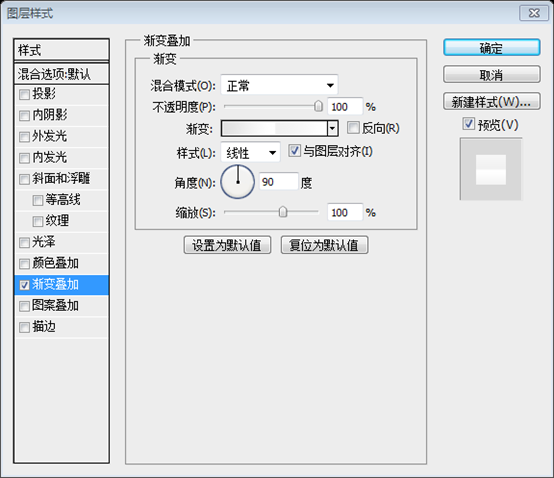
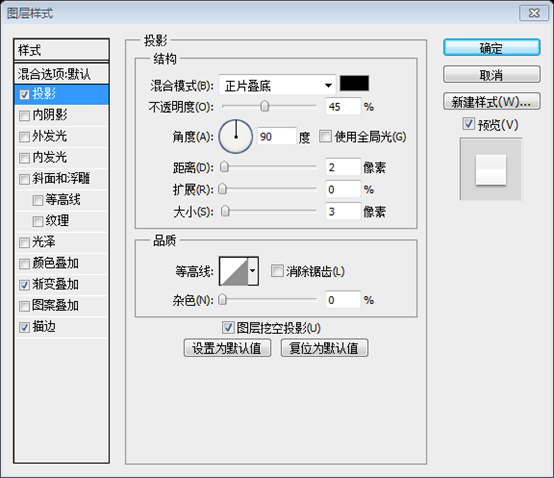
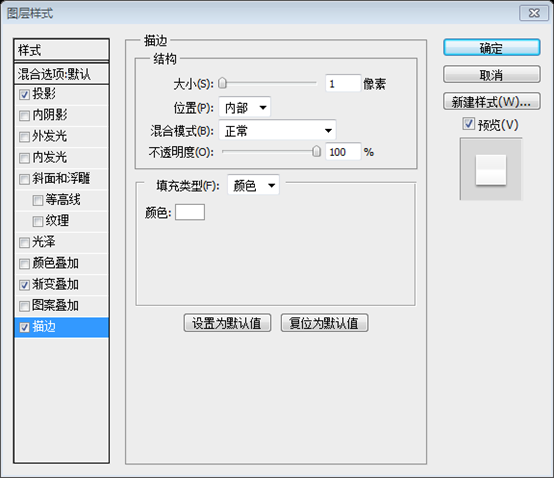
3.4. In the same box as gradient overlay, look for Drop Shadow and Stroke. We have to select them too. Drop shadow settings: Opacity - 45%, distance - 2 px, spread - 0 px and size - 3 px. Stroke settings: Size - 1 px, position - inside and color: #ffffff.
3.4在渐变叠加的窗口上,找到投影和描边。同样如下图设置。投影设置:不透明度为45%,距离为2px,扩展为0,大小为3px。描边设置:大小为1px,位置为内部,颜色为#ffffff。

4. Adding Separators to the box
4、在方块中添加分隔符
4.1. Click and hold the Rounded Rectangle Tool to select Line tool.
4.1点击并按住圆角矩形工具去选择直线工具
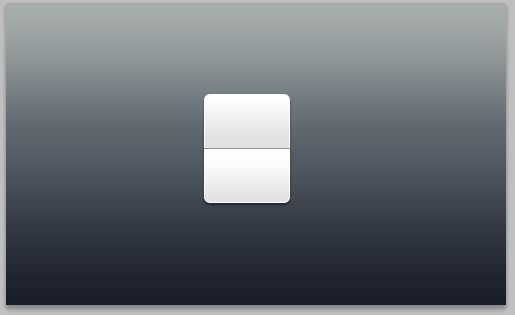
4.2. With weight as 1 px and color #90949c, draw a line horizontally middle across the white box, just enough to touch the edges widthwise, like shown in the pic below. Name it "dark-sep".
4.2宽度设置为1px,颜色为#90949c,在白色方块中画一条水平直线(198,143,86,1),正好触及白色矩形的两边,如下图所示,命名为“深线”
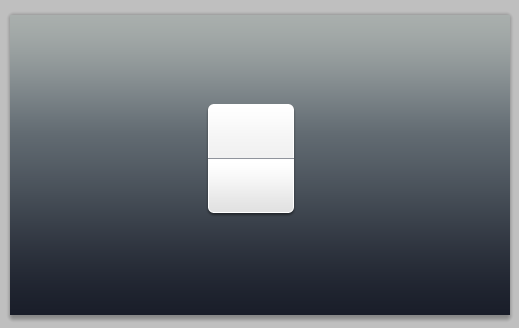
4.3. Right-click (ctrl-click in mac) "dark-sep" layer and select duplicate. Name it "white-sep". Press V on the keyboard to select Move tool, press bottom arrow to move "white-sep" downwards by 1 px and change it color to #ffffff.
4.3右击“深线”图层,选择复制图层。命名为“白线”,按键盘上的V选择移动工具,按下方向键移动“白线”图层下移1px,改变颜色为#ffffff
5. Adding text to complete the countdown
5、添加文本完成倒计时数字牌
5.1. Press T on the keyboard to select Text tool. We have chosen "Myriad Pro bold" in 80 pt size but feel free to select your favorite font here. Select the layer "white-box" and type in a digit or a letter in vertical and horizontal middle. We have typed in a 2.
5.1按键盘上的T选择文字工具。选择字体Myriad Pro bold,字体大小80pt,或者选择你觉得合适的字体。选择白色方块图层,居中输入一个数字或文字。这儿输入的是2.

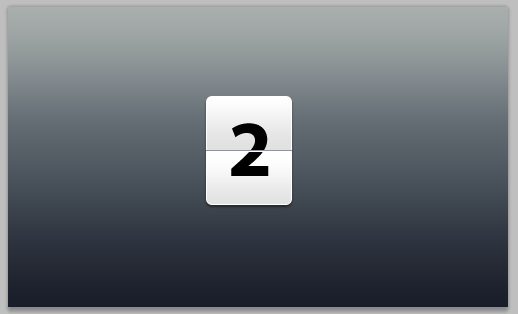
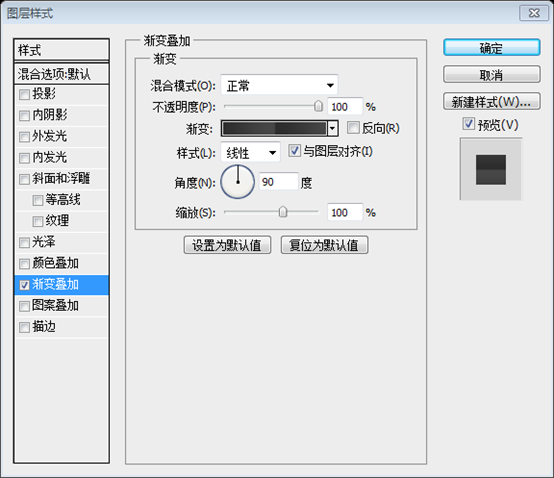
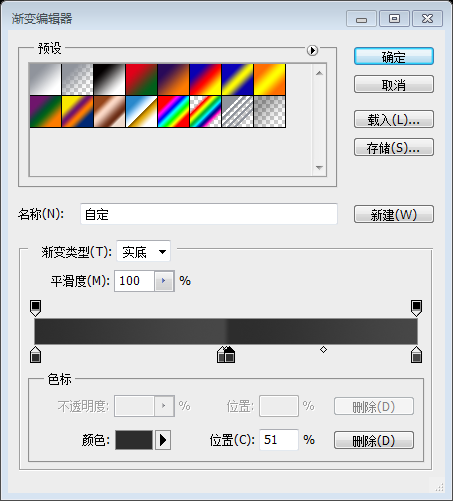
5.2. With text layer as selection, go to gradient overlay (as explained in step 2.1). Again, make sure the opacity is 100%, style is linear and angle is 90 degrees. Click on the gradient and in the Gradient Editor, add color stops in this order: #2d2d2d at 0% location, #474747 at 49%, #2d2d2d at 51% location and finally, #474747 at 100% location.
5.2选中文字图层,添加渐变叠加(像之前的步骤2.1)。再次,不透明度设置为100%,样式设置为线性,角度为90度。点击渐变,在渐变编辑器窗口里,按顺序设置颜色:在0%的位置上为#2d2d2d,在49%的位置上为#474747,在51%的位置上为#2d2d2d,在100%的位置上设置为#474747。

Here we have our countdown ready for usage as an element in broadcasting, collaterals or user interfaces.
至此已经完成计时牌,可以用在广告牌的元素,并列的元素,或是用户界面元素。
Bonus Step - add reflection to the counter
奖励步骤:添加数字牌的倒影
B.1. Select the layer "white-box" and duplicate this layer (step 4.3). Right click (ctrl-click in mac) and first select "rasterize layer" and then, "clear layer style" as shown below.
B.1选择“白色方块”图层,并复制该图层。右键选择“栅格化图层”,接着选“清除图层样式”
B.2. Press M on the keyboard to select Rectangular Marquee Tool and select the box 60% horizontally, from the bottom, like shown above. Go to Select > Modify > Feather and choose a feather radius of 20 px. We pressed "delete" 3 times to get the desired effect. You may choose as per your preference.
B.2按键盘上的M选择矩形选择工具,从下往上选择竖直60%部分,如上所示。点击:选择 > 修改 > 羽化,选择羽化半径为20px。 按Delete键3次获得理想的效果。你也可以按照你自己的想法设置
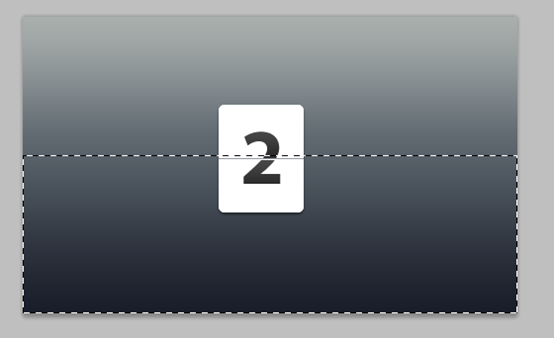
B.3. Press ctrl+d (cmd+d in mac) to deselect. Press V to go back to move tool and move the shape to the bottom of white box. Go to Edit > Transform > Flip vertical and change opacity of this layer to 20%.
B.3按Ctrl+D取消选择。按V选择移动工具,移动到白色方块的下方。点击:编辑 > 变形 > 垂直翻转(注:这步好像是多余的)。设置不透明度为20%

Show us what you made!
这是我另外做的一个效果
更多PS网页设计教程——小贴士:五步在PS中创建倒计时数字牌相关文章请关注PHP中文网!

热AI工具

Undresser.AI Undress
人工智能驱动的应用程序,用于创建逼真的裸体照片

AI Clothes Remover
用于从照片中去除衣服的在线人工智能工具。

Undress AI Tool
免费脱衣服图片

Clothoff.io
AI脱衣机

AI Hentai Generator
免费生成ai无尽的。

热门文章

热工具

记事本++7.3.1
好用且免费的代码编辑器

SublimeText3汉化版
中文版,非常好用

禅工作室 13.0.1
功能强大的PHP集成开发环境

Dreamweaver CS6
视觉化网页开发工具

SublimeText3 Mac版
神级代码编辑软件(SublimeText3)

热门话题
 如何使用Photoshop创建社交媒体图形?
Mar 18, 2025 pm 01:41 PM
本文使用Photoshop详细介绍了社交媒体图形,涵盖设置,设计工具和优化技术。它强调图形创建的效率和质量。
 如何使用Photoshop(优化文件大小,分辨率)准备Web图像?
Mar 18, 2025 pm 01:35 PM
文章讨论使用Photoshop优化Web的图像,重点关注文件大小和分辨率。主要问题是平衡质量和加载时间。
 PS一直显示正在载入是什么原因?
Apr 06, 2025 pm 06:39 PM
PS“正在载入”问题是由资源访问或处理问题引起的:硬盘读取速度慢或有坏道:使用CrystalDiskInfo检查硬盘健康状况并更换有问题的硬盘。内存不足:升级内存以满足PS对高分辨率图片和复杂图层处理的需求。显卡驱动程序过时或损坏:更新驱动程序以优化PS和显卡之间的通信。文件路径过长或文件名有特殊字符:使用简短的路径和避免使用特殊字符。PS自身问题:重新安装或修复PS安装程序。
 PS导出PDF有哪些常见问题
Apr 06, 2025 pm 04:51 PM
导出PS为PDF时常见问题及解决方法:字体嵌入问题:勾选"字体"选项,选择"嵌入",或将字体转换成曲线(路径)。颜色偏差问题:将文件转换成CMYK模式,并进行校色;直接用RGB导出需做好预览和颜色偏差的心理准备。分辨率和文件大小问题:根据实际情况选择分辨率,或使用压缩选项优化文件体积。特殊效果问题:导出前将图层合并(扁平化),或权衡利弊。
 如何使用Photoshop(分辨率,颜色配置文件)准备打印图像?
Mar 18, 2025 pm 01:36 PM
该文章指导在Photoshop中准备用于打印的图像,重点介绍分辨率,色谱和清晰度。它认为300 ppi和CMYK配置文件对于质量印刷至关重要。
 PS执行操作时一直显示正在载入如何解决?
Apr 06, 2025 pm 06:30 PM
PS卡在“正在载入”?解决方法包括:检查电脑配置(内存、硬盘、处理器)、清理硬盘碎片、更新显卡驱动、调整PS设置、重新安装PS,以及养成良好的编程习惯。
 如何使用Photoshop的视频编辑功能?
Mar 18, 2025 pm 01:37 PM
本文介绍了如何使用Photoshop进行视频编辑,详细详细介绍了导入,编辑和导出视频的步骤,并突出了时间表面板,视频层和效果等关键功能。
 PS导出PDF如何设置密码保护
Apr 06, 2025 pm 04:45 PM
在 Photoshop 中导出带密码保护的 PDF:打开图像文件。点击“文件”>“导出”>“导出为 PDF”。设置“安全性”选项,两次输入相同的密码。点击“导出”生成 PDF 文件。


