

【HTML5】3D模型--百行代码实现旋转立体魔方实例

最近研究魔方的玩法,就突然想用HMTL5写一个魔方的模型,由于魔方是一个3D的立方体,这次就试着用HTML5写了一个简单的3D模型。
下面是预览画面。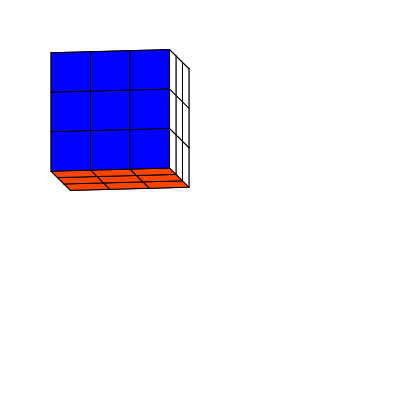
制作流程
首先你需要下载Html5开源库件lufylegend-1.4.0
魔方分为6个面,每个面由9个小矩形组成,现在我把每个小矩形当做一个类封装起来,
因为现在建立的是一个3D魔方,所以要画出每个小矩形,需要知道小矩形的4个定点,而这4个定点会根据空间的旋转角度而变换,所以为了计算出这4个定点坐标,需要知道魔方绕x轴和z轴旋转的角度。
所以,建立矩形类如下
function Rect(pointA,pointB,pointC,pointD,angleX,angleZ,color){
    base(this,LSprite,[]);
    this.pointZ=[(pointA[0]+pointB[0]+pointC[0]+pointD[0])/4,(pointA[1]+pointB[1]+pointC[1]+pointD[1])/4,(pointA[2]+pointB[2]+pointC[2]+pointD[2])/4];
    this.z = this.pointZ[2];
    this.pointA=pointA,this.pointB=pointB,this.pointC=pointC,this.pointD=pointD,this.angleX=angleX,this.angleZ=angleZ,this.color=color;
}

Rect.prototype.setAngle = function(a,b){
    this.angleX = a;
    this.angleZ = b;
    this.z=this.getPoint(this.pointZ)[2];
};
pointA,pointB,pointC,pointD是小矩形的四个顶点,angleX,angleZ分别是x轴和z轴旋转的角度,color是小矩形的颜色。
魔方分为6个面,先看一下最前面的一面,如果以立方体的中心作为3D坐标系的中心,那么9个小矩形的各个定点所对应的坐标如下图所示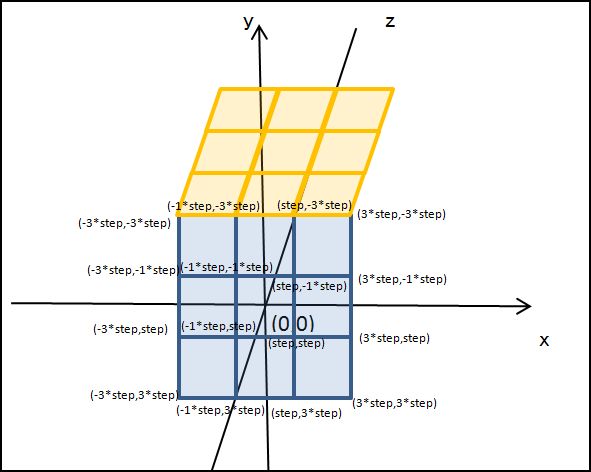
所以,前面这个面的9个小矩形可以由下面的代码来建立
for(var x=0;x<3;x++){
    for(var y=0;y<3;y++){
        z = 3;
        var rect = new Rect([-3*step + x*2*step,-3*step + y*2*step,-3*step + z*2*step],[-step + x*2*step,-3*step + y*2*step,-3*step + z*2*step],
        [-step + x*2*step,-step + y*2*step,-3*step + z*2*step],[-3*step + x*2*step,-step + y*2*step,-3*step + z*2*step],0,0,"#FF0000");
        backLayer.addChild(rect);
    }
}
其中backLayer是一个LSprite类,step是半个小矩形的长,同样的道理,可以也得到其他5个面。
6个面都建立了,在绘制这6个面之前,首先要根据旋转的角度来计算各个定点的坐标,看下面的图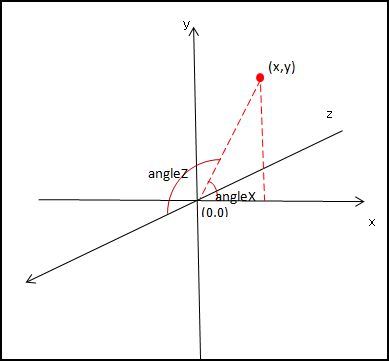
根据上面的图,用下面的公式即可得到变换后的定点坐标
Rect.prototype.getPoint = function(p){
    var u2,v2,w2,u=p[0],v=p[1],w=p[2];
    u2 = u * Math.cos(this.angleX) - v * Math.sin(this.angleX);
    v2 = u * Math.sin(this.angleX) + v * Math.cos(this.angleX);
    w2 = w;
    u = u2; v = v2; w = w2;
    u2 = u;
    v2 = v * Math.cos(this.angleZ) - w * Math.sin(this.angleZ);
    w2 = v * Math.sin(this.angleZ) + w * Math.cos(this.angleZ);
    u = u2; v = v2; w = w2;
    return [u2,v2,w2];
};
最后根据小矩形的四个定点坐标,来绘制这个矩形,
Rect.prototype.draw = function(layer){
    this.graphics.clear();
    this.graphics.drawVertices(1,"#000000",[this.getPoint(this.pointA),this.getPoint(this.pointB),
    this.getPoint(this.pointC),this.getPoint(this.pointD)],true,this.color);
};
其中drawVertices是lufylegend.js库件中LGraphics类的一个方法,它可以根据传入的定点坐标数组来绘制一个多边形。
最后,给出完整代码,代码很少,JS代码一共91行。
一,index.html
<!DOCTYPE html>
<html>
<head>
<meta charset="UTF-8">
<title>3D魔方</title>
</head>
<body>
<p id="mylegend">loading……</p>
<script type="text/javascript" src="../lufylegend-1.4.0.min.js"></script>
<script type="text/javascript" src="./Main.js"></script>
<script type="text/javascript" src="./Rect.js"></script>
</body>
</html>
二,Rect类
function Rect(pointA,pointB,pointC,pointD,angleX,angleZ,color){
    base(this,LSprite,[]);
    this.pointZ=[(pointA[0]+pointB[0]+pointC[0]+pointD[0])/4,(pointA[1]+pointB[1]+pointC[1]+pointD[1])/4,(pointA[2]+pointB[2]+pointC[2]+pointD[2])/4];
    this.z = this.pointZ[2];
    this.pointA=pointA,this.pointB=pointB,this.pointC=pointC,this.pointD=pointD,this.angleX=angleX,this.angleZ=angleZ,this.color=color;
}
Rect.prototype.draw = function(layer){
    this.graphics.clear();
    this.graphics.drawVertices(1,"#000000",[this.getPoint(this.pointA),this.getPoint(this.pointB),
this.getPoint(this.pointC),this.getPoint(this.pointD)],true,this.color);
};Rect.prototype.setAngle = function(a,b){
    this.angleX = a;
    this.angleZ = b;
    this.z=this.getPoint(this.pointZ)[2];
};
Rect.prototype.getPoint = function(p){
    var u2,v2,w2,u=p[0],v=p[1],w=p[2];
    u2 = u * Math.cos(this.angleX) - v * Math.sin(this.angleX);
    v2 = u * Math.sin(this.angleX) + v * Math.cos(this.angleX);
    w2 = w;
    u = u2; v = v2; w = w2;
    u2 = u;
    v2 = v * Math.cos(this.angleZ) - w * Math.sin(this.angleZ);
    w2 = v * Math.sin(this.angleZ) + w * Math.cos(this.angleZ);
    u = u2; v = v2; w = w2;
    return [u2,v2,w2];
};
三,Main.js
init(50,"mylegend",400,400,main);
var a = 0,b=0,backLayer,step = 20,key = null;
function main(){
    backLayer = new LSprite();
    addChild(backLayer);
    backLayer.x = 120,backLayer.y = 120;
    //后
    for(var x=0;x<3;x++){
        for(var y=0;y<3;y++){
            z = 0;
            var rect = new Rect([-3*step + x*2*step,-3*step + y*2*step,-3*step + z*2*step],[-step + x*2*step,-3*step + y*2*step,-3*step + z*2*step],
            [-step + x*2*step,-step + y*2*step,-3*step + z*2*step],[-3*step + x*2*step,-step + y*2*step,-3*step + z*2*step],0,0,"#FF4500");
            backLayer.addChild(rect);
        }
    }
    //前
    for(var x=0;x<3;x++){
        for(var y=0;y<3;y++){
            z = 3;
            var rect = new Rect([-3*step + x*2*step,-3*step + y*2*step,-3*step + z*2*step],[-step + x*2*step,-3*step + y*2*step,-3*step + z*2*step],
            [-step + x*2*step,-step + y*2*step,-3*step + z*2*step],[-3*step + x*2*step,-step + y*2*step,-3*step + z*2*step],0,0,"#FF0000");
            backLayer.addChild(rect);
        }
    }
    //上
    for(var x=0;x<3;x++){
        for(var z=0;z<3;z++){
            y = 0;
            var rect = new Rect([-3*step + x*2*step,-3*step + y*2*step,-3*step + z*2*step],[-step + x*2*step,-3*step + y*2*step,-3*step + z*2*step],
            [-step + x*2*step,-3*step + y*2*step,-step + z*2*step],[-3*step + x*2*step,-3*step + y*2*step,-step + z*2*step],0,0,"#FFFFFF");
            backLayer.addChild(rect);
        }
    }
    //下
    for(var x=0;x<3;x++){
        for(var z=0;z<3;z++){
            y = 3;
            var rect = new Rect([-3*step + x*2*step,-3*step + y*2*step,-3*step + z*2*step],[-step + x*2*step,-3*step + y*2*step,-3*step + z*2*step],
            [-step + x*2*step,-3*step + y*2*step,-step + z*2*step],[-3*step + x*2*step,-3*step + y*2*step,-step + z*2*step],0,0,"#FFFF00");
            backLayer.addChild(rect);
        }
    }
    //左
    for(var y=0;y<3;y++){
        for(var z=0;z<3;z++){
            x = 0;
            var rect = new Rect([-3*step + x*2*step,-3*step + y*2*step,-3*step + z*2*step],[-3*step + x*2*step,-3*step + y*2*step,-step + z*2*step],
            [-3*step + x*2*step,-step + y*2*step,-step + z*2*step],[-3*step + x*2*step,-step + y*2*step,-3*step + z*2*step],0,0,"#008000");
            backLayer.addChild(rect);
        }
    }
    //右
    for(var y=0;y<3;y++){
        for(var z=0;z<3;z++){
            x = 3;
            var rect = new Rect([-3*step + x*2*step,-3*step + y*2*step,-3*step + z*2*step],[-3*step + x*2*step,-3*step + y*2*step,-step + z*2*step],
            [-3*step + x*2*step,-step + y*2*step,-step + z*2*step],[-3*step + x*2*step,-step + y*2*step,-3*step + z*2*step],0,0,"#0000FF");
            backLayer.addChild(rect);
        }
    }
    backLayer.addEventListener(LEvent.ENTER_FRAME,onframe);
}
function onframe(){
    a += 0.1 , b += 0.1;
    backLayer.childList = backLayer.childList.sort(function(a,b){return a.z - b.z;});
    for(key in backLayer.childList){
        backLayer.childList[key].setAngle(a,b);
        backLayer.childList[key].draw(backLayer);
   }
}以上就是【HTML5】3D模型--百行代码实现旋转立体魔方实例 的内容,更多相关内容请关注PHP中文网(www.php.cn)!

热AI工具

Undresser.AI Undress
人工智能驱动的应用程序,用于创建逼真的裸体照片

AI Clothes Remover
用于从照片中去除衣服的在线人工智能工具。

Undress AI Tool
免费脱衣服图片

Clothoff.io
AI脱衣机

Video Face Swap
使用我们完全免费的人工智能换脸工具轻松在任何视频中换脸!

热门文章
热工具

记事本++7.3.1
好用且免费的代码编辑器

SublimeText3汉化版
中文版,非常好用

禅工作室 13.0.1
功能强大的PHP集成开发环境

Dreamweaver CS6
视觉化网页开发工具

SublimeText3 Mac版
神级代码编辑软件(SublimeText3)


