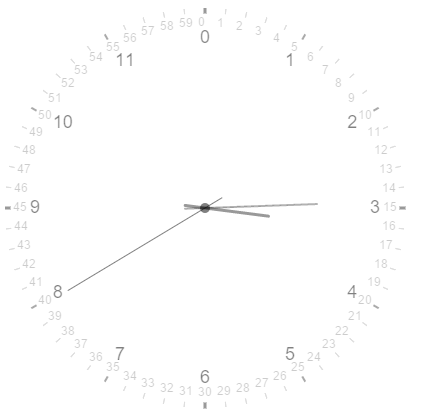
用HTML5的canvas实现一个炫酷时钟效果
对于H5来说,canvas可以说是它最有特色的一个地方了,有了它之后我们可以随意的在网页上画各种各样的图形,做一些小游戏啊什么的。canvas这个标签的用法,在网上也有特别多的教程了,这里就不作介绍了。今天我们就用canvas来做一个小小的时钟。
那么首先在这个页面里面我使用了两个canvas,一个用来绘制静态的时钟表盘和刻度,另一个用来绘制时钟的三个指针,然后用定位让他们重合到一起。然后这里没什么好说的,下面附上代码。
<canvas id="plate">

            画表盘

    </canvas>

    <canvas id="needles">

            画时针

</canvas>var plate=document.getElementById('plate');
var needles=document.getElementById('needles');
needles.setAttribute('style','position:absolute;top:8px;left:8px;'); //这里因为chrome里面,body的magin值为8px,所以我这里就没设为0了。
var cntP=plate.getContext('2d');
var cntH=needles.getContext('2d');
plate.width=800;
plate.height=500;
needles.width=800;
needles.height=500;
到了这里准备工作就做完了,下面就准备绘制时钟了。我先定义了一个绘制时钟表盘的构造函数。
function drawclock(cnt,radius,platelen,linewidth,numLen,NUMLEN){
this.cnt=cnt;
this.radius=radius;
this.platelen=platelen;
this.linewidth=linewidth;
this.numLen=numLen;
this.NUMLEN=NUMLEN;
this.getCalibCoor=function(i){
//获得表盘刻度两端的坐标
var X=200+this.radius*Math.sin(6*i*Math.PI/180);
var Y=200-this.radius*Math.cos(6*i*Math.PI/180);
var x=200+(this.radius-this.platelen)*Math.sin(6*i*Math.PI/180);
var y=200-(this.radius-this.platelen)*Math.cos(6*i*Math.PI/180);
// 获得分钟数字的坐标
var numx=200+(this.radius-this.platelen-this.numLen)*Math.sin(6*i*Math.PI/180);
var numy=200-(this.radius-this.platelen-this.numLen)*Math.cos(6*i*Math.PI/180);
//获得小时数字的坐标
var numX=200+(this.radius-this.platelen-this.NUMLEN)*Math.sin(6*i*Math.PI/180);
var numY=200-(this.radius-this.platelen-this.NUMLEN)*Math.cos(6*i*Math.PI/180);
return {X:X,Y:Y,x:x,y:y,numx:numx,numy:numy,numX:numX,numY:numY};
};
this.drawCalibration=function(){ //画刻度
for(var i=0,coorObj;i<60;i++){
coorObj=this.getCalibCoor(i);
this.cnt.beginPath();
this.cnt.moveTo(coorObj.X,coorObj.Y);
this.cnt.lineTo(coorObj.x,coorObj.y);
this.cnt.closePath();
this.cnt.lineWidth=this.linewidth;
this.cnt.strokeStyle='#ddd';
i%5==0&&(this.cnt.strokeStyle='#aaa')
&&(this.cnt.lineWidth=this.linewidth*2);
i%15==0&&(this.cnt.strokeStyle='#999')
&&(this.cnt.lineWidth=this.linewidth*3);
this.cnt.stroke();
this.cnt.font='10px Arial';
this.cnt.fillStyle='rgba(0,0,0,.2)';
this.cnt.fillText(i,coorObj.numx-7,coorObj.numy+3);
i%5==0&&(this.cnt.fillStyle='rgba(0,0,0,.5)')
&&(this.cnt.font='18px Arial')
&&(this.cnt.fillText(i/5,coorObj.numX-5,coorObj.numY+5));
}
};
}
var clock=new drawclock(cntP,200,5,1,10,25); //实例化一个表盘对象
clock.drawCalibration();
这里最重要的部分就应该是获得刻度和数字绘制的坐标了。我把绘制刻度的起始点放在了表盘的边缘上,然后从表盘的半径上减去刻度的长度,就可以得到刻度终点的位置,然后利用角度和三角函数得到两个点的坐标。最后就可以绘制出表盘的刻度了。下面绘制出表盘上的数字也是一样的方法。我这里吧表盘的中心放在了(200,200)这里位置。到了这里我们就已经绘制好了一个静态的时钟表盘。
下面我又定义了一个绘制时钟指针的构造函数。
function clockNeedle(cnt,R,lineWidth,strokeStyle,lineCap,obj){

                this.R=R;

                this.cnt=cnt;

                this.lineWidth=lineWidth;

                this.strokeStyle=strokeStyle;

                this.lineCap=lineCap;

                this.obj=obj;

                this.getNeedleCoor=function(i){

                    var X=200+this.R*0.8*Math.sin(i); //起点的坐标

                    var Y=200-this.R*0.8*Math.cos(i);


                    var x=200-20*Math.sin(i); //终点的坐标

                    var y=200+20*Math.cos(i);

                    return {X:X,Y:Y,x:x,y:y};

                };

                this.drawNeedle=function(){

                    var d=new Date().getTime();

                    var angle;

                    switch(this.obj){

                        case 0:

                        angle=(d/3600000%24+8)/12*360*Math.PI/180;

                        break;

                        case 1:

                        angle=d/60000%60/60*360*Math.PI/180;

                        break;

                        case 2:

                        angle=d/1000%60/60*360*Math.PI/180;

                        break;

                    }

                    var coorobj=this.getNeedleCoor(angle);

                    this.cnt.beginPath();

                    this.cnt.moveTo(coorobj.x,coorobj.y);

                    this.cnt.lineTo(coorobj.X,coorobj.Y);

                    // this.cnt.closePath();


                    this.cnt.lineWidth=this.lineWidth;

                    this.cnt.strokeStyle=this.strokeStyle;

                    this.cnt.lineCap=this.lineCap;

                    this.cnt.stroke();

                }

            }
这里有两个地方需要说一下:1、在我们获得当前时间的的毫秒数,然后转换为小时的时候,对24取模计算出当天的小时数的时候,这里需要加上8。2、如果想要使用lineCap这个属性吗,那么上面在设置路径的时候,不要用closePath()。
到了这里我们还需要一个来绘制指针的方法,并且让指针看起来能够转动:
function draw(){

                cntH.clearRect(0,0,needles.width,needles.height);

                var mzneedle=new clockNeedle(cntH,200,1,'rgba(0,0,0,.5)','round',2);

                //最后一个参数0代表画时针,1画分针,2画秒针

                var fzneedle=new clockNeedle(cntH,80,3,'rgba(0,0,0,.4)','round',0);

                var szneedle=new clockNeedle(cntH,140,2,'rgba(0,0,0,.3)','round',1);

                mzneedle.drawNeedle();

                fzneedle.drawNeedle();

                szneedle.drawNeedle();

                cntH.arc(200,200,5,0,2*Math.PI);

                cntH.fillStyle='rgba(0,0,0,.5)';

                cntH.fill();

     }

     setInterval(draw,1);
下面附上该时钟的图片:
以上就是用HTML5的canvas实现一个炫酷时钟效果 的内容,更多相关内容请关注PHP中文网(www.php.cn)!

热AI工具

Undresser.AI Undress
人工智能驱动的应用程序,用于创建逼真的裸体照片

AI Clothes Remover
用于从照片中去除衣服的在线人工智能工具。

Undress AI Tool
免费脱衣服图片

Clothoff.io
AI脱衣机

Video Face Swap
使用我们完全免费的人工智能换脸工具轻松在任何视频中换脸!

热门文章

热工具

记事本++7.3.1
好用且免费的代码编辑器

SublimeText3汉化版
中文版,非常好用

禅工作室 13.0.1
功能强大的PHP集成开发环境

Dreamweaver CS6
视觉化网页开发工具

SublimeText3 Mac版
神级代码编辑软件(SublimeText3)


