php实现留言板功能的代码详细介绍
这个小小的留言板功能适合班级内或者公司内部之间的讨论,对话和留言,非常的方便,更重要的是无需网络,对于公司管理层来说是非常乐于常见的,
下面是这个留言板的写法:
1 首先是登录页面:
<form action="chuli.php" method="post">
    <p style="margin-left: 500px; margin-top: 200px;
     height: 250px; width: 250px">/*为了把登录表放到页面中间,比较美观*/
        <h1>公司内部留言板</h1>
    <p style="margin-top: 20px">用户名:<input type="text" name="username"/></p><br/>
    <p>密   码:<input type="password" name="password"/></p><br/>
    <p><input type="submit" value="登录"/></p>
    </p>

</form>2 登录页面完成后要进入登录处理页面了,也就是上面提交到的chuli.php
<?php
session_start(); // 登录之后要把所包含登录的页面连接起来,开启session
include("DADB.class.php");
$db=new DADB();
$user=$_POST["username"];
$pwd=$_POST["password"];
$sql="select password from yuangong where username='{$user}'";
$arr=$db->Query($sql);
if($arr[0][0]==$pwd && !empty($pwd))
{
$_SESSION["username"]=$user;
header("location:main.php");
}
else
{
echo"登录失败";
}
?>如图所示,是登录页面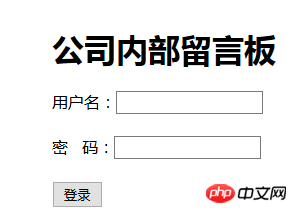
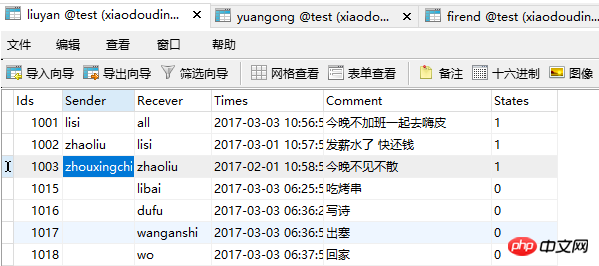
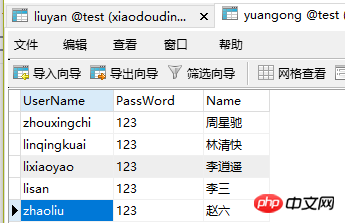
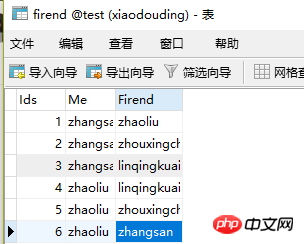
3.登录完成后是进入主页面,也就是显示自己收到的对话内容,下面是设计的数据库的表格和主页面的代码:
<body>
<p><h3><a href="fabu.php">发布信息</a>
<a href="tuichu.php">退出系统</a></h3> </p>
<br/><br/>
<h2>留言信息:</h2>
<table cellpadding="0" cellspacing="0" border="1" width="60%">
<tr>
<td>发送人</td>
<td>接收人</td>
<td>发送时间</td>
<td>信息内容</td>
</tr>
<?php
session_start();
if(empty($_SESSION["username"]))
{
header("location:login.php");
}
$user=$_SESSION["username"];
include("DADB.class.php");
$db=new DADB();
$sql="select * from liuyan where recever='$user' or recever='all' ";
$arr=$db->Query($sql);
foreach($arr as $v)
{ $fjr=uname($v[1]);
$jsr=uname($v[2]);
echo"<tr>
<td>{$fjr}</td> //发送人和接收人要用到姓名,所以这里我们调用了一个方法
<td>{$jsr}</td>
<td>{$v[3]}</td>
<td>{$v[4]}</td>
</tr>";
}
function uname($user) //运用了uname方法
{
global $db; //要想方法里面也可以用$db 这里用了全局变量
if($user=="all")
{
return "所有人";
}else
{
$sql1="select name from yuangong where username='{$user}'";
$att=$db->Query($sql1);
return $att[0][0];}
}
?>
</table>
</body>4代码写到这里,比较重要的部分就完成了,下面是要进入发布信息页面了,相当于之前写的添加的页面,其处理页面也是和之前没什么区别的,差别在于现在的处理页面是在用户登录的情况下操作的,需要用session把所有的登录情况下的页面连接起来
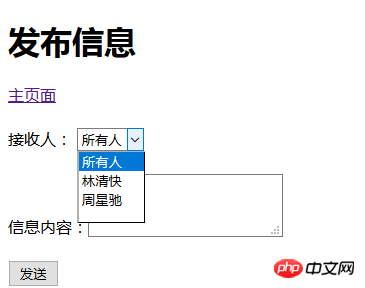
<h1>发布信息</h1>
<a href="main.php">主页面</a>
<br />
<br />
<?php
session_start();
if(empty($_SESSION["username"]))
{
header("location:login.php");
exit;
}
$user = $_SESSION["username"];
include("DADB.class.php");
$db = new DADB();
$shaoyou = "select * from firend where me='{$user}'";
$ahaoyou = $db->Query($shaoyou);
?>
<form action="fabuchuli.php" method="post">
<p>接收人:
<select name="jsr">
<option value="all">所有人</option>
<?php
foreach($ahaoyou as $v)
{
$name = uname($v[2]);
echo "<option value='{$v[2]}'>{$name}</option>";
}
?>
</select>
</p>
<br />
<p>
信息内容:<textarea name="neirong"></textarea>
</p><br />
<input type="submit" value="发送" />
</form>
<?php
function uname($user)
{
global $db;
if($user=="all")
{
return "所有人";
}
else
{
$sql1 = "select name from yuangong where username='{$user}'";
$att = $db->Query($sql1);
return $att[0][0];
}
}
?>
</body>
//这是发布页面的代码 和添加页面的代码相似
<?php
<?php
session_start();
$re=$_POST["jsr"];
$comment=$_POST["neirong"];
$time=date("Y-m-d H:i:s"); //获取当前时间
$_SESSION["username"]=$user;
include("DADB.class.php");
$db=new DADB();
$sql="insert into liuyan VALUES ('','{$user}','{$jsr}','{$time}','{$comment}',false)";
if($db->Query($sql,0))
{
header("location:main.php");
}
else{
echo"发布失败";
}
?>
?>
一个简单的留言板已经完成了,退出的时候需要清除session 并且返回到登录页面
//退出页面代码
<?php
session_start();
unset($_SESSION["username"]);
header("location:login.php");
?>以上就是php实现留言板功能的代码详细介绍的内容,更多相关内容请关注PHP中文网(www.php.cn)!

热AI工具

Undresser.AI Undress
人工智能驱动的应用程序,用于创建逼真的裸体照片

AI Clothes Remover
用于从照片中去除衣服的在线人工智能工具。

Undress AI Tool
免费脱衣服图片

Clothoff.io
AI脱衣机

AI Hentai Generator
免费生成ai无尽的。

热门文章

热工具

记事本++7.3.1
好用且免费的代码编辑器

SublimeText3汉化版
中文版,非常好用

禅工作室 13.0.1
功能强大的PHP集成开发环境

Dreamweaver CS6
视觉化网页开发工具

SublimeText3 Mac版
神级代码编辑软件(SublimeText3)

热门话题
 适用于 Ubuntu 和 Debian 的 PHP 8.4 安装和升级指南
Dec 24, 2024 pm 04:42 PM
PHP 8.4 带来了多项新功能、安全性改进和性能改进,同时弃用和删除了大量功能。 本指南介绍了如何在 Ubuntu、Debian 或其衍生版本上安装 PHP 8.4 或升级到 PHP 8.4
 如何设置 Visual Studio Code (VS Code) 进行 PHP 开发
Dec 20, 2024 am 11:31 AM
Visual Studio Code,也称为 VS Code,是一个免费的源代码编辑器 - 或集成开发环境 (IDE) - 可用于所有主要操作系统。 VS Code 拥有针对多种编程语言的大量扩展,可以轻松编写
 我后悔之前不知道的 7 个 PHP 函数
Nov 13, 2024 am 09:42 AM
如果您是一位经验丰富的 PHP 开发人员,您可能会感觉您已经在那里并且已经完成了。您已经开发了大量的应用程序,调试了数百万行代码,并调整了一堆脚本来实现操作
 您如何在PHP中解析和处理HTML/XML?
Feb 07, 2025 am 11:57 AM
本教程演示了如何使用PHP有效地处理XML文档。 XML(可扩展的标记语言)是一种用于人类可读性和机器解析的多功能文本标记语言。它通常用于数据存储
 在PHP API中说明JSON Web令牌(JWT)及其用例。
Apr 05, 2025 am 12:04 AM
JWT是一种基于JSON的开放标准,用于在各方之间安全地传输信息,主要用于身份验证和信息交换。1.JWT由Header、Payload和Signature三部分组成。2.JWT的工作原理包括生成JWT、验证JWT和解析Payload三个步骤。3.在PHP中使用JWT进行身份验证时,可以生成和验证JWT,并在高级用法中包含用户角色和权限信息。4.常见错误包括签名验证失败、令牌过期和Payload过大,调试技巧包括使用调试工具和日志记录。5.性能优化和最佳实践包括使用合适的签名算法、合理设置有效期、
 php程序在字符串中计数元音
Feb 07, 2025 pm 12:12 PM
字符串是由字符组成的序列,包括字母、数字和符号。本教程将学习如何使用不同的方法在PHP中计算给定字符串中元音的数量。英语中的元音是a、e、i、o、u,它们可以是大写或小写。 什么是元音? 元音是代表特定语音的字母字符。英语中共有五个元音,包括大写和小写: a, e, i, o, u 示例 1 输入:字符串 = "Tutorialspoint" 输出:6 解释 字符串 "Tutorialspoint" 中的元音是 u、o、i、a、o、i。总共有 6 个元
 解释PHP中的晚期静态绑定(静态::)。
Apr 03, 2025 am 12:04 AM
静态绑定(static::)在PHP中实现晚期静态绑定(LSB),允许在静态上下文中引用调用类而非定义类。1)解析过程在运行时进行,2)在继承关系中向上查找调用类,3)可能带来性能开销。
 什么是PHP魔术方法(__ -construct,__destruct,__call,__get,__ set等)并提供用例?
Apr 03, 2025 am 12:03 AM
PHP的魔法方法有哪些?PHP的魔法方法包括:1.\_\_construct,用于初始化对象;2.\_\_destruct,用于清理资源;3.\_\_call,处理不存在的方法调用;4.\_\_get,实现动态属性访问;5.\_\_set,实现动态属性设置。这些方法在特定情况下自动调用,提升代码的灵活性和效率。


