css3动画效果总结分析
css3的动画功能有以下三种:
1、transition(过度属性)
2、animation(动画属性)
3、transform(2D/3D转换属性)
下面逐一进行介绍我的理解:
1、transition:<过渡属性名称> <过渡时间> <过渡模式>
如-webkit-transition:color 1s;
等同于:
-webkit-transition-property:color;
-webkit-transition-duration:1s;
多个属性的过渡效果可以这样写:
方法1:-webkit-transition:<属性1> <时间1> ,<属性2> <时间2> ,。。。
方法2:
-webkit-transition:<属性1> <时间1>;
-webkit-transition:<属性2> <时间2>;
transition-timing-function属性值有5个:
ease:缓慢开始,缓慢结束
liner:匀速
ease-in:缓慢开始
ease-out:缓慢结束
ease-in-out:缓慢开始,缓慢结束(和ease稍有区别)
实例:
transition过渡效果
<!DOCTYPE html>
<html lang="en">
<head>
    <meta charset="UTF-8">
    <title>transition过渡效果</title>
    <style>
        *{
            margin: 0px;
            padding: 0px;
        }
        #box{
            width: 200px;
            height: 200px;
            background-color: chocolate;
            position: relative;
            left: 0px;
            top: 0px;
            transition: top 5s ease,left 5s ease ;
            -moz-transition: top 5s ease,left 5s ease ; /* Firefox 4 */
            -webkit-transition: top 5s ease,left 5s ease ; /* Safari and Chrome */
            -o-transition: top 5s ease,left 5s ease ; /* Opera */
        }
        .btn{
            width: 512px;
            margin: 0 auto;
            border: 2px solid #e3e3e3;
            border-radius: 5px;
            padding: 10px;

        }
        .btn button{
            width: 80px;
            height: 40px;
            text-align: center;
            line-height: 40px;
            margin-right: 20px;
        }
        button:last-child{
            margin-right: 0px;
        }
    </style>
    <script>
        window.onload=function(){
            var e1 = document.getElementById("e1");
            var e2 = document.getElementById("e2");
            var e3 = document.getElementById("e3");
            var e4 = document.getElementById("e4");
            var e5 = document.getElementById("e5");
            var box = document.getElementById("box");
            e1.onclick=function(){
                box.style.left = 1000+"px";
                box.style.top = 100+"px";
                box.style.transitionTimingFunction="ease";
            };
            e2.onclick=function(){
                box.style.right = 0+"px";
                box.style.top = 0+"px";
                box.style.transitionTimingFunction="liner";
            };
            e3.onclick=function(){
                box.style.right = 1000+"px";
                box.style.top = 100+"px";
                box.style.transitionTimingFunction="ease-in";
            };
            e4.onclick=function(){
                box.style.left = 0+"px";
                box.style.top = 0+"px";
                box.style.transitionTimingFunction="ease-out";
            };
            e5.onclick=function(){
                box.style.left = 1000+"px";
                box.style.top = 100+"px";
                box.style.transitionTimingFunction="ease-in-out";
            };

        }
    </script>
</head>
<body>
    <p id="box"></p>
    <br>
    <br>
    <br>
    <br>
    <br>
    <br>
    <hr>
    <br>
    <br>
    <br>
    <p class="btn">
        <button id="e1">ease</button>
        <button id="e2">liner</button>
        <button id="e3">ease-in</button>
        <button id="e4">ease-out</button>
        <button id="e5">ease-in-out</button>
    </p>
</body>
</html>2、动画属性animation
animation: name duration timing-function delay iteration-count direction;
值 | 描述 |
animation-name | 规定需要绑定到选择器的 keyframe 名称。。 |
animation-duration | 规定完成动画所花费的时间,以秒或毫秒计。 |
animation-timing-function | 规定动画的速度曲线。 |
animation-delay | 规定在动画开始之前的延迟。 |
animation-iteration-count | 规定动画应该播放的次数。 |
animation-direction | 规定是否应该轮流反向播放动画。 |
注释:Internet Explorer 9 以及更早的版本不支持 animation 属性。
@keyframes animationname {keyframes-selector {css-styles;}}
值 | 描述 |
animationname | 必需。定义动画的名称。 |
keyframes-selector | 必需。动画时长的百分比。 合法的值:
|
css-styles | 必需。一个或多个合法的 CSS 样式属性。 |
以百分比来规定改变发生的时间,或者通过关键词 "from" 和 "to",等价于 0% 和 100%。
0% 是动画的开始时间,100% 动画的结束时间。
例如:
  animation:mymove 5s infinite;

  @keyframes mymove{

    from{ top:0px; }

    to{ top:200px; }

}还可以这么写:
  @keyframes mymove{

    0%{ top:0px; }

    25%{ top:200px; }

    50%{ top:100px; }

    75%{ top:200px; }

    100%{ top:0px; }

} 案例:
css3的animation效果
<!DOCTYPE html>
<html>
<head>
<style>
p
{
width:100px;
height:100px;
background:red;
position:relative;
animation:mymove 5s infinite;
-moz-animation:mymove 5s infinite; /* Firefox */
-webkit-animation:mymove 5s infinite; /* Safari and Chrome */
-o-animation:mymove 5s infinite; /* Opera */
}

@keyframes mymove
{
from {top:0px;}
to {top:200px;}
}

@-moz-keyframes mymove /* Firefox */
{
from {top:0px;}
to {top:200px;}
}

@-webkit-keyframes mymove /* Safari and Chrome */
{
from {top:0px;}
to {top:200px;}
}

@-o-keyframes mymove /* Opera */
{
from {top:0px;}
to {top:200px;}
}
</style>
</head>
<body>

<p><b>注释:</b>本例在 Internet Explorer 中无效。</p>

<p></p>

</body>
</html>3、设置3D场景(即transform)
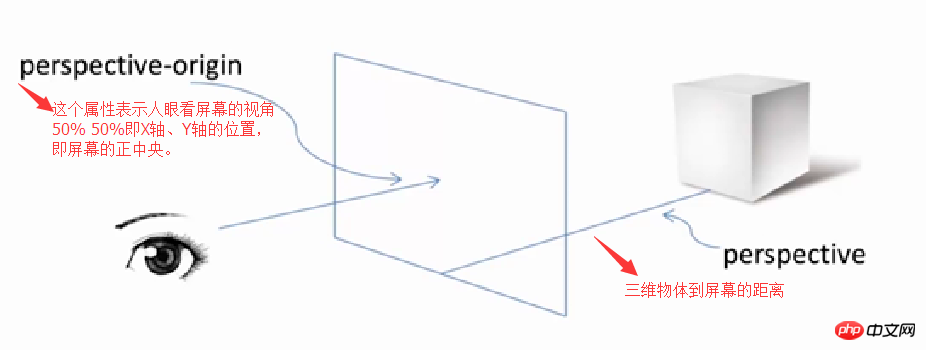
-webkit-perspective:800;(单位为像素)--即三维物体距离屏幕的距离。
-webkit-perspective-origin:50% 50%;(这个属性代表了人眼观察的视野。50% 50%为X轴、Y轴相应的位置,即屏幕的正中央。) 
使用transform属性调整元素:-webkit-transform-style:-webkit-perserve-3d;(这个属性是告诉浏览器我们是在一个三维空间中对元素进行操作)
(1)、translate(移动距离)
translateX(x px)
translateY(y px)
translateZ(z px)
(2)、rotate(旋转角度)
rotateX(x deg)
rotateY(y deg)
rotateZ(z deg)

transform:rotate(45deg)
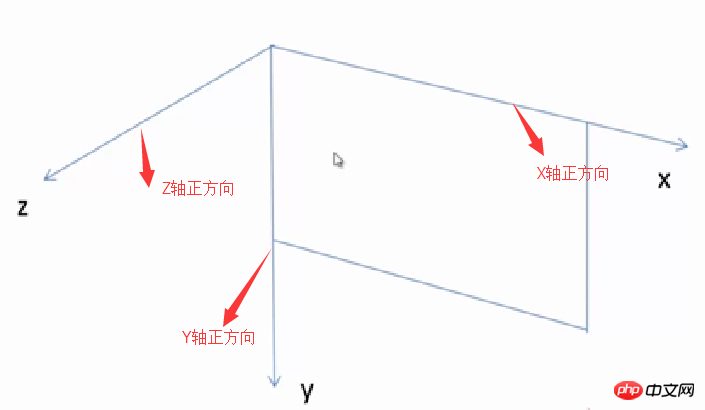
rotateX:向屏幕上边沿向内旋转为正方向。
rotateY:向屏幕竖直向下为正方向。
rotateZ:向屏幕外为正方向。
一个p块,右边沿向屏幕内旋转45deg,即应设置为:Transform:rotateY(45deg)。
实例:
transform3D转换效果
<!DOCTYPE html>
<html lang="en">
<head>
    <meta charset="UTF-8">
    <title>transform3D转换效果</title>
    <style>
        *{
            margin: 0px;
            padding: 0px;
        }
        #box{
            width: 200px;
            height: 200px;
            background-color: chocolate;
            position: relative;
            left: 0px;
            top: 0px;
            perspective:800px;
            perspective-origin:50% 50%;
            transform-style: preserve-3d;
            transform-origin:0% 100%;//以Y轴为旋转中心
        }
        p{
            margin:20px 520px;
        }
        .btn{
            width: 300px;
            margin: 0 auto;
            border: 2px solid #e3e3e3;
            border-radius: 5px;
            padding: 10px;

        }
        .btn button{
            width: 80px;
            height: 40px;
            text-align: center;
            line-height: 40px;
            margin-right: 20px;
        }
        button:last-child{
            margin-right: 0px;
        }
    </style>
    <script>
        window.onload=function(){
            var tx = document.getElementById("tx");
            var ty = document.getElementById("ty");
            var tz = document.getElementById("tz");
            var rx = document.getElementById("rx");
            var ry = document.getElementById("ry");
            var rz = document.getElementById("rz");
            var box = document.getElementById("box");
            tx.onclick=function(){
                box.style.transform = "translateX(500px)";
            };
            ty.onclick=function(){
                box.style.transform = "translateY(400px)"
            };
            rx.onclick=function(){
                box.style.transform = "rotateX(30deg)"
            };
            ry.onclick=function(){
                box.style.transform = "rotateY(30deg)"
            };
            rz.onclick=function(){
                box.style.transform = "rotateZ(30deg)"
            };
        }
    </script>
</head>
<body>
    <p id="box"></p>
    <br>
    <br>
    <br>
    <br>
    <br>
    <br>
    <hr>
    <br>
    <br>
    <br>
    <p>translate(移动距离)</p>
    <p class="btn">
        <button id="tx">translateX</button>
        <button id="ty">translateY</button>
    </p>
    <p>rotate(旋转角度)</p>
    <p class="btn">
        <button id="rx">rotateX</button>
        <button id="ry">rotateY</button>
        <button id="rz">rotateZ</button>
    </p>
</body>
</html>使用transform-origin属性调整旋转中心。默认旋转中心点为p盒子的正中心。
这个旋转中心是可以改变的:
X轴:left、center、right.
Y轴:top、center、bottom.
Z轴:length px(一个长度值)。
以上这篇css3动画效果小结(推荐)就是小编分享给大家的全部内容了,希望能给大家一个参考,也希望大家多多支持PHP中文网。
更多css3动画效果总结分析相关文章请关注PHP中文网!
相关文章:

热AI工具

Undresser.AI Undress
人工智能驱动的应用程序,用于创建逼真的裸体照片

AI Clothes Remover
用于从照片中去除衣服的在线人工智能工具。

Undress AI Tool
免费脱衣服图片

Clothoff.io
AI脱衣机

Video Face Swap
使用我们完全免费的人工智能换脸工具轻松在任何视频中换脸!

热门文章

热工具

记事本++7.3.1
好用且免费的代码编辑器

SublimeText3汉化版
中文版,非常好用

禅工作室 13.0.1
功能强大的PHP集成开发环境

Dreamweaver CS6
视觉化网页开发工具

SublimeText3 Mac版
神级代码编辑软件(SublimeText3)
 如何加速Windows 11中的动画效果:2种方法解析
Apr 24, 2023 pm 04:55 PM
当微软推出Windows11时,它带来了许多变化。其中一项更改是增加了用户界面动画的数量。一些用户想要改变事物的出现方式,他们必须想办法去做。拥有动画让用户感觉更好、更友好。动画使用视觉效果使计算机看起来更具吸引力和响应能力。其中一些包括几秒钟或几分钟后的滑动菜单。计算机上有许多动画会影响PC性能、减慢速度并影响您的工作。在这种情况下,您必须关闭动画。本文将介绍用户可以提高其在PC上的动画速度的几种方法。您可以使用注册表编辑器或您运行的自定义文件来应用更改。如何提高Windows11动画的
![动画不工作在PowerPoint中[修复]](https://img.php.cn/upload/article/000/887/227/170831232982910.jpg?x-oss-process=image/resize,m_fill,h_207,w_330) 动画不工作在PowerPoint中[修复]
Feb 19, 2024 am 11:12 AM
动画不工作在PowerPoint中[修复]
Feb 19, 2024 am 11:12 AM
您是否正在尝试制作演示文稿,但无法添加动画?如果动画在你的WindowsPC上的PowerPoint中不起作用,那么这篇文章将会帮助你。这是一个常见的问题,许多人都在抱怨。例如,在Microsoft团队中演示或在屏幕录制期间,动画可能会停止工作。在本指南中,我们将探索各种故障排除技术,以帮助您修复在Windows上的PowerPoint中无法运行的动画。为什么我的PowerPoint动画不起作用?我们注意到可能导致Windows上PowerPoint中的动画无法工作问题的一些可能原因如下:由于个
 CSS动画:如何实现元素的闪光效果
Nov 21, 2023 am 10:56 AM
CSS动画:如何实现元素的闪光效果,需要具体代码示例在网页设计中,动画效果有时可以为页面带来很好的用户体验。而闪光效果是一种常见的动画效果,它可以使元素更加引人注目。下面将介绍如何使用CSS实现元素的闪光效果。一、闪光的基本实现首先,我们需要使用CSS的animation属性来实现闪光效果。animation属性的值需要指定动画名称、动画执行时间、动画延迟时
 ppt动画如何设置先进入再退出
Mar 20, 2024 am 09:30 AM
我们在日常的办公中经常会使用到ppt,那么你是否对ppt里边的每个操作功能都很了解呢?例如:ppt中怎么设置动画效果、怎么设置切换效果、每个动画的效果时长是多少?每个幻灯片能不能自动播放、ppt动画先进入再退出等等,那么今天这期我就先跟大家分享ppt动画先进入再退出的具体操作步骤,就在下方,小伙伴们快来看一看吧!1.首先,我们在电脑中打开ppt,单击文本框外侧选中文本框,(如下图红色圈出部分所示)。2.然后,单击菜单栏中的【动画】,选中【擦除】的效果,(如图红色圈出部分所示)。3.接下来,单击【
 跳票 2 年,国产 3D 动画电影《二郎神之深海蛟龙》定档 7 月 13 日
Jan 26, 2024 am 09:42 AM
本站1月26日消息,国产3D动画电影《二郎神之深海蛟龙》发布一组最新剧照,正式宣布将于7月13日上映。据了解,《二郎神之深海蛟龙》是由迷狐星(北京)动漫有限公司、霍尔果斯众合千澄影业有限公司、浙江横店影业有限公司、浙江共赢影业有限公司、成都天火科技有限公司、华文映像(北京)影业有限公司出品,王君执导的动画电影,原定2022年7月22日在中国大陆上映。本站剧情简介:封神之战后,姜子牙携“封神榜”分封诸神,而后封神榜被天庭密封于九州秘境深海之下。事实上,除了分封神位,封神榜中还封缄着众多强大的妖邪元
 如何使用Vue实现打字机动画特效
Sep 19, 2023 am 09:33 AM
如何使用Vue实现打字机动画特效打字机动画是一种常见且引人注目的特效,常用于网站的标题、标语等文字展示上。在Vue中,我们可以通过使用Vue自定义指令来实现打字机动画效果。本文将详细介绍如何使用Vue来实现这一特效,并提供具体的代码示例。步骤1:创建Vue项目首先,我们需要创建一个Vue项目。可以使用VueCLI来快速创建一个新的Vue项目,或者手动在HT
 如何在 Windows 11 中禁用动画
Apr 16, 2023 pm 11:34 PM
MicrosoftWindows11中包含多项新特性和功能。用户界面已更新,公司还引入了一些新效果。默认情况下,动画效果应用于控件和其他对象。我应该禁用这些动画吗?尽管Windows11具有视觉上吸引人的动画和淡入淡出效果,但它们可能会导致您的计算机对某些用户来说感觉迟钝,因为它们会为某些任务增加一点延迟。关闭动画以获得更灵敏的用户体验很简单。在我们看到对操作系统进行了哪些其他更改后,我们将引导您了解在Windows11中打开或关闭动画效果的方法。我们还有一篇关于如何在Windows
 Netflix 黏土动画电影《小鸡快跑 2》终极预告公布,12 月 15 日上线
Nov 20, 2023 pm 01:21 PM
Netflix的黏土动画电影《小鸡快跑2》的最终预告已经公布,该影片预计将于12月15日上线本站注意到,《小鸡快跑2》预告片展示了小鸡洛基和金杰为了寻找女儿莫莉开展行动。莫莉被FunLand农场的一辆卡车带走,洛基和金杰冒着危险找回女儿。该片由萨姆・菲尔执导,并由桑迪韦・牛顿、扎克瑞・莱维、贝拉・拉姆齐、伊梅尔达・斯汤顿和大卫・布拉德利主演。据了解,《小鸡快跑2》是继《小鸡快跑》之后时隔20多年推出的续集。第一部作品于2001年1月2日在中国上映,讲述了一群小鸡们在养鸡厂面临被做成鸡肉馅饼的命运


