HTML5-定制input元素的代码实例详解
input元素可以生成一个供用户输入数据的简单文本框。其缺点在于用户在其中输入什么值都可以,可以配置type类型来获取额外的属性。其中type属性有23个不同的值,而input元素共有30个属性,其中许多属性只能与特定的type属性值搭配使用。
一、用input元素输入文字
type属性设置为text的input元素在浏览器中显示为一个单行文本框。
1. 设定元素大小
maxlength属性设定用户能够输入的字符的最大数目;
size属性设定文本框能够显示的字符数目。
<label for="username"></label>
<input type="text" name="username" id="username" maxlength="10" size="20">
2. 设置初始值和占位式提示
value属性设定默认值;
placeholder属性设置一段提示文字,告知用户输入什么类型的数据。
<label for="address"></label>
<input type="text" name="address" id="address" value="北京市">
<label for="tel"></label>
<input type="text" name="telephone" placeholder="请输入电话号码">
3. 使用数据列表
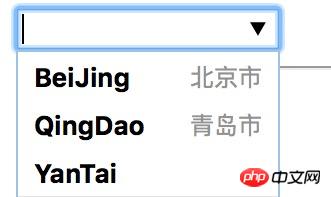
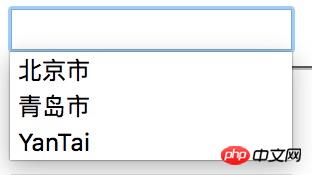
可以将input元素的list属性设置为一个datalist元素的id属性值,这样用户在文本框中输入数据时只需从后一元素提供的一批选项中选择就行了。
<input type="text" name="city" list="cityList">
<datalist id="cityList">
    <option value="BeiJing" label="北京市"></option>
    <option value="QingDao">青岛市</option>
    <option value="YanTai"></option>
</datalist>
图 chrome下展示 
图 firefox下展示
注意:在不同浏览器下表现会有所不同
(1)datalist元素中的每一个option元素都代表一个供用户选择的值,其value属性值在该元素代表的选项被选中时就是input元素所用的数据值;
(2)说明信息,可以通过label属性设置,也可以作为option元素的内容设置。
4. 生成只读或被禁用的文本框
readonly和disabled属性都可以用来生成用户不能编辑的文本框,其结果的外观不同。
<input type="text" name="readonly" value="readonly" readonly>
<input type="text" name="disabled" value="disabled" disabled>
注意:设置了disabled属性的input元素的数据不能被提交到服务器;readonly属性的input元素的数据可以被提交到服务器;
建议:readonly属性需要谨慎使用(无视觉信号告知用户禁止编辑,用户不能输入,让用户困惑),应该考虑使用hidden类型的input元素;
二、用input元素为输入数据把关
1. 用input元素获取数值
type属性设置为number的input元素生成的输入框只允许接受数值。
min设定可接受的最小值;
max设定可接受的最大值;
step指定上下调节数值的步长。
<fieldset>
    <legend>number</legend>
    <label for="score">分数:</label>
<input type="number" name="score" id="score" min="60" max="100" step="5"></fieldset>2. 用input元素获取指定范围内的数值
range型input元素可以事先规定一个数值范围供用户选择。
<fieldset>
    <legend>range</legend>
    <label for="price">价格:</label>
    <span>1</span>
    <input type="range" name="price" id="price" min="0" max="100" step="5">
<span>100</span></fieldset>3. 用input元素获取布尔型输入
checkbox型input会生成供用户选择是或否的复选框。
<fieldset>
    <legend>checkbox</legend>
    <input type="checkbox" name="agree" id="agree">
<label for="agree">同意条款</label></fieldset>注意:提交表单时,只有处于勾选状态的复选框的数据值会发送给服务器(checkbox型input元素的数据项如果不存在于提交项中,则表明用户未勾选)。
4. 用input元素生成一组固定选项
radio型input元素用来生成一组单选按钮,供用户从一批固定的选项中作出选择。它适合于可用有效数据不多的情况。要生成一组互斥的选项,只需将所有相关input元素的name属性设置为同一个值即可。
<fieldset>
    <legend>选出你最喜欢的水果:</legend>
    <label for="oranges">
        <input type="radio" value="oranges" id="oranges" name="fave">
        Oranges    </label>
    <label for="apples">
        <input type="radio" value="apples" id="apples" name="fave" checked>
Apples </label></fieldset>5. 用input元素获取有规定格式的字符串
type属性设置为email、tel、url的input元素能够接受的输入数据分别为有效的电子邮箱地址、电话号码和URL。
<fieldset>
    <legend>规定格式的字符串</legend>
    <p>
        <label for="email">
            邮箱:<input type="email" name="email" id="email">
        </label>
    </p>
    <p>
        <label for="password">
            密码:<input type="password" name="password" id="password">
        </label>
    </p>
    <p>
        <label for="tel">
            电话:<input type="tel" name="tel" id="tel">
        </label>
    </p>
    <p>
        <label for="url">
            URL:<input type="text" name="url" id="url">
        </label>
</p></fieldset>注意:上述类型input元素,只有在提交表单的时候才会检测用户输入的数据,且检查效果各不相同。
6. 用input元素获取时间和日期
| type属性值 | 说明 | 示例(chrome下) |
|---|---|---|
| datetime | 获取世界时日期和时间,包括时区信息 | 根据填写情况 |
| datetime-local | 获取本地日期和时间,不包括时区信息 | 根据填写情况 |
| date | 获取本地日期 | 2016-08-12 |
| month | 获取年月信息 | 2016-08 |
| time | 获取时间 | 13:00 |
| week | 获取当前星期 | 2016-W32 |
<fieldset>
    <legend>日期&时间</legend>
    <p>
        <label for="myDateTime">
            日期时间:<input type="datetime" name="myDateTime" id="myDateTime">
        </label>
    </p>
    <p>
        <label for="myTime">
            时间:<input type="time" name="myTime" id="myTime">
        </label>
    </p>
    <p>
        <label for="myDate">
            日期:<input type="date" name="myDate" id="myDate">
        </label>
    </p>
    <p>
        <label for="myMonth">
            月份:<input type="month" name="myMonth" id="myMonth">
        </label>
    </p>
    <p>
        <label for="myWeek">
            周:<input type="week" name="myWeek" id="myWeek">
        </label>
</p></fieldset>7. 用input元素获取颜色值
color型input元素只能用来选择颜色,提交到服务器的7个字符,如”#011993”。
<fieldset>
    <legend>颜色</legend>
    <label for="color">
        颜色:<input type="color" name="color" id="color">
</label></fieldset>8. 用input元素生成图像按钮和分区响应图
image型input元素生成的按钮显示为一幅图像,点击它可以提交表单。 
注意:在发送的数据中包括来自那个image型input元素的两个数据项,它们分别代表用户点击位置相对于图像左上角的x坐标和y坐标。
9. 用input元素上传文件
input元素类型是file型,它可以在提交表单时将文件上传到服务器。
| 属性 | 说明 |
|---|---|
| accept | 指定接受的MIME类型 |
| multipe | 设置这个属性的input元素可一次上传多个文件 |
<form action="http://localhost:8888/form/uploadFile" method="post" enctype="multipart/form-data">
    <label for="filedata">请选择文件:</label>
    <input type="file" name="filedata" id="filedata">
<button type="submit">提交</button></form>注意:表单编码类型为multipart/form-data的时候才能上传文件。
以上是HTML5-定制input元素的代码实例详解的详细内容。更多信息请关注PHP中文网其他相关文章!

热AI工具

Undresser.AI Undress
人工智能驱动的应用程序,用于创建逼真的裸体照片

AI Clothes Remover
用于从照片中去除衣服的在线人工智能工具。

Undress AI Tool
免费脱衣服图片

Clothoff.io
AI脱衣机

AI Hentai Generator
免费生成ai无尽的。

热门文章

热工具

记事本++7.3.1
好用且免费的代码编辑器

SublimeText3汉化版
中文版,非常好用

禅工作室 13.0.1
功能强大的PHP集成开发环境

Dreamweaver CS6
视觉化网页开发工具

SublimeText3 Mac版
神级代码编辑软件(SublimeText3)


