

Spring Boot添加MySQL数据库及JPA实例的示例代码分享

本篇文章主要介绍了Spring Boot 添加MySQL数据库及JPA,小编觉得挺不错的,现在分享给大家,也给大家做个参考。一起跟随小编过来看看吧
最近在学习Spring Boot,继续前面的学习,这一次我们加入MySQL数据库和JPA。
配置:
pom.xml文件
<!-- 添加Mysql和JPA-->
  <dependency>
  <groupId>org.springframework.boot</groupId>
  <artifactId>spring-boot-starter-data-jpa</artifactId>
  </dependency>
  <dependency>
   <groupId>mysql</groupId>
   <artifactId>mysql-connector-java</artifactId>
  </dependency>
在Application.properties(在resource文件夹下新建,进行配置)文件中添加数据进行配置:
spring.datasource.url = jdbc:mysql://localhost:3306/spring_boot
spring.datasource.username = root
spring.datasource.password = root
spring.datasource.driverClassName = com.mysql.jdbc.Driver


# Specify the DBMS
spring.jpa.database = MYSQL
# Show or not log for each sql query
spring.jpa.show-sql = true
# Hibernate ddl auto (create, create-drop, update)
spring.jpa.hibernate.ddl-auto = update
# Naming strategy
spring.jpa.hibernate.naming-strategy = org.hibernate.cfg.ImprovedNamingStrategy

# stripped before adding them to the entity manager)
spring.jpa.properties.hibernate.dialect = org.hibernate.dialect.MySQL5Dialect
User类
package com.seawater.bean;

import javax.persistence.*;
import javax.validation.constraints.NotNull;

/**
 * Created by zhouhs on 2016/12/30.
 */
@Entity
@Table(name = "user")
public class User {

 @Id
 @GeneratedValue(strategy = GenerationType.AUTO)
 private Long id;
 private String name;
 private int age;

 public Long getId() {
  return id;
 }

 public void setId(Long id) {
  this.id = id;
 }

 public String getName() {
  return name;
 }

 public void setName(String name) {
  this.name = name;
 }

 public int getAge() {
  return age;
 }

 public void setAge(int age) {
  this.age = age;
 }
}UserController
package com.seawater.controller;
import com.seawater.Dao.UserDao;
import com.seawater.bean.User;
import io.swagger.annotations.Api;
import io.swagger.annotations.ApiImplicitParam;
import io.swagger.annotations.ApiImplicitParams;
import io.swagger.annotations.ApiOperation;
import org.springframework.web.bind.annotation.RequestMapping;
import org.springframework.web.bind.annotation.RequestMethod;
import org.springframework.web.bind.annotation.RequestParam;
import org.springframework.web.bind.annotation.RestController;

import javax.annotation.Resource;

/**
 * Created by zhouhs on 2016/12/30.
 */
@RestController
@RequestMapping(value = "/user")
@Api(description = "用户")
public class UserController {

 @Resource
 UserDao userDAO;
 @ApiOperation(value = "添加用户")
 @ApiImplicitParams({
   @ApiImplicitParam(name = "name" , value = "name" , paramType = "query" , required = true ),
   @ApiImplicitParam(name = "age" , value = "age" , paramType = "query" , required = true )
 })
 @RequestMapping(value = "/addUser" , method = RequestMethod.POST)
 public String addUser(@RequestParam(value = "name") String name,@RequestParam(value = "age") int age){

  User user = new User();
  user.setName(name);
  user.setAge(age);

  userDAO.save(user);

  return "add user success !";
 }

 @ApiOperation(value = "查找用户")
 @ApiImplicitParam(name = "id" , value = "id" , paramType = "query" , required = true , dataType = "int")
 @RequestMapping(value = "/findById" , method = RequestMethod.POST)
 public String findById(@RequestParam(value = "id") Long id){

  User user = userDAO.findById(id);

  if(user == null){
   return "error";
  }else{
   return "name:" + user.getName() + " , age:" + user.getAge();
  }
 }

 @ApiOperation(value = "查询所有用户")
 @RequestMapping(value = "/findAll" , method = RequestMethod.POST)
 public Iterable findAll(){

  Iterable<User> userList = userDAO.findAll();

  return userList;

 }

 @ApiOperation(value = "删除用户")
 @ApiImplicitParam(name = "id" , value = "id" , paramType = "query" , required = true , dataType = "int")
 @RequestMapping(value = "/deleteById" , method = RequestMethod.POST)
 public String deleteById(@RequestParam(value = "id") Long id){

  userDAO.delete(id);
  return "delete success !";

 }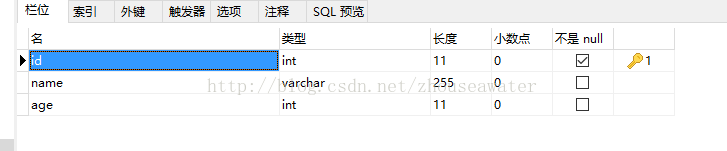
}数据表(id定义为Integer):
UserDao:
package com.seawater.Dao;

import com.seawater.bean.User;
import org.springframework.data.repository.CrudRepository;

/**
 * Created by zhouhs on 2016/12/30.
 */
public interface UserDao extends CrudRepository<User, Long> {

 public User findById(Long id);

}然后启动项目:访问localhost:8081/swagger-ui.html
结果:
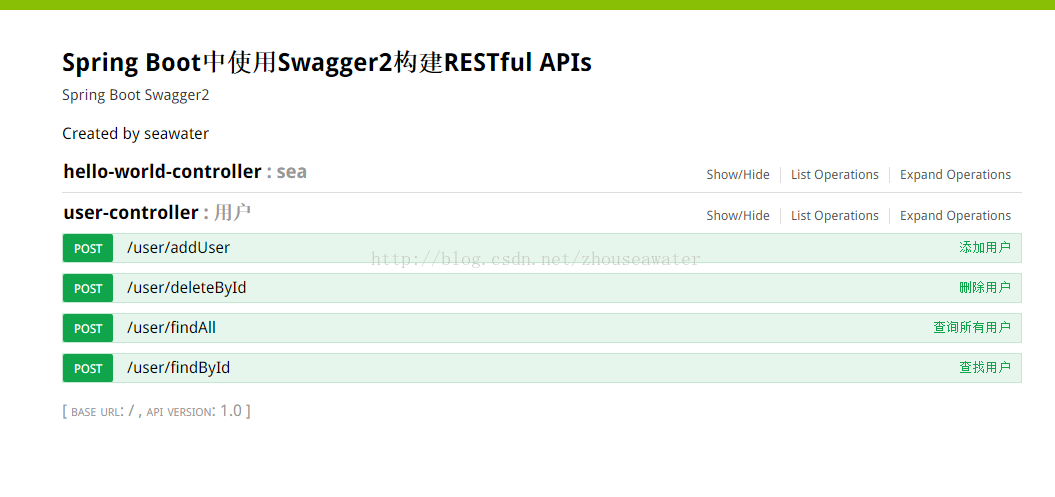
方法我就不一一操作了。
以上是Spring Boot添加MySQL数据库及JPA实例的示例代码分享的详细内容。更多信息请关注PHP中文网其他相关文章!

热AI工具

Undresser.AI Undress
人工智能驱动的应用程序,用于创建逼真的裸体照片

AI Clothes Remover
用于从照片中去除衣服的在线人工智能工具。

Undress AI Tool
免费脱衣服图片

Clothoff.io
AI脱衣机

AI Hentai Generator
免费生成ai无尽的。

热门文章
热工具

记事本++7.3.1
好用且免费的代码编辑器

SublimeText3汉化版
中文版,非常好用

禅工作室 13.0.1
功能强大的PHP集成开发环境

Dreamweaver CS6
视觉化网页开发工具

SublimeText3 Mac版
神级代码编辑软件(SublimeText3)
热门话题


 MySQL:初学者的数据管理易用性
Apr 09, 2025 am 12:07 AM
MySQL:初学者的数据管理易用性
Apr 09, 2025 am 12:07 AM
MySQL适合初学者使用,因为它安装简单、功能强大且易于管理数据。1.安装和配置简单,适用于多种操作系统。2.支持基本操作如创建数据库和表、插入、查询、更新和删除数据。3.提供高级功能如JOIN操作和子查询。4.可以通过索引、查询优化和分表分区来提升性能。5.支持备份、恢复和安全措施,确保数据的安全和一致性。
 忘记数据库密码,能在Navicat中找回吗?
Apr 08, 2025 pm 09:51 PM
忘记数据库密码,能在Navicat中找回吗?
Apr 08, 2025 pm 09:51 PM
Navicat本身不存储数据库密码,只能找回加密后的密码。解决办法:1. 检查密码管理器;2. 检查Navicat的“记住密码”功能;3. 重置数据库密码;4. 联系数据库管理员。
 navicat premium怎么创建
Apr 09, 2025 am 07:09 AM
navicat premium怎么创建
Apr 09, 2025 am 07:09 AM
使用 Navicat Premium 创建数据库:连接到数据库服务器并输入连接参数。右键单击服务器并选择“创建数据库”。输入新数据库的名称和指定字符集和排序规则。连接到新数据库并在“对象浏览器”中创建表。右键单击表并选择“插入数据”来插入数据。
 mysql:简单的概念,用于轻松学习
Apr 10, 2025 am 09:29 AM
mysql:简单的概念,用于轻松学习
Apr 10, 2025 am 09:29 AM
MySQL是一个开源的关系型数据库管理系统。1)创建数据库和表:使用CREATEDATABASE和CREATETABLE命令。2)基本操作:INSERT、UPDATE、DELETE和SELECT。3)高级操作:JOIN、子查询和事务处理。4)调试技巧:检查语法、数据类型和权限。5)优化建议:使用索引、避免SELECT*和使用事务。
 Navicat for MariaDB如何查看数据库密码?
Apr 08, 2025 pm 09:18 PM
Navicat for MariaDB如何查看数据库密码?
Apr 08, 2025 pm 09:18 PM
Navicat for MariaDB 无法直接查看数据库密码,因为密码以加密形式存储。为确保数据库安全,有三个方法可重置密码:通过 Navicat 重置密码,设置复杂密码。查看配置文件(不推荐,风险高)。使用系统命令行工具(不推荐,需要对命令行工具精通)。
 navicat如何执行sql
Apr 08, 2025 pm 11:42 PM
navicat如何执行sql
Apr 08, 2025 pm 11:42 PM
在 Navicat 中执行 SQL 的步骤:连接到数据库。创建 SQL 编辑器窗口。编写 SQL 查询或脚本。单击“运行”按钮执行查询或脚本。查看结果(如果执行查询的话)。
 navicat怎么新建连接mysql
Apr 09, 2025 am 07:21 AM
navicat怎么新建连接mysql
Apr 09, 2025 am 07:21 AM
可在 Navicat 中通过以下步骤新建 MySQL 连接:打开应用程序并选择“新建连接”(Ctrl N)。选择“MySQL”作为连接类型。输入主机名/IP 地址、端口、用户名和密码。(可选)配置高级选项。保存连接并输入连接名称。
 MySQL和SQL:开发人员的基本技能
Apr 10, 2025 am 09:30 AM
MySQL和SQL:开发人员的基本技能
Apr 10, 2025 am 09:30 AM
MySQL和SQL是开发者必备技能。1.MySQL是开源的关系型数据库管理系统,SQL是用于管理和操作数据库的标准语言。2.MySQL通过高效的数据存储和检索功能支持多种存储引擎,SQL通过简单语句完成复杂数据操作。3.使用示例包括基本查询和高级查询,如按条件过滤和排序。4.常见错误包括语法错误和性能问题,可通过检查SQL语句和使用EXPLAIN命令优化。5.性能优化技巧包括使用索引、避免全表扫描、优化JOIN操作和提升代码可读性。
