开发企业应用时我们常常遇到要同时访问多种不同数据库的问题,有时是必须把数据归档到某种数据仓库中,有时是要把数据变更推送到第三方数据库中。使用Spring框架时,使用单一数据库是非常容易的,但如果要同时访问多个数据库的话事件就变得复杂多了。
本文以在Spring框架下开发一个SpringMVC程序为例,示范了一种同时访问多种数据库的方法,而且尽量地简化配置改动。
建议你也同时搭好两个数据库来跟进我们的示例。本文中我们用了PostgreSQL和MySQL。
下面的脚本内容是在两个数据库中建表和插入数据的命令。
PostgreSQL
CREATE TABLE usermaster (
   id integer,
   name character varying,
   emailid character varying,
   phoneno character varying(10),
   location character varying
)

INSERT INTO usermaster(id, name, emailid, phoneno, location)
VALUES (1, 'name_postgres', 'email@email.com', '1234567890', 'IN');
MySQL
CREATE TABLE `usermaster` (
   `id` int(11) NOT NULL,
   `name` varchar(255) DEFAULT NULL,
   `emailid` varchar(20) DEFAULT NULL,
   `phoneno` varchar(20) DEFAULT NULL,
   `location` varchar(20) DEFAULT NULL,
   PRIMARY KEY (`id`)
)

INSERT INTO `kode12`.`usermaster`
  (`id`, `name`, `emailid`, `phoneno`, `location`)
VALUES
  ('1', 'name_mysql', 'test@tset.com', '9876543210', 'IN');
我们用Spring Tool Suite (STS)来构建这个例子:
点击File -> New -> Spring Starter Project。
在对话框中输入项目名、Maven坐标、描述和包信息等,点击Next。
在boot dependency中选择Web,点击Next。
点击Finish。STS会自动按照项目依赖关系从Spring仓库中下载所需要的内容。
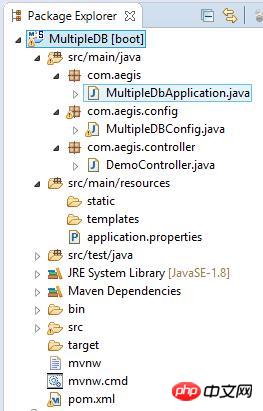
创建完的项目如下图所示:

接下来我们仔细研究一下项目中的各个相关文件内容。
pom.xml
pom中包含了所有需要的依赖和插件映射关系。
代码:
<?xml version="1.0" encoding="UTF-8"?>
<project xmlns="http://maven.apache.org/POM/4.0.0"
    xmlns:xsi="http://www.w3.org/2001/XMLSchema-instance"
    xsi:schemaLocation="http://maven.apache.org/POM/4.0.0
    http://maven.apache.org/xsd/maven-4.0.0.xsd">
    <modelVersion>4.0.0</modelVersion>

    <groupId>com.aegis</groupId>
    <artifactId>MultipleDBConnect</artifactId>
    <version>0.0.1-SNAPSHOT</version>
    <packaging>jar</packaging>

    <name>MultipleDB</name>
    <description>MultipleDB with Spring Boot</description>

    <parent>
        <groupId>org.springframework.boot</groupId>
        <artifactId>spring-boot-starter-parent</artifactId>
        <version>1.3.5.RELEASE</version>
        <relativePath />
    </parent>

    <properties>
        <project.build.sourceEncoding>UTF-8</project.build.sourceEncoding>
        <java.version>1.8</java.version>
    </properties>

    <dependencies>
        <dependency>
            <groupId>org.springframework.boot</groupId>
            <artifactId>spring-boot-starter-web</artifactId>
        </dependency>

        <dependency>
            <groupId>org.springframework.boot</groupId>
            <artifactId>spring-boot-starter-test</artifactId>
            <scope>test</scope>
        </dependency>

        <dependency>
            <groupId>org.springframework.boot</groupId>
            <artifactId>spring-boot-starter-jdbc</artifactId>
        </dependency>

        <dependency>
            <groupId>org.postgresql</groupId>
            <artifactId>postgresql</artifactId>
        </dependency>

        <dependency>
            <groupId>mysql</groupId>
            <artifactId>mysql-connector-java</artifactId>
            <version>5.1.38</version>
        </dependency>
    </dependencies>

    <build>
        <plugins>
            <plugin>
                <groupId>org.springframework.boot</groupId>
                <artifactId>spring-boot-maven-plugin</artifactId>
            </plugin>
        </plugins>
    </build>
</project>解释:
下面详细解释各种依赖关系的细节:
spring-boot-starter-web:为Web开发和MVC提供支持。
spring-boot-starter-test:提供JUnit、Mockito等测试依赖。
spring-boot-starter-jdbc:提供JDBC支持。
postgresql:PostgreSQL数据库的JDBC驱动。
mysql-connector-java:MySQL数据库的JDBC驱动。
application.properties
包含程序需要的所有配置信息。在旧版的Spring中我们要通过多个XML文件来提供这些配置信息。
server.port=6060
spring.ds_post.url =jdbc:postgresql://localhost:5432/kode12
spring.ds_post.username =postgres
spring.ds_post.password =root
spring.ds_post.driverClassName=org.postgresql.Driver
spring.ds_mysql.url = jdbc:mysql://localhost:3306/kode12
spring.ds_mysql.username = root
spring.ds_mysql.password = root
spring.ds_mysql.driverClassName=com.mysql.jdbc.Driver
解释:
“server.port=6060”声明你的嵌入式服务器启动后会使用6060端口(port.server.port是Boot默认的标准端口)。
其他属性中:
以“spring.ds_*”为前缀的是用户定义属性。
以“spring.ds_post.*”为前缀的是为PostgreSQL数据库定义的属性。
以“spring.ds_mysql.*”为前缀的是为MySQL数据库定义的属性。
MultipleDbApplication.java
package com.aegis;

import org.springframework.boot.SpringApplication;
import org.springframework.boot.autoconfigure.SpringBootApplication;

@SpringBootApplication
public MultipleDbApplication {

    public static void main(String[] args) {
        SpringApplication.run(MultipleDbApplication.class, args);
    }
}这个文件包含了启动我们的Boot程序的主函数。注解“@SpringBootApplication”是所有其他Spring注解和Java注解的组合,包括:
@Configuration
@EnableAutoConfiguration
@ComponentScan
@Target(value={TYPE})
@Retention(value=RUNTIME)
@Documented
@Inherited其他注解:
@Configuration
@EnableAutoConfiguration
@ComponentScan
上述注解会让容器通过这个类来加载我们的配置。
MultipleDBConfig.java
package com.aegis.config;
import javax.sql.DataSource;
import org.springframework.beans.factory.annotation.Qualifier;
import org.springframework.boot.autoconfigure.jdbc.DataSourceBuilder;
import org.springframework.boot.context.properties.ConfigurationProperties;
import org.springframework.context.annotation.Bean;
import org.springframework.context.annotation.Configuration;
import org.springframework.context.annotation.Primary;
import org.springframework.jdbc.core.JdbcTemplate;

@Configuration
public class MultipleDBConfig {
    @Bean(name = "mysqlDb")
    @ConfigurationProperties(prefix = "spring.ds_mysql")
    public DataSource mysqlDataSource() {
        return DataSourceBuilder.create().build();
    }

    @Bean(name = "mysqlJdbcTemplate")
    public JdbcTemplate jdbcTemplate(@Qualifier("mysqlDb") DataSource dsMySQL) {
        return new JdbcTemplate(dsMySQL);
    }

    @Bean(name = "postgresDb")
    @ConfigurationProperties(prefix = "spring.ds_post")
    public DataSource postgresDataSource() {
        return  DataSourceBuilder.create().build();
    }

    @Bean(name = "postgresJdbcTemplate")
    public JdbcTemplate postgresJdbcTemplate(@Qualifier("postgresDb")

    DataSource dsPostgres) {
        return new JdbcTemplate(dsPostgres);
    }
}解释:
这是加了注解的配置类,包含加载我们的PostgreSQL和MySQL数据库配置的函数和注解。这也会负责为每一种数据库创建JDBC模板类。
下面我们看一下这四个函数:
@Bean(name = "mysqlDb")
@ConfigurationProperties(prefix = "spring.ds_mysql")
public DataSource mysqlDataSource() {
return DataSourceBuilder.create().build();
}上面代码第一行创建了mysqlDb bean。
第二行帮助@Bean加载了所有有前缀spring.ds_mysql的属性。
第四行创建并初始化了DataSource类,并创建了mysqlDb DataSource对象。
@Bean(name = "mysqlJdbcTemplate")
public JdbcTemplate jdbcTemplate(@Qualifier("mysqlDb") DataSource dsMySQL) {
     return new JdbcTemplate(dsMySQL);
}第一行以mysqlJdbcTemplate为名创建了一个JdbcTemplate类型的新Bean。
第二行将第一行中创建的DataSource类型新参数传入函数,并以mysqlDB为qualifier。
第三行用DataSource对象初始化JdbcTemplate实例。
@Bean(name = "postgresDb")
@ConfigurationProperties(prefix = "spring.ds_post")
public DataSource postgresDataSource() {
   return  DataSourceBuilder.create().build();
}第一行创建DataSource实例postgresDb。
第二行帮助@Bean加载所有以spring.ds_post为前缀的配置。
第四行创建并初始化DataSource实例postgresDb。
@Bean(name = "postgresJdbcTemplate")
public JdbcTemplate postgresJdbcTemplate(@Qualifier("postgresDb")
DataSource dsPostgres) {
  return new JdbcTemplate(dsPostgres);
}第一行以postgresJdbcTemplate为名创建JdbcTemplate类型的新bean。
第二行接受DataSource类型的参数,并以postgresDb为qualifier。
第三行用DataSource对象初始化JdbcTemplate实例。
DemoController.java
package com.aegis.controller;
import java.util.HashMap;
import java.util.Map;
import org.springframework.beans.factory.annotation.Autowired;
import org.springframework.beans.factory.annotation.Qualifier;
import org.springframework.jdbc.core.JdbcTemplate;
import org.springframework.web.bind.annotation.PathVariable;
import org.springframework.web.bind.annotation.RequestMapping;
import org.springframework.web.bind.annotation.RestController;

@RestController
public class DemoController {

    @Autowired
    @Qualifier("postgresJdbcTemplate")
    private JdbcTemplate postgresTemplate;

    @Autowired
    @Qualifier("mysqlJdbcTemplate")
    private JdbcTemplate mysqlTemplate;

    @RequestMapping(value = "/getPGUser")
    public String getPGUser() {
        Map<String, Object> map = new HashMap<String, Object>();
        String query = " select * from usermaster";
        try {
            map = postgresTemplate.queryForMap(query);
        } catch (Exception e) {
            e.printStackTrace();
        }
        return "PostgreSQL Data: " + map.toString();
    }

    @RequestMapping(value = "/getMYUser")
    public String getMYUser() {
        Map<String, Object> map = new HashMap<String, Object>();
        String query = " select * from usermaster";
        try {
            map = mysqlTemplate.queryForMap(query);
        } catch (Exception e) {
            e.printStackTrace();
        }
        return "MySQL Data: " + map.toString();
    }
}解释:
@RestController类注解表明这个类中定义的所有函数都被默认绑定到响应中。
上面代码段创建了一个JdbcTemplate实例。@Qualifier用于生成一个对应类型的模板。代码中提供的是postgresJdbcTemplate作为Qualifier参数,所以它会加载MultipleDBConfig实例的jdbcTemplate(…)函数创建的Bean。
这样Spring就会根据你的要求来调用合适的JDBC模板。在调用URL “/getPGUser”时Spring会用PostgreSQL模板,调用URL “/getMYUser”时Spring会用MySQL模板。
@Autowired
@Qualifier("postgresJdbcTemplate")
private JdbcTemplate postgresTemplate;这里我们用queryForMap(String query)函数来使用JDBC模板从数据库中获取数据,queryForMap(…)返回一个map,以字段名为Key,Value为实际字段值。
执行类MultipleDbApplication中的main (…)函数就可以看到演示效果。在你常用的浏览器中点击下面URL:
URL: http://localhost:6060/getMYUser

Url: http://localhost:6060/getPGUser
上面的URL会查询PostgreSQL数据库并以字符串形式返回数据。

以上是Java Spring中同时访问多种不同数据库的代码实例分享的详细内容。更多信息请关注PHP中文网其他相关文章!


