

介绍java中三种spring注解方法

本篇文章主要介绍最重要的三个Spring注解,也就是@Autowired、@Resource和@Service,具有很好的参考价值。下面跟着小编一起来看下吧
什么是注解
传统的Spring做法是使用.xml文件来对bean进行注入或者是配置aop、事物,这么做有两个缺点:
1、如果所有的内容都配置在.xml文件中,那么.xml文件将会十分庞大;如果按需求分开.xml文件,那么.xml文件又会非常多。总之这将导致配置文件的可读性与可维护性变得很低
2、在开发中在.java文件和.xml文件之间不断切换,是一件麻烦的事,同时这种思维上的不连贯也会降低开发的效率
为了解决这两个问题,Spring引入了注解,通过"@XXX"的方式,让注解与Java Bean紧密结合,既大大减少了配置文件的体积,又增加了Java Bean的可读性与内聚性。
本篇文章,讲讲最重要的三个Spring注解,也就是@Autowired、@Resource和@Service,希望能通过有限的篇幅说清楚这三个注解的用法。
不使用注解
先看一个不使用注解的Spring示例,在这个示例的基础上,改成注解版本的,这样也能看出使用与不使用注解之间的区别,先定义一个老虎:
public class Tiger
{
 private String tigerName = "TigerKing";

 public String toString()
 {
  return "TigerName:" + tigerName;
 }
}再定义一个猴子:
public class Monkey
{
 private String monkeyName = "MonkeyKing";

 public String toString()
 {
  return "MonkeyName:" + monkeyName;
 }
}定义一个动物园:
public class Zoo
{
 private Tiger tiger;
 private Monkey monkey;

 public void setTiger(Tiger tiger)
 {
  this.tiger = tiger;
 }

 public void setMonkey(Monkey monkey)
 {
  this.monkey = monkey;
 }

 public Tiger getTiger()
 {
  return tiger;
 }

 public Monkey getMonkey()
 {
  return monkey;
 }
 public String toString()
 {
  return tiger + "\n" + monkey;
 }
}spring的配置文件这么写:
<?xml version="1.0" encoding="UTF-8"?>
<beans xmlns:xsi="http://www.w3.org/2001/XMLSchema-instance"
 xmlns="http://www.springframework.org/schema/beans"
 xmlns:context="http://www.springframework.org/schema/context"
 xsi:schemaLocation="http://www.springframework.org/schema/beans
  http://www.springframework.org/schema/beans/spring-beans-4.2.xsd
  http://www.springframework.org/schema/context
  http://www.springframework.org/schema/context/spring-context-4.2.xsd"
 default-autowire="byType">

 <bean id="zoo" class="com.xrq.bean.Zoo" >
  <property name="tiger" ref="tiger" />
  <property name="monkey" ref="monkey" />
 </bean>

 <bean id="tiger" class="com.xrq.domain.Tiger" />
 <bean id="monkey" class="com.xrq.domain.Monkey" />
</beans>
都很熟悉,权当复习一遍了。
@Autowired
@Autowired顾名思义,就是自动装配,其作用是为了消除代码Java代码里面的getter/setter与bean属性中的property。当然,getter看个人需求,如果私有属性需要对外提供的话,应当予以保留。
因此,引入@Autowired注解,先看一下spring配置文件怎么写:
<?xml version="1.0" encoding="UTF-8"?>
<beans xmlns:xsi="http://www.w3.org/2001/XMLSchema-instance"
 xmlns="http://www.springframework.org/schema/beans"
 xmlns:context="http://www.springframework.org/schema/context"
 xsi:schemaLocation="http://www.springframework.org/schema/beans
  http://www.springframework.org/schema/beans/spring-beans-4.2.xsd
  http://www.springframework.org/schema/context
  http://www.springframework.org/schema/context/spring-context-4.2.xsd">

 <context:component-scan base-package="com.xrq" />

 <bean id="zoo" class="com.xrq.bean.Zoo" />
 <bean id="tiger" class="com.xrq.domain.Tiger" />
 <bean id="monkey" class="com.xrq.domain.Monkey" />
</beans>
注意第10行,使用必须告诉spring一下我要使用注解了,告诉的方式有很多,
看到第12行,原来zoo里面应当注入两个属性tiger、monkey,现在不需要注入了。再看下,Zoo.java也很方便,把getter/setter都可以去掉:
public class Zoo
{
 @Autowired
 private Tiger tiger;

 @Autowired
 private Monkey monkey;

 public String toString()
 {
  return tiger + "\n" + monkey;
 }
}这里@Autowired注解的意思就是,当Spring发现@Autowired注解时,将自动在代码上下文中找到和其匹配(默认是类型匹配)的Bean,并自动注入到相应的地方去。
有一个细节性的问题是,假如bean里面有两个property,Zoo.java里面又去掉了属性的getter/setter并使用@Autowired注解标注这两个属性那会怎么样?答案是Spring会按照xml优先的原则去Zoo.java中寻找这两个属性的getter/setter,导致的结果就是初始化bean报错。
OK,假设此时我把.xml文件的13行、14行两行给去掉,再运行,会抛出异常:
Exception in thread "main" org.springframework.beans.factory.BeanCreationException: Error creating bean with name 'Zoo': Injection of autowired dependencies failed; nested exception is org.springframework.beans.factory.BeanCreationException: Could not autowire field: private com.xrq.domain.Tiger com.xrq.bean.Zoo.ttiger; nested exception is org.springframework.beans.factory.NoSuchBeanDefinitionException: No qualifying bean of type [com.xrq.domain.Tiger] found for dependency: expected at least 1 bean which qualifies as autowire candidate for this dependency. Dependency annotations: {@org.springframework.beans.factory.annotation.Autowired(required=true)}
 at org.springframework.beans.factory.annotation.AutowiredAnnotationBeanPostProcessor.postProcessPropertyValues(AutowiredAnnotationBeanPostProcessor.java:334)
 at org.springframework.beans.factory.support.AbstractAutowireCapableBeanFactory.populateBean(AbstractAutowireCapableBeanFactory.java:1214)
 at org.springframework.beans.factory.support.AbstractAutowireCapableBeanFactory.doCreateBean(AbstractAutowireCapableBeanFactory.java:543)
 at org.springframework.beans.factory.support.AbstractAutowireCapableBeanFactory.createBean(AbstractAutowireCapableBeanFactory.java:482)
 at org.springframework.beans.factory.support.AbstractBeanFactory$1.getObject(AbstractBeanFactory.java:305)
 at org.springframework.beans.factory.support.DefaultSingletonBeanRegistry.getSingleton(DefaultSingletonBeanRegistry.java:230)
 at org.springframework.beans.factory.support.AbstractBeanFactory.doGetBean(AbstractBeanFactory.java:301)
 at org.springframework.beans.factory.support.AbstractBeanFactory.getBean(AbstractBeanFactory.java:196)
 at org.springframework.beans.factory.support.DefaultListableBeanFactory.preInstantiateSingletons(DefaultListableBeanFactory.java:772)
 at org.springframework.context.support.AbstractApplicationContext.finishBeanFactoryInitialization(AbstractApplicationContext.java:835)
 at org.springframework.context.support.AbstractApplicationContext.refresh(AbstractApplicationContext.java:537)
 at org.springframework.context.support.ClassPathXmlApplicationContext.<init>(ClassPathXmlApplicationContext.java:139)
 at org.springframework.context.support.ClassPathXmlApplicationContext.<init>(ClassPathXmlApplicationContext.java:83)
 at com.xrq.test.MyTest.main(MyTest.java:13)
Caused by: org.springframework.beans.factory.BeanCreationException: Could not autowire field: private com.xrq.domain.Tiger com.xrq.bean.Zoo.ttiger; nested exception is org.springframework.beans.factory.NoSuchBeanDefinitionException: No qualifying bean of type [com.xrq.domain.Tiger] found for dependency: expected at least 1 bean which qualifies as autowire candidate for this dependency. Dependency annotations: {@org.springframework.beans.factory.annotation.Autowired(required=true)}
 at org.springframework.beans.factory.annotation.AutowiredAnnotationBeanPostProcessor$AutowiredFieldElement.inject(AutowiredAnnotationBeanPostProcessor.java:571)
 at org.springframework.beans.factory.annotation.InjectionMetadata.inject(InjectionMetadata.java:88)
 at org.springframework.beans.factory.annotation.AutowiredAnnotationBeanPostProcessor.postProcessPropertyValues(AutowiredAnnotationBeanPostProcessor.java:331)
 ... 13 more
Caused by: org.springframework.beans.factory.NoSuchBeanDefinitionException: No qualifying bean of type [com.xrq.domain.Tiger] found for dependency: expected at least 1 bean which qualifies as autowire candidate for this dependency. Dependency annotations: {@org.springframework.beans.factory.annotation.Autowired(required=true)}
 at org.springframework.beans.factory.support.DefaultListableBeanFactory.raiseNoSuchBeanDefinitionException(DefaultListableBeanFactory.java:1373)
 at org.springframework.beans.factory.support.DefaultListableBeanFactory.doResolveDependency(DefaultListableBeanFactory.java:1119)
 at org.springframework.beans.factory.support.DefaultListableBeanFactory.resolveDependency(DefaultListableBeanFactory.java:1014)
 at org.springframework.beans.factory.annotation.AutowiredAnnotationBeanPostProcessor$AutowiredFieldElement.inject(AutowiredAnnotationBeanPostProcessor.java:543)
... 15 more因为,@Autowired注解要去寻找的是一个Bean,Tiger和Monkey的Bean定义都给去掉了,自然就不是一个Bean了,Spring容器找不到也很好理解。那么,如果属性找不到我不想让Spring容器抛出异常,而就是显示null,可以吗?可以的,其实异常信息里面也给出了提示了,就是将@Autowired注解的required属性设置为false即可:
public class Zoo
{
 @Autowired(required = false)
 private Tiger tiger;

 @Autowired(required = false)
 private Monkey monkey;
 public String toString()
 {
  return tiger + "\n" + monkey;
 }
}此时,找不到tiger、monkey两个属性,Spring容器不再抛出异而是认为这两个属性为null。
@Autowired接口注入
上面的比较简单,我们只是简单注入一个Java类,那么如果有一个接口,有多个实现,Bean里引用的是接口名,又该怎么做呢?比如有一个Car接口:
public interface Car
{
 public String carName();
}两个实现类BMW和Benz:
@Service
public class BMW implements Car
{
 public String carName()
 {
  return "BMW car";
 }
}@Service
public class Benz implements Car
{
public String carName()
{
return "Benz car";
}
}写一个CarFactory,引用Car:
@Service
public class CarFactory
{
 @Autowired
 private Car car;
 public String toString()
 {
  return car.carName();
 }
}不用说,一定是报错的,Car接口有两个实现类,Spring并不知道应当引用哪个实现类。这种情况通常有两个解决办法:
1、删除其中一个实现类,Spring会自动去base-package下寻找Car接口的实现类,发现Car接口只有一个实现类,便会直接引用这个实现类
2、实现类就是有多个该怎么办?此时可以使用@Qualifier注解:
@Service
public class CarFactory
{
 @Autowired
 @Qualifier("BMW")
 private Car car;

 public String toString()
 {
  return car.carName();
 }
}注意@Qualifier注解括号里面的应当是Car接口实现类的类名,我之前试的时候一直以为是bean的名字,所以写了"bMW",结果一直报错。
@Resource
把@Resource注解放在@Autowired下面说,是因为它们作用非常相似,这个就简单说了,例子过后点明一下@Resource和@Autowired的区别。先看一下@Resource,直接写Zoo.java了:
@Service
public class Zoo
{
 @Resource(name = "tiger")
 private Tiger tiger;
 @Resource(type = Monkey.class)
 private Monkey monkey;
 public String toString()
 {
  return tiger + "\n" + monkey;
 }
}这是详细一些的用法,说一下@Resource的装配顺序:
1、@Resource后面没有任何内容,默认通过name属性去匹配bean,找不到再按type去匹配
2、指定了name或者type则根据指定的类型去匹配bean
3、指定了name和type则根据指定的name和type去匹配bean,任何一个不匹配都将报错
然后,区分一下@Autowired和@Resource两个注解的区别:
1、@Autowired默认按照byType方式进行bean匹配,@Resource默认按照byName方式进行bean匹配
2、@Autowired是Spring的注解,@Resource是J2EE的注解,这个看一下导入注解的时候这两个注解的包名就一清二楚了
Spring属于第三方的,J2EE是Java自己的东西,因此,建议使用@Resource注解,以减少代码和Spring之间的耦合。
@Service
上面这个例子,还可以继续简化,因为spring的配置文件里面还有12行~14行三个bean,下一步的简化是把这三个bean也给去掉,使得spring配置文件里面只有一个自动扫描的标签,增强Java代码的内聚性并进一步减少配置文件。
要继续简化,可以使用@Service。先看一下配置文件,当然是全部删除了:
<?xml version="1.0" encoding="UTF-8"?>
<beans xmlns:xsi="http://www.w3.org/2001/XMLSchema-instance"
 xmlns="http://www.springframework.org/schema/beans"
 xmlns:context="http://www.springframework.org/schema/context"
 xsi:schemaLocation="http://www.springframework.org/schema/beans
  http://www.springframework.org/schema/beans/spring-beans-4.2.xsd
  http://www.springframework.org/schema/context
  http://www.springframework.org/schema/context/spring-context-4.2.xsd">
 <context:component-scan base-package="com.xrq" />
</beans>
是不是感觉很爽?起码我觉得是的。OK,下面以Zoo.java为例,其余的Monkey.java和Tiger.java都一样:
@Service
public class Zoo
{
 @Autowired
 private Tiger ttiger;
 @Autowired
 private Monkey mmonkey;
 public String toString()
 {
  return ttiger + "\n" + mmonkey;
 }
}这样,Zoo.java在Spring容器中存在的形式就是"zoo",即可以通过ApplicationContext的getBean("zoo")方法来得到Zoo.java。@Service注解,其实做了两件事情:
1、声明Zoo.java是一个bean,这点很重要,因为Zoo.java是一个bean,其他的类才可以使用@Autowired将Zoo作为一个成员变量自动注入
2、Zoo.java在bean中的id是"zoo",即类名且首字母小写
如果,我不想用这种形式怎么办,就想让Zoo.java在Spring容器中的名字叫做"Zoo",可以的:
@Service
@Scope("prototype")
public class Zoo
{
 @Autowired
 private Monkey monkey;
 @Autowired
 private Tiger tiger;
 public String toString()
 {
  return "MonkeyName:" + monkey + "\nTigerName:" + tiger;
 }
}这样,就可以通过ApplicationContext的getBean("zoo")方法来得到Zoo.java了。
这里我还多加了一个@Scope注解,应该很好理解。因为Spring默认产生的bean是单例的,假如我不想使用单例怎么办,xml文件里面可以在bean里面配置scope属性。注解也是一样,配置@Scope即可,默认是"singleton"即单例,"prototype"表示原型即每次都会new一个新的出来。
补充细节
最后再补充一个我发现的细节。假如animal包下有Tiger、domain包下也有Tiger,它们二者都加了@Service注解,那么在Zoo.java中即使明确表示我要引用的是domain包下的Tiger,程序运行的时候依然会报错。
细想,其实这很好理解,两个Tiger都使用@Service注解标注,意味着两个Bean的名字都是"tiger",那么我在Zoo.java中自动装配的是哪个Tiger呢?不明确,因此,Spring容器会抛出BeanDefinitionStoreException异常,Caused by:
Caused by: org.springframework.context.annotation.ConflictingBeanDefinitionException: Annotation-specified bean name 'monkey' for bean class [com.xrq.domain.Monkey] conflicts with existing, non-compatible bean definition of same name and class [com.xrq.animal.Monkey]
【相关推荐】
1. Java免费视频教程
2. JAVA教程手册
3. 全面解析Java注解
以上是介绍java中三种spring注解方法的详细内容。更多信息请关注PHP中文网其他相关文章!

热AI工具

Undresser.AI Undress
人工智能驱动的应用程序,用于创建逼真的裸体照片

AI Clothes Remover
用于从照片中去除衣服的在线人工智能工具。

Undress AI Tool
免费脱衣服图片

Clothoff.io
AI脱衣机

AI Hentai Generator
免费生成ai无尽的。

热门文章
热工具

记事本++7.3.1
好用且免费的代码编辑器

SublimeText3汉化版
中文版,非常好用

禅工作室 13.0.1
功能强大的PHP集成开发环境

Dreamweaver CS6
视觉化网页开发工具

SublimeText3 Mac版
神级代码编辑软件(SublimeText3)
热门话题


 编程新范式,当Spring Boot遇上OpenAI
Feb 01, 2024 pm 09:18 PM
编程新范式,当Spring Boot遇上OpenAI
Feb 01, 2024 pm 09:18 PM
2023年,AI技术已经成为热点话题,对各行业产生了巨大影响,编程领域尤其如此。人们越来越认识到AI技术的重要性,Spring社区也不例外。随着GenAI(GeneralArtificialIntelligence)技术的不断进步,简化具备AI功能的应用程序的创建变得至关重要和迫切。在这个背景下,"SpringAI"应运而生,旨在简化开发AI功能应用程序的过程,使其变得简单直观,避免不必要的复杂性。通过"SpringAI",开发者可以更轻松地构建具备AI功能的应用程序,将其变得更加易于使用和操作
 利用Spring Boot以及Spring AI构建生成式人工智能应用
Apr 28, 2024 am 11:46 AM
利用Spring Boot以及Spring AI构建生成式人工智能应用
Apr 28, 2024 am 11:46 AM
Spring+AI作为行业领导者,通过其强大、灵活的API和先进的功能,为各种行业提供了领先性的解决方案。在本专题中,我们将深入探讨Spring+AI在各领域的应用示例,每个案例都将展示Spring+AI如何满足特定需求,实现目标,并将这些LESSONSLEARNED扩展到更广泛的应用。希望这个专题能对你有所启发,更深入地理解和利用Spring+AI的无限可能。Spring框架在软件开发领域已经有超过20年的历史,自SpringBoot1.0版本发布以来已有10年。现在,无人会质疑,Spring
 spring编程式事务有哪些实现方式
Jan 08, 2024 am 10:23 AM
spring编程式事务有哪些实现方式
Jan 08, 2024 am 10:23 AM
spring编程式事务的实现方式:1、使用TransactionTemplate;2、使用TransactionCallback和TransactionCallbackWithoutResult;3、使用Transactional注解;4、使用TransactionTemplate和@Transactional结合使用;5、自定义事务管理器。
 Java Spring怎么实现定时任务
May 24, 2023 pm 01:28 PM
Java Spring怎么实现定时任务
May 24, 2023 pm 01:28 PM
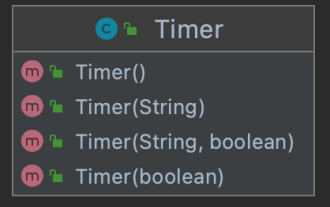
java实现定时任务Jdk自带的库中,有两种方式可以实现定时任务,一种是Timer,另一种是ScheduledThreadPoolExecutor。Timer+TimerTask创建一个Timer就创建了一个线程,可以用来调度TimerTask任务Timer有四个构造方法,可以指定Timer线程的名字以及是否设置为为守护线程。默认名字Timer-编号,默认不是守护线程。主要有三个比较重要的方法:cancel():终止任务调度,取消当前调度的所有任务,正在运行的任务不受影响purge():从任务队
 Spring Boot与Spring Cloud的区别与联系
Jun 22, 2023 pm 06:25 PM
Spring Boot与Spring Cloud的区别与联系
Jun 22, 2023 pm 06:25 PM
SpringBoot和SpringCloud都是SpringFramework的扩展,它们可以帮助开发人员更快地构建和部署微服务应用程序,但它们各自有不同的用途和功能。SpringBoot是一个快速构建Java应用的框架,使得开发人员可以更快地创建和部署基于Spring的应用程序。它提供了一个简单、易于理解的方式来构建独立的、可执行的Spring应用
 Spring 最常用的 7 大类注解,史上最强整理!
Jul 26, 2023 pm 04:38 PM
Spring 最常用的 7 大类注解,史上最强整理!
Jul 26, 2023 pm 04:38 PM
随着技术的更新迭代,Java5.0开始支持注解。而作为java中的领军框架spring,自从更新了2.5版本之后也开始慢慢舍弃xml配置,更多使用注解来控制spring框架。
 从零开始学Spring Cloud
Jun 22, 2023 am 08:11 AM
从零开始学Spring Cloud
Jun 22, 2023 am 08:11 AM
作为一名Java开发者,学习和使用Spring框架已经是一项必不可少的技能。而随着云计算和微服务的盛行,学习和使用SpringCloud成为了另一个必须要掌握的技能。SpringCloud是一个基于SpringBoot的用于快速构建分布式系统的开发工具集。它为开发者提供了一系列的组件,包括服务注册与发现、配置中心、负载均衡和断路器等,使得开发者在构建微
 Spring如何设置事务隔离级别
Jan 26, 2024 pm 05:38 PM
Spring如何设置事务隔离级别
Jan 26, 2024 pm 05:38 PM
Spring设置事务隔离级别的方法:1、使用@Transactional注解;2、在Spring配置文件中设置;3、使用PlatformTransactionManager;4、在Java配置类中设置。详细介绍:1、使用@Transactional注解,在需要进行事务管理的类或方法上添加@Transactional注解,并在属性中设置隔离级别;2、在Spring配置文件等等。
