

用Shape做动画的实例详解

上一篇几乎都在说DoubleAnimation的应用,这篇说说PointAnimation。
1. 使用PointAnimation
使用PointAnimation可以让Shape变形,但实际上没看到多少人会这么用,毕竟WPF做的软件多数不需要这么花俏。
1.1 在XAML上使用PointAnimation
<Storyboard x:Name="Storyboard2" RepeatBehavior="Forever" AutoReverse="True" Duration="0:0:4"><PointAnimation Storyboard.TargetProperty="(Path.Data).(PathGeometry.Figures)[0].(PathFigure.StartPoint)" Storyboard.TargetName="Path2" To="0,0" EnableDependentAnimation="True" /><PointAnimation Storyboard.TargetProperty="(Path.Data).(PathGeometry.Figures)[0].(PathFigure.Segments)[0].(LineSegment.Point)" Storyboard.TargetName="Path2" To="100,0" EnableDependentAnimation="True" /><ColorAnimation To="#FF85C82E" Storyboard.TargetProperty="(Shape.Fill).(SolidColorBrush.Color)" Storyboard.TargetName="Path2" /></Storyboard>…<Path Margin="0,20,0,0" x:Name="Path2" Fill="GreenYellow"><Path.Data><PathGeometry><PathFigure StartPoint="50,0"><LineSegment Point="50,0" /><LineSegment Point="0,100" /><LineSegment Point="0,100" /><LineSegment Point="100,100" /><LineSegment Point="100,100" /></PathFigure></PathGeometry></Path.Data></Path>

在这个例子里最头痛的地方是Property-path 语法,如果不能熟记的话最好依赖Blend生成。
1.2 在代码中使用PointAnimation
如果Point数量很多,例如图表,通常会在C#代码中使用PointAnimation:
_storyboard = new Storyboard();
Random random = new Random();for (int i = 0; i < _pathFigure.Segments.Count; i++)
{var animation = new PointAnimation { Duration = TimeSpan.FromSeconds(3) };
    Storyboard.SetTarget(animation, _pathFigure.Segments[i]);
    Storyboard.SetTargetProperty(animation, "(LineSegment.Point)");
    animation.EnableDependentAnimation = true;
    animation.EasingFunction = new QuarticEase { EasingMode = EasingMode.EaseOut };
    animation.To = new Point((_pathFigure.Segments[i] as LineSegment).Point.X, (i % 2 == 0 ? 1 : -1) * i * 1.2 + 60);
    _storyboard.Children.Add(animation);
}
_storyboard.Begin();
因为可以直接SetTarget,所以Property-path语法就可以很简单。
2. 扩展PointAnimation
上面两个例子的动画都还算简单,如果更复杂些,XAML或C#代码都需要写到很复杂。我参考了这个网页 想做出类似的动画,但发现需要写很多XAML所以放弃用PointAnimation实现。这个页面的动画核心是这段HTML:
<polygon fill="#FFD41D" points="97.3,0 127.4,60.9 194.6,70.7 145.9,118.1 157.4,185.1 97.3,153.5 37.2,185.1 48.6,118.1 0,70.7     67.2,60.9">
      <animate id="animation-to-check" begin="indefinite" fill="freeze" attributeName="points" dur="500ms" to="110,58.2 147.3,0 192.1,29 141.7,105.1 118.7,139.8 88.8,185.1 46.1,156.5 0,125 23.5,86.6     71.1,116.7"/>
<animate id="animation-to-star" begin="indefinite" fill="freeze" attributeName="points" dur="500ms" to="97.3,0 127.4,60.9 194.6,70.7 145.9,118.1 157.4,185.1 97.3,153.5 37.2,185.1 48.6,118.1 0,70.7 67.2,60.9"/> </polygon>只需一组Point的集合就可以控制所有Point的动画,确实比PointAnimation高效很多。 在WPF中可以通过继承Timeline实现一个PointCollectionAnimamtion,具体可以参考这个项目。可惜的是虽然UWP的Timeline类并不封闭,但完全不知道如何继承并派生一个自定义的Animation。
这时候需要稍微变通一下思维。可以将DoubleAnimation理解成这样:Storyboard将TimeSpan传递给DoubleAnimation,DoubleAnimation通过这个TimeSpan(有时还需要结合EasingFunction)计算出目标属性的当前值最后传递给目标属性,如下图所示:

既然这样,也可以接收到这个计算出来的Double,再通过Converter计算出目标的PointCollection值:
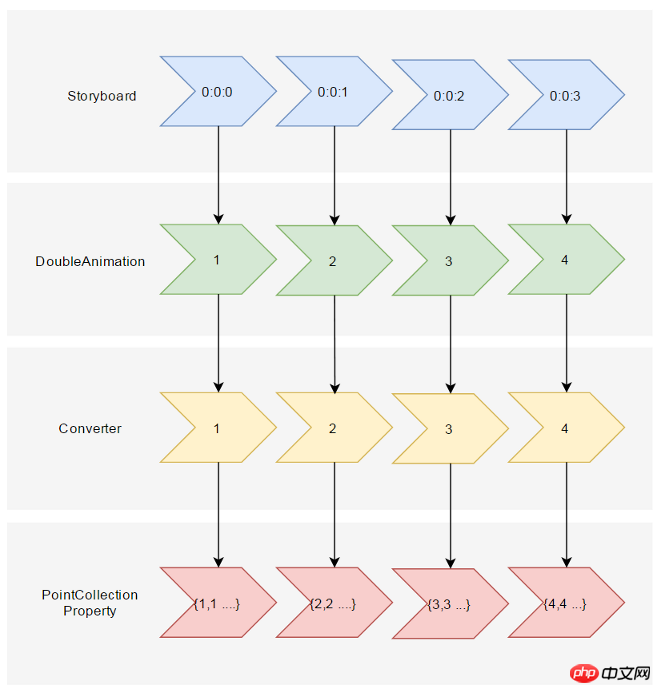
假设告诉这个Converter当传入的Double值(命名为Progress)为0的时候,PointCollection是{0,0 1,1 …},Progress为100时PointCollection是{1,1 2,2 …},当Progress处于其中任何值时的计算方法则是:
private PointCollection GetCurrentPoints(PointCollection fromPoints, PointCollection toPoints, double percentage)
{var result = new PointCollection();for (var i = 0;
        i < Math.Min(fromPoints.Count, toPoints.Count);
        i++)
    {
        var x = (1 - percentage / 100d) * fromPoints[i].X + percentage / 100d * toPoints[i].X;
        var y = (1 - percentage / 100d) * fromPoints[i].Y + percentage / 100d * toPoints[i].Y;

        result.Add(new Point(x, y));
    }return result;
}这样就完成了从TimeSpan到PointCollection的转换过程。然后就是定义在XAML上的使用方式。参考上面PointCollectionAnimation,虽然多了个Converter,但XAML也应该足够简洁:
<local:ProgressToPointCollectionBridge x:Name="ProgressToPointCollectionBridge"><PointCollection>97.3,0 127.4,60.9 194.6,70.7 145.9,118.1 157.4,185.1 97.3,153.5 37.2,185.1 48.6,118.1 0,70.7 67.2,60.9</PointCollection><PointCollection>110,58.2 147.3,0 192.1,29 141.7,105.1 118.7,139.8 88.8,185.1 46.1,156.5 0,125 23.5,86.6 71.1,116.7</PointCollection></local:ProgressToPointCollectionBridge><Storyboard x:Name="Storyboard1" FillBehavior="HoldEnd"><DoubleAnimation Duration="0:0:2" To="100" FillBehavior="HoldEnd" Storyboard.TargetProperty="(local:ProgressToPointCollectionBridge.Progress)" Storyboard.TargetName="ProgressToPointCollectionBridge" EnableDependentAnimation="True"/></Storyboard>…<Polygon x:Name="polygon" Points="{Binding Source={StaticResource ProgressToPointCollectionBridge},Path=Points}" Stroke="DarkOliveGreen" StrokeThickness="2" Height="250" Width="250" Stretch="Fill" />最终我选择了将这个Converter命名为ProgressToPointCollectionBridge。可以看出Polygon 将Points绑定到ProgressToPointCollectionBridge,DoubleAnimation 改变ProgressToPointCollectionBridge.Progress,从而改变Points。XAML的简洁程度还算令人满意,如果需要操作多个点的话相对于PointAnimation的优势就很大。
运行结果如下:

完整的XAML:
<UserControl.Resources><local:ProgressToPointCollectionBridge x:Name="ProgressToPointCollectionBridge"><PointCollection>97.3,0 127.4,60.9 194.6,70.7 145.9,118.1 157.4,185.1 97.3,153.5 37.2,185.1 48.6,118.1 0,70.7 67.2,60.9</PointCollection><PointCollection>110,58.2 147.3,0 192.1,29 141.7,105.1 118.7,139.8 88.8,185.1 46.1,156.5 0,125 23.5,86.6 71.1,116.7</PointCollection></local:ProgressToPointCollectionBridge><Storyboard x:Name="Storyboard1" FillBehavior="HoldEnd"><DoubleAnimation Duration="0:0:2" To="100" FillBehavior="HoldEnd" Storyboard.TargetProperty="(local:ProgressToPointCollectionBridge.Progress)" Storyboard.TargetName="ProgressToPointCollectionBridge" EnableDependentAnimation="True"><DoubleAnimation.EasingFunction><ElasticEase EasingMode="EaseInOut" /></DoubleAnimation.EasingFunction></DoubleAnimation><ColorAnimation Duration="0:0:2" To="#FF48F412" Storyboard.TargetProperty="(Shape.Fill).(SolidColorBrush.Color)" Storyboard.TargetName="polygon" d:IsOptimized="True"><ColorAnimation.EasingFunction><ElasticEase EasingMode="EaseInOut" /></ColorAnimation.EasingFunction></ColorAnimation></Storyboard></UserControl.Resources><Grid x:Name="LayoutRoot" Background="White"><Polygon x:Name="polygon" Points="{Binding Source={StaticResource ProgressToPointCollectionBridge},Path=Points}" Stroke="DarkOliveGreen" StrokeThickness="2" Height="250" Width="250" Stretch="Fill" Fill="#FFEBF412" /></Grid>ProgressToPointCollectionBridge:
[ContentProperty(Name = nameof(Children))]public class ProgressToPointCollectionBridge : DependencyObject
{public ProgressToPointCollectionBridge()
    {
        Children = new ObservableCollection<PointCollection>();
    }/// <summary>///     获取或设置Points的值/// </summary>public PointCollection Points
    {get { return (PointCollection) GetValue(PointsProperty); }set { SetValue(PointsProperty, value); }
    }/// <summary>///     获取或设置Progress的值/// </summary>public double Progress
    {get { return (double) GetValue(ProgressProperty); }set { SetValue(ProgressProperty, value); }
    }/// <summary>///     获取或设置Children的值/// </summary>public Collection<PointCollection> Children
    {get { return (Collection<PointCollection>) GetValue(ChildrenProperty); }set { SetValue(ChildrenProperty, value); }
    }protected virtual void OnProgressChanged(double oldValue, double newValue)
    {UpdatePoints();
    }protected virtual void OnChildrenChanged(Collection<PointCollection> oldValue, Collection<PointCollection> newValue)
    {var oldCollection = oldValue as INotifyCollectionChanged;if (oldCollection != null)
            oldCollection.CollectionChanged -= OnChildrenCollectionChanged;var newCollection = newValue as INotifyCollectionChanged;if (newCollection != null)
            newCollection.CollectionChanged += OnChildrenCollectionChanged;UpdatePoints();
    }private void OnChildrenCollectionChanged(object sender, NotifyCollectionChangedEventArgs e)
    {UpdatePoints();
    }private void UpdatePoints()
    {if (Children == null || Children.Any() == false)
        {
            Points = null;
        }else if (Children.Count == 1)
        {var fromPoints = new PointCollection();for (var i = 0; i < Children[0].Count; i++)
                fromPoints.Add(new Point(0, 0));var toPoints = Children[0];
            Points = GetCurrentPoints(fromPoints, toPoints, Progress);
        }else{var rangePerSection = 100d / (Children.Count - 1);var fromIndex = Math.Min(Children.Count - 2, Convert.ToInt32(Math.Floor(Progress / rangePerSection)));
            fromIndex = Math.Max(fromIndex, 0);var toIndex = fromIndex + 1;
            PointCollection fromPoints;if (fromIndex == toIndex)
            {
                fromPoints = new PointCollection();for (var i = 0; i < Children[0].Count; i++)
                    fromPoints.Add(new Point(0, 0));
            }else{
                fromPoints = Children.ElementAt(fromIndex);
            }var toPoints = Children.ElementAt(toIndex);
            var percentage = (Progress / rangePerSection - fromIndex) * 100;

            Points = GetCurrentPoints(fromPoints, toPoints, percentage);
        }
    }private PointCollection GetCurrentPoints(PointCollection fromPoints, PointCollection toPoints, double percentage)
    {var result = new PointCollection();for (var i = 0;
            i < Math.Min(fromPoints.Count, toPoints.Count);
            i++)
        {
            var x = (1 - percentage / 100d) * fromPoints[i].X + percentage / 100d * toPoints[i].X;
            var y = (1 - percentage / 100d) * fromPoints[i].Y + percentage / 100d * toPoints[i].Y;

            result.Add(new Point(x, y));
        }return result;
}#region DependencyProperties#endregion}3. 结语
如果将DoubleAnimation说成“对目标的Double属性做动画”,那PointAnimation可以说成“对目标的Point.X和Point.Y两个Double属性同时做动画”,ColorAnimation则是“对目标的Color.A、R、G、B四个Int属性同时做动画”。这样理解的话PointAnimation和ColorAnimation只不过是DoubleAnimation的延伸而已,进一步的说,通过DoubleAnimation应该可以延伸出所有类型属性的动画。不过我并不清楚怎么在UWP上自定义动画,只能通过本文的折衷方式扩展。虽然XAML需要写复杂些,但这样也有它的好处:
不需要了解太多Animation相关类的知识,只需要有依赖属性、绑定等基础知识就够了。
不会因为动画API的改变而更改,可以兼容WPF、Silverlight和UWP(大概吧,我没有真的在WPF上测试这些代码)。
代码足够简单,省去了计算TimeSpan及EasingFunction的步骤。 稍微修改下还可以做成泛型的
AnimationBridge < T >,提供PointCollection以外数据类型的支持。
结合上一篇文章再发散一下,总觉得将来遇到什么UWP没有提供的功能都可以通过变通的方法实现,Binding和DependencyProperty真是UWP开发者最好的朋友。
4. 参考
How SVG Shape Morphing Works
Gadal MetaSyllabus
以上是用Shape做动画的实例详解的详细内容。更多信息请关注PHP中文网其他相关文章!

热AI工具

Undresser.AI Undress
人工智能驱动的应用程序,用于创建逼真的裸体照片

AI Clothes Remover
用于从照片中去除衣服的在线人工智能工具。

Undress AI Tool
免费脱衣服图片

Clothoff.io
AI脱衣机

AI Hentai Generator
免费生成ai无尽的。

热门文章
热工具

记事本++7.3.1
好用且免费的代码编辑器

SublimeText3汉化版
中文版,非常好用

禅工作室 13.0.1
功能强大的PHP集成开发环境

Dreamweaver CS6
视觉化网页开发工具

SublimeText3 Mac版
神级代码编辑软件(SublimeText3)
热门话题


 crystaldiskmark是什么软件?-crystaldiskmark如何使用?
Mar 18, 2024 pm 02:58 PM
crystaldiskmark是什么软件?-crystaldiskmark如何使用?
Mar 18, 2024 pm 02:58 PM
CrystalDiskMark是一款适用于硬盘的小型HDD基准测试工具,可以快速测量顺序和随机读/写速度。接下来就让小编为大家介绍一下CrystalDiskMark,以及crystaldiskmark如何使用吧~一、CrystalDiskMark介绍CrystalDiskMark是一款广泛使用的磁盘性能测试工具,用于评估机械硬盘和固态硬盘(SSD)的读写速度和随机I/O性能。它是一款免费的Windows应用程序,并提供用户友好的界面和各种测试模式来评估硬盘驱动器性能的不同方面,并被广泛用于硬件评
 foobar2000怎么下载?-foobar2000怎么使用
Mar 18, 2024 am 10:58 AM
foobar2000怎么下载?-foobar2000怎么使用
Mar 18, 2024 am 10:58 AM
foobar2000是一款能随时收听音乐资源的软件,各种音乐无损音质带给你,增强版本的音乐播放器,让你得到更全更舒适的音乐体验,它的设计理念是将电脑端的高级音频播放器移植到手机上,提供更加便捷高效的音乐播放体验,界面设计简洁明了易于使用它采用了极简的设计风格,没有过多的装饰和繁琐的操作能够快速上手,同时还支持多种皮肤和主题,根据自己的喜好进行个性化设置,打造专属的音乐播放器支持多种音频格式的播放,它还支持音频增益功能根据自己的听力情况调整音量大小,避免过大的音量对听力造成损害。接下来就让小编为大
 网易邮箱大师怎么用
Mar 27, 2024 pm 05:32 PM
网易邮箱大师怎么用
Mar 27, 2024 pm 05:32 PM
网易邮箱,作为中国网民广泛使用的一种电子邮箱,一直以来以其稳定、高效的服务赢得了用户的信赖。而网易邮箱大师,则是专为手机用户打造的邮箱软件,它极大地简化了邮件的收发流程,让我们的邮件处理变得更加便捷。那么网易邮箱大师该如何使用,具体又有哪些功能呢,下文中本站小编将为大家带来详细的内容介绍,希望能帮助到大家!首先,您可以在手机应用商店搜索并下载网易邮箱大师应用。在应用宝或百度手机助手中搜索“网易邮箱大师”,然后按照提示进行安装即可。下载安装完成后,我们打开网易邮箱账号并进行登录,登录界面如下图所示
 百度网盘app怎么用
Mar 27, 2024 pm 06:46 PM
百度网盘app怎么用
Mar 27, 2024 pm 06:46 PM
在如今云存储已经成为我们日常生活和工作中不可或缺的一部分。百度网盘作为国内领先的云存储服务之一,凭借其强大的存储功能、高效的传输速度以及便捷的操作体验,赢得了广大用户的青睐。而且无论你是想要备份重要文件、分享资料,还是在线观看视频、听取音乐,百度网盘都能满足你的需求。但是很多用户们可能对百度网盘app的具体使用方法还不了解,那么这篇教程就将为大家详细介绍百度网盘app如何使用,还有疑惑的用户们就快来跟着本文详细了解一下吧!百度云网盘怎么用:一、安装首先,下载并安装百度云软件时,请选择自定义安装选
 BTCC教学:如何在BTCC交易所绑定使用MetaMask钱包?
Apr 26, 2024 am 09:40 AM
BTCC教学:如何在BTCC交易所绑定使用MetaMask钱包?
Apr 26, 2024 am 09:40 AM
MetaMask(中文也叫小狐狸钱包)是一款免费的、广受好评的加密钱包软件。目前,BTCC已支持绑定MetaMask钱包,绑定后可使用MetaMask钱包进行快速登入,储值、买币等,且首次绑定还可获得20USDT体验金。在BTCCMetaMask钱包教学中,我们将详细介绍如何注册和使用MetaMask,以及如何在BTCC绑定并使用小狐狸钱包。MetaMask钱包是什么?MetaMask小狐狸钱包拥有超过3,000万用户,是当今最受欢迎的加密货币钱包之一。它可免费使用,可作为扩充功能安装在网络
 小爱音箱怎么使用 小爱音箱怎么连接手机
Feb 22, 2024 pm 05:19 PM
小爱音箱怎么使用 小爱音箱怎么连接手机
Feb 22, 2024 pm 05:19 PM
长按音箱的播放键后,在软件中连接wifi即可使用。教程适用型号:小米12系统:EMUI11.0版本:小爱同学2.4.21解析1首先找到音箱的播放键,长按进入配网模式。2在手机上的小爱音箱软件中登录小米账号,点击添加新的小爱音箱。3输入wifi的名称和密码后,即可呼唤小爱同学进行使用了。补充:小爱音箱有什么功能1小爱音箱有系统功能、社交功能、娱乐功能、知识功能、生活功能、智能家庭、训练计划。总结/注意事项手机要提前安装好小爱同学APP,方便连接和使用。
 PHP 函数的扩展和第三方模块
Apr 13, 2024 pm 02:12 PM
PHP 函数的扩展和第三方模块
Apr 13, 2024 pm 02:12 PM
要扩展PHP函数功能,可以使用扩展和第三方模块。扩展提供附加函数和类,可通过pecl包管理器安装和启用。第三方模块提供特定功能,可通过Composer包管理器安装。实践案例包括使用扩展解析复杂JSON数据和使用模块验证数据。
 ppt动画如何设置先进入再退出
Mar 20, 2024 am 09:30 AM
ppt动画如何设置先进入再退出
Mar 20, 2024 am 09:30 AM
我们在日常的办公中经常会使用到ppt,那么你是否对ppt里边的每个操作功能都很了解呢?例如:ppt中怎么设置动画效果、怎么设置切换效果、每个动画的效果时长是多少?每个幻灯片能不能自动播放、ppt动画先进入再退出等等,那么今天这期我就先跟大家分享ppt动画先进入再退出的具体操作步骤,就在下方,小伙伴们快来看一看吧!1.首先,我们在电脑中打开ppt,单击文本框外侧选中文本框,(如下图红色圈出部分所示)。2.然后,单击菜单栏中的【动画】,选中【擦除】的效果,(如图红色圈出部分所示)。3.接下来,单击【
