JAVA之:OGNL表达式练习
一、OGNL表达式
1.简介
OGNL:对象视图导航语言. ${user.addr.name} 这种写法就叫对象视图导航。
OGNL不仅仅可以视图导航.支持比EL表达式更加丰富的功能。
2.使用OGNL准备工作
2.1导包
struts2 的包中已经包含了.所以不需要导入额外的jar包
2.2代码准备


    @Test//准备工作public void fun1() throws Exception{//准备OGNLContext//准备RootUser rootUser = new User("tom",18);//准备ContextMap<String,User> context = new HashMap<String,User>();
            context.put("user1", new User("jack",18));
            context.put("user2", new User("rose",22));
        OgnlContext oc = new OgnlContext();//将rootUser作为root部分        oc.setRoot(rootUser);//将context这个Map作为Context部分        oc.setValues(context);//书写OGNLOgnl.getValue("", oc, oc.getRoot());
}3.基本语法演示


        //取出root中user对象的name属性String name = (String) Ognl.getValue("name", oc, oc.getRoot());
        Integer age = (Integer) Ognl.getValue("age", oc, oc.getRoot());
        System.out.println(name);
        System.out.println(age);

        //取出context中键为user1对象的name属性String name = (String) Ognl.getValue("#user1.name", oc, oc.getRoot());
        String name2 = (String) Ognl.getValue("#user2.name", oc, oc.getRoot());
        Integer age = (Integer) Ognl.getValue("#user2.age", oc, oc.getRoot());
        System.out.println(name);
        System.out.println(name2);
        System.out.println(age);

        //将root中的user对象的name属性赋值Ognl.getValue("name='jerry'", oc, oc.getRoot());
        String name = (String) Ognl.getValue("name", oc, oc.getRoot());

        String name2 = (String) Ognl.getValue("#user1.name='郝强勇',#user1.name", oc, oc.getRoot());
        System.out.println(name);
        System.out.println(name2);

        //调用root中user对象的setName方法Ognl.getValue("setName('lilei')", oc, oc.getRoot());
        String name = (String) Ognl.getValue("getName()", oc, oc.getRoot());
        String name2 = (String) Ognl.getValue("#user1.setName('lucy'),#user1.getName()", oc, oc.getRoot());

        System.out.println(name);
        System.out.println(name2);

        String name = (String) Ognl.getValue("@cn.itheima.a_ognl.HahaUtils@echo('hello 强勇!')", oc, oc.getRoot());//Double pi = (Double) Ognl.getValue("@java.lang.Math@PI", oc, oc.getRoot());Double pi = (Double) Ognl.getValue("@@PI", oc, oc.getRoot());
        System.out.println(name);
        System.out.println(pi);

        //创建list对象Integer size = (Integer) Ognl.getValue("{'tom','jerry','jack','rose'}.size()", oc, oc.getRoot());
        String name = (String) Ognl.getValue("{'tom','jerry','jack','rose'}[0]", oc, oc.getRoot());
        String name2 = (String) Ognl.getValue("{'tom','jerry','jack','rose'}.get(1)", oc, oc.getRoot());    /*System.out.println(size);
        System.out.println(name);
        System.out.println(name2);*///创建Map对象Integer size2 = (Integer) Ognl.getValue("#{'name':'tom','age':18}.size()", oc, oc.getRoot());
        String name3  = (String) Ognl.getValue("#{'name':'tom','age':18}['name']", oc, oc.getRoot());
        Integer age  = (Integer) Ognl.getValue("#{'name':'tom','age':18}.get('age')", oc, oc.getRoot());
        System.out.println(size2);
        System.out.println(name3);
        System.out.println(age);
二、OGNL与Struts2的结合
1.结合原理

ValueStack中的两部分

2.栈原理

栈是由ArrayList模拟的

栈中的两个方法的实现

访问栈中属性的特点.由上到下

3.查看值栈中两部分内容(使用DEBUG标签)
3.1Root
默认情况下,栈中放置当前访问的Action对象

3.2Context


Context部分就是ActionContext数据中心
4.struts2与ognl结合体现
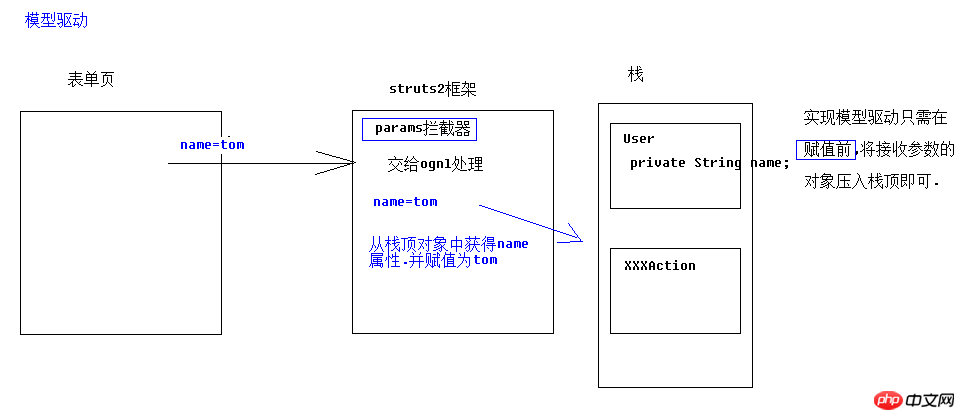
4.1参数接收


如何获得值栈对象,值栈对象与ActionContext对象是互相引用的
//压入栈顶//1获得值栈ValueStack vs = ActionContext.getContext().getValueStack();//2将u压入栈顶vs.push(u);
4.2配置文件中


<action name="Demo3Action" class="cn.itheima.d_config.Demo3Action" method="execute" ><result name="success" type="redirectAction" ><param name="actionName">Demo1Action</param><param name="namespace">/</param><!-- 如果添加的参数struts"看不懂".就会作为参数附加重定向的路径之后.
如果参数是动态的.可以使用${}包裹ognl表达式.动态取值 --><param name="name">${name}</param></result></action>5.扩展:request对象的getAttribute方法
查找顺序:

三、练习:客户列表


    public String list() throws Exception {//1 接受参数String cust_name = ServletActionContext.getRequest().getParameter("cust_name");//2 创建离线查询对象DetachedCriteria dc =DetachedCriteria.forClass(Customer.class);//3 判断参数拼装条件if(StringUtils.isNotBlank(cust_name)){
            dc.add(Restrictions.like("cust_name", "%"+cust_name+"%"));
        }//4 调用Service将离线对象传递List<Customer> list = cs.getAll(dc);//5 将返回的list放入request域.转发到list.jsp显示        //ServletActionContext.getRequest().setAttribute("list", list);// 放到ActionContextActionContext.getContext().put("list", list);        return "list";
    }

<s:iterator value="#list" var="cust" >
    <TR
        style="FONT-WEIGHT: normal; FONT-STYLE: normal; BACKGROUND-COLOR: white; TEXT-DECORATION: none">
        <TD>
            <s:property value="#cust.cust_name" />
        </TD>
        <TD>
        <s:property value="#cust.cust_level" />
        </TD>
        <TD>
        <s:property value="#cust.cust_source" />
        </TD>
        <TD>
        <s:property value="#cust.cust_linkman" />
        </TD>
        <TD>
        <s:property value="#cust.cust_phone" />
        </TD>
        <TD>
        <s:property value="#cust.cust_mobile" />
        </TD>
        <TD>
        <a href="${pageContext.request.contextPath }/customerServlet?method=edit&custId=${customer.cust_id}">修改</a>
          <a href="${pageContext.request.contextPath }/customerServlet?method=delete&custId=${customer.cust_id}">删除</a>
        </TD>
    </TR>
    </s:iterator>
    <%-- <s:iterator value="#list"  >
    <TR
        style="FONT-WEIGHT: normal; FONT-STYLE: normal; BACKGROUND-COLOR: white; TEXT-DECORATION: none">
        <TD>
            <s:property value="cust_name" />
        </TD>
        <TD>
        <s:property value="cust_level" />
        </TD>
        <TD>
        <s:property value="cust_source" />
        </TD>
        <TD>
        <s:property value="cust_linkman" />
        </TD>
        <TD>
        <s:property value="cust_phone" />
        </TD>
        <TD>
        <s:property value="cust_mobile" />
        </TD>
        <TD>
        <a href="${pageContext.request.contextPath }/customerServlet?method=edit&custId=${customer.cust_id}">修改</a>
          <a href="${pageContext.request.contextPath }/customerServlet?method=delete&custId=${customer.cust_id}">删除</a>
        </TD>
    </TR>
</s:iterator> --%> 注意:

以上是JAVA之:OGNL表达式练习的详细内容。更多信息请关注PHP中文网其他相关文章!

热AI工具

Undresser.AI Undress
人工智能驱动的应用程序,用于创建逼真的裸体照片

AI Clothes Remover
用于从照片中去除衣服的在线人工智能工具。

Undress AI Tool
免费脱衣服图片

Clothoff.io
AI脱衣机

Video Face Swap
使用我们完全免费的人工智能换脸工具轻松在任何视频中换脸!

热门文章

热工具

记事本++7.3.1
好用且免费的代码编辑器

SublimeText3汉化版
中文版,非常好用

禅工作室 13.0.1
功能强大的PHP集成开发环境

Dreamweaver CS6
视觉化网页开发工具

SublimeText3 Mac版
神级代码编辑软件(SublimeText3)
 学会彻底卸载pip,使用Python更加高效
Jan 16, 2024 am 09:01 AM
不再需要pip?快来学习如何有效卸载pip!引言:pip是Python的包管理工具之一,它可以方便地安装、升级和卸载Python包。然而,有时候我们可能需要卸载pip,可能是因为我们希望使用其他的包管理工具,或者因为我们需要完全清除Python环境。本文将介绍如何有效地卸载pip,并提供具体的代码示例。一、卸载pip的方法下面将介绍两种常见的卸载pip的方法
 深入研究matplotlib的色彩映射表
Jan 09, 2024 pm 03:51 PM
深入学习matplotlib颜色表,需要具体代码示例一、引言matplotlib是一个功能强大的Python绘图库,它提供了丰富的绘图函数和工具,可以用于创建各种类型的图表。而颜色表(colormap)是matplotlib中一个重要的概念,它决定了图表的配色方案。深入学习matplotlib颜色表,将帮助我们更好地掌握matplotlib的绘图功能,使绘
 Struts2框架的原理是什么
Jan 04, 2024 pm 01:55 PM
Struts2框架的原理:1、拦截器解析请求路径;2、查找Action的完整类名;3、创建Action对象;4、执行Action方法;5、返回结果;6、视图解析。它原理基于拦截器的机制,使得业务逻辑控制器与Servlet API完全脱离开,提高了代码的可重用性和可维护性。通过使用反射机制,Struts2框架可以灵活地创建和管理Action对象,实现请求与响应的处理。
 Pygame入门指南:全面安装和配置教程
Feb 19, 2024 pm 10:10 PM
从零开始学习Pygame:完整的安装和配置教程,需要具体代码示例引言:Pygame是一个使用Python编程语言开发的开源游戏开发库,它提供了丰富的功能和工具,使得开发者可以轻松创建各种类型的游戏。本文将带您从零开始学习Pygame,并提供完整的安装和配置教程,以及具体的代码示例,让您快速入门。第一部分:安装Python和Pygame首先,确保您的计算机上已
 一起学习word根号输入办法
Mar 19, 2024 pm 08:52 PM
在word中编辑文字内容时,有时会需要输入公式符号。有的小伙们不知道在word根号输入的方法,小面就让小编跟小伙伴们一起分享下word根号输入的方法教程。希望对小伙伴们有所帮助。首先,打开电脑上的Word软件,然后打开要编辑的文件,并将光标移动到需要插入根号的位置,参考下方的图片示例。2.选择【插入】,再选择符号里的【公式】。如下方的图片红色圈中部分内容所示:3.接着选择下方的【插入新公式】。如下方的图片红色圈中部分内容所示:4.选择【根式】,再选择合适的根号。如下方的图片红色圈中部分内容所示:
 揭秘C语言的吸引力: 发掘程序员的潜质
Feb 24, 2024 pm 11:21 PM
学习C语言的魅力:解锁程序员的潜力随着科技的不断发展,计算机编程已经成为了一个备受关注的领域。在众多编程语言中,C语言一直以来都备受程序员的喜爱。它的简单、高效以及广泛应用的特点,使得学习C语言成为了许多人进入编程领域的第一步。本文将讨论学习C语言的魅力,以及如何通过学习C语言来解锁程序员的潜力。首先,学习C语言的魅力在于其简洁性。相比其他编程语言而言,C语
 从零开始学习Go语言中的main函数
Mar 27, 2024 pm 05:03 PM
标题:从零开始学习Go语言中的main函数Go语言作为一种简洁、高效的编程语言,备受开发者青睐。在Go语言中,main函数是一个入口函数,每个Go程序都必须包含main函数作为程序的入口点。本文将从零开始介绍如何学习Go语言中的main函数,并提供具体的代码示例。一、首先,我们需要安装Go语言的开发环境。可以前往官方网站(https://golang.org
 快速学会pip安装,从零开始掌握技巧
Jan 16, 2024 am 10:30 AM
从零开始学习pip安装,快速掌握技巧,需要具体代码示例概述:pip是Python包管理工具,能够方便地安装、升级和管理Python包。对于Python开发者来说,掌握pip的使用技巧是非常重要的。本文将从零开始介绍pip的安装方法,并给出一些实用的技巧和具体的代码示例,帮助读者快速掌握pip的使用。一、安装pip在使用pip之前,首先需要安装pip。pip的


