一、结果跳转方式


<action name="Demo1Action" class="cn.itheima.a_result.Demo1Action" method="execute" ><result name="success" type="dispatcher" >/hello.jsp</result></action>


<action name="Demo2Action" class="cn.itheima.a_result.Demo2Action" method="execute" ><result name="success" type="redirect" >/hello.jsp</result></action>


<action name="Demo3Action" class="cn.itheima.a_result.Demo3Action" method="execute" > <result name="success" type="chain"> <!-- action的名字 --> <param name="actionName">Demo1Action</param> <!-- action所在的命名空间 --> <param name="namespace">/</param> </result></action>


<action name="Demo4Action" class="cn.itheima.a_result.Demo4Action" method="execute" ><result name="success" type="redirectAction"> <!-- action的名字 --> <param name="actionName">Demo1Action</param> <!-- action所在的命名空间 --> <param name="namespace">/</param></result></action>
二、访问servletAPI方式
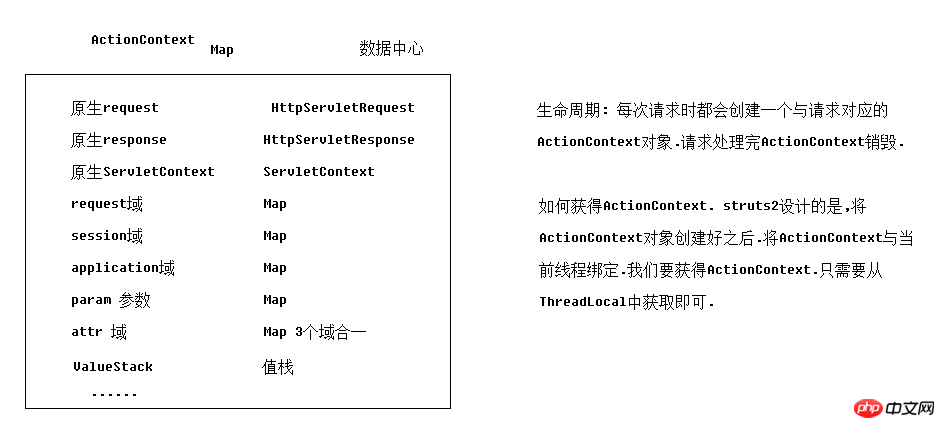
1.原理

2.通过ActionContext(推荐)


//如何在action中获得原生ServletAPIpublic class Demo5Action extends ActionSupport {public String execute() throws Exception {//request域=> map (struts2并不推荐使用原生request域)//不推荐Map<String, Object> requestScope = (Map<String, Object>) ActionContext.getContext().get("request");//推荐ActionContext.getContext().put("name", "requestTom");//session域 => mapMap<String, Object> sessionScope = ActionContext.getContext().getSession();
        sessionScope.put("name", "sessionTom");//application域=>mapMap<String, Object> applicationScope = ActionContext.getContext().getApplication();
        applicationScope.put("name", "applicationTom");        return SUCCESS;
    }
}
3.通过ServletActionContext


//如何在action中获得原生ServletAPIpublic class Demo6Action extends ActionSupport {//并不推荐public String execute() throws Exception {//原生requestHttpServletRequest request = ServletActionContext.getRequest();//原生sessionHttpSession session = request.getSession();//原生responseHttpServletResponse response = ServletActionContext.getResponse();//原生servletContextServletContext servletContext = ServletActionContext.getServletContext();return SUCCESS;
    }
}
4.通过实现接口方式


//如何在action中获得原生ServletAPIpublic class Demo7Action extends ActionSupport implements ServletRequestAware {    private HttpServletRequest request;public String execute() throws Exception {

        System.out.println("原生request:"+request);return SUCCESS;
    }

    @Overridepublic void setServletRequest(HttpServletRequest request) {this.request = request;
    }

}
三、如何获得参数
1.扩展
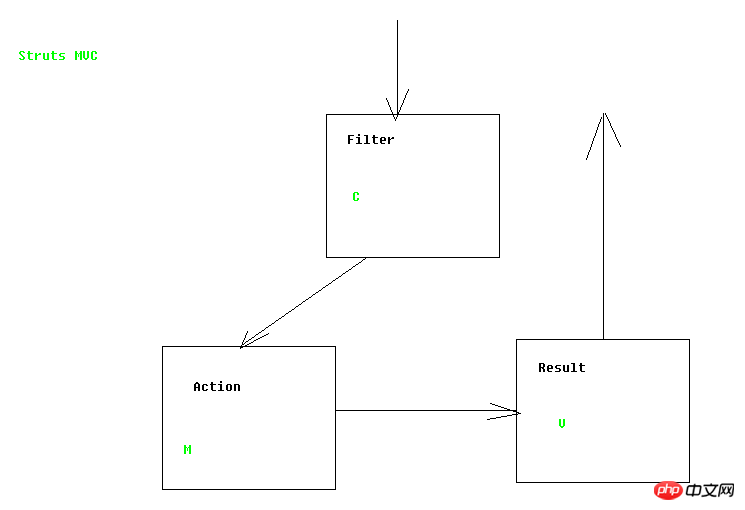
1.1 strutsMVC

1.2 Action生命周期
1.2.1 每次请求到来时,都会创建一个新的Action实例
1.2.2 Action是线程安全的.可以使用成员变量接收参数
2.属性驱动获得参数


    <form action="${pageContext.request.contextPath}/Demo8Action">用户名:<input type="text" name="name" /><br>年龄:<input type="text" name="age" /><br>生日:<input type="text" name="birthday" /><br>
        <input type="submit" value="提交" />
    </form>

    //准备与参数键名称相同的属性private String name;//自动类型转换 只能转换8大基本数据类型以及对应包装类private Integer age;//支持特定类型字符串转换为Date ,例如 yyyy-MM-ddprivate Date   birthday;    public String execute() throws Exception {

        System.out.println("name参数值:"+name+",age参数值:"+age+",生日:"+birthday);        return SUCCESS;
    }public String getName() {return name;
    }public void setName(String name) {this.name = name;
    }public Integer getAge() {return age;
    }public void setAge(Integer age) {this.age = age;
    }public Date getBirthday() {return birthday;
    }public void setBirthday(Date birthday) {this.birthday = birthday;
    }
3.对象驱动


    <form action="${pageContext.request.contextPath}/Demo9Action">用户名:<input type="text" name="user.name" /><br>年龄:<input type="text" name="user.age" /><br>生日:<input type="text" name="user.birthday" /><br>
        <input type="submit" value="提交" />
    </form>

public class Demo9Action extends ActionSupport  {//准备user对象private User user;public String execute() throws Exception {

        System.out.println(user);        return SUCCESS;
    }public User getUser() {return user;
    }public void setUser(User user) {this.user = user;
    }
}
4.模型驱动


    <form action="${pageContext.request.contextPath}/Demo10Action">用户名:<input type="text" name="name" /><br>年龄:<input type="text" name="age" /><br>生日:<input type="text" name="birthday" /><br>
        <input type="submit" value="提交" />
    </form>

public class Demo10Action extends ActionSupport implements ModelDriven<User> {//准备user 成员变量private User user =new User();public String execute() throws Exception {

        System.out.println(user);        return SUCCESS;
    }

    @Overridepublic User getModel() {return user;
    }
}
四、集合类型参数封装
1.List和Map


<form action="${pageContext.request.contextPath}/Demo11Action" method="post" >list:<input type="text" name="list" /><br>list:<input type="text" name="list[3]" /><br>map:<input type="text" name="map['haha']" /><br>
<input type="submit" value="提交" />
</form>

public class Demo11Action extends ActionSupport  {//listprivate List<String> list;//Mapprivate Map<String,String> map;
    public String execute() throws Exception {

        System.out.println("list:"+list);
        System.out.println("map:"+map);        return SUCCESS;
    }public List<String> getList() {return list;
    }public void setList(List<String> list) {this.list = list;
    }public Map<String, String> getMap() {return map;
    }public void setMap(Map<String, String> map) {this.map = map;
    }

}
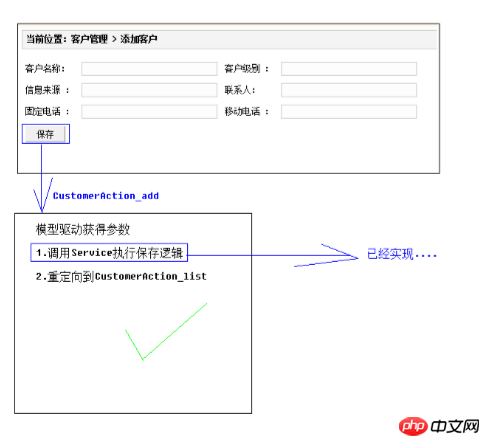
五、练习:添加客户
注意:struts和hibernate包在合并时.javassist-3.18.1-GA.jar包是重复的,删除版本低的.
实现步骤:


public class CustomerAction extends ActionSupport implements ModelDriven<Customer> {private CustomerService cs = new CustomerServiceImpl();private Customer customer = new Customer();    //添加客户public String add() throws Exception {//1 调用Service        cs.save(customer);//2 重定向到列表action方法return "toList";
    }
}

<package name="crm" namespace="/" extends="struts-default" ><action name="CustomerAction_*" class="cn.itheima.web.action.CustomerAction" method="{1}" ><result name="list" >/jsp/customer/list.jsp</result><result name="toList" type="redirectAction"> <param name="actionName">CustomerAction_list</param> <param name="namespace">/</param> </result></action></package>
以上是分享关于javaee学习的知识点的详细内容。更多信息请关注PHP中文网其他相关文章!


