TextInput组件的详细介绍
1,TextInput组件介绍
2,组件的属性
3,组件的方法
4,使用样例
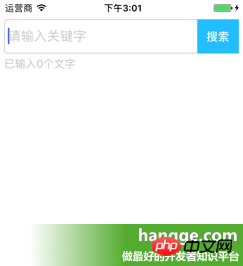
页面上添加一个 TextInput 用于输入文字,并设置相关的占位符文字以及样式。
当输入框文字改变时,下方 Text 组件会实时统计并显示输入的文字长度。
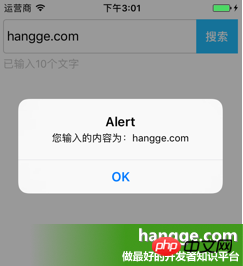
点击输入框右侧“搜索”按钮,则将输入框内容弹出显示。


|
1
2
3
4
5
6
7
8
9
10
11
12
13
14
15
16
17
18
19
20
21
22
23
24
25
26
27
28
29
30
31
32
33
34
35
36
37
38
39
40
41
42
43
44
45
46
47
48
49
50
51
52
53
54
55
56
57
58
59
60
61
62
63
64
65
66
67
68
69
70
71
72
73
74
75
76
77
78
79
80
81
82
83
84
85
86
87
88
89
90
91
92
93
94
95
96
97
98
99
|
import React, { Component } from 'react';
import { AppRegistry,
StyleSheet,
Text,
View,
TextInput,
} from 'react-native';
//输入框组件class Search extends Component { //构造函数
constructor(props) {
super(props);
this.state = {text: ''};
}
//组件渲染
render() {
return (
<View style={styles.flex}>
<View style={[styles.flexDirection, styles.inputHeight]}>
<View style={styles.flex}>
<TextInput style={styles.input} returnKeyType="search" placeholder="请输入关键字" onChangeText={(text) => this.setState({text})}/>
</View>
<View style={styles.btn}>
<Text style={styles.search} onPress={this.search.bind(this)}>搜索</Text>
</View>
</View>
<Text style={styles.tip}>已输入{this.state.text.length}个文字</Text>
</View>
);
}
//搜索按钮点击
search(){
alert("您输入的内容为:"+this.state.text);
}
}//默认应用的容器组件class App extends Component { render() {
return (
<View style={[styles.flex, styles.topStatus]}>
<Search></Search>
</View>
);
}
}
//样式定义const styles = StyleSheet.create({ flex:{
flex: 1,
},
flexDirection:{
flexDirection:'row'
},
topStatus:{
marginTop:25,
},
inputHeight:{
height:45,
},
input:{
height:45,
borderWidth:1,
marginLeft: 5,
paddingLeft:5,
borderColor: '#ccc',
borderRadius: 4
},
btn:{
width:55,
marginLeft:-5,
marginRight:5,
backgroundColor:'#23BEFF',
height:45,
justifyContent:'center',
alignItems: 'center'
},
search:{
color:'#fff',
fontSize:15,
fontWeight:'bold'
},
tip:{
marginLeft: 5,
marginTop: 5,
color: '#C0C0C0',
}
});AppRegistry.registerComponent('HelloWorld', () => App);
|
以上是TextInput组件的详细介绍的详细内容。更多信息请关注PHP中文网其他相关文章!

热AI工具

Undresser.AI Undress
人工智能驱动的应用程序,用于创建逼真的裸体照片

AI Clothes Remover
用于从照片中去除衣服的在线人工智能工具。

Undress AI Tool
免费脱衣服图片

Clothoff.io
AI脱衣机

Video Face Swap
使用我们完全免费的人工智能换脸工具轻松在任何视频中换脸!

热门文章

热工具

记事本++7.3.1
好用且免费的代码编辑器

SublimeText3汉化版
中文版,非常好用

禅工作室 13.0.1
功能强大的PHP集成开发环境

Dreamweaver CS6
视觉化网页开发工具

SublimeText3 Mac版
神级代码编辑软件(SublimeText3)
 如何利用React和WebSocket构建实时聊天应用
Sep 26, 2023 pm 07:46 PM
如何利用React和WebSocket构建实时聊天应用引言:随着互联网的快速发展,实时通讯越来越受到人们的关注。实时聊天应用已经成为现代社交和工作生活中不可或缺的一部分。本文将介绍如何利用React和WebSocket构建一个简单的实时聊天应用,并提供具体的代码示例。一、技术准备在开始构建实时聊天应用之前,我们需要准备以下技术和工具:React:一个用于构建
 React前后端分离指南:如何实现前后端的解耦和独立部署
Sep 28, 2023 am 10:48 AM
React前后端分离指南:如何实现前后端的解耦和独立部署,需要具体代码示例在当今的Web开发环境中,前后端分离已经成为一种趋势。通过将前端和后端代码分开,可以使得开发工作更加灵活、高效,并且方便进行团队协作。本文将介绍如何使用React实现前后端分离,从而实现解耦和独立部署的目标。首先,我们需要理解什么是前后端分离。传统的Web开发模式中,前端和后端是耦合在
 如何利用React和Flask构建简单易用的网络应用
Sep 27, 2023 am 11:09 AM
如何利用React和Flask构建简单易用的网络应用引言:随着互联网的发展,网络应用的需求也越来越多样化和复杂化。为了满足用户对于易用性和性能的要求,使用现代化的技术栈来构建网络应用变得越来越重要。React和Flask是两种在前端和后端开发中非常受欢迎的框架,它们可以很好的结合在一起,用来构建简单易用的网络应用。本文将详细介绍如何利用React和Flask
 如何利用React和RabbitMQ构建可靠的消息传递应用
Sep 28, 2023 pm 08:24 PM
如何利用React和RabbitMQ构建可靠的消息传递应用引言:现代化的应用程序需要支持可靠的消息传递,以实现实时更新和数据同步等功能。React是一种流行的JavaScript库,用于构建用户界面,而RabbitMQ是一种可靠的消息传递中间件。本文将介绍如何结合React和RabbitMQ构建可靠的消息传递应用,并提供具体的代码示例。RabbitMQ概述:
 React Router使用指南:如何实现前端路由控制
Sep 29, 2023 pm 05:45 PM
ReactRouter使用指南:如何实现前端路由控制随着单页应用的流行,前端路由成为了一个不可忽视的重要部分。ReactRouter作为React生态系统中最受欢迎的路由库,提供了丰富的功能和易用的API,使得前端路由的实现变得非常简单和灵活。本文将介绍ReactRouter的使用方法,并提供一些具体的代码示例。安装ReactRouter首先,我们需
 如何利用React和Google BigQuery构建快速的数据分析应用
Sep 26, 2023 pm 06:12 PM
如何利用React和GoogleBigQuery构建快速的数据分析应用引言:在当今信息爆炸的时代,数据分析已经成为了各个行业中不可或缺的环节。而其中,构建快速、高效的数据分析应用则成为了许多企业和个人追求的目标。本文将介绍如何利用React和GoogleBigQuery结合起来构建快速的数据分析应用,并提供详细的代码示例。一、概述React是一个用于构建
 如何利用React和Apache Kafka构建实时数据处理应用
Sep 27, 2023 pm 02:25 PM
如何利用React和ApacheKafka构建实时数据处理应用引言:随着大数据与实时数据处理的兴起,构建实时数据处理应用成为了很多开发者的追求。React作为一个流行的前端框架,与ApacheKafka作为一个高性能的分布式消息传递系统的结合,可以帮助我们搭建实时数据处理应用。本文将介绍如何利用React和ApacheKafka构建实时数据处理应用,并
 如何利用React和Docker打包和部署前端应用
Sep 26, 2023 pm 03:14 PM
如何利用React和Docker打包和部署前端应用前端应用的打包和部署是项目开发中非常重要的一环。随着现代前端框架的飞速发展,React已经成为了许多前端开发人员的首选。而Docker作为一种容器化解决方案,可以极大地简化应用的部署过程。本文将介绍如何利用React和Docker打包和部署前端应用,并提供具体的代码示例。一、准备工作在开始之前,我们需要先安装


