

分享使用JavaScript制作微信音乐相册实例
这篇文章主要为大家分享了js微信应用场景之微信音乐相册案例,具有一定的参考价值,感兴趣的小伙伴们可以参考一下
这个demo只是一个js微信音乐相册案例大概思路,具体还需要根据情况来进行
<!DOCTYPE html>
<html lang="en">
<head>
<meta charset="UTF-8">
<meta name="viewport" content="width=device-width, user-scalable=no, initial-scale=1.0, maximum-scale=1.0, minimum-scale=1.0">
<title>Document</title>
<link rel="stylesheet" href="reset.css" rel="external nofollow" >
<link rel="stylesheet" href="swiper.min.css" rel="external nofollow" >
<link rel="stylesheet" type="text/css" href="animate.css" rel="external nofollow" >
<style>
html,body{
width:100%;
height:100%;
overflow:hidden;
}
html{
font-size:100px;/*设计稿640*960*/
}
.main,.swiper-container,.swiper-slide{
width:100%;
height:100%;
overflow:hidden;
}
.page1{
position:relative;
background:url("../img/swiper/bg1.jpg") no-repeat;
background-size:cover;
}
.page1 img{
position:absolute;
opacity:0;
}
.page1 img:nth-child(1){
left:2rem;
top:.28rem;
width:.96rem;
height:2.32rem;
}
.page1 img:nth-child(2){
right:0;
top:.28rem;
width:3.7rem;
height:6rem;
}
.page1 img:nth-child(3){
left:.5rem;
bottom:.8rem;
width:5.5rem;
height:5.12rem;
}
.page1 img:nth-child(4){
left:-1.6rem;
bottom:0;
width:7.86rem;
height:5.88rem;
}
/*实现切换完成后页面中的元素在开始运动的思想:开始的时候当前的这个区域没有对应的ID,当切换到这个区域的时候,我们为其增加ID,在css中我们把所有的动画效果都放在指定的ID下,这样的话只需要让区域有ID,里面的子元素就有动画了*/
#page1 img:nth-child(1){
/*注意移动端的样式写两套 并且不加webkit的在后*/
-webkit-animation:bounceInLeft 1s linear 0s 1 both;
animation:bounceInLeft 1s linear 0s 1 both;
}
#page1 img:nth-child(2){
/*注意移动端的样式写两套 并且不加webkit的在后*/
-webkit-animation:bounceInRight 1s linear .3s 1 both;
animation:bounceInRight 1s linear .3s 1 both;
}
#page1 img:nth-child(3){
/*注意移动端的样式写两套 并且不加webkit的在后*/
-webkit-animation:bounceInUp 1s linear .6s 1 both;
animation:bounceInUp 1s linear .6s 1 both;
}
#page1 img:nth-child(4){
/*注意移动端的样式写两套 并且不加webkit的在后*/
-webkit-animation:bounceInUp 1s linear .9s 1 both;
animation:bounceInUp 1s linear .9s 1 both;
}
.page2{
position:relative;
background:url("../img/swiper/bg2.jpg") no-repeat;
background-size:cover;
}
.page2 img{
position:absolute;
top:2.5rem;
opacity:0;
}
.page2 img:nth-child(1){
top:0;
left:0;
width:3.4rem;
height:1.74rem;
}
.page2 img:nth-child(2){
left:1.48rem;
}
.page2 img:nth-child(3){
left:3.2rem;
}
.page2 img:nth-child(4){
left:4.7rem;
}
#page2 img:nth-child(1){
-webkit-animation:bounceInLeft 1s linear 0s 1 both;
animation:bounceInLeft 1s linear 0s 1 both;
}
#page2 img:nth-child(2){
-webkit-animation:zoomIn 1s linear .3s 1 both;
animation:zoomIn 1s linear .3s 1 both;
}
#page2 img:nth-child(3){
-webkit-animation:zoomIn 1s linear .6s 1 both;
animation:zoomIn 1s linear .6s 1 both;
}
#page2 img:nth-child(4){
-webkit-animation:zoomIn 1s linear .9s 1 both;
animation:zoomIn 1s linear .9s 1 both;
}
.arrow{
position:absolute;
left:50%;
bottom:.2rem;
z-index:10;
margin-left:-.24rem;
width:.48rem;
height:.36rem;
background:url("../img/swiper/web-swipe-tip.png") no-repeat;
background-size:100% 100%;
-webkit-animation:bounce 1s linear 0s infinite both;
animation:bounce 1s linear 0s infinite both;
}
.music{
display:none;
position:absolute;
top:.2rem;
right:.2rem;
z-index:10;
width:.6rem;
height:.6rem;
background:url("../audio/music.svg") no-repeat;
background-size:100% 100%;
}
.music.move{
-webkit-animation :musicMove 1s linear 0s infinite both;
animation :musicMove 1s linear 0s infinite both;
}
.music audio{
display:none;
}
@-webkit-keyframes musicMove{
0%{
-webkit-transform:rotate(0deg);
transform:rotate(0deg);
}
100%{
-webkit-transform:rotate(360deg);
transform:rotate(360deg);
}
}
@keyframes musicMove{
0%{
-webkit-transform:rotate(0deg);
transform:rotate(0deg);
}
100%{
-webkit-transform:rotate(360deg);
transform:rotate(360deg);
}
}
</style>
</head>
<body>
<section class='main'>
<!--MUSIC-->
<p class='music' id='musicMenu'>
<audio src="beyond.mp3" preload = 'none' loop autoplay></audio id='musicAudio'>
<!-- <audio>
<source src='beyond.mp3' type='audio/mpeg'/>
<source src='beyond.wav' type='audio/wav'/>
<source src='beyond.ogg' type='audio/ogg'/>
</audio> -->
</p>
<!--CONTAINER-->
<p class='swiper-container'>
<p class='swiper-wrapper'>
<p class='swiper-slide page1'>
<img src="img/swiper/page1-text1.png" alt="">
<img src="img/swiper/page1-text2.png" alt="">
<img src="img/swiper/page1-text3.png" alt="">
<img src="img/swiper/page1-text4.png" alt="">
</p>
<p class='swiper-slide page2'>
<img src="img/swiper/page2-text1.png" alt="">
<img src="img/swiper/page2-text2.png" alt="">
<img src="img/swiper/page2-text3.png" alt="">
<img src="img/swiper/page2-text4.png" alt="">
</p>
</p>
</p>
<!--ARROW-->
<p class='arrow'></p>
</section>
<script charset='utf-8' src='swiper.min.js'></script>
<script>
//rem
~function(){
var desW = 640,
winW = document.documentElement.clientWidth,
ratio = winW / desW,
oMain = document.querySelector(".main");
if(winW>desW){
oMain.style.margin = "0 auto";
oMain.style.width = desW + 'px';
return;
}
document.documentElement.style.fontSize = ratio*100+"px";
}()
new Swiper('.swiper-container',{
direction:"vertical",
loop:true,
/*当切换结束后,给当前展示的区域添加对应的ID,由此实现对应的动画效果*/
onSlideChangeEnd:function(swiper){
var slideAry = swiper.slides;//获取当前一共有多少个活动快(包含loop模式前后多加的两个)
var curIn = swiper.activeIndex;//当前展示的这个区域的索引
var total = slideAry.length;
//计算ID是PAGE?
var targetId = 'page';
switch(curIn){
case 0:
targetId += total - 2;
break;
case total - 1:
targetId += 1;
break;
default:
targetId += curIn
}
//给当前的活动块设置ID即可,还要把其余的移除
[].forEach.call(slideAry,function(item,index){
if(curIn === index){
item.id = targetId;
return;
}
item.id = null;
})
slideAry[curIn].id = targetId;
//最后把animate.css里面的动画to里面添加opacity:1
}
})
//MUSIC
~function(){
var musicMenu = document.getElementById('musicMenu'),
musicAudio = document.getElementById('musicAudio');
musicMenu.addEventListener('click',function(){
if(musicAudio.paused){
musicAudio.play();
musicMenu.className = "music move";
return;
}
musicAudio.pause();
musicMenu.className = "music";
})
function controlMusic(){
musicAudio.volume = 0.1;
musicAudio.play();
musicAudio.addEventListener('canplay',function(){
musicMenu.style.display = "block";
musicMenu.className = "music move";
})
}
window.setTimeout(controlMusic,1000)
}()
</script>
</body>
</html>以上是分享使用JavaScript制作微信音乐相册实例的详细内容。更多信息请关注PHP中文网其他相关文章!

热AI工具

Undresser.AI Undress
人工智能驱动的应用程序,用于创建逼真的裸体照片

AI Clothes Remover
用于从照片中去除衣服的在线人工智能工具。

Undress AI Tool
免费脱衣服图片

Clothoff.io
AI脱衣机

AI Hentai Generator
免费生成ai无尽的。

热门文章
热工具

记事本++7.3.1
好用且免费的代码编辑器

SublimeText3汉化版
中文版,非常好用

禅工作室 13.0.1
功能强大的PHP集成开发环境

Dreamweaver CS6
视觉化网页开发工具

SublimeText3 Mac版
神级代码编辑软件(SublimeText3)
热门话题


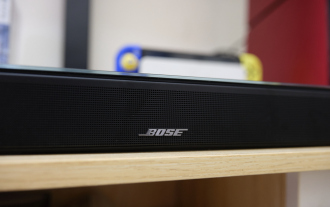 Bose Soundbar Ultra首发体验:开箱即用的家庭影院?
Feb 06, 2024 pm 05:30 PM
Bose Soundbar Ultra首发体验:开箱即用的家庭影院?
Feb 06, 2024 pm 05:30 PM
从我记事开始,家里就有一对落地式的大尺寸音箱,让我一直认为电视只有配上一套完整的音响系统才能称得上是电视。但是刚开始工作的时候,我买不起专业的家庭音响。经过查询和了解产品定位后,我发现回音壁这个品类非常适合我,不论是音质、体积还是价格都符合我的需求。因此,我决定选择回音壁。精挑细选后,我选中了2024年初Bose推出了这款全景声回音壁产品:Bose家庭娱乐扬声器Ultra。(图片来源:雷科技摄制)一般来说,想要体验到「原汁原味」的杜比全景声效果,需要我们在家中布置一套经过测量、校准的环绕声+吊顶
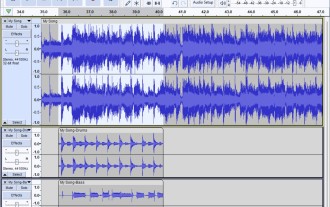 借助英特尔 OpenVINO 插件,Audacity 现已获得 AI 音频编辑功能
Feb 15, 2024 am 11:06 AM
借助英特尔 OpenVINO 插件,Audacity 现已获得 AI 音频编辑功能
Feb 15, 2024 am 11:06 AM
Audacity是一款免费开源的跨平台音频编辑软件。它具有开放的代码和插件贡献机制,任何人都可以参与其中。此外,英特尔还提供了一套免费的OpenVINOAI插件,专为音乐编辑和播客制作人而设计。本站注意到,该插件包大小约为2GB,可在Intel的GitHub页上下载,还需要64位Windows版Audacity才能运行。该AI插件最直观的地方在于为Audacity音乐编辑功能带来了三种高级工具:首先是“音乐生成”功能,用户可以用文本描述所需音乐,AI会生成60秒以内的音乐片段,方便广告和电影音乐
 推荐:优秀JS开源人脸检测识别项目
Apr 03, 2024 am 11:55 AM
推荐:优秀JS开源人脸检测识别项目
Apr 03, 2024 am 11:55 AM
人脸检测识别技术已经是一个比较成熟且应用广泛的技术。而目前最为广泛的互联网应用语言非JS莫属,在Web前端实现人脸检测识别相比后端的人脸识别有优势也有弱势。优势包括减少网络交互、实时识别,大大缩短了用户等待时间,提高了用户体验;弱势是:受到模型大小限制,其中准确率也有限。如何在web端使用js实现人脸检测呢?为了实现Web端人脸识别,需要熟悉相关的编程语言和技术,如JavaScript、HTML、CSS、WebRTC等。同时还需要掌握相关的计算机视觉和人工智能技术。值得注意的是,由于Web端的计
 选择适合音乐生的平板电脑
Jan 10, 2024 pm 10:09 PM
选择适合音乐生的平板电脑
Jan 10, 2024 pm 10:09 PM
音乐生用什么平板合适华为的ipad中的12.9寸音响是一款非常好的产品。它配备了四个扬声器,音效非常出色。而且,它属于pro系列,相比其他款式稍微更好一些。总体来说,ipadpro是一款非常优秀的产品。这款mini4手机的喇叭声音较小,效果一般般。不能用来外放音乐,还是需要依靠耳机来享受音乐。耳机音质好的会有稍微好一些的效果,而便宜的三四十元的耳机就无法满足要求了。钢琴电子谱用什么平板如果您想购买一台10寸以上的iPad,我推荐使用两款应用程序,分别是Henle和Piascore。Henle提供
 汽水音乐本地音乐怎么添加
Feb 23, 2024 pm 07:13 PM
汽水音乐本地音乐怎么添加
Feb 23, 2024 pm 07:13 PM
汽水音乐本地音乐怎么添加?汽水音乐APP中可以添加自己喜爱的本地音乐,但是多数的小伙伴不知道如何添加本地音乐,接下来就是小编为用户带来的汽水音乐本地音乐添加方法图文教程,感兴趣的用户快来一起看看吧!汽水音乐使用教程汽水音乐本地音乐怎么添加1、首先打开汽水音乐APP,主页面最下方【音乐】功能专区点击;2、之后进入到播放页面,点击右下角【三个点】图标;3、最后下方展开功能栏,选择其中【下载】按钮即可添加到本地音乐。
 抖音查看收藏的音乐的详细步骤
Mar 26, 2024 pm 06:20 PM
抖音查看收藏的音乐的详细步骤
Mar 26, 2024 pm 06:20 PM
1、点击【+】。2、点击上方【选择音乐】。3、点击【我的收藏】即可。方法二:1、打开抖音,点击【我】。2、点击头像旁边的【收藏】。3、点击【音乐】即可
 微信怎么放音乐
Feb 23, 2024 pm 09:28 PM
微信怎么放音乐
Feb 23, 2024 pm 09:28 PM
微信怎么放音乐?微信APP中是可以播放自己喜爱的音乐,但是多数的小伙伴不知道微信中如何播放自己喜爱的音乐,接下来就是小编为用户带来的微信放音乐方法图文教程,感兴趣的用户快来一起看看吧!微信使用教程微信怎么放音乐1、首先打开微信APP,从顶部向下滑动进入到小程序页面;2、接着点击如下图箭头所示的【音乐】;3、然后在如下图的界面,搜索框输入喜爱的歌名;4、最后选择对应歌名点击即可放歌曲。
 抖音app照片怎么添加音乐 抖音app照片添加音乐的方法
Mar 12, 2024 pm 03:10 PM
抖音app照片怎么添加音乐 抖音app照片添加音乐的方法
Mar 12, 2024 pm 03:10 PM
抖音app照片怎么添加音乐?抖音app是一款可以分享自己日常生活的手机软件,在这个软件上面有非常多好用的功能,其中,用户们最喜欢的还是可以分享自己的日常的功能,在这个功能里面,用户可以给我们想要的图片添加一个背景音乐,也可以给我们的图片添加一些滤镜或者是调整一些参数,很多用户还不清楚怎么给照片添加音乐,下面小编整理了照片添加背景音乐的方法供大家参考。抖音app照片添加音乐的方法 1、打开【抖音】app,点击中间的【+】 2、进入拍摄视频界面后点击右下角的【上传】 3、在上传界面我们需要
