

laravel5.4+vue+element实现简单搭建的实例

本篇文章主要介绍了laravel5.4+vue+element简单搭建的示例代码,具有一定的参考价值,感兴趣的小伙伴们可以参考一下
如今laravel来到5.4版本,更方便引入vue了,具体步骤如下:
1.下载laravel5.4,这边是下载地址(里面的配置文件都写得差不多了)!
2.打开package.json
内容如下
{
 "private": true,
 "scripts": {
  "dev": "node node_modules/cross-env/bin/cross-env.js NODE_ENV=development node_modules/webpack/bin/webpack.js --progress --hide-modules --config=node_modules/laravel-mix/setup/webpack.config.js",
  "watch": "node node_modules/cross-env/bin/cross-env.js NODE_ENV=development node_modules/webpack/bin/webpack.js --watch --progress --hide-modules --config=node_modules/laravel-mix/setup/webpack.config.js",
  "hot": "node node_modules/cross-env/bin/cross-env.js NODE_ENV=development node_modules/webpack-dev-server/bin/webpack-dev-server.js --inline --hot --config=node_modules/laravel-mix/setup/webpack.config.js",
  "production": "node node_modules/cross-env/bin/cross-env.js NODE_ENV=production node_modules/webpack/bin/webpack.js --progress --hide-modules --config=node_modules/laravel-mix/setup/webpack.config.js"
 },
 "devDependencies": {
  "axios": "^0.15.2",
  "bootstrap-sass": "^3.3.7",
  "jquery": "^3.1.0",
  "laravel-mix": "^0.6.0",
  "lodash": "^4.16.2",
  "vue": "^2.0.1"
 }
}修改一下
{
 "private": true,
 "scripts": {
  "dev": "cross-env NODE_ENV=development node_modules/webpack/bin/webpack.js --progress --hide-modules --config=node_modules/laravel-mix/setup/webpack.config.js",
  "watch": "cross-en NODE_ENV=development node_modules/webpack/bin/webpack.js --watch --progress --hide-modules --config=node_modules/laravel-mix/setup/webpack.config.js",
  "hot": "cross-env NODE_ENV=development node_modules/webpack-dev-server/bin/webpack-dev-server.js --inline --hot --config=node_modules/laravel-mix/setup/webpack.config.js",
  "production": "cross-env NODE_ENV=production node_modules/webpack/bin/webpack.js --progress --hide-modules --config=node_modules/laravel-mix/setup/webpack.config.js"
 },
 "devDependencies": {
  "axios": "^0.15.3",
  "bootstrap-sass": "^3.3.7",
  "jquery": "^3.1.1",
  "laravel-mix": "^0.8.3",
  "cross-env": "^3.2.3",
  "lodash": "^4.17.4",
  "vue": "^2.1.10",
  "element-ui": "^1.2.8",
  "vue-loader": "^11.3.4",
  "vue-router": "^2.4.0"
 }
}修改的地方看清楚哦
lodash的版本改为^4.17.4,否则编译会出错,请注意红色字体
laravel5.4的mix挺好用,建议大家去看一下,这是地址
3.在根目录运行 cnpm install
注意是cnpm,尤其是windows用户,不然将会报错
4.然后修改resources/assets/js/bootstrap.js
30多行有
代码如下:
window.axios.defaults.headers.common = { 'X-CSRF-TOKEN': ......., 'X-Requested-With': 'XMLHttpRequest'};把'X-CSRF-TOKEN'这一项改为
代码如下:
'X-CSRF-TOKEN': document.querySelector('meta[name="X-CSRF-TOKEN"]').content,
否则,不能成功获取csrf
5.修改resources/assets/js/app.js
这里简单测试一下,并没有引入element
/**
 * First we will load all of this project's JavaScript dependencies which
 * includes Vue and other libraries. It is a great starting point when
 * building robust, powerful web applications using Vue and Laravel.
 */

require('./bootstrap');

/**
 * Next, we will create a fresh Vue application instance and attach it to
 * the page. Then, you may begin adding components to this application
 * or customize the JavaScript scaffolding to fit your unique needs.
 */

import App from "./components/Example.vue"

const app = new Vue({
  el: '#app',
  render: h => h(App)
});6.修改resources/views/welcome.blade.php
<!DOCTYPE html>
<html lang="{{ config('app.locale') }}">
<head>
<meta charset="utf-8">
<meta http-equiv="X-UA-Compatible" content="IE=edge">
<meta name="viewport" content="width=device-width, initial-scale=1">
<meta name="X-CSRF-TOKEN" content="{{csrf_token()}}">
<title>123</title>
</head>
<body>
<p id="app"></p>
<script src="{{ mix('js/app.js') }}"></script>
</body>
</html>然后运行npm run watch
这就简单搭建成功了
第二种方法,没有用到mix
下图为我动到的文件
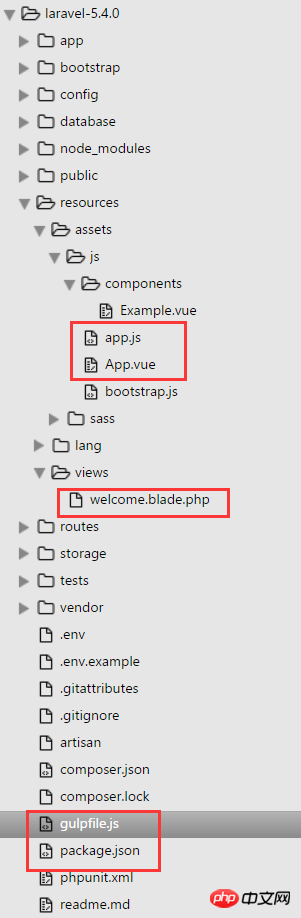
1.下载laravel5.4
2.命令行(laravel5.4目录下):composer install
3.新建.env文件,把.env.example里的内容复制到.env文件中
4.生成key,命令行:PHP artisan key:generate
5.配置文件package.json,内容如下:
{
 "private": true,
 "scripts": {
  "prod": "gulp --production",
  "dev": "gulp watch"
 },
 "devDependencies": {
  "babel-core": "^6.20.0",
  "babel-loader": "^6.2.9",
  "css-loader": "^0.25.0",
  "element-ui": "^1.1.1",
  "gulp": "^3.9.1",
  "handsontable": "0.27.0",
  "laravel-elixir": "^6.0.0-15",
  "laravel-elixir-vue-2": "^0.2.0",
  "laravel-elixir-webpack-official": "^1.0.10",
  "style-loader": "^0.13.1",
  "vue": "^2.1.4",
  "vue-loader": "^10.0.0",
  "vue-resource": "^1.0.3",
  "vue-router": "^2.1.1",
  "vue-template-compiler": "^2.1.4",
  "axios": "^0.15.2",
  "bootstrap-sass": "^3.3.7",
  "jquery": "^3.1.0",
  "laravel-mix": "^0.5.0",
  "lodash": "^4.16.2"
 },
 "dependencies": {}
}6.命令行(没有npm的自行下载):npm install
7.resources/assets/js下新建App.vue文件,内容如下:
<template>
 <p id="app">
  <router-view></router-view>
 </p>
</template>
8.resources/assets/js/app.js
/**
* First we will load all of this project's JavaScript dependencies which
* includes Vue and other libraries. It is a great starting point when
* building robust, powerful web applications using Vue and Laravel.
*/
require('./bootstrap');
/**
* Next, we will create a fresh Vue application instance and attach it to
* the page. Then, you may begin adding components to this application
* or customize the JavaScript scaffolding to fit your unique needs.
*/
import App from './App.vue'
import VueRouter from 'vue-router'
import ElementUI from 'element-ui'
import 'element-ui/lib/theme-default/index.css'
Vue.use(VueRouter)
Vue.use(ElementUI)
const router = new VueRouter({
routes: [
{ path: '/', component: require('./components/Example.vue') }
]
})
const app = new Vue({
el: '#app',
router,
template: '<App/>',
components: { App }
});9.把resources/view/welcome.blade.php改为:
<!DOCTYPE html>
<html lang="en">
<head>
<meta charset="UTF-8">
<title>Hello</title>
</head>
<body>
<p id="app"></p>
<script src="{{ asset('js/app.js') }}"></script>
</body>
</html>10.在主目录下新建gulpfile.js文件,内容:
const elixir = require('laravel-elixir');
const path = require('path');

require('laravel-elixir-vue-2');
/*
 |--------------------------------------------------------------------------
 | Elixir Asset Management
 |--------------------------------------------------------------------------
 |
 | Elixir provides a clean, fluent API for defining some basic Gulp tasks
 | for your Laravel application. By default, we are compiling the Sass
 | file for our application, as well as publishing vendor resources.
 |
 */

elixir(mix => {
  // Elixir.webpack.config.module.loaders = [];

  Elixir.webpack.mergeConfig({
    resolveLoader: {
      root: path.join(__dirname, 'node_modules'),
    },
    module: {
      loaders: [
        {
          test: /\.css$/,
          loader: 'style!css'
        }
      ]
    }
  });

  mix.sass('app.scss')
    .webpack('app.js')
});11.命令行(没有gulp,自行下载):gulp watch
这样就简单的搭建完成了,可以访问了!
以上是laravel5.4+vue+element实现简单搭建的实例的详细内容。更多信息请关注PHP中文网其他相关文章!

热AI工具

Undresser.AI Undress
人工智能驱动的应用程序,用于创建逼真的裸体照片

AI Clothes Remover
用于从照片中去除衣服的在线人工智能工具。

Undress AI Tool
免费脱衣服图片

Clothoff.io
AI脱衣机

Video Face Swap
使用我们完全免费的人工智能换脸工具轻松在任何视频中换脸!

热门文章
热工具

记事本++7.3.1
好用且免费的代码编辑器

SublimeText3汉化版
中文版,非常好用

禅工作室 13.0.1
功能强大的PHP集成开发环境

Dreamweaver CS6
视觉化网页开发工具

SublimeText3 Mac版
神级代码编辑软件(SublimeText3)


 Python中的SVM实例
Jun 11, 2023 pm 08:42 PM
Python中的SVM实例
Jun 11, 2023 pm 08:42 PM
Python中的支持向量机(SupportVectorMachine,SVM)是一个强大的有监督学习算法,可以用来解决分类和回归问题。SVM在处理高维度数据和非线性问题的时候表现出色,被广泛地应用于数据挖掘、图像分类、文本分类、生物信息学等领域。在本文中,我们将介绍在Python中使用SVM进行分类的实例。我们将使用scikit-learn库中的SVM模
 Vue框架下,如何快速搭建统计图表系统
Aug 21, 2023 pm 05:48 PM
Vue框架下,如何快速搭建统计图表系统
Aug 21, 2023 pm 05:48 PM
Vue框架下,如何快速搭建统计图表系统在现代网页应用中,统计图表是必不可少的组成部分。Vue.js作为一款流行的前端框架,提供了很多便捷的工具和组件,能够帮助我们快速搭建统计图表系统。本文将介绍如何利用Vue框架以及一些插件来搭建一个简单的统计图表系统。首先,我们需要准备一个Vue.js的开发环境,包括安装Vue脚手架以及一些相关的插件。在命令行中执行以下命
 雾锁王国能野地搭建筑吗
Mar 07, 2024 pm 08:28 PM
雾锁王国能野地搭建筑吗
Mar 07, 2024 pm 08:28 PM
玩家在雾锁王国中进行游戏时可以收集不同的材料用来建造建筑,有很多玩家想知道野地搭建筑吗,雾锁王国能野地是不能搭建筑的,必须要在祭坛的范围内才可以搭建。雾锁王国能野地搭建筑吗答:不能。1、雾锁王国能野地是不能搭建筑的。2、建筑必须要在祭坛的范围内才可以搭建。3、玩家可以自行放置灵火祭坛,但一旦离开了范围,将无法进行建筑搭建。4、我们也可以直接在山上挖个洞当做我们的家,这样不用耗建筑材料。5、玩家自己搭建的建筑中,存在舒适度机制,也就是说,内饰越好,舒适度越高。6、高舒适度将为玩家带来属性加成,例如
 VUE3入门实例:制作一个简单的视频播放器
Jun 15, 2023 pm 09:42 PM
VUE3入门实例:制作一个简单的视频播放器
Jun 15, 2023 pm 09:42 PM
随着新一代前端框架的不断涌现,VUE3作为一个快速、灵活、易上手的前端框架备受热爱。接下来,我们就来一起学习VUE3的基础知识,制作一个简单的视频播放器。一、安装VUE3首先,我们需要在本地安装VUE3。打开命令行工具,执行以下命令:npminstallvue@next接着,新建一个HTML文件,引入VUE3:<!doctypehtml>
 学习Golang指针转换的最佳实践示例
Feb 24, 2024 pm 03:51 PM
学习Golang指针转换的最佳实践示例
Feb 24, 2024 pm 03:51 PM
Golang是一门功能强大且高效的编程语言,可以用于开发各种应用程序和服务。在Golang中,指针是一种非常重要的概念,它可以帮助我们更灵活和高效地操作数据。指针转换是指在不同类型之间进行指针操作的过程,本文将通过具体的实例来学习Golang中指针转换的最佳实践。1.基本概念在Golang中,每个变量都有一个地址,地址就是变量在内存中的位置。
 CentOS 7下搭建web服务器的最佳实践及注意事项
Aug 25, 2023 pm 11:33 PM
CentOS 7下搭建web服务器的最佳实践及注意事项
Aug 25, 2023 pm 11:33 PM
CentOS7下搭建web服务器的最佳实践及注意事项引言:在当今互联网时代,web服务器是构建和托管网站的核心组件之一。CentOS7是一个强大的Linux发行版,广泛应用于服务器环境。本文将探讨在CentOS7上搭建web服务器的最佳实践和注意事项,并提供一些代码示例以帮助您更好地理解。一、安装ApacheHTTP服务器Apache是使用最广泛的w
 PHP 简单网络爬虫开发实例
Jun 13, 2023 pm 06:54 PM
PHP 简单网络爬虫开发实例
Jun 13, 2023 pm 06:54 PM
随着互联网的迅速发展,数据已成为了当今信息时代最为重要的资源之一。而网络爬虫作为一种自动化获取和处理网络数据的技术,正越来越受到人们的关注和应用。本文将介绍如何使用PHP开发一个简单的网络爬虫,并实现自动化获取网络数据的功能。一、网络爬虫概述网络爬虫是一种自动化获取和处理网络资源的技术,其主要工作过程是模拟浏览器行为,自动访问指定的URL地址并提取所
 Python中的VAE算法实例
Jun 11, 2023 pm 07:58 PM
Python中的VAE算法实例
Jun 11, 2023 pm 07:58 PM
VAE是一种生成模型,全称是VariationalAutoencoder,中文译作变分自编码器。它是一种无监督的学习算法,可以用来生成新的数据,比如图像、音频、文本等。与普通的自编码器相比,VAE更加灵活和强大,能够生成更加复杂和真实的数据。Python是目前使用最广泛的编程语言之一,也是深度学习的主要工具之一。在Python中,有许多优秀的机器学习和深度
