

angular4实现tab栏切换的方法分享

本文主要介绍了angular4实现tab栏切换的方法示例,小编觉得挺不错的,现在分享给大家,也给大家做个参考。一起跟随小编过来看看吧,希望能帮助到大家。
管理系统 tab 切换页,是一种常见的需求,大概如下:
点击左边菜单,右边显示相应的选项卡,然后不同的选项卡面可以同时编辑,切换时信息不掉失!
用php或.net,java的开发技术,大概是切换显示,然后加一个ifram来做到,或者通过ajax加载信息显示相应的层.
但是如果用angular 要如何实现呢?第一个想法,是否可以用同样的ifarm来实现呢?
第二个想到的是路由插座大概是这样的
复制代码 代码如下:
但都没能实现,于是在想一个简单的tab页面就这么难吗?
或者真的没有什么简单的方法了吗?
很长一段时间,没有去管这个了
因为我知道自己对angular的理解和学习还不够,于是就放下了很长一段时间,直到在知乎看到一篇文章
Angular路由复用策略
于是有了一种思路,花了半天的时间终于实现了anguar 4 tab 切换页大概思路实现如下:
一、实现 RouteReuseStrategy 接口自定义一个路由利用策略
SimpleReuseStrategy.ts代码如下:
import { RouteReuseStrategy, DefaultUrlSerializer, ActivatedRouteSnapshot, DetachedRouteHandle } from '@angular/router';

export class SimpleReuseStrategy implements RouteReuseStrategy {

  public static handlers: { [key: string]: DetachedRouteHandle } = {}

  /** 表示对所有路由允许复用 如果你有路由不想利用可以在这加一些业务逻辑判断 */
  public shouldDetach(route: ActivatedRouteSnapshot): boolean {
    return true;
  }

  /** 当路由离开时会触发。按path作为key存储路由快照&组件当前实例对象 */
  public store(route: ActivatedRouteSnapshot, handle: DetachedRouteHandle): void {
    SimpleReuseStrategy.handlers[route.routeConfig.path] = handle
  }

  /** 若 path 在缓存中有的都认为允许还原路由 */
  public shouldAttach(route: ActivatedRouteSnapshot): boolean {
    return !!route.routeConfig && !!SimpleReuseStrategy.handlers[route.routeConfig.path]
  }

  /** 从缓存中获取快照,若无则返回nul */
  public retrieve(route: ActivatedRouteSnapshot): DetachedRouteHandle {
    if (!route.routeConfig) {
      return null
    }

    return SimpleReuseStrategy.handlers[route.routeConfig.path]
  }

  /** 进入路由触发,判断是否同一路由 */
  public shouldReuseRoute(future: ActivatedRouteSnapshot, curr: ActivatedRouteSnapshot): boolean {
    return future.routeConfig === curr.routeConfig
  }
}二、策略注册到模块当中:
import { BrowserModule } from '@angular/platform-browser';
import { NgModule } from '@angular/core';
import { FormsModule } from '@angular/forms';
import { CommonModule as SystemCommonModule } from '@angular/common';
import { AppComponent } from './app.component';
import { AppRoutingModule,ComponentList } from './app.routing'
import { SimpleReuseStrategy } from './SimpleReuseStrategy';
import { RouteReuseStrategy } from '@angular/router';

@NgModule({
 declarations: [
  AppComponent,
  ComponentList
 ],
 imports: [
  BrowserModule,
  AppRoutingModule,
  FormsModule,
  SystemCommonModule
 ],
 providers: [
  { provide: RouteReuseStrategy, useClass: SimpleReuseStrategy }
 ],
 bootstrap: [AppComponent]
})
export class AppModule { }上面两步基本上实现了复用策略但要实现第一张效果图,还是要做一些其它工作
三、定义路由添加一些data数据路由代码如下:
import { NgModule } from '@angular/core';
import { Routes, RouterModule } from '@angular/router';
import { AboutComponent } from './home/about.component'
import { HomeComponent } from './home/home.component'
import { NewsComponent } from './home/news.component'
import { ContactComponent } from './home/contact.component'


export const routes: Routes = [
 { path: '', redirectTo: 'home', pathMatch: 'full', },
 { path: 'home', component: HomeComponent,data: { title: '首页', module: 'home', power: "SHOW" } },
 { path: 'news',component: NewsComponent ,data: { title: '新闻管理', module: 'news', power: "SHOW" }},
 { path: 'contact',component: ContactComponent ,data: { title: '联系我们', module: 'contact', power: "SHOW" }},
 { path: 'about', component: AboutComponent,data: { title: '关于我们', module: 'about', power: "SHOW" } },
];

@NgModule({
 imports: [RouterModule.forRoot(routes)],
 exports: [RouterModule]
})

export class AppRoutingModule { }

export const ComponentList=[
  HomeComponent,
  NewsComponent,
  AboutComponent,
  ContactComponent
]四、在
import { Component } from '@angular/core';
import { SimpleReuseStrategy } from './SimpleReuseStrategy';
import { ActivatedRoute, Router, NavigationEnd } from '@angular/router';
import { Title } from '@angular/platform-browser';
import 'rxjs/add/operator/filter';
import 'rxjs/add/operator/map';
import 'rxjs/add/operator/mergeMap';
@Component({
selector: 'app-root',
styleUrls:['app.css'],
templateUrl: 'app.html',
providers: [SimpleReuseStrategy]
})
export class AppComponent {
//路由列表
menuList: Array<{ title: string, module: string, power: string,isSelect:boolean }>=[];
constructor(private router: Router,
private activatedRoute: ActivatedRoute,
private titleService: Title) {
//路由事件
this.router.events.filter(event => event instanceof NavigationEnd)
.map(() => this.activatedRoute)
.map(route => {
while (route.firstChild) route = route.firstChild;
return route;
})
.filter(route => route.outlet === 'primary')
.mergeMap(route => route.data)
.subscribe((event) => {
//路由data的标题
let title = event['title'];
this.menuList.forEach(p => p.isSelect=false);
var menu = { title: title, module: event["module"], power: event["power"], isSelect:true};
this.titleService.setTitle(title);
let exitMenu=this.menuList.find(info=>info.title==title);
if(exitMenu){//如果存在不添加,当前表示选中
this.menuList.forEach(p => p.isSelect=p.title==title);
return ;
}
this.menuList.push(menu);
});
}
//关闭选项标签
closeUrl(module:string,isSelect:boolean){
//当前关闭的是第几个路由
let index=this.menuList.findIndex(p=>p.module==module);
//如果只有一个不可以关闭
if(this.menuList.length==1) return ;
this.menuList=this.menuList.filter(p=>p.module!=module);
//删除复用
delete SimpleReuseStrategy.handlers[module];
if(!isSelect) return;
//显示上一个选中
let menu=this.menuList[index-1];
if(!menu) {//如果上一个没有下一个选中
menu=this.menuList[index+1];
}
// console.log(menu);
// console.log(this.menuList);
this.menuList.forEach(p => p.isSelect=p.module==menu.module );
//显示当前路由信息
this.router.navigate(['/'+menu.module]);
}
}
import { Component } from '@angular/core';
import { SimpleReuseStrategy } from './SimpleReuseStrategy';
import { ActivatedRoute, Router, NavigationEnd } from '@angular/router';
import { Title } from '@angular/platform-browser';
import 'rxjs/add/operator/filter';
import 'rxjs/add/operator/map';
import 'rxjs/add/operator/mergeMap';
@Component({
selector: 'app-root',
styleUrls:['app.css'],
templateUrl: 'app.html',
providers: [SimpleReuseStrategy]
})
export class AppComponent {
//路由列表
menuList: Array<{ title: string, module: string, power: string,isSelect:boolean }>=[];
constructor(private router: Router,
private activatedRoute: ActivatedRoute,
private titleService: Title) {
//路由事件
this.router.events.filter(event => event instanceof NavigationEnd)
.map(() => this.activatedRoute)
.map(route => {
while (route.firstChild) route = route.firstChild;
return route;
})
.filter(route => route.outlet === 'primary')
.mergeMap(route => route.data)
.subscribe((event) => {
//路由data的标题
let title = event['title'];
this.menuList.forEach(p => p.isSelect=false);
var menu = { title: title, module: event["module"], power: event["power"], isSelect:true};
this.titleService.setTitle(title);
let exitMenu=this.menuList.find(info=>info.title==title);
if(exitMenu){//如果存在不添加,当前表示选中
this.menuList.forEach(p => p.isSelect=p.title==title);
return ;
}
this.menuList.push(menu);
});
}
//关闭选项标签
closeUrl(module:string,isSelect:boolean){
//当前关闭的是第几个路由
let index=this.menuList.findIndex(p=>p.module==module);
//如果只有一个不可以关闭
if(this.menuList.length==1) return ;
this.menuList=this.menuList.filter(p=>p.module!=module);
//删除复用
delete SimpleReuseStrategy.handlers[module];
if(!isSelect) return;
//显示上一个选中
let menu=this.menuList[index-1];
if(!menu) {//如果上一个没有下一个选中
menu=this.menuList[index+1];
}
// console.log(menu);
// console.log(this.menuList);
this.menuList.forEach(p => p.isSelect=p.module==menu.module );
//显示当前路由信息
this.router.navigate(['/'+menu.module]);
}
}app.html 的代码如下:
<p class="row">
 <p class="col-md-4">
  <ul>
   <li><a routerLinkActive="active" routerLink="/home">首页</a></li>
   <li><a routerLinkActive="active" routerLink="/about">关于我们</a></li>
   <li><a routerLinkActive="active" routerLink="/news">新闻中心</a></li>
   <li><a routerLinkActive="active" routerLink="/contact">联系我们</a></li>
  </ul>
 </p>
 <p class="col-md-8">
  <p class="crumbs clearfix">
   <ul>
     <ng-container *ngFor="let menu of menuList">
       <ng-container *ngIf="menu.isSelect">
         <li class="isSelect">
           <a routerLink="/{{ menu.module }}">{{ menu.title }}</a>
           <span (click)="closeUrl(menu.module,menu.isSelect)">X</span>
         </li>
       </ng-container>
       <ng-container *ngIf="!menu.isSelect">
         <li>
           <a routerLink="/{{ menu.module }}">{{ menu.title }}</a>
           <span (click)="closeUrl(menu.module,menu.isSelect)">X</span>
         </li>
       </ng-container>
     </ng-container>
   </ul>
  </p>
  <router-outlet></router-outlet>
 </p>
</p>整体效果如下:
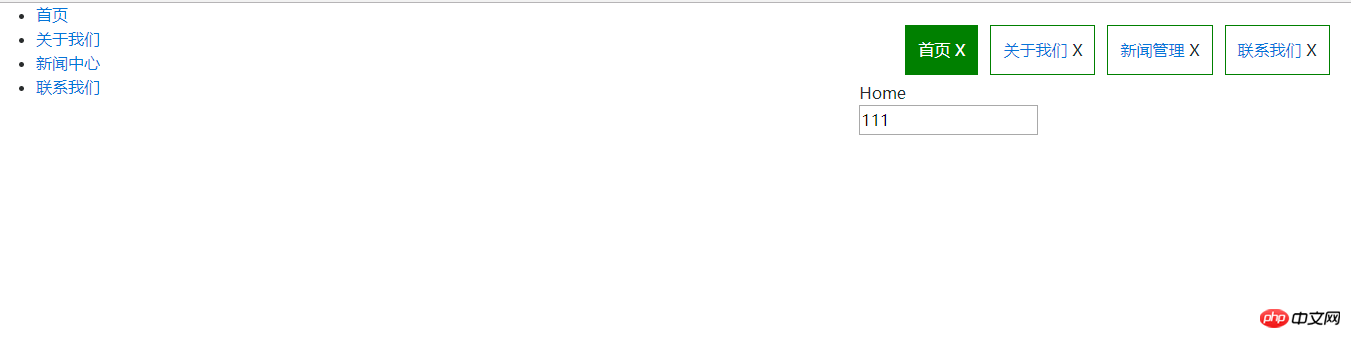
最终点击菜单显示相应的标签选中,可以切换编辑内容,关闭标签时,重新点击菜单可以重新加载内容。
相关推荐:
以上是angular4实现tab栏切换的方法分享的详细内容。更多信息请关注PHP中文网其他相关文章!

热AI工具

Undresser.AI Undress
人工智能驱动的应用程序,用于创建逼真的裸体照片

AI Clothes Remover
用于从照片中去除衣服的在线人工智能工具。

Undress AI Tool
免费脱衣服图片

Clothoff.io
AI脱衣机

AI Hentai Generator
免费生成ai无尽的。

热门文章
热工具

记事本++7.3.1
好用且免费的代码编辑器

SublimeText3汉化版
中文版,非常好用

禅工作室 13.0.1
功能强大的PHP集成开发环境

Dreamweaver CS6
视觉化网页开发工具

SublimeText3 Mac版
神级代码编辑软件(SublimeText3)
热门话题


 夸克网盘怎么分享到百度网盘?
Mar 14, 2024 pm 04:40 PM
夸克网盘怎么分享到百度网盘?
Mar 14, 2024 pm 04:40 PM
夸克网盘和百度网盘都是很便利的存储工具,不少的用户们都在询问这两款软件互通吗?夸克网盘怎么分享到百度网盘?下面就让本站来为用户们来仔细的介绍一下夸克网盘的文件怎么保存到百度网盘方法吧。 夸克网盘的文件怎么保存到百度网盘方法 1、想要知道怎么把夸克网盘的文件转到百度网盘,首先在夸克网盘上下载需要保存的文件,然后打开百度网盘客户端后,选择压缩文件要保存的文件夹,双击打开该文件夹。 2、打开该文件夹后,点击窗口左上角区域的“上传”。 3、在电脑中找到需要上传的压缩文件,点击选
 怎么在番茄免费小说app中写小说 分享番茄小说写小说方法教程
Mar 28, 2024 pm 12:50 PM
怎么在番茄免费小说app中写小说 分享番茄小说写小说方法教程
Mar 28, 2024 pm 12:50 PM
番茄小说是一款非常热门的小说阅读软件,我们在番茄小说中经常会有新的小说和漫画可以去阅读,每一本小说和漫画都很有意思,很多小伙伴也想着要去写小说来赚取赚取零花钱,在把自己想要写的小说内容编辑成文字,那么我们要怎么样在这里面去写小说呢?小伙伴们都不知道,那就让我们一起到本站本站中花点时间来看写小说的方法介绍吧。分享番茄小说写小说方法教程 1、首先在手机上打开番茄免费小说app,点击个人中心——作家中心 2、跳转到番茄作家助手页面——点击创建新书在小说的结
 七彩虹主板怎么进入bios?教你两种方法
Mar 13, 2024 pm 06:01 PM
七彩虹主板怎么进入bios?教你两种方法
Mar 13, 2024 pm 06:01 PM
七彩虹主板在中国国内市场享有较高的知名度和市场占有率,但是有些七彩虹主板的用户还不清楚怎么进入bios进行设置呢?针对这一情况,小编专门为大家带来了两种进入七彩虹主板bios的方法,快来试试吧! 方法一:使用u盘启动快捷键直接进入u盘装系统 七彩虹主板一键启动u盘的快捷键是ESC或F11,首先使用黑鲨装机大师制作一个黑鲨U盘启动盘,然后开启电脑,当看到开机画面的时候,连续按下键盘上的ESC或F11键以后将会进入到一个启动项顺序选择的窗口,将光标移动到显示“USB”的地方,然
 微信删除的人如何找回(简单教程告诉你如何恢复被删除的联系人)
May 01, 2024 pm 12:01 PM
微信删除的人如何找回(简单教程告诉你如何恢复被删除的联系人)
May 01, 2024 pm 12:01 PM
而后悔莫及、人们常常会因为一些原因不小心将某些联系人删除、微信作为一款广泛使用的社交软件。帮助用户解决这一问题,本文将介绍如何通过简单的方法找回被删除的联系人。1.了解微信联系人删除机制这为我们找回被删除的联系人提供了可能性、微信中的联系人删除机制是将其从通讯录中移除,但并未完全删除。2.使用微信内置“通讯录恢复”功能微信提供了“通讯录恢复”节省时间和精力,用户可以通过该功能快速找回之前被删除的联系人,功能。3.进入微信设置页面点击右下角,打开微信应用“我”再点击右上角设置图标、进入设置页面,,
 网易云音乐怎么分享到微信朋友圈_网易云音乐分享到微信朋友圈教程
Mar 25, 2024 am 11:41 AM
网易云音乐怎么分享到微信朋友圈_网易云音乐分享到微信朋友圈教程
Mar 25, 2024 am 11:41 AM
1、首先我们进入到网易云音乐中,然后在软件首页界面中,点击进入到歌曲的播放界面中。2、然后在歌曲播放界面中,找到右上方的分享功能按钮,如下图红框所示位置,点击选择分享的渠道;在分享渠道中,点击底部的“分享至”选项,然后选择第一个“微信朋友圈”,即可将内容分享至微信朋友圈。
 手机字体大小设置方法(轻松调整手机字体大小)
May 07, 2024 pm 03:34 PM
手机字体大小设置方法(轻松调整手机字体大小)
May 07, 2024 pm 03:34 PM
字体大小的设置成为了一项重要的个性化需求,随着手机成为人们日常生活的重要工具。以满足不同用户的需求、本文将介绍如何通过简单的操作,提升手机使用体验,调整手机字体大小。为什么需要调整手机字体大小-调整字体大小可以使文字更清晰易读-适合不同年龄段用户的阅读需求-方便视力不佳的用户使用手机系统自带字体大小设置功能-如何进入系统设置界面-在设置界面中找到并进入"显示"选项-找到"字体大小"选项并进行调整第三方应用调整字体大小-下载并安装支持字体大小调整的应用程序-打开应用程序并进入相关设置界面-根据个人
 手机版龙蛋孵化方法大揭秘(一步一步教你如何成功孵化手机版龙蛋)
May 04, 2024 pm 06:01 PM
手机版龙蛋孵化方法大揭秘(一步一步教你如何成功孵化手机版龙蛋)
May 04, 2024 pm 06:01 PM
手机游戏成为了人们生活中不可或缺的一部分,随着科技的发展。它以其可爱的龙蛋形象和有趣的孵化过程吸引了众多玩家的关注,而其中一款备受瞩目的游戏就是手机版龙蛋。帮助玩家们在游戏中更好地培养和成长自己的小龙,本文将向大家介绍手机版龙蛋的孵化方法。1.选择合适的龙蛋种类玩家需要仔细选择自己喜欢并且适合自己的龙蛋种类,根据游戏中提供的不同种类的龙蛋属性和能力。2.提升孵化机的等级玩家需要通过完成任务和收集道具来提升孵化机的等级,孵化机的等级决定了孵化速度和孵化成功率。3.收集孵化所需的资源玩家需要在游戏中
 快速掌握:华为手机开启两个微信账号方法大揭秘!
Mar 23, 2024 am 10:42 AM
快速掌握:华为手机开启两个微信账号方法大揭秘!
Mar 23, 2024 am 10:42 AM
在当今社会,手机已经成为我们生活中不可或缺的一部分。而微信作为我们日常沟通、工作、生活的重要工具,更是经常被使用。然而,在处理不同事务时可能需要分开两个微信账号,这就要求手机能够支持同时登录两个微信账号。华为手机作为国内知名品牌,很多人使用,那么华为手机开启两个微信账号的方法是怎样的呢?下面就来揭秘一下这个方法。首先,要在华为手机上同时使用两个微信账号,最简
