

通用的匀速运动框架如何打造

本文主要为大家带来一篇打造通用的匀速运动框架(实例讲解)。小编觉得挺不错的,现在就分享给大家,也给大家做个参考。一起跟随小编过来看看吧,希望能帮助到大家。
本文,是接着上 基于匀速运动的实例讲解(侧边栏,淡入淡出) 继续的,在这篇文章的最后,我们做了2个小实例:侧边栏与改变透明度的淡入淡出效果,本文我们把上文的animate函数,继续改造,让他变得更加的通用和强大:
1,支持多个物体的运动
2,同时运动
3,顺序运动
这三种运动方式也是jquery中animate函数支持的
一、animate函数中怎么区分变化不同的样式?
上文中,侧边栏效果 用的animate函数 改变的是left值
function animate(obj, target, speed) {
 clearInterval(timer);
 timer = setInterval(function () {
 if (obj.offsetLeft == target) {
  clearInterval(timer);
 } else {
  obj.style.left = obj.offsetLeft + speed + 'px';
 }
 }, 30);
}淡入淡出效果 用的animate函数 改变的是透明度
function animate(obj, target, speed) {
  clearInterval(timer);
  var cur = 0;
  timer = setInterval(function () {
   cur = css( obj, 'opacity') * 100;
   if( cur == target ){
   clearInterval( timer );
   }else {
   cur += speed;
   obj.style.opacity = cur / 100;
   obj.style.filter = "alpha(opacity:" + cur + ")";
   }
  }, 30);
}而我们封装的函数,要变成通用的,首先面临的问题就是 这个函数要同时支持left值和透明度的变化,更通用的做法应该是要支持所有的样式变化,比如轮播功能,他有左右滑动,也有上下滑动。
我们可以在获取样式和改变样式的时候,做一下判断就可以了,判断分2类就能达到目的,因为其他样式( margin, left, top, right, font-size等等 )都是px,而透明度没有px单位
function animate(obj, attr, target, speed) {
 clearInterval(timer);
 var cur = 0;
 timer = setInterval(function () {
 if (attr == 'opacity') {
  cur = css(obj, 'opacity') * 100;
 } else {
  cur = parseInt(css(obj, attr));
 }

 if (cur == target) {
  clearInterval(timer);
 } else {
  if (attr == 'opacity') {
  obj.style.opacity = ( cur + speed ) / 100;
  obj.style.filter = "alpha(opacity:" + (cur + speed) + ")";
  } else {
  obj.style[attr] = cur + speed + "px";
  }
 }
 }, 30);
}合并之后的animate相比之前多了一个参数attr, 这个参数就是变化的样式,obj: 变化的对象, target: 样式需要变化到的目标值. speed: 样式每次变化的大小
如:
oImg.onmouseover = function () {
  animate(this, 'opacity', 100, 10);
}oImg是获取到的图片对象. 这里各参数意思如下:
this:当前图片对象
opacity: 变化的样式是透明度
100: 鼠标移到图片上时,透明度变成100
10: 透明度每次在原来的基础上加10
<!doctype html>
<html lang="en">
<head>
<meta charset="UTF-8">
<title>合并的运动 - by ghostwu</title>
<style>
img {
border: none;
opacity: 0.3;
filter: alpha(opacity:30);
position: absolute;
left: 200px;
}
#box {
width: 150px;
height: 300px;
background: red;
position: absolute;
left: -150px;
top: 50px;
}
#box p {
width: 28px;
height: 100px;
position: absolute;
right: -28px;
top: 100px;
background: green;
}
</style>
<script>
window.onload = function () {
var oImg = document.getElementById("img"),
oBox = document.getElementById("box"),
timer = null;
oImg.onmouseover = function () {
animate(this, 'opacity', 100, 10);
}
oImg.onmouseout = function () {
animate(this, 'opacity', 30, -10);
}
oBox.onmouseover = function () {
animate(this, 'left', 0, 10);
}
oBox.onmouseout = function () {
animate(this, 'left', -150, -10);
}
function animate(obj, attr, target, speed) {
clearInterval(timer);
var cur = 0;
timer = setInterval(function () {
if (attr == 'opacity') {
cur = css(obj, 'opacity') * 100;
} else {
cur = parseInt(css(obj, attr));
}
if (cur == target) {
clearInterval(timer);
} else {
if (attr == 'opacity') {
obj.style.opacity = ( cur + speed ) / 100;
obj.style.filter = "alpha(opacity:" + (cur + speed) + ")";
} else {
obj.style[attr] = cur + speed + "px";
}
}
}, 30);
}
function css(obj, attr) {
if (obj.currentStyle) {
return obj.currentStyle[attr];
} else {
return getComputedStyle(obj, false)[attr];
}
}
}
</script>
</head>
<body>
<p id="box">
<p>分享到</p>
</p>
<img src="./img/h4.jpg" alt="" id="img"/>
</body>
</html>上述就是完整的代码实例。
当你分别测试这两个功能的时候:
移动到图片上然后移出来
移动到分享到,然后移出来
这样是没有问题的
如果你这样测试:
移动到 分享到,然后迅速又移动到图片上, 这个时候你会发现 分享到 停下来了,这就不符合逻辑了! 按道理来说,鼠标移动到图片上,相当于触发了 “分享到” 的mouseout( 鼠标移出事件 ),那么 "分享到" 这个时候要隐藏,并不是停止。 为什么会这样呢?因为这两个运动共享了一个定时器,当鼠标移动到图片上,开启定时器的时候,把“分享到”的定时器给停了。那么再做多物体运动的时候,我们就要把定时器拆分,每个对象都要有一个定时器,怎么做呢? 非常简单,不要定义一个简单的timer变量,我们只要把timer加在obj对象上,那么每个对象都有一个timer属性,就达到定时器的分离效果了
修改之后的完整代码如下,请自行展开:
<!doctype html>
<html lang="en">
<head>
<meta charset="UTF-8">
<title>Document</title>
<style>
img {
border: none;
opacity: 0.3;
filter: alpha(opacity:30);
position: absolute;
left: 200px;
}
#box {
width: 150px;
height: 300px;
background: red;
position: absolute;
left: -150px;
top: 50px;
}
#box p {
width: 28px;
height: 100px;
position: absolute;
right: -28px;
top: 100px;
background: green;
}
</style>
<script>
window.onload = function () {
var oImg = document.getElementById("img"),
oBox = document.getElementById("box");
oImg.onmouseover = function () {
animate(this, 'opacity', 100, 10);
}
oImg.onmouseout = function () {
animate(this, 'opacity', 30, -10);
}
oBox.onmouseover = function () {
animate(this, 'left', 0, 10);
}
oBox.onmouseout = function () {
animate(this, 'left', -150, -10);
}
function animate(obj, attr, target, speed) {
clearInterval(obj.timer);
var cur = 0;
obj.timer = setInterval(function () {
if (attr == 'opacity') {
cur = css(obj, 'opacity') * 100;
} else {
cur = parseInt(css(obj, attr));
}
if (cur == target) {
clearInterval(obj.timer);
} else {
if (attr == 'opacity') {
obj.style.opacity = ( cur + speed ) / 100;
obj.style.filter = "alpha(opacity:" + (cur + speed) + ")";
} else {
obj.style[attr] = cur + speed + "px";
}
}
}, 30);
}
function css(obj, attr) {
if (obj.currentStyle) {
return obj.currentStyle[attr];
} else {
return getComputedStyle(obj, false)[attr];
}
}
}
</script>
</head>
<body>
<p id="box">
<p>分享到</p>
</p>
<img src="./img/h4.jpg" alt="" id="img"/>
</body>
</html>至此,我们就完成了多物体运动与不同样式的修改
二、让animate函数支持多个样式同时改变
比如:
oBox.onmouseover = function(){
  animate( this, { "width" : 500, "height" : 400 }, 10 );
}oBox是一个p元素,animate各参数的意思:
this: 当前p元素
{width : 500, "height" : 400 } : 把宽度变成500, 高度变成400,这两个样式要在同一时间完成,
10: 样式每次在原来的基础上变化10(如width初始值200--> 210, 220, 230.....)
完整的同时运动变化 代码:
<!doctype html>
<html lang="en">
<head>
<meta charset="UTF-8">
<title>Document</title>
<style>
p {
width: 200px;
height: 200px;
background: red;
}
</style>
<script>
window.onload = function () {
var oBox = document.getElementById("box");
oBox.onmouseover = function(){
// animate( this, { "width" : 500, "height" : 500 }, 10 );
animate( this, { "width" : 500, "height" : 400 }, 10 );
}
function animate(obj, attr, speed) {
clearInterval(obj.timer);
var cur = 0;
obj.timer = setInterval(function () {
for ( var key in attr ) {
if (key == 'opacity') {
cur = css(obj, 'opacity') * 100;
} else {
cur = parseInt(css(obj, key));
}
var target = attr[key];
if (cur == target) {
clearInterval(obj.timer);
} else {
if (key == 'opacity') {
obj.style.opacity = ( cur + speed ) / 100;
obj.style.filter = "alpha(opacity:" + (cur + speed) + ")";
} else {
obj.style[key] = cur + speed + "px";
}
}
}
}, 30);
}
function css(obj, attr) {
if (obj.currentStyle) {
return obj.currentStyle[attr];
} else {
return getComputedStyle(obj, false)[attr];
}
}
}
</script>
</head>
<body>
<p id="box"></p>
</body>
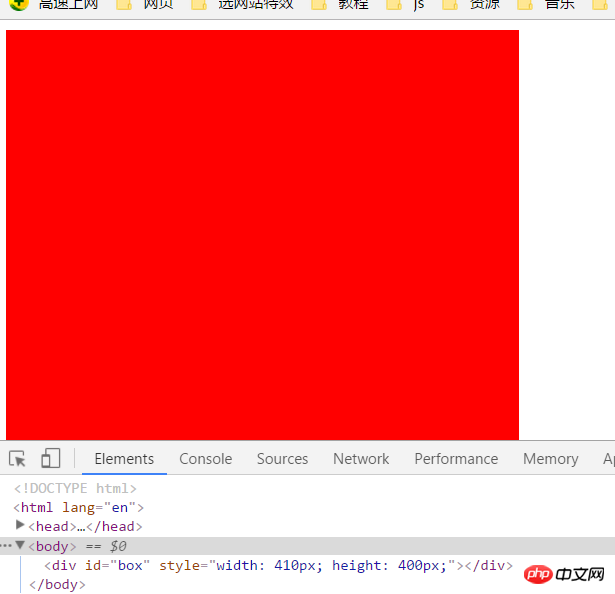
</html>请自行展开这段代码,这段代码能够同时运动,但是有一个问题:
p的初始宽度与高度( width : 200, height : 200)
变化步长一样( 10 )
变化时间一样( 每30毫秒变化一次 )
目标( width: 500, height : 400 )
你能想到什么问题吗?( 两个人在同一起跑线上,速度一样, 时间一样,但是要同时到达不同的目标,一个500, 一个400 )
答案是很明显的,肯定是目标近的( height : 400 )那个先到达,然后把对象上的定时器关了,另一个目标更远的( width: 500 )肯定到达不了
你可以在这句代码下面,输出当前的值和目标值:
var target = attr[key];
console.log( key, cur, target );
输出来的结果是:
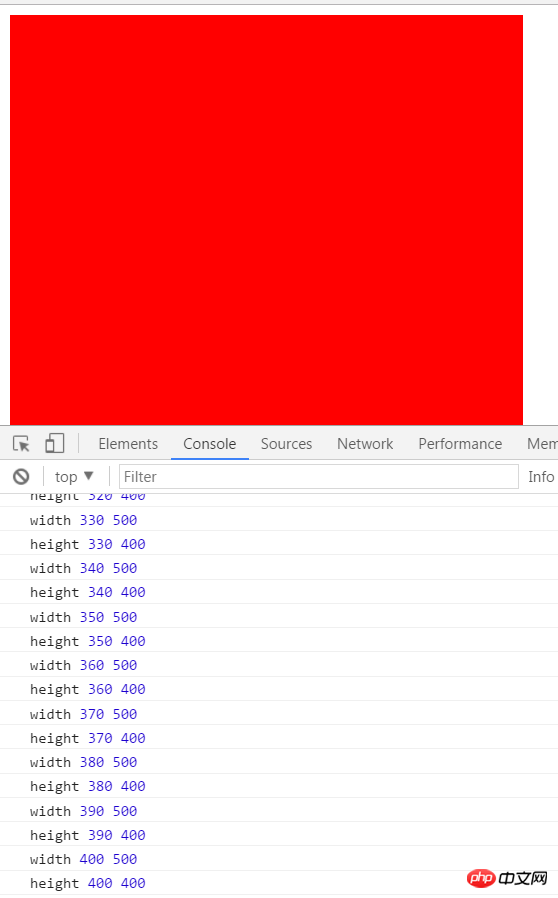
从上图可以看出,height已经达到了400px,但是width停在了410px,为什么不是400px ? 因为width = 400的时候, 就是( cur == 500 ) 相当于( 400 == 500 ) 不成立,所以执行了else语句,width = cur + 10 = 400 + 10 = 410,然后height到达400px停止了定时器,所以width停在了410px.
那么我们怎么解决这个问题呢?
其实也好办,就是height = 400的时候 不要把定时器关了,应该等width = 500的时候再关闭定时器,不就在同一时间,完成了同时到达目标的效果吗?
修改后的代码如下:
<!doctype html>
<html lang="en">
<head>
<meta charset="UTF-8">
<title>Document</title>
<style>
p {
width: 200px;
height: 200px;
background: red;
}
</style>
<script>
window.onload = function () {
var oBox = document.getElementById("box");
oBox.onmouseover = function(){
animate( this, { "width" : 500, "height" : 400 }, 10 );
}
function animate(obj, attr, speed) {
clearInterval(obj.timer);
var cur = 0;
obj.timer = setInterval(function () {
var bFlag = true;
for ( var key in attr ) {
if (key == 'opacity') {
cur = css(obj, 'opacity') * 100;
} else {
cur = parseInt(css(obj, key));
}
var target = attr[key];
if (cur != target) {
bFlag = false;
if (key == 'opacity') {
obj.style.opacity = ( cur + speed ) / 100;
obj.style.filter = "alpha(opacity:" + (cur + speed) + ")";
} else {
obj.style[key] = cur + speed + "px";
}
}
}
if ( bFlag ) {
clearInterval( obj.timer );
}
}, 30);
}
function css(obj, attr) {
if (obj.currentStyle) {
return obj.currentStyle[attr];
} else {
return getComputedStyle(obj, false)[attr];
}
}
}
</script>
</head>
<body>
<p id="box"></p>
</body>
</html>声明一个变量,每次变化完一次( width, height )样式 把bFlag = true, 只要在for循环中有一个没有到达目标,bFlag的值都是false,这样就不会关闭定时器。当两个都到达目标,才关闭定时器.
三、顺序运动
如样式变化,按顺序来,不是同时变化, 如:
oBox.onmouseover = function(){
//回调函数: 把函数当做参数传递给另一个函数
  animate( this, { 'width' : 500 }, 10, function(){
    animate( this, { 'height' : 500 }, 10 );
  } );
}当把width变成500px的时候,如果传递了回调函数, 再接着执行回调函数里面的运动
修改后的完整代码:
<!DOCTYPE html>
<html>
<head lang="en">
<meta charset="UTF-8">
<title>通用的匀速运动框架 - by ghostwu</title>
<style>
p {
width: 200px;
height: 200px;
background: red;
}
</style>
<script>
window.onload = function () {
var oBox = document.getElementById("box");
oBox.onmouseover = function(){
//回调函数: 把函数当做参数传递给另一个函数
animate( this, { 'width' : 500 }, 10, function(){
animate( this, { 'height' : 500 }, 10 );
} );
}
function animate(obj, attr, speed, fn ) {
clearInterval(obj.timer);
var cur = 0;
obj.timer = setInterval(function () {
var bFlag = true;
for (var key in attr) {
if (key == 'opacity') {
cur = css(obj, 'opacity') * 100;
} else {
cur = parseInt(css(obj, key));
}
var target = attr[key];
if (cur != target) {
bFlag = false;
if (key == 'opacity') {
obj.style.opacity = ( cur + speed ) / 100;
obj.style.filter = "alpha(opacity:" + (cur + speed) + ")";
} else {
obj.style[key] = cur + speed + "px";
}
}
}
if (bFlag) {
clearInterval(obj.timer);
fn && fn.call( obj );
}
}, 30);
}
function css(obj, attr) {
if (obj.currentStyle) {
return obj.currentStyle[attr];
} else {
return getComputedStyle(obj, false)[attr];
}
}
}
</script>
</head>
<body>
<p id="box"></p>
</body>
</html>相关推荐:
浅谈Javascript如何实现匀速运动_javascript技巧
以上是通用的匀速运动框架如何打造的详细内容。更多信息请关注PHP中文网其他相关文章!

热AI工具

Undresser.AI Undress
人工智能驱动的应用程序,用于创建逼真的裸体照片

AI Clothes Remover
用于从照片中去除衣服的在线人工智能工具。

Undress AI Tool
免费脱衣服图片

Clothoff.io
AI脱衣机

AI Hentai Generator
免费生成ai无尽的。

热门文章
热工具

记事本++7.3.1
好用且免费的代码编辑器

SublimeText3汉化版
中文版,非常好用

禅工作室 13.0.1
功能强大的PHP集成开发环境

Dreamweaver CS6
视觉化网页开发工具

SublimeText3 Mac版
神级代码编辑软件(SublimeText3)
热门话题


 如何评估Java框架商业支持的性价比
Jun 05, 2024 pm 05:25 PM
如何评估Java框架商业支持的性价比
Jun 05, 2024 pm 05:25 PM
评估Java框架商业支持的性价比涉及以下步骤:确定所需的保障级别和服务水平协议(SLA)保证。研究支持团队的经验和专业知识。考虑附加服务,如升级、故障排除和性能优化。权衡商业支持成本与风险缓解和提高效率。
 PHP 框架的轻量级选项如何影响应用程序性能?
Jun 06, 2024 am 10:53 AM
PHP 框架的轻量级选项如何影响应用程序性能?
Jun 06, 2024 am 10:53 AM
轻量级PHP框架通过小体积和低资源消耗提升应用程序性能。其特点包括:体积小,启动快,内存占用低提升响应速度和吞吐量,降低资源消耗实战案例:SlimFramework创建RESTAPI,仅500KB,高响应性、高吞吐量
 PHP 框架的学习曲线与其他语言框架相比如何?
Jun 06, 2024 pm 12:41 PM
PHP 框架的学习曲线与其他语言框架相比如何?
Jun 06, 2024 pm 12:41 PM
PHP框架的学习曲线取决于语言熟练度、框架复杂性、文档质量和社区支持。与Python框架相比,PHP框架的学习曲线更高,而与Ruby框架相比,则较低。与Java框架相比,PHP框架的学习曲线中等,但入门时间较短。
 Java框架的性能比较
Jun 04, 2024 pm 03:56 PM
Java框架的性能比较
Jun 04, 2024 pm 03:56 PM
根据基准测试,对于小型、高性能应用程序,Quarkus(快速启动、低内存)或Micronaut(TechEmpower优异)是理想选择。SpringBoot适用于大型、全栈应用程序,但启动时间和内存占用稍慢。
 golang框架文档最佳实践
Jun 04, 2024 pm 05:00 PM
golang框架文档最佳实践
Jun 04, 2024 pm 05:00 PM
编写清晰全面的文档对于Golang框架至关重要。最佳实践包括:遵循既定文档风格,例如Google的Go编码风格指南。使用清晰的组织结构,包括标题、子标题和列表,并提供导航。提供全面准确的信息,包括入门指南、API参考和概念。使用代码示例说明概念和使用方法。保持文档更新,跟踪更改并记录新功能。提供支持和社区资源,例如GitHub问题和论坛。创建实际案例,如API文档。
 零零科技推出 8K 运动飞行相机:哈浮飞行相机 X1 PRO 与 X1 PROMAX
Aug 28, 2024 pm 03:31 PM
零零科技推出 8K 运动飞行相机:哈浮飞行相机 X1 PRO 与 X1 PROMAX
Aug 28, 2024 pm 03:31 PM
飞行相机开创者零零科技宣布推出哈浮飞行相机X1PRO与X1PROMAX,并已于北京时间8月27日凌晨在Indiegogo开启众筹,上线145分钟,众筹金额即突破百万美金,创造了飞行相机新纪录。两款产品作为全球首款也是最先进的飞行运动相机,重新定义了飞行拍摄体验,尤其适合运动爱好者与专业内容创作者。哈浮飞行相机X1PRO和X1PROMAX便携可折叠设计,无需遥控器交互体验。X1PROMAX:1/1.3英寸CMOS传感器,定制7层镜头。8K视频,14档动态范围,107°广角视野。可定制的ND滤镜。X
 如何为不同的应用场景选择最佳的golang框架
Jun 05, 2024 pm 04:05 PM
如何为不同的应用场景选择最佳的golang框架
Jun 05, 2024 pm 04:05 PM
根据应用场景选择最佳Go框架:考虑应用类型、语言特性、性能需求、生态系统。常见Go框架:Gin(Web应用)、Echo(Web服务)、Fiber(高吞吐量)、gorm(ORM)、fasthttp(速度)。实战案例:构建RESTAPI(Fiber),与数据库交互(gorm)。选择框架:性能关键选fasthttp,灵活Web应用选Gin/Echo,数据库交互选gorm。
 golang框架开发实战详解:问题答疑
Jun 06, 2024 am 10:57 AM
golang框架开发实战详解:问题答疑
Jun 06, 2024 am 10:57 AM
在Go框架开发中,常见的挑战及其解决方案是:错误处理:利用errors包进行管理,并使用中间件集中处理错误。身份验证和授权:集成第三方库并创建自定义中间件来检查凭据。并发处理:利用goroutine、互斥锁和通道来控制资源访问。单元测试:使用gotest包,模拟和存根进行隔离,并使用代码覆盖率工具确保充分性。部署和监控:使用Docker容器打包部署,设置数据备份,通过日志记录和监控工具跟踪性能和错误。
