

Vue制作图片轮播
这次给大家带来Vue制作图片轮播,Vue制作图片轮播的注意事项有哪些,下面就是实战案例,一起来看一下。
之前一直都没有认真的写过一个组件。以前在写业务代码的过程中,都是用的别人封装好的组件,这次尝试着写了一个图片轮播组件,虽然比不上知名的轮播组件,但它的功能基本完整,而且在写这个组件的过程中,学的东西也很多,在这里也给大家分享出来,如有疏漏,欢迎指正!
在制作这个组件之前,笔者google了不少关于轮播的文章,发现实现一个轮播的思路虽然各有不同,但是大的逻辑其实差不多,本文主要依据慕课网上焦点轮播图特效这节课,不过慕课网主要用原生JS写,而笔者则用Vue进行了重构,并且进行了一点修改。完成后的组件效果图如下:
一、理清思路,理解需求和原理
1. 要写一个什么样的轮播?
在点击右侧箭头时,图片向左滑动到下一张;点击左侧箭头时,图片向右滑到下一张
点击下面的小圆点,滑到对应的图片,相应小圆点的样式也发生改变
要有过渡效果,要缓缓滑动过去
当鼠标hover到图片上时,轮播暂停,当鼠标leave时,轮播继续
自动播放功能
无限滚动,即在滚动到最后一张时,再点击下一张时会继续向左滑动到第一张,而不是整个拉到第一张,这里有点难
2. 理解无限轮播的原理
我们先看下原理图:

图中红线区域即是我们看到的图片,这个轮播 只展示5张图片 ,但是在它的首尾各还有两张图片,在图1前面放置了图5,在图5后面放置了图1,之所以这么做,是为了做无限滚动。 无限滚动的原理在于:当整个图向左侧滚动到右边的图5时,会继续向前走到图1,在完全显示出图1后,会以肉眼看不到的速度向右侧拉回到最左边的图1。 这样,即使再向左侧滑动看到的就是图2了。
如下图:在最后的图1完成过渡完全显示出来后,再将整个列表瞬间向右拉到左侧的图1。另一张边界图图5的滚动也是,不过方向相反。


二、先让图片切换起来
1. 布局和准备
<template>
 <p id="slider">
  <p class="window">  // window上图中红线框
   <ul class="container" :style="containerStyle"> //注意这里的:style //这是图片列表,排成一排
    <li> //列表最前面的辅助图,它和图5一样,用于无限滚动
     <img :src="sliders[sliders.length - 1].img" alt="">
    </li>
    <li v-for="(item, index) in sliders" :key="index"> //通过v-for渲染的需要展示的5张图
     <img :src="item.img" alt="">
    </li>
    <li> //列表最后面的辅助图,它和图1一样,用于无限滚动
     <img :src="sliders[0].img" alt="">
    </li>
   </ul>
   <ul class="direction"> //两侧的箭头
    <li class="left">
     <svg class="icon" width="30px" height="30.00px" viewBox="0 0 1024 1024" version="1.1" xmlns="http://www.w3.org/2000/svg"><path fill="#ffffff" d="M481.233 904c8.189 0 16.379-3.124 22.628-9.372 12.496-12.497 12.496-32.759 0-45.256L166.488 512l337.373-337.373c12.496-12.497 12.496-32.758 0-45.255-12.498-12.497-32.758-12.497-45.256 0l-360 360c-12.496 12.497-12.496 32.758 0 45.255l360 360c6.249 6.249 14.439 9.373 22.628 9.373z" /></svg>
    </li>
    <li class="right">
     <svg class="icon" width="30px" height="30.00px" viewBox="0 0 1024 1024" version="1.1" xmlns="http://www.w3.org/2000/svg"><path fill="#ffffff" d="M557.179 904c-8.189 0-16.379-3.124-22.628-9.372-12.496-12.497-12.496-32.759 0-45.256L871.924 512 534.551 174.627c-12.496-12.497-12.496-32.758 0-45.255 12.498-12.497 32.758-12.497 45.256 0l360 360c12.496 12.497 12.496 32.758 0 45.255l-360 360c-6.249 6.249-14.439 9.373-22.628 9.373z" /></svg>
    </li>
   </ul>
   <ul class="dots"> //下面的小圆点
    <li v-for="(dot, i) in sliders" :key="i"
    :class="{dotted: i === (currentIndex-1)}"
    >
    </li>
   </ul>
  </p>
 </p>
</template>
<script>
export default {
 name: 'slider',
 data () {
  return {
   sliders:[
    {
     img:'../../static/images/1.jpg'
    },
    {
     img:'../../static/images/2.jpg'
    },
    {
     img:'../../static/images/3.jpg'
    },
    {
     img:'../../static/images/4.jpg'
    },
    {
     img:'../../static/images/5.jpg'
    }
   ],
   currentIndex:1,
   distance:-600
  }
 },
 computed:{
  containerStyle() { //这里用了计算属性,用transform来移动整个图片列表
   return {
    transform:`translate3d(${this.distance}px, 0, 0)`
   }
  }
 }
}
</script>好了,布局大概就是这样,效果图如下:

上面的代码已经做了注释,有几个点在这里再提一下:
window是红线框, 宽度为600px ,它不会动,移动的是包裹着图片的container,它的移动方式用 :style="containerStyle" ,这是一个计算属性,用 transform:translate3d(${this.distance, 0, 0}) 来控制左右移动
data里的 distance 和 currentIndex 是关键, distance 控制着移动的距离,默认是-600,显示7张图片中的第二张,也就是图1。 currentIndex 是window显示的图片的索引,这里默认是1,也是7张图片中第2张。
需要展示的只有5张图片,但是在图1前了一张图5、在图5后面放了一张图1来做无限滚动,原理前面说过了
当点击右侧的箭头,container向左移动, distance 会越来越小;当点击左侧的箭头,container向右移动, distance 会越来越大,方向不要弄错
2. 图片切换
我们在左侧和右侧的箭头上添加点击事件:
<ul class="direction">
    <li class="left" @click="move(600, 1)">
     <svg class="icon" width="30px" height="30.00px" viewBox="0 0 1024 1024" version="1.1" xmlns="http://www.w3.org/2000/svg"><path fill="#ffffff" d="M481.233 904c8.189 0 16.379-3.124 22.628-9.372 12.496-12.497 12.496-32.759 0-45.256L166.488 512l337.373-337.373c12.496-12.497 12.496-32.758 0-45.255-12.498-12.497-32.758-12.497-45.256 0l-360 360c-12.496 12.497-12.496 32.758 0 45.255l360 360c6.249 6.249 14.439 9.373 22.628 9.373z" /></svg>
    </li>
    <li class="right" @click="move(600, -1)">
     <svg class="icon" width="30px" height="30.00px" viewBox="0 0 1024 1024" version="1.1" xmlns="http://www.w3.org/2000/svg"><path fill="#ffffff" d="M557.179 904c-8.189 0-16.379-3.124-22.628-9.372-12.496-12.497-12.496-32.759 0-45.256L871.924 512 534.551 174.627c-12.496-12.497-12.496-32.758 0-45.255 12.498-12.497 32.758-12.497 45.256 0l360 360c12.496 12.497 12.496 32.758 0 45.255l-360 360c-6.249 6.249-14.439 9.373-22.628 9.373z" /></svg>
    </li>
   </ul>
   ......
   methods:{
      move(offset, direction) {
        this.distance += this.distance * direction
        if (this.distance < -3000) this.distance = -600
        if (this.distance > -600) this.distance = -3000
      }
}解释下上面的代码:点击左侧或者右侧的箭头,调用move函数,move接收偏移量offset和方向direction两个参数。direction只传两个值,1表示container向右移动,-1表示container向左移动;偏移量是600,也就是一张图片的宽度。如果移动到7张图片的最后一张,就把container拉到7张图片里的第二张;如果移动到7张图片里第一张,就把container拉到7张图片里的第5张。
效果:
可以看到,图片切换效果已经出来了,但是下面的小圆点没有跟着变换。接下来我们把这个效果加上。从上面的html代码可以看到, :class="{dotted: i === (currentIndex - 1)}" ,小圆点的切换效果和data里的currentIndex值相关,我们只要随着图片切换变动currentIndex值就可以了。
修改move方法里的代码:
......
move(offset, direction) {
  direction === -1 ? this.currentIndex++ : this.currentIndex--
  if (this.currentIndex > 5) this.currentIndex = 1
  if (this.currentIndex < 1) this.currentIndex = 5
  this.distance = this.distance + offset * direction
  if (this.distance < -3000) this.distance = -600
  if (this.distance > -600) this.distance = -3000
}上面的添加的三行代码很好理解,如果是点击右侧箭头,container就是向左移动, this.currentIndex 就是减1,反之就是加1。
效果:
可以看到,小圆点的切换效果已经出来了。
三、过渡动画
上面的代码已经实现了切换,但是没有动画效果,显的非常生硬,接下来就是给每个图片的切换过程添加过渡效果。
这个轮播组件笔者并没有使用Vue自带的class钩子,也没有直接使用css的transition属性,而是用慕课网原作者讲的setTimeout方法加递归来实现。
其实我也试过使用Vue的钩子,但是总有一些小问题解决不掉;比如下面找到的这个例子:例子
这个例子在过渡的边界上有一些问题,我也遇到了,而且还是时有时无。而如果使用css的transition过渡方法,在处理边界的无限滚动上总会在chrome浏览器上有一下闪动,即使添加了 -webkit-transform-style:preserve-3d; 和 -webkit-backface-visibility:hidden 也还是没用,而且要配合transition的 transitionend 事件对于IE浏览器的支持也不怎么好。
如果大家有看到更好的办法,请在评论中留言哦~
下面我们来写这个过渡效果,主要是改写:
methods:{
  move(offset, direction) {
    direction === -1 ? this.currentIndex++ : this.currentIndex--
    if (this.currentIndex > 5) this.currentIndex = 1
    if (this.currentIndex < 1) this.currentIndex = 5
    const destination = this.distance + offset * direction
    this.animate(destination, direction)
  },
  animate(des, direc) {
    if ((direc === -1 && des < this.distance) || (direc === 1 && des > this.distance)) {
      this.distance += 30 * direc
      window.setTimeout(() => {
        this.animate(des, direc)
      }, 20)
    } else {
      this.distance = des
      if (des < -3000) this.distance = -600
      if (des > -600) this.distance = -3000
   }
  }
}上面的代码是这个轮播我觉得最麻烦、也是最难理解的地方。
来理解一下:首先,我们对于move方法进行了改写,因为要一点点的移动,所以要先算出要移动到的目标距离。然后,我们写一个animate函数来实现这个过渡。这个animate函数接收两个参数,一个是要移动到的距离,另一个是方向。 如果我们点击了右侧的箭头,container要向左侧移动,要是没有移动到目标距离,就在 this.distance 减去一定的距离,如果减去后还是没有到达,在20毫米以后再调用这个 this.animate ,如此不断移动,就形成了过渡效果。而如果移动到了目标距离,那就将目标距离赋值给 this.distance ,然后再进行边界和无限滚动的判断。
当然,使用 window.setInterval() 也可以实现这个效果,而且会稍微好理解一点,因为没有用到递归:
methods:{
  move(offset, direction) {
    direction === -1 ? this.currentIndex++ : this.currentIndex--
    if (this.currentIndex > 5) this.currentIndex = 1
    if (this.currentIndex < 1) this.currentIndex = 5
    const destination = this.distance + offset * direction
    this.animate(destination, direction)
  },
  animate(des, direc) {
    const temp = window.setInterval(() => {
      if ((direc === -1 && des < this.distance) || (direc === 1 && des > this.distance)) {
        this.distance += 30 * direc
      } else {
        window.clearInterval(temp)
        this.distance = des
        if (des < -3000) this.distance = -600
        if (des > -600) this.distance = -3000
      }
    }, 20)
  }
}实现出来的效果如下:

四、简单节流一下
写到这里,效果是出来了,但是会有一点问题,如果多次快速点击,就会有可能出现下面这种情况:
出现这种情况的原因很简单,因为是使用定时器过渡,所以连续快速点击就会出现错乱,简单节流一下就好了: 在过渡完成之前点击箭头无效,其实就是设了一个闸,第一次点击把闸打开,在闸再次打开之前,让一部分代码无法执行,然后再在恰当的时机把闸打开。
我们把这个闸设在move函数里:
move(offset, direction) {
  if (!this.transitionEnd) return //这里是闸
  this.transitionEnd = false    //开闸以后再把闸关上
  direction === -1 ? this.currentIndex++ : this.currentIndex--
  if (this.currentIndex > 5) this.currentIndex = 1
  if (this.currentIndex < 1) this.currentIndex = 5
  const destination = this.distance + offset * direction
  this.animate(destination, direction)
}this.transitionEnd 是这个闸的钥匙,我们把它放到data里:
this.transitionEnd: true
这个闸一开始默认的状态是开着的,第一次点击以后,这个闸就关上了, this.tranisitonEnd = false ,在再次打开之前,后面的代码都执行不了。接下来就是在恰当的时机把这个闸打开,而这个恰当的时机就是过渡完成时,也就是在 animate函数 里:
animate(des, direc) {
  if (this.temp) {
    window.clearInterval(this.temp)
    this.temp = null
  }
  this.temp = window.setInterval(() => {
    if ((direc === -1 && des < this.distance) || (direc === 1 && des > this.distance)) {
     this.distance += 30 * direc
    } else {
     this.transitionEnd = true   //闸再次打开
     window.clearInterval(this.temp)
     this.distance = des
     if (des < -3000) this.distance = -600
     if (des > -600) this.distance = -3000
    }
  }, 20)
}这下快速点击就没有之前的那个问题了:

五、点击小圆点实现图片过渡切换
到目前为止的代码:
<template>
 <p id="slider">
  <p class="window">
   <ul class="container" :style="containerStyle">
    <li>
     <img :src="sliders[sliders.length - 1].img" alt="">
    </li>
    <li v-for="(item, index) in sliders" :key="index">
     <img :src="item.img" alt="">
    </li>
    <li>
     <img :src="sliders[0].img" alt="">
    </li>
   </ul>
   <ul class="direction">
    <li class="left" @click="move(600, 1)">
     <svg class="icon" width="30px" height="30.00px" viewBox="0 0 1024 1024" version="1.1" xmlns="http://www.w3.org/2000/svg"><path fill="#ffffff" d="M481.233 904c8.189 0 16.379-3.124 22.628-9.372 12.496-12.497 12.496-32.759 0-45.256L166.488 512l337.373-337.373c12.496-12.497 12.496-32.758 0-45.255-12.498-12.497-32.758-12.497-45.256 0l-360 360c-12.496 12.497-12.496 32.758 0 45.255l360 360c6.249 6.249 14.439 9.373 22.628 9.373z" /></svg>
    </li>
    <li class="right" @click="move(600, -1)">
     <svg class="icon" width="30px" height="30.00px" viewBox="0 0 1024 1024" version="1.1" xmlns="http://www.w3.org/2000/svg"><path fill="#ffffff" d="M557.179 904c-8.189 0-16.379-3.124-22.628-9.372-12.496-12.497-12.496-32.759 0-45.256L871.924 512 534.551 174.627c-12.496-12.497-12.496-32.758 0-45.255 12.498-12.497 32.758-12.497 45.256 0l360 360c12.496 12.497 12.496 32.758 0 45.255l-360 360c-6.249 6.249-14.439 9.373-22.628 9.373z" /></svg>
    </li>
   </ul>
   <ul class="dots">
    <li v-for="(dot, i) in sliders" :key="i"
    :class="{dotted: i === (currentIndex-1)}"
    >
    </li>
   </ul>
  </p>
 </p>
</template>
<script>
export default {
 name: 'slider',
 data () {
  return {
   sliders:[
    {
     img:'../../static/images/1.jpg'
    },
    {
     img:'../../static/images/2.jpg'
    },
    {
     img:'../../static/images/3.jpg'
    },
    {
     img:'../../static/images/4.jpg'
    },
    {
     img:'../../static/images/5.jpg'
    }
   ],
   currentIndex:1,
   distance:-600,
   transitionEnd: true
  }
 },
 computed:{
  containerStyle() {
   return {
    transform:`translate3d(${this.distance}px, 0, 0)`
   }
  }
 },
 methods:{
  move(offset, direction) {
   if (!this.transitionEnd) return
   this.transitionEnd = false
   direction === -1 ? this.currentIndex++ : this.currentIndex--
   if (this.currentIndex > 5) this.currentIndex = 1
   if (this.currentIndex < 1) this.currentIndex = 5
   const destination = this.distance + offset * direction
   this.animate(destination, direction)
  },
  animate(des, direc) {
   if (this.temp) {
    window.clearInterval(this.temp)
    this.temp = null
   }
   this.temp = window.setInterval(() => {
    if ((direc === -1 && des < this.distance) || (direc === 1 && des > this.distance)) {
     this.distance += 30 * direc
    } else {
     this.transitionEnd = true
     window.clearInterval(this.temp)
     this.distance = des
     if (des < -3000) this.distance = -600
     if (des > -600) this.distance = -3000
    }
   }, 20)
  }
 }
}
</script>接下来我们要实现点击下面的小圆点来实现过渡和图片切换。
<ul class="dots">
  <li v-for="(dot, i) in sliders" :key="i"
  :class="{dotted: i === (currentIndex-1)}"
  @click = jump(i+1)>
  </li>
</ul>在点击小圆点的时候我们调用 jump 函数,并将索引 i+1 传给它。 这里需要特别注意,小圆点的索引和图片对应的索引不一致,图片共7张,而5个小圆点对应的是图片中中间的5张,所以我们才传 i+1 。
jump(index) {
  const direction = index - this.currentIndex >= 0 ? -1 : 1 //获取滑动方向
  const offset = Math.abs(index - this.currentIndex) * 600  //获取滑动距离
  this.move(offset, direction)
}上面的代码有一个问题,在jump函数里调用move方法,move里对于currentIndex的都是 +1 ,而点击小圆点可能是将 currentIndex 加或者减好多个,所以要对move里的代码修改下:
direction === -1 ? this.currentIndex += offset/600 : this.currentIndex -= offset/600
改一行,根据offset算出currentIndex就行了。
但是又有一个问题,长距离切换速度太慢,如下:
所以我们需要控制一下速度,让滑动一张图片耗费的时间和滑动多张图片耗费的时间一样,给move和animate函数添加一个speed参数,还要再算一下:
jump(index) {
  const direction = index - this.currentIndex >= 0 ? -1 : 1
  const offset = Math.abs(index - this.currentIndex) * 600
  const jumpSpeed = Math.abs(index - this.currentIndex) === 0 ? this.speed : Math.abs(index - this.currentIndex) * this.speed
  this.move(offset, direction, jumpSpeed)
}六、自动播放与暂停
前面的写的差不多了,到这里就非常简单了,写一个函数play:
play() {
  if (this.timer) {
    window.clearInterval(this.timer)
    this.timer = null
  }
  this.timer = window.setInterval(() => {
    this.move(600, -1, this.speed)
  }, 4000)
}除了初始化以后自动播放,还要通过mouseover和mouseleave来控制暂停与播放:
stop() {
  window.clearInterval(this.timer)
  this.timer = null
}七、 两处小坑
1. window.onblur 和 window.onfocus
写到这里,基本功能都差不多了。但是如果把页面切换到别的页面,导致轮播图所在页面失焦,过一段时间再切回来会发现轮播狂转。原因是页面失焦以后,setInterval停止运行,但是如果切回来就会一次性把该走的一次性走完。解决的方法也很简单,当页面失焦时停止轮播,页面聚焦时开始轮播。
window.onblur = function() { this.stop() }.bind(this)
window.onfocus = function() { this.play() }.bind(this)2. window.setInterval() 小坑
当定时器 window.setInterval() 在多个异步回调中使用时,就有可能在某种机率下开启多个执行队列, 所以为了保险起见,不仅应该在该清除时清除定时器,还要在每次使用之前也清除一遍 。
八、用props简单写两个对外接口
props: {
  initialSpeed: {
   type: Number,
   default: 30
  },
  initialInterval: {
   type: Number,
   default: 4
  }
},
data() {
  ......
  speed: this.initialSpeed
},
computed:{
  interval() {
    return this.initialInterval * 1000
  }
}然后再在相应的地方修改下就可以了。
完整的代码如下:
<template>
 <p id="slider">
  <p class="window" @mouseover="stop" @mouseleave="play">
   <ul class="container" :style="containerStyle">
    <li>
     <img :src="sliders[sliders.length - 1].img" alt="">
    </li>
    <li v-for="(item, index) in sliders" :key="index">
     <img :src="item.img" alt="">
    </li>
    <li>
     <img :src="sliders[0].img" alt="">
    </li>
   </ul>
   <ul class="direction">
    <li class="left" @click="move(600, 1, speed)">
     <svg class="icon" width="30px" height="30.00px" viewBox="0 0 1024 1024" version="1.1" xmlns="http://www.w3.org/2000/svg"><path fill="#ffffff" d="M481.233 904c8.189 0 16.379-3.124 22.628-9.372 12.496-12.497 12.496-32.759 0-45.256L166.488 512l337.373-337.373c12.496-12.497 12.496-32.758 0-45.255-12.498-12.497-32.758-12.497-45.256 0l-360 360c-12.496 12.497-12.496 32.758 0 45.255l360 360c6.249 6.249 14.439 9.373 22.628 9.373z" /></svg>
    </li>
    <li class="right" @click="move(600, -1, speed)">
     <svg class="icon" width="30px" height="30.00px" viewBox="0 0 1024 1024" version="1.1" xmlns="http://www.w3.org/2000/svg"><path fill="#ffffff" d="M557.179 904c-8.189 0-16.379-3.124-22.628-9.372-12.496-12.497-12.496-32.759 0-45.256L871.924 512 534.551 174.627c-12.496-12.497-12.496-32.758 0-45.255 12.498-12.497 32.758-12.497 45.256 0l360 360c12.496 12.497 12.496 32.758 0 45.255l-360 360c-6.249 6.249-14.439 9.373-22.628 9.373z" /></svg>
    </li>
   </ul>
   <ul class="dots">
    <li v-for="(dot, i) in sliders" :key="i"
    :class="{dotted: i === (currentIndex-1)}"
    @click = jump(i+1)
    >
    </li>
   </ul>
  </p>
 </p>
</template>
<script>
export default {
 name: 'slider',
 props: {
  initialSpeed: {
   type: Number,
   default: 30
  },
  initialInterval: {
   type: Number,
   default: 4
  }
 },
 data () {
  return {
   sliders:[
    {
     img:'../../static/images/1.jpg'
    },
    {
     img:'../../static/images/2.jpg'
    },
    {
     img:'../../static/images/3.jpg'
    },
    {
     img:'../../static/images/4.jpg'
    },
    {
     img:'../../static/images/5.jpg'
    }
   ],
   currentIndex:1,
   distance:-600,
   transitionEnd: true,
   speed: this.initialSpeed
  }
 },
 computed:{
  containerStyle() {
   return {
    transform:`translate3d(${this.distance}px, 0, 0)`
   }
  },
  interval() {
   return this.initialInterval * 1000
  }
 },
 mounted() {
  this.init()
 },
 methods:{
  init() {
   this.play()
   window.onblur = function() { this.stop() }.bind(this)
   window.onfocus = function() { this.play() }.bind(this)
  },
  move(offset, direction, speed) {
   if (!this.transitionEnd) return
   this.transitionEnd = false
   direction === -1 ? this.currentIndex += offset/600 : this.currentIndex -= offset/600
   if (this.currentIndex > 5) this.currentIndex = 1
   if (this.currentIndex < 1) this.currentIndex = 5
   const destination = this.distance + offset * direction
   this.animate(destination, direction, speed)
  },
  animate(des, direc, speed) {
   if (this.temp) {
    window.clearInterval(this.temp)
    this.temp = null
   }
   this.temp = window.setInterval(() => {
    if ((direc === -1 && des < this.distance) || (direc === 1 && des > this.distance)) {
     this.distance += speed * direc
    } else {
     this.transitionEnd = true
     window.clearInterval(this.temp)
     this.distance = des
     if (des < -3000) this.distance = -600
     if (des > -600) this.distance = -3000
    }
   }, 20)
  },
  jump(index) {
   const direction = index - this.currentIndex >= 0 ? -1 : 1
   const offset = Math.abs(index - this.currentIndex) * 600
   const jumpSpeed = Math.abs(index - this.currentIndex) === 0 ? this.speed : Math.abs(index - this.currentIndex) * this.speed
   this.move(offset, direction, jumpSpeed)
  },
  play() {
   if (this.timer) {
    window.clearInterval(this.timer)
    this.timer = null
   }
   this.timer = window.setInterval(() => {
    this.move(600, -1, this.speed)
   }, this.interval)
  },
  stop() {
   window.clearInterval(this.timer)
   this.timer = null
  }
 }
}
</script>github地址
九、结语
大概写完了这个组件,发现其实还有许多地方可以优化, this.distance 和 this.currentIndex 耦合性很高,完全可以通过计算属性连到一起。还有过渡方式,用定时器的方法还是有些生硬,没有发挥出Vue的优势来。不过,第一个组件算是写完了,也费了一番力气。
相信看了本文案例你已经掌握了方法,更多精彩请关注php中文网其它相关文章!
推荐阅读:
以上是Vue制作图片轮播的详细内容。更多信息请关注PHP中文网其他相关文章!

热AI工具

Undresser.AI Undress
人工智能驱动的应用程序,用于创建逼真的裸体照片

AI Clothes Remover
用于从照片中去除衣服的在线人工智能工具。

Undress AI Tool
免费脱衣服图片

Clothoff.io
AI脱衣机

Video Face Swap
使用我们完全免费的人工智能换脸工具轻松在任何视频中换脸!

热门文章
热工具

记事本++7.3.1
好用且免费的代码编辑器

SublimeText3汉化版
中文版,非常好用

禅工作室 13.0.1
功能强大的PHP集成开发环境

Dreamweaver CS6
视觉化网页开发工具

SublimeText3 Mac版
神级代码编辑软件(SublimeText3)
热门话题
 7647
7647
 15
1392
52
91
11
73
19
36
110
15
1392
52
91
11
73
19
36
110

 小红书发布自动保存图片怎么解决?发布自动保存图片在哪里?
Mar 22, 2024 am 08:06 AM
小红书发布自动保存图片怎么解决?发布自动保存图片在哪里?
Mar 22, 2024 am 08:06 AM
随着社交媒体的不断发展,小红书已经成为越来越多年轻人分享生活、发现美好事物的平台。许多用户在发布图片时遇到了自动保存的问题,这让他们感到十分困扰。那么,如何解决这个问题呢?一、小红书发布自动保存图片怎么解决?1.清除缓存首先,我们可以尝试清除小红书的缓存数据。步骤如下:(1)打开小红书,点击右下角的“我的”按钮;(2)在个人中心页面,找到“设置”并点击;(3)向下滚动,找到“清除缓存”选项,点击确认。清除缓存后,重新进入小红书,尝试发布图片看是否解决了自动保存的问题。2.更新小红书版本确保你的小
 抖音评论里怎么发图片?评论区图片入口在哪里?
Mar 21, 2024 pm 09:12 PM
抖音评论里怎么发图片?评论区图片入口在哪里?
Mar 21, 2024 pm 09:12 PM
随着抖音短视频的火爆,用户们在评论区互动变得更加丰富多彩。有些用户希望在评论中分享图片,以更好地表达自己的观点或情感。那么,抖音评论里怎么发图片呢?本文将为你详细解答这个问题,并为你提供一些相关的技巧和注意事项。一、抖音评论里怎么发图片?1.打开抖音:首先,你需要打开抖音APP,并登录你的账号。2.找到评论区:在浏览或发布短视频时,找到想要评论的地方,点击“评论”按钮。3.输入评论内容:在评论区输入你的评论内容。4.选择发送图片:在输入评论内容的界面,你会看到一个“图片”按钮或者“+”号按钮,点
 在 iPhone 上使图片更清晰的 6 种方法
Mar 04, 2024 pm 06:25 PM
在 iPhone 上使图片更清晰的 6 种方法
Mar 04, 2024 pm 06:25 PM
Apple最近的iPhone可以通过清晰的细节、饱和度和亮度来捕捉回忆。但有时,您可能会遇到一些问题,这些问题可能会导致图像看起来不那么清晰。尽管iPhone相机上的自动对焦已经取得了长足的进步,可以让您快速拍照,但相机在某些情况下可能会错误地对焦错误的拍摄对象,从而使照片在不需要的区域更加模糊。如果iPhone上的照片看起来失焦或总体上缺乏清晰度,以下帖子应该可以帮助您使它们更清晰。如何在iPhone上使图片更清晰[6种方法]您可以尝试使用本机的“照片”应用来清理照片。如果您需要更多功能和选项
 ppt怎么让图片一张一张出来
Mar 25, 2024 pm 04:00 PM
ppt怎么让图片一张一张出来
Mar 25, 2024 pm 04:00 PM
在PowerPoint中,让图片逐一显示是一种常用的技巧,可以通过设置动画效果来实现。本指南详细介绍了实现这一技巧的步骤,包括基本设置、图片插入、添加动画、调整动画顺序和时间。此外,还提供了高级设置和调整,例如使用触发器、调整动画速度和顺序,以及预览动画效果。通过遵循这些步骤和技巧,用户可以轻松地在PowerPoint中设置图片逐一出现,从而提升演示文稿的视觉效果并吸引观众的注意力。
 网页图片加载不出来怎么办?6种解决办法
Mar 15, 2024 am 10:30 AM
网页图片加载不出来怎么办?6种解决办法
Mar 15, 2024 am 10:30 AM
有网友发现打开浏览器网页,网页上的图片迟迟加载不出来,是怎么回事?检查过网络是正常的,那是哪里出现了问题呢?下面小编就给大家介绍一下网页图片加载不出来的六种解决方法。 网页图片加载不出来: 1、网速问题 网页显示不出图片有可能是因为电脑的网速比较慢,电脑中开启的软件比较多, 而我们访问的图片比较大,这就可能因为加载超时,导致图片显示不出来, 可以将比较占网速的软件将关掉,可以去任务管理器查看一下。 2、访问人数过多 网页显示不出图片还有可能是因为我们访问的网页,在同时间段访问的
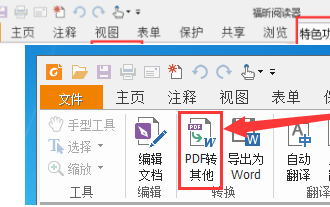 福昕PDF阅读器如何将pdf文档转成jpg图片-福昕PDF阅读器将pdf文档转成jpg图片的方法
Mar 04, 2024 pm 05:49 PM
福昕PDF阅读器如何将pdf文档转成jpg图片-福昕PDF阅读器将pdf文档转成jpg图片的方法
Mar 04, 2024 pm 05:49 PM
你们是不是也在使用福昕PDF阅读器软件呢?那么你们知道福昕PDF阅读器如何将pdf文档转成jpg图片吗?下面这篇文章就为大伙带来了福昕PDF阅读器将pdf文档转成jpg图片的方法,感兴趣的小伙伴们快来下文看看吧。先启动福昕PDF阅读器,接着在顶部工具栏找到“特色功能”,然后选择“PDF转其他”功能。在接下来,打开一个名为“福昕pdf在线转换”的网页。在页面上方右侧点击“登录”按钮进行登录,然后打开“PDF转图片”功能。之后点击上传按钮并将想要转换成图片的pdf文件添加进来,添加完毕后点击“开始转
 wps文档中两张图片怎么并排
Mar 20, 2024 pm 04:00 PM
wps文档中两张图片怎么并排
Mar 20, 2024 pm 04:00 PM
在使用wps办公软件时,我们发现不单单只用一种形式,文字里会加入表格和图片,表格里也可以加入图片等等,这些都是兼并使用的,让整个文档的内容看起来更丰富,如果需要在文档中插入两张图片,而且需要并排排列。我们接下来的课程就可以解决这个问题:wps文档中两张图片怎么并排。1、首先需要打开WPS软件,找到你想要调整的图片。左键点击图片会弹出一个菜单栏,选择“页面布局”。2、在文字环绕中选择“紧密型环绕”。3、当需要的图片都确认设定为“紧密型文字环绕”之后,便可以把图片随意拖动到合适的位置,点击第一张图片
 如何让Win11在启动时自动显示一张图片
Dec 31, 2023 pm 10:54 PM
如何让Win11在启动时自动显示一张图片
Dec 31, 2023 pm 10:54 PM
有一些用户想要在不更改桌面壁纸的情况下,在开机时自动打开一张图片来看,我们可以使用这个功能欣赏图片或是提示备忘录等,其实设置方法非常简单,只要将图片放到对应的启动文件夹中就可以了,下面一起来看一下吧。win11开机怎么自动打开一张图片:1、首先我们需要双击打开桌面上“此电脑”2、进入此电脑后,双击进入系统“c盘”3、然后定位到如下位置“C:\Users\Administrator\AppData\Roaming\Microsoft\Windows\StartMenu\Programs\Start
