

nginx使用replace-filter-nginx-module实现内容替换

本文所给大家分享的是nginx使用replace-filter-nginx-module实现内容替换,很详细,有需要的朋友可以参考一下
有时候我们想对响应(例如PHP接口)返回的内容做些字符串,虽然可以使用各语言代码相关方法(例如PHP的str_replace)进行替换,但是在nginx层面替换是更方便的,无需修改代码。
约定:本文源代码目录统一放在:/root/soft/src 里。
安装
安装此模块需要先安装 sregex 运行库:
$ git clone https://github.com/agentzh/sregex
$ cd sregex
$ make
$ make install
然后安装 replace-filter-nginx-module 模块:
$ cd /root/soft/src
$ git clone https://github.com/agentzh/replace-filter-nginx-module
$ wget http://nginx.org/download/nginx-1.12.2.tar.gz
$ tar zxvf nginx-1.12.2.tar.gz
这里采用静态编译的方式安装模块,需要重新编译 nginx 。获取 nginx 上一次编译参数:
$ nginx -V
nginx version: nginx/1.12.2
built by gcc 4.4.7 20120313 (Red Hat 4.4.7-16) (GCC)
built with OpenSSL 1.0.1e-fips 11 Feb 2013
TLS SNI support enabled
configure arguments: --user=www --group=www --prefix=/usr/local/nginx --with-http_stub_status_module --with-http_ssl_module --with-http_gzip_static_module --with-ipv6 --with-http_sub_module --with-ld-opt=-ljemalloc --with-http_ssl_module --with-http_realip_module --with-http_addition_module --with-http_sub_module
这里添加 replace-filter-nginx-module 模块:
--add-module=/root/soft/src/replace-filter-nginx-module
最终编译命令:
cd nginx-1.12.2

$  ./configure --user=www --group=www --prefix=/usr/local/nginx --with-http_stub_status_module --with-http_ssl_module --with-http_gzip_static_module --with-ipv6 --with-http_sub_module --with-ld-opt=-ljemalloc --with-http_ssl_module --with-http_realip_module --with-http_addition_module --with-http_sub_module --add-module=/root/soft/src/replace-filter-nginx-module

$ make
由于这里是升级nginx,所以千万不要make install,不然就真的覆盖了。 接下来手动替换二进制文件:
$ cp /usr/local/nginx/sbin/nginx /usr/local/nginx/sbin/nginx.bak
$ cp -rfp ./objs/nginx /usr/local/nginx/sbin/
测试是否可行:
$ nginx -v
nginx version: nginx/1.12.2
配置是否正常:
$ /usr/local/nginx/sbin/nginx -t
nginx: the configuration file /usr/local/nginx/conf/nginx.conf syntax is ok
nginx: configuration file /usr/local/nginx/conf/nginx.conf test is successful
配置
这里测试的是:把接口返回的 img.test.com 换成 media.test.com。
修改: /usr/local/nginx/conf/vhost/test.com.conf
location ~ [^/]\.php(/|$)
{
    # comment try_files $uri =404; to enable pathinfo
    try_files $uri =404;
    fastcgi_pass  127.0.0.1:9000;
    fastcgi_index index.php;
    include fastcgi.conf;
}为:
location ~ [^/]\.php(/|$)
{
    replace_filter 'img.test.com' 'media.test.com' g;
    replace_filter_types application/json;

    # comment try_files $uri =404; to enable pathinfo
    try_files $uri =404;
    fastcgi_pass  127.0.0.1:9000;
    fastcgi_index index.php;
include fastcgi.conf;注意需要添加replace_filter_types 。
保存后检查配置是否ok:
$ /usr/local/nginx/sbin/nginx -t
nginx: the configuration file /usr/local/nginx/conf/nginx.conf syntax is ok
nginx: configuration file /usr/local/nginx/conf/nginx.conf test is successful
然后热重启:
# 升级完成第一次需要重启
$ service nginx restart

# 热重启
$ /usr/local/nginx/sbin/nginx -s reload
参考
1、已安装nginx动态添加模块
http://coolnull.com/4245.html
2、LNMP平滑升级nginx并安装ngx_lua模块教程
http://www.mamicode.com/info-...
3、openresty/replace-filter-nginx-module: Streaming regular expression replacement in response bodies
https://github.com/openresty/...
4、比ngx_http_substitutions_filter_module 更强大的替换模块sregex的replace-filter-nginx-module
https://www.cnblogs.com/archo...
原载于:http://www.cnblogs.com/52fhy/...
相关推荐:
以上是nginx使用replace-filter-nginx-module实现内容替换 的详细内容。更多信息请关注PHP中文网其他相关文章!

热AI工具

Undresser.AI Undress
人工智能驱动的应用程序,用于创建逼真的裸体照片

AI Clothes Remover
用于从照片中去除衣服的在线人工智能工具。

Undress AI Tool
免费脱衣服图片

Clothoff.io
AI脱衣机

AI Hentai Generator
免费生成ai无尽的。

热门文章
热工具

记事本++7.3.1
好用且免费的代码编辑器

SublimeText3汉化版
中文版,非常好用

禅工作室 13.0.1
功能强大的PHP集成开发环境

Dreamweaver CS6
视觉化网页开发工具

SublimeText3 Mac版
神级代码编辑软件(SublimeText3)
热门话题


 tomcat服务器怎么让外网访问
Apr 21, 2024 am 07:22 AM
tomcat服务器怎么让外网访问
Apr 21, 2024 am 07:22 AM
要让 Tomcat 服务器对外网访问,需要:修改 Tomcat 配置文件,允许外部连接。添加防火墙规则,允许访问 Tomcat 服务器端口。创建 DNS 记录,将域名指向 Tomcat 服务器公有 IP。可选:使用反向代理提升安全性和性能。可选:设置 HTTPS 以提高安全性。
 html文件怎么生成网址
Apr 21, 2024 pm 12:57 PM
html文件怎么生成网址
Apr 21, 2024 pm 12:57 PM
要将 HTML 文件转换为网址,需要使用网络服务器,包括以下步骤:获取网络服务器。设置网络服务器。上传 HTML 文件。创建域名。路由请求。
 nodejs项目怎么部署到服务器
Apr 21, 2024 am 04:40 AM
nodejs项目怎么部署到服务器
Apr 21, 2024 am 04:40 AM
Node.js 项目的服务器部署步骤:准备部署环境:获取服务器访问权限、安装 Node.js、设置 Git 存储库。构建应用程序:使用 npm run build 生成可部署代码和依赖项。上传代码到服务器:通过 Git 或文件传输协议。安装依赖项:SSH 登录服务器并使用 npm install 安装应用程序依赖项。启动应用程序:使用 node index.js 等命令启动应用程序,或使用 pm2 等进程管理器。配置反向代理(可选):使用 Nginx 或 Apache 等反向代理路由流量到应用程
 nodejs可以外网访问么
Apr 21, 2024 am 04:43 AM
nodejs可以外网访问么
Apr 21, 2024 am 04:43 AM
是的,Node.js 可以外网访问。您可以使用以下方法:使用 Cloud Functions 部署函数并公开访问。使用 Express 框架创建路由并定义端点。使用 Nginx 反向代理请求到 Node.js 应用程序。使用 Docker 容器运行 Node.js 应用程序并通过端口映射公开。
 如何使用 PHP 部署和维护网站
May 03, 2024 am 08:54 AM
如何使用 PHP 部署和维护网站
May 03, 2024 am 08:54 AM
要成功部署和维护PHP网站,需要执行以下步骤:选择Web服务器(如Apache或Nginx)安装PHP创建数据库并连接PHP上传代码到服务器设置域名和DNS监控网站维护步骤包括更新PHP和Web服务器、备份网站、监控错误日志和更新内容。
 如何使用 Fail2Ban 保护服务器免受暴力攻击
Apr 27, 2024 am 08:34 AM
如何使用 Fail2Ban 保护服务器免受暴力攻击
Apr 27, 2024 am 08:34 AM
Linux管理员的一个重要任务是保护服务器免受非法攻击或访问。默认情况下,Linux系统带有配置良好的防火墙,比如iptables、UncomplicatedFirewall(UFW),ConfigServerSecurityFirewall(CSF)等,可以防止多种攻击。任何连接到互联网的机器都是恶意攻击的潜在目标。有一个名为Fail2Ban的工具可用来缓解服务器上的非法访问。什么是Fail2Ban?Fail2Ban[1]是一款入侵防御软件,可以保护服务器免受暴力攻击。它是用Python编程语
 和我一起来学习Linux安装Nginx
Apr 28, 2024 pm 03:10 PM
和我一起来学习Linux安装Nginx
Apr 28, 2024 pm 03:10 PM
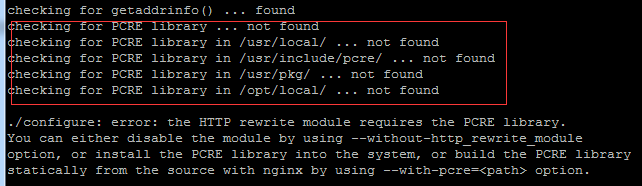
而今天将来一起带领大家在Linux环境安装Nginx,这里用的Linux系统是CentOS7.2.准备安装工具1.从Nginx官网下载Nginx。这里用的版本为:1.13.6.2.将下载下来的Nginx上传到Linux上,这里以/opt/nginx目录为例。运行“tar-zxvfnginx-1.13.6.tar.gz”进行解压。3.切换到/opt/nginx/nginx-1.13.6目录下,运行./configure进行初始化配置。如出现下面的提示,说明该机器没有安装PCRE,而Nginx需要依
 keepalived+nginx搭建高可用几个注意点
Apr 23, 2024 pm 05:50 PM
keepalived+nginx搭建高可用几个注意点
Apr 23, 2024 pm 05:50 PM
在yum安装完keepalived之后,配置keepalived的配置文件注意点在master和backup的keepalived的配置文件中,网卡名字为当前机器的网卡名称VIP的选择为可用的一个ip,通常在做高可用,局域网环境比较多,所以这个vip是和两台机器同网段的一个内网ip。如果用在外网环境下,无所谓在不在一个网段,只要客户端能访问到。停掉nginx服务,启动keepalived服务,会看到keepalived拉动nginx服务启动若是无法启动失败,基本都是配置文件和脚本的问题,或者是防
