Spring MVC代码实践之网站架构及演变
本篇文章给大家分享的是Spring MVC代码实践之网站架构及演变,内容挺不错的,希望可以帮助到有需要的朋友
网站架构及其演变过程
基础结构
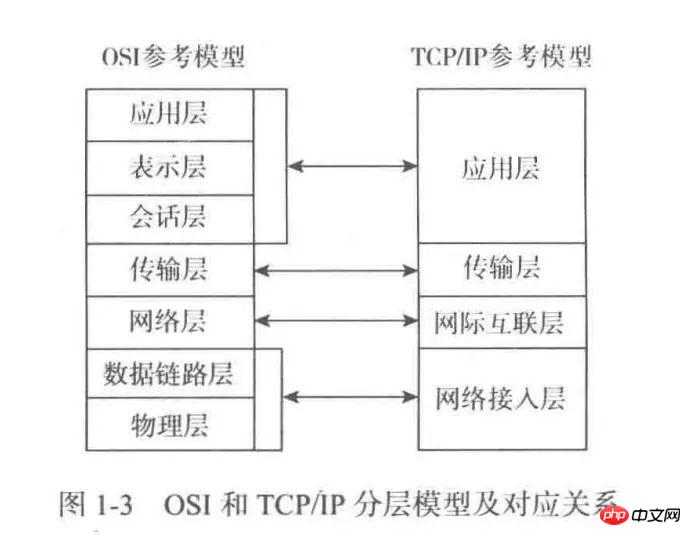
网络传输分解方式:
标准的 OSI 参考模型
TCP/IP 参考模型
海量数据的解决方案
-
缓存和页面静态化
-
缓存
通过程序直接保存在内存中
使用缓存框架 (Encache、Redis、Memcache)
-
页面静态化
使用模板技术生成(Velocity、FreeMaker等)
-
数据库优化
-
表结构优化
-
SQL 语句优化
-
分区
-
分表
-
索引优化
-
使用存储过程代替直接操作过程
-
分离活跃数据
-
批量读取和延迟修改
-
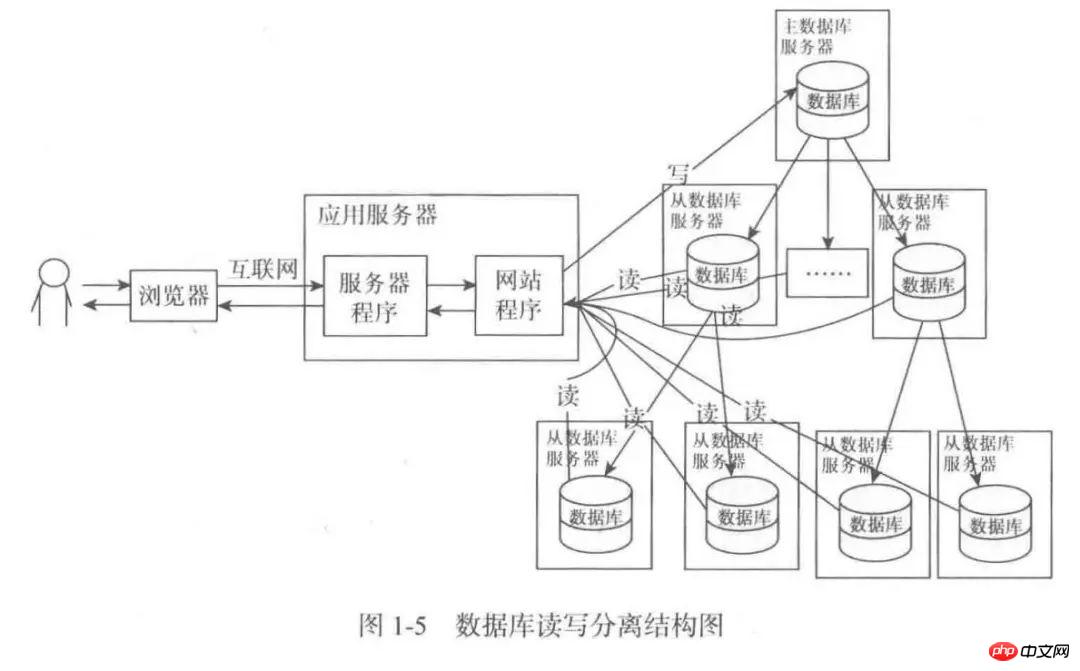
读写分离

-
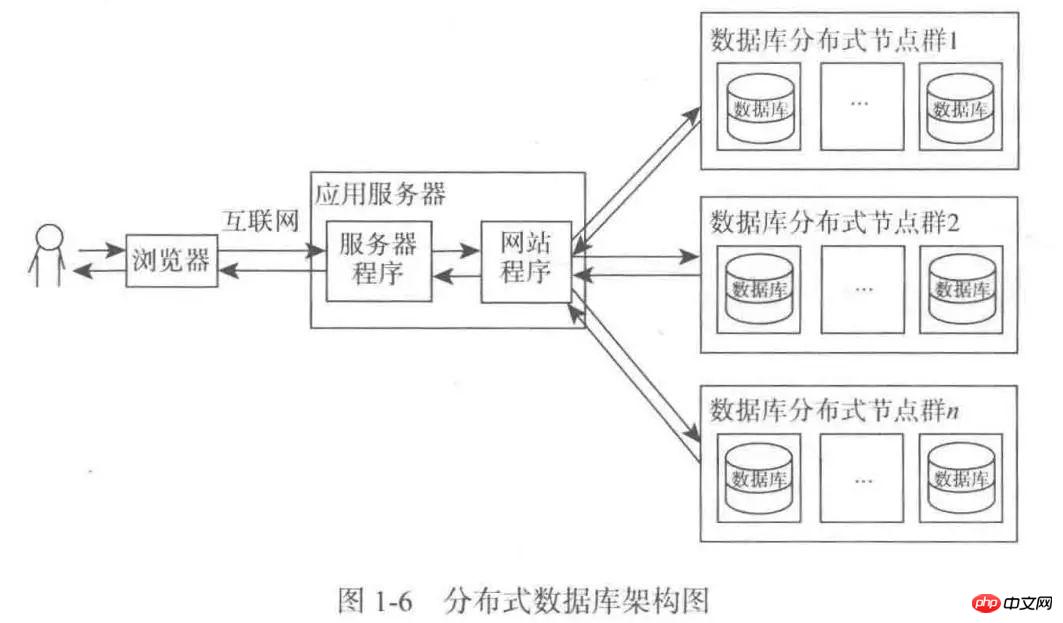
分布式数据库

-
NoSQL 和 Hadoop
高并发的解决方案
应用和静态资源的分离:静态文件(图片、视频、JS、CSS等)放在专门的服务器上
页面缓存(Nginx 服务器、Squid 服务器)
集群与分布式
反向代理
CDN
-
底层优化:网络传输协议
常见协议和标准
TCP/IP 协议
IP:查找地址,对应着国际互联网
TCP:规范传输规则,对应着传输层
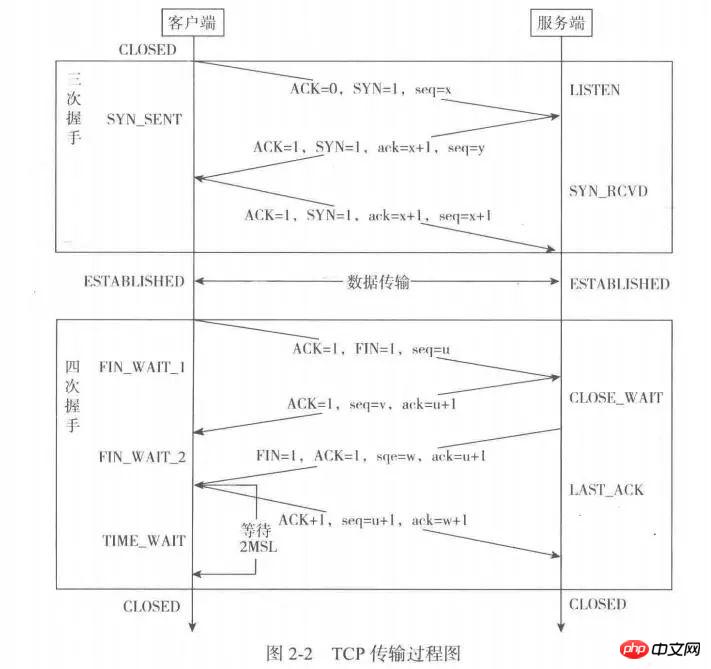
TCP 在传输之前会进行三次沟通,称 “三次握手”,传完数据断开的时候要进行四次沟通,称 “四次挥手”。
TCP 两个序号,三个标志位含义:
seq:表示所传数据的序号。TCP 传输时每一个字节都有一个序号,发送数据的时候会将数据的第一个序号发送给对方,接收方会按序号检查是否接收完整了,如果没接收完整就需要重新传送,这样就可以保证数据的完整性。
ack:表示确认号。接收端用它来给发送端反馈已经成功接收到的数据信息,它的值为希望接收的下一个数据包起始序号。
ACK:确认位,只有 ACK = 1 的时候 ack 才起作用。正常通信时 ACK 为 1,第一次发起请求时因为没有需要确认接收的数据所以 ACK 为 0。
SYN:同步位,用于在建立连接时同步序号。刚开始建立连接时并没有历史接收的数据,所以 ack 也就没有办法设置,这是按照正常的机制就无法运行了,SYN 的作用就是解决这个问题的,当接收端接收到 SYN = 1 的报文时就会直接将 ack 设置为接收到的 seq + 1 的值,注意这里的值并不是检验后设置的,而是根据 SYN 直接设置的,这样正常的机制就可以运行了,所以 SYN 叫同步位。SYN 会在前两次握手时都为 1,这是因为通信的双方的 ack 都需要设置一个初始值。
FIN:终止位,用来在数据传输完毕后释放连接。
DNS 的设置
DNS 解析
参考域名设置,如下是我在腾讯云域名的设置
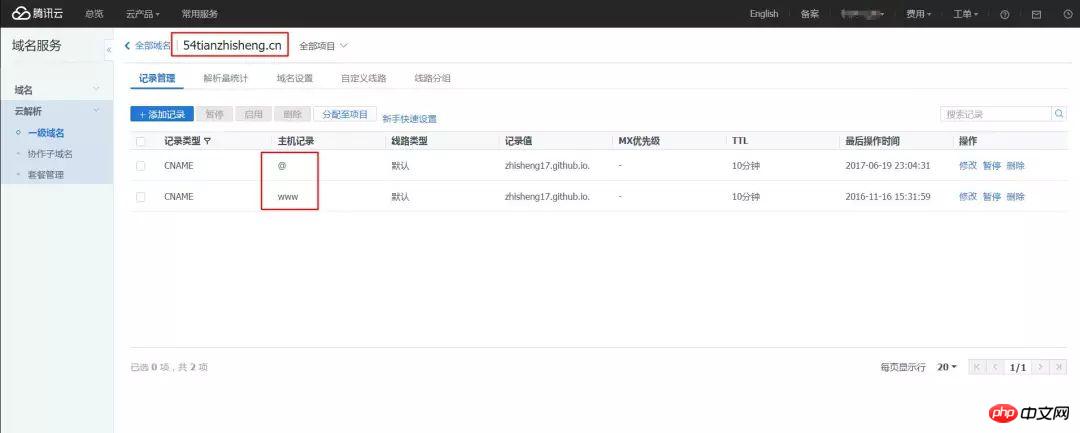
记录类型:
A记录: 将域名指向一个IPv4地址(例如:8.8.8.8)
CNAME:将域名指向另一个域名(例如 www.54tianzhisheng.cn)
MX: 将域名指向邮件服务器地址
TXT: 可任意填写,长度限制255,通常做SPF记录(反垃圾邮件)
NS: 域名服务器记录,将子域名指定其他DNS服务器解析
AAAA:将域名指向一个iPv6地址(例如:ff06:0:0:0:0:0:0:c3)
SRV:记录提供特定服务的服务器(例如xmpp-server.tcp)
显性URL:将域名301重定向到另一个地址
隐性URL:类似显性URL,但是会隐藏真实目标地址
主机记录:
要解析 www.54tianzhisheng.cn,请填写 www。主机记录就是域名前缀,常见用法有:
www: *解析后的域名为 www.54tianzhisheng.cn。
*@: 直接解析主域名 54tianzhisheng.cn。
*: 泛解析,匹配其他所有域名 *.54tianzhisheng.cn。
mail: 将域名解析为 mail.54tianzhisheng.cn,通常用于解析邮箱服务器。
二级域名: 如:abc.54tianzhisheng.cn,填写abc。
手机网站: 如:m.54tianzhisheng.cn,填写m。
Java 中 Socket 的用法
普通 Soket 的用法
Socket 分为 ServerSocket 和 Socket 两大类。
ServerSocket 用于服务器端,可以通过 accept 方法监听请求,监听到请求后返回 Socket;
Socket 用户具体完成数据传输,客户端直接使用 Socket 发送请求并传输数据。
随便写了个单方面发送消息的 demo:
客户端:
<span style="color:rgb(199,146,234);line-height:20px;font-size:13px !important;white-space: !important;">import</span><span style="color:rgb(238,255,255);line-height:20px;font-size:13px !important;white-space: !important;"> java</span><span style="color:rgb(204,204,204);line-height:20px;font-size:13px !important;white-space: !important;">.</span><span style="color:rgb(238,255,255);line-height:20px;font-size:13px !important;white-space: !important;">io</span><span style="color:rgb(204,204,204);line-height:20px;font-size:13px !important;white-space: !important;">.</span><span style="color:rgb(126,165,247);line-height:20px;font-size:13px !important;white-space: !important;">IOException</span><span style="color:rgb(204,204,204);line-height:20px;font-size:13px !important;white-space: !important;">;</span><span style="color:rgb(199,146,234);line-height:20px;font-size:13px !important;white-space: !important;">import</span><span style="color:rgb(238,255,255);line-height:20px;font-size:13px !important;white-space: !important;"> java</span><span style="color:rgb(204,204,204);line-height:20px;font-size:13px !important;white-space: !important;">.</span><span style="color:rgb(238,255,255);line-height:20px;font-size:13px !important;white-space: !important;">io</span><span style="color:rgb(204,204,204);line-height:20px;font-size:13px !important;white-space: !important;">.</span><span style="color:rgb(126,165,247);line-height:20px;font-size:13px !important;white-space: !important;">OutputStream</span><span style="color:rgb(204,204,204);line-height:20px;font-size:13px !important;white-space: !important;">;</span><span style="color:rgb(199,146,234);line-height:20px;font-size:13px !important;white-space: !important;">import</span><span style="color:rgb(238,255,255);line-height:20px;font-size:13px !important;white-space: !important;"> java</span><span style="color:rgb(204,204,204);line-height:20px;font-size:13px !important;white-space: !important;">.</span><span style="color:rgb(238,255,255);line-height:20px;font-size:13px !important;white-space: !important;">net</span><span style="color:rgb(204,204,204);line-height:20px;font-size:13px !important;white-space: !important;">.</span><span style="color:rgb(126,165,247);line-height:20px;font-size:13px !important;white-space: !important;">Socket</span><span style="color:rgb(204,204,204);line-height:20px;font-size:13px !important;white-space: !important;">;</span><span style="color:rgb(79,103,117);line-height:20px;font-size:13px !important;white-space: !important;">/**</span><span style="color:rgb(79,103,117);line-height:20px;font-size:13px !important;white-space: !important;"> * Created by 10412 on 2017/5/2.</span><span style="color:rgb(79,103,117);line-height:20px;font-size:13px !important;white-space: !important;"> * TCP客户端:</span><span style="color:rgb(79,103,117);line-height:20px;font-size:13px !important;white-space: !important;"> ①:建立tcp的socket服务,最好明确具体的地址和端口。这个对象在创建时,就已经可以对指定ip和端口进行连接(三次握手)。</span><span style="color:rgb(79,103,117);line-height:20px;font-size:13px !important;white-space: !important;"> ②:如果连接成功,就意味着通道建立了,socket流就已经产生了。只要获取到socket流中的读取流和写入流即可,只要通过getInputStream和getOutputStream就可以获取两个流对象。</span><span style="color:rgb(79,103,117);line-height:20px;font-size:13px !important;white-space: !important;"> ③:关闭资源。</span>*/ //单方面的输入! public class TcpClient { public static void main(String[] args) { try { Socket s = new Socket("127.0.0.1", 9999); OutputStream o = s.getOutputStream(); o.write("tcp sssss".getBytes()); s.close(); } catch (IOException e) { e.printStackTrace(); } } }登录后复制
服务器端:
<span style="color:rgb(199,146,234);line-height:20px;font-size:13px !important;white-space: !important;">import</span><span style="color:rgb(238,255,255);line-height:20px;font-size:13px !important;white-space: !important;"> java</span><span style="color:rgb(204,204,204);line-height:20px;font-size:13px !important;white-space: !important;">.</span><span style="color:rgb(238,255,255);line-height:20px;font-size:13px !important;white-space: !important;">io</span><span style="color:rgb(204,204,204);line-height:20px;font-size:13px !important;white-space: !important;">.</span><span style="color:rgb(126,165,247);line-height:20px;font-size:13px !important;white-space: !important;">IOException</span><span style="color:rgb(204,204,204);line-height:20px;font-size:13px !important;white-space: !important;">;</span><span style="color:rgb(199,146,234);line-height:20px;font-size:13px !important;white-space: !important;">import</span><span style="color:rgb(238,255,255);line-height:20px;font-size:13px !important;white-space: !important;"> java</span><span style="color:rgb(204,204,204);line-height:20px;font-size:13px !important;white-space: !important;">.</span><span style="color:rgb(238,255,255);line-height:20px;font-size:13px !important;white-space: !important;">io</span><span style="color:rgb(204,204,204);line-height:20px;font-size:13px !important;white-space: !important;">.</span><span style="color:rgb(126,165,247);line-height:20px;font-size:13px !important;white-space: !important;">InputStream</span><span style="color:rgb(204,204,204);line-height:20px;font-size:13px !important;white-space: !important;">;</span><span style="color:rgb(199,146,234);line-height:20px;font-size:13px !important;white-space: !important;">import</span><span style="color:rgb(238,255,255);line-height:20px;font-size:13px !important;white-space: !important;"> java</span><span style="color:rgb(204,204,204);line-height:20px;font-size:13px !important;white-space: !important;">.</span><span style="color:rgb(238,255,255);line-height:20px;font-size:13px !important;white-space: !important;">net</span><span style="color:rgb(204,204,204);line-height:20px;font-size:13px !important;white-space: !important;">.</span><span style="color:rgb(126,165,247);line-height:20px;font-size:13px !important;white-space: !important;">ServerSocket</span><span style="color:rgb(204,204,204);line-height:20px;font-size:13px !important;white-space: !important;">;</span><span style="color:rgb(199,146,234);line-height:20px;font-size:13px !important;white-space: !important;">import</span><span style="color:rgb(238,255,255);line-height:20px;font-size:13px !important;white-space: !important;"> java</span><span style="color:rgb(204,204,204);line-height:20px;font-size:13px !important;white-space: !important;">.</span><span style="color:rgb(238,255,255);line-height:20px;font-size:13px !important;white-space: !important;">net</span><span style="color:rgb(204,204,204);line-height:20px;font-size:13px !important;white-space: !important;">.</span><span style="color:rgb(126,165,247);line-height:20px;font-size:13px !important;white-space: !important;">Socket</span><span style="color:rgb(204,204,204);line-height:20px;font-size:13px !important;white-space: !important;">;</span>/** * Created by 10412 on 2017/5/2. */ public class TcpServer { public static void main(String[] args) { try { ServerSocket ss = new ServerSocket(9999);//建立服务端的socket服务 Socket s = ss.accept();//获取客户端对象 String ip = s.getInetAddress().getHostAddress(); int port = s.getPort(); System.out.println(ip + " : " + port + " connected"); // 可以通过获取到的socket对象中的socket流和具体的客户端进行通讯。 InputStream ins = s.getInputStream();//读取客户端的数据,使用客户端对象的socket读取流 byte[] bytes = new byte[1024]; int len = ins.read(bytes); String text = new String(bytes, 0, len); System.out.println(text); //关闭资源 s.close(); ss.close(); } catch (IOException e) { e.printStackTrace(); } } }登录后复制
以上是Spring MVC代码实践之网站架构及演变的详细内容。更多信息请关注PHP中文网其他相关文章!

热AI工具

Undresser.AI Undress
人工智能驱动的应用程序,用于创建逼真的裸体照片

AI Clothes Remover
用于从照片中去除衣服的在线人工智能工具。

Undress AI Tool
免费脱衣服图片

Clothoff.io
AI脱衣机

AI Hentai Generator
免费生成ai无尽的。

热门文章

热工具

记事本++7.3.1
好用且免费的代码编辑器

SublimeText3汉化版
中文版,非常好用

禅工作室 13.0.1
功能强大的PHP集成开发环境

Dreamweaver CS6
视觉化网页开发工具

SublimeText3 Mac版
神级代码编辑软件(SublimeText3)

热门话题
 编程新范式,当Spring Boot遇上OpenAI
Feb 01, 2024 pm 09:18 PM
2023年,AI技术已经成为热点话题,对各行业产生了巨大影响,编程领域尤其如此。人们越来越认识到AI技术的重要性,Spring社区也不例外。随着GenAI(GeneralArtificialIntelligence)技术的不断进步,简化具备AI功能的应用程序的创建变得至关重要和迫切。在这个背景下,"SpringAI"应运而生,旨在简化开发AI功能应用程序的过程,使其变得简单直观,避免不必要的复杂性。通过"SpringAI",开发者可以更轻松地构建具备AI功能的应用程序,将其变得更加易于使用和操作
 有什么学c语言的网站
Jan 30, 2024 pm 02:38 PM
学c语言的网站:1、C语言中文网;2、菜鸟教程;3、C语言论坛;4、C语言帝国;5、脚本之家;6、天极网;7、红黑联盟;8、51自学网;9、力扣;10、C Programming。详细介绍:1、C语言中文网,这是一个专门为初学者提供C语言学习资料的网站,内容丰富,包括基础语法、指针、数组、函数、结构体等多个模块;2、菜鸟教程,这是一个综合性的编程学习网站等等。
 利用Spring Boot以及Spring AI构建生成式人工智能应用
Apr 28, 2024 am 11:46 AM
Spring+AI作为行业领导者,通过其强大、灵活的API和先进的功能,为各种行业提供了领先性的解决方案。在本专题中,我们将深入探讨Spring+AI在各领域的应用示例,每个案例都将展示Spring+AI如何满足特定需求,实现目标,并将这些LESSONSLEARNED扩展到更广泛的应用。希望这个专题能对你有所启发,更深入地理解和利用Spring+AI的无限可能。Spring框架在软件开发领域已经有超过20年的历史,自SpringBoot1.0版本发布以来已有10年。现在,无人会质疑,Spring
 Spring Data JPA 的架构和工作原理是什么?
Apr 17, 2024 pm 02:48 PM
SpringDataJPA基于JPA架构,通过映射、ORM和事务管理与数据库交互。其存储库提供CRUD操作,派生查询简化了数据库访问。此外,它使用延迟加载,仅在必要时检索数据,从而提高了性能。
 1.3ms耗时!清华最新开源移动端神经网络架构 RepViT
Mar 11, 2024 pm 12:07 PM
论文地址:https://arxiv.org/abs/2307.09283代码地址:https://github.com/THU-MIG/RepViTRepViT在移动端ViT架构中表现出色,展现出显着的优势。接下来,我们将探讨本研究的贡献所在。文中提到,轻量级ViTs通常比轻量级CNNs在视觉任务上表现得更好,这主要归功于它们的多头自注意力模块(MSHA)可以让模型学习全局表示。然而,轻量级ViTs和轻量级CNNs之间的架构差异尚未得到充分研究。在这项研究中,作者们通过整合轻量级ViTs的有效
 golang框架架构的学习曲线有多陡峭?
Jun 05, 2024 pm 06:59 PM
Go框架架构的学习曲线取决于对Go语言和后端开发的熟悉程度以及所选框架的复杂性:对Go语言的基础知识有较好的理解。具有后端开发经验会有所帮助。复杂性不同的框架导致学习曲线差异。
 PHP MVC 架构:构建面向未来的 Web 应用程序
Mar 03, 2024 am 09:01 AM
引言在当今快速发展的数字世界中,构建健壮、灵活且可维护的WEB应用程序至关重要。PHPmvc架构提供了实现这一目标的理想解决方案。MVC(模型-视图-控制器)是一种广泛使用的设计模式,可以将应用程序的各个方面分离为独立的组件。MVC架构的基础MVC架构的核心原理是分离关注点:模型:封装应用程序的数据和业务逻辑。视图:负责呈现数据并处理用户交互。控制器:协调模型和视图之间的交互,管理用户请求和业务逻辑。PHPMVC架构phpMVC架构遵循传统MVC模式,但也引入了语言特定的功能。以下是PHPMVC
 Spring如何设置事务隔离级别
Jan 26, 2024 pm 05:38 PM
Spring设置事务隔离级别的方法:1、使用@Transactional注解;2、在Spring配置文件中设置;3、使用PlatformTransactionManager;4、在Java配置类中设置。详细介绍:1、使用@Transactional注解,在需要进行事务管理的类或方法上添加@Transactional注解,并在属性中设置隔离级别;2、在Spring配置文件等等。


