Angular Universal
Angular在服务端渲染方面提供一套前后端同构解决方案,它就是 Angular Universal(统一平台),一项在服务端运行 Angular 应用的技术。
标准的 Angular 应用会执行在浏览器中,它会在 DOM 中渲染页面,以响应用户的操作。
而 Angular Universal 会在服务端通过一个被称为服务端渲染(server-side rendering - SSR)的过程生成静态的应用页面。
它可以生成这些页面,并在浏览器请求时直接用它们给出响应。 它也可以把页面预先生成为 HTML 文件,然后把它们作为静态文件供服务端使用。
工作原理
要制作一个 Universal 应用,就要安装 platform-server 包。 platform-server 包提供了服务端的 DOM 实现、XMLHttpRequest 和其它底层特性,但不再依赖浏览器。
你要使用 platform-server 模块而不是 platform-browser 模块来编译这个客户端应用,并且在一个 Web 服务器上运行这个 Universal 应用。
服务器(下面的示例中使用的是 Node Express 服务器)会把客户端对应用页面的请求传给 renderModuleFactory 函数。
renderModuleFactory 函数接受一个模板 HTML 页面(通常是 index.html)、一个包含组件的 Angular 模块和一个用于决定该显示哪些组件的路由作为输入。
该路由从客户端的请求中传给服务器。 每次请求都会给出所请求路由的一个适当的视图。
renderModuleFactory 在模板中的 <app> 标记中渲染出哪个视图,并为客户端创建一个完成的 HTML 页面。
最后,服务器就会把渲染好的页面返回给客户端。
为什么要服务端渲染
三个主要原因:
帮助网络爬虫(SEO)
提升在手机和低功耗设备上的性能
迅速显示出第首页
帮助网络爬虫(SEO)
Google、Bing、百度、Facebook、Twitter 和其它搜索引擎或社交媒体网站都依赖网络爬虫去索引你的应用内容,并且让它的内容可以通过网络搜索到。
这些网络爬虫可能不会像人类那样导航到你的具有高度交互性的 Angular 应用,并为其建立索引。
Angular Universal 可以为你生成应用的静态版本,它易搜索、可链接,浏览时也不必借助 JavaScript。它也让站点可以被预览,因为每个 URL 返回的都是一个完全渲染好的页面。
启用网络爬虫通常被称为搜索引擎优化 (SEO)。
提升手机和低功耗设备上的性能
有些设备不支持 JavaScript 或 JavaScript 执行得很差,导致用户体验不可接受。 对于这些情况,你可能会需要该应用的服务端渲染、无 JavaScript 的版本。 虽然有一些限制,不过这个版本可能是那些完全没办法使用该应用的人的唯一选择。
快速显示首页
快速显示首页对于吸引用户是至关重要的。
如果页面加载超过了三秒中,那么 53% 的移动网站会被放弃。 你的应用需要启动的更快一点,以便在用户决定做别的事情之前吸引他们的注意力。
使用 Angular Universal,你可以为应用生成“着陆页”,它们看起来就和完整的应用一样。 这些着陆页是纯 HTML,并且即使 JavaScript 被禁用了也能显示。 这些页面不会处理浏览器事件,不过它们可以用 routerLink 在这个网站中导航。
在实践中,你可能要使用一个着陆页的静态版本来保持用户的注意力。 同时,你也会在幕后加载完整的 Angular 应用。 用户会认为着陆页几乎是立即出现的,而当完整的应用加载完之后,又可以获得完全的交互体验。
示例解析
下面将基于我在GitHub上的示例项目 angular-universal-starter 来进行讲解。
这个项目与第一篇的示例项目一样,都是基于 Angular CLI进行开发构建的,因此它们的区别只在于服务端渲染所需的那些配置上。
安装工具
在开始之前,下列包是必须安装的(示例项目均已配置好,只需 npm install 即可):
@angular/platform-server - Universal 的服务端元件。
@nguniversal/module-map-ngfactory-loader - 用于处理服务端渲染环境下的惰性加载。
@nguniversal/express-engine - Universal 应用的 Express 引擎。
ts-loader - 用于对服务端应用进行转译。
express - Node Express 服务器
使用下列命令安装它们:
1 | npm install --save @angular/platform-server @nguniversal/module-map-ngfactory-loader ts-loader @nguniversal/express-engine express
|
登录后复制
项目配置
配置工作有:
创建服务端应用模块:src/app/app.server.module.ts
修改客户端应用模块:src/app/app.module.ts
创建服务端应用的引导程序文件:src/main.server.ts
修改客户端应用的引导程序文件:src/main.ts
创建 TypeScript 的服务端配置:src/tsconfig.server.json
修改 @angular/cli 的配置文件:.angular-cli.json
创建 Node Express 的服务程序:server.ts
创建服务端预渲染的程序:prerender.ts
创建 Webpack 的服务端配置:webpack.server.config.js
1、创建服务端应用模块:src/app/app.server.module.ts
1 2 3 4 5 6 7 8 9 10 11 12 13 14 15 16 17 18 19 | import { NgModule } from '@angular/core';
import { ServerModule, ServerTransferStateModule } from '@angular/platform-server';
import { ModuleMapLoaderModule } from '@nguniversal/module-map-ngfactory-loader';
import { AppBrowserModule } from './app.module';
import { AppComponent } from './app.component';
@NgModule({
imports: [
AppBrowserModule,
ServerModule,
ModuleMapLoaderModule,
ServerTransferStateModule,
],
bootstrap: [AppComponent],
})
export class AppServerModule {
}
|
登录后复制
服务端应用模块(习惯上叫作 AppServerModule)是一个 Angular 模块,它包装了应用的根模块 AppModule,以便 Universal 可以在你的应用和服务器之间进行协调。 AppServerModule 还会告诉 Angular 再把你的应用以 Universal 方式运行时,该如何引导它。
2、修改客户端应用模块:src/app/app.module.ts
1 2 3 4 5 6 7 8 9 10 11 12 13 14 15 16 17 18 19 20 21 22 23 24 25 26 27 28 29 30 31 32 33 | import { BrowserModule, BrowserTransferStateModule } from '@angular/platform-browser';
import { HttpClientModule } from '@angular/common/http';
import { APP_ID, Inject, NgModule, PLATFORM_ID } from '@angular/core';
import { AppComponent } from './app.component';
import { HomeComponent } from './home/home.component';
import { TransferHttpCacheModule } from '@nguniversal/common';
import { isPlatformBrowser } from '@angular/common';
import { AppRoutingModule } from './app.routes';
@NgModule({
imports: [
AppRoutingModule,
BrowserModule.withServerTransition({appId: 'my-app'}),
TransferHttpCacheModule,
BrowserTransferStateModule,
HttpClientModule
],
declarations: [
AppComponent,
HomeComponent
],
providers: [],
bootstrap: [AppComponent]
})
export class AppBrowserModule {
constructor(@Inject(PLATFORM_ID) private platformId: Object,
@Inject(APP_ID) private appId: string) {
const platform = isPlatformBrowser(platformId) ? 'in the browser' : 'on the server';
console.log(`Running ${platform} with appId=${appId}`);
}
}
|
登录后复制
将 NgModule 的元数据中 BrowserModule 的导入改成 BrowserModule.withServerTransition({appId: 'my-app'}),Angular 会把 appId 值(它可以是任何字符串)添加到服务端渲染页面的样式名中,以便它们在客户端应用启动时可以被找到并移除。
此时,我们可以通过依赖注入(@Inject(PLATFORM_ID) 及 @Inject(APP_ID))取得关于当前平台和 appId 的运行时信息:
1 2 3 4 5 6 7 | constructor(@Inject(PLATFORM_ID) private platformId: Object,
@Inject(APP_ID) private appId: string) {
const platform = isPlatformBrowser(platformId) ? 'in the browser' : 'on the server';
console.log(`Running ${platform} with appId=${appId}`);
}
|
登录后复制
3、创建服务端应用的引导程序文件:src/main.server.ts
该文件导出服务端模块:
1 | export { AppServerModule } from './app/app.server.module';
|
登录后复制
4、修改客户端应用的引导程序文件:src/main.ts
监听 DOMContentLoaded 事件,在发生 DOMContentLoaded 事件时运行我们的代码,以使 TransferState 正常工作
1 2 3 4 5 6 7 8 9 10 11 12 13 14 | import { enableProdMode } from '@angular/core';
import { platformBrowserDynamic } from '@angular/platform-browser-dynamic';
import { AppBrowserModule } from './app/app.module';
import { environment } from './environments/environment';
if (environment.production) {
enableProdMode();
}
document.addEventListener('DOMContentLoaded', () => {
platformBrowserDynamic().bootstrapModule(AppBrowserModule);
});
|
登录后复制
5、创建 TypeScript 的服务端配置:src/tsconfig.server.json
1 2 3 4 5 6 7 8 9 10 11 12 13 14 15 16 17 18 | {
"extends": "../tsconfig.json",
"compilerOptions": {
"outDir": "../out-tsc/app",
"baseUrl": "./",
"module": "commonjs",
"types": [
"node"
]
},
"exclude": [
"test.ts",
"**/*.spec.ts"
],
"angularCompilerOptions": {
"entryModule": "app/app.server.module#AppServerModule"
}
}
|
登录后复制
与 tsconfig.app.json 的差异在于:
6、修改 @angular/cli 的配置文件:.angular-cli.json
在 apps 下添加:
1 2 3 4 5 6 7 8 9 10 11 12 13 14 15 16 17 18 19 20 21 22 23 24 | {
"platform": "server",
"root": "src",
"outDir": "dist/server",
"assets": [
"assets",
"favicon.ico"
],
"index": "index.html",
"main": "main.server.ts",
"test": "test.ts",
"tsconfig": "tsconfig.server.json",
"testTsconfig": "tsconfig.spec.json",
"prefix": "",
"styles": [
"styles.scss"
],
"scripts": [],
"environmentSource": "environments/environment.ts",
"environments": {
"dev": "environments/environment.ts",
"prod": "environments/environment.prod.ts"
}
}
|
登录后复制
7、创建 Node Express 的服务程序:server.ts
1 2 3 4 5 6 7 8 9 10 11 12 13 14 15 16 17 18 19 20 21 22 23 24 25 26 27 28 29 30 31 32 33 34 35 36 37 38 39 40 41 42 43 44 45 46 47 48 49 50 51 52 53 54 55 56 57 | import 'zone.js/dist/zone-node';
import 'reflect-metadata';
import { enableProdMode } from '@angular/core';
import * as express from 'express';
import { join } from 'path';
import { readFileSync } from 'fs';
enableProdMode();
const app = express();
const PORT = process.env.PORT || 4000;
const DIST_FOLDER = join(process.cwd(), 'dist');
const template = readFileSync(join(DIST_FOLDER, 'browser', 'index.html')).toString();
const {AppServerModuleNgFactory, LAZY_MODULE_MAP} = require('./dist/server/main.bundle');
import { ngExpressEngine } from '@nguniversal/express-engine';
import { provideModuleMap } from '@nguniversal/module-map-ngfactory-loader';
app.engine('html', ngExpressEngine({
bootstrap: AppServerModuleNgFactory,
providers: [
provideModuleMap(LAZY_MODULE_MAP)
]
}));
app.set('view engine', 'html');
app.set('views', join(DIST_FOLDER, 'browser'));
app.get('*.*', express.static(join(DIST_FOLDER, 'browser'), {
maxAge: '1y'
}));
app.get('*', (req, res) => {
res.render('index', {req});
});
app.listen(PORT, () => {
console.log(`Node Express server listening on http:
});
|
登录后复制
Universal 模板引擎
这个文件中最重要的部分是 ngExpressEngine 函数:
1 2 3 4 5 6 | app.engine('html', ngExpressEngine({
bootstrap: AppServerModuleNgFactory,
providers: [
provideModuleMap(LAZY_MODULE_MAP)
]
}));
|
登录后复制
ngExpressEngine 是对 Universal 的 renderModuleFactory 函数的封装。它会把客户端请求转换成服务端渲染的 HTML 页面。如果你使用不同于Node的服务端技术,你需要在该服务端的模板引擎中调用这个函数。
ngExpressEngine 函数返回了一个会解析成渲染好的页面的承诺(Promise)。
接下来你的引擎要决定拿这个页面做点什么。 现在这个引擎的回调函数中,把渲染好的页面返回给了 Web 服务器,然后服务器通过 HTTP 响应把它转发给了客户端。
8、创建服务端预渲染的程序:prerender.ts
1 2 3 4 5 6 7 8 9 10 11 12 13 14 15 16 17 18 19 20 21 22 23 24 25 26 27 28 29 30 31 32 33 34 35 36 37 38 39 40 41 42 43 | import 'zone.js/dist/zone-node';
import 'reflect-metadata';
import { readFileSync, writeFileSync, existsSync, mkdirSync } from 'fs';
import { join } from 'path';
import { enableProdMode } from '@angular/core';
enableProdMode();
import { provideModuleMap } from '@nguniversal/module-map-ngfactory-loader';
import { renderModuleFactory } from '@angular/platform-server';
import { ROUTES } from './static.paths';
const {AppServerModuleNgFactory, LAZY_MODULE_MAP} = require('./dist/server/main.bundle');
const BROWSER_FOLDER = join(process.cwd(), 'browser');
const index = readFileSync(join('browser', 'index.html'), 'utf8');
let previousRender = Promise.resolve();
ROUTES.forEach(route => {
const fullPath = join(BROWSER_FOLDER, route);
if (!existsSync(fullPath)) {
mkdirSync(fullPath);
}
previousRender = previousRender.then(_ => renderModuleFactory(AppServerModuleNgFactory, {
document: index,
url: route,
extraProviders: [
provideModuleMap(LAZY_MODULE_MAP)
]
})).then(html => writeFileSync(join(fullPath, 'index.html'), html));
});
|
登录后复制
9、创建 Webpack 的服务端配置:webpack.server.config.js
Universal 应用不需要任何额外的 Webpack 配置,Angular CLI 会帮我们处理它们。但是由于本例子的 Node Express 的服务程序是 TypeScript 应用(server.ts及prerender.ts),所以要使用 Webpack 来转译它。这里不讨论 Webpack 的配置,需要了解的移步 Webpack官网
1 2 3 4 5 6 7 8 9 10 11 12 13 14 15 16 17 18 19 20 21 22 23 24 25 26 27 28 29 30 31 32 33 34 35 | const path = require('path');
const webpack = require('webpack');
module.exports = {
entry: {
server: './server.ts',
prerender: './prerender.ts'
},
target: 'node',
resolve: {extensions: ['.ts', '.js']},
externals: [/(node_modules|main\..*\.js)/,],
output: {
path: path.join(__dirname, 'dist'),
filename: '[name].js'
},
module: {
rules: [
{test: /\.ts$/, loader: 'ts-loader'}
]
},
plugins: [
new webpack.ContextReplacementPlugin(
/(.+)?angular(\\|\/)core(.+)?/,
path.join(__dirname, 'src'),
{}
),
new webpack.ContextReplacementPlugin(
/(.+)?express(\\|\/)(.+)?/,
path.join(__dirname, 'src'),
{}
)
]
};
|
登录后复制
测试配置
通过上面的配置,我们就制作完成一个可在服务端渲染的 Angular Universal 应用。
在 package.json 的 scripts 区配置 build 和 serve 有关的命令:
1 2 3 4 5 6 7 8 9 10 11 12 13 14 15 16 | {
"scripts": {
"ng": "ng",
"start": "ng serve -o",
"ssr": "npm run build:ssr && npm run serve:ssr",
"prerender": "npm run build:prerender && npm run serve:prerender",
"build": "ng build",
"build:client-and-server-bundles": "ng build --prod && ng build --prod --app 1 --output-hashing=false",
"build:prerender": "npm run build:client-and-server-bundles && npm run webpack:server && npm run generate:prerender",
"build:ssr": "npm run build:client-and-server-bundles && npm run webpack:server",
"generate:prerender": "cd dist && node prerender",
"webpack:server": "webpack --config webpack.server.config.js --progress --colors",
"serve:prerender": "cd dist/browser && http-server",
"serve:ssr": "node dist/server"
}
}
|
登录后复制
开发只需运行 npm run start
执行 npm run ssr 编译应用程序,并启动一个Node Express来为应用程序提供服务 http://localhost:4000
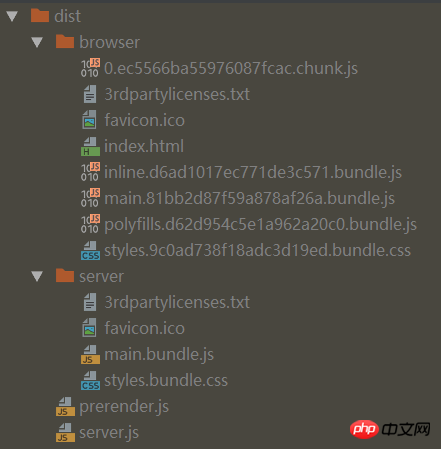
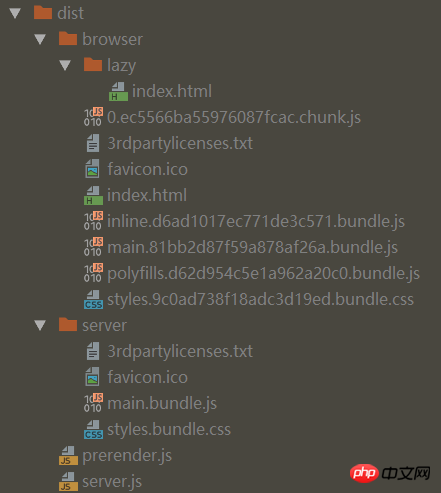
dist目录:

执行npm run prerender - 编译应用程序并预渲染应用程序文件,启动一个演示http服务器,以便您可以查看它 http://localhost:8080
注意: 要将静态网站部署到静态托管平台,您必须部署dist/browser文件夹, 而不是dist文件夹
dist目录:
根据项目实际的路由信息并在根目录的 static.paths.ts 中配置,提供给 prerender.ts 解析使用。
1 2 3 4 | export const ROUTES = [
'/',
'/lazy'
];
|
登录后复制
因此,从dist目录可以看到,服务端预渲染会根据配置好的路由在 browser 生成对应的静态index.html。如 / 对应 /index.html,/lazy 对应 /lazy/index.html。
服务端的模块懒加载
在前面的介绍中,我们在 app.server.module.ts 中导入了 ModuleMapLoaderModule,在 app.module.ts。
ModuleMapLoaderModule 模块可以使得懒加载的模块也可以在服务端进行渲染,而你要做也只是在 app.server.module.ts 中导入。
服务端到客户端的状态传输
在前面的介绍中,我们在 app.server.module.ts 中导入了 ServerTransferStateModule,在 app.module.ts 中导入了 BrowserTransferStateModule 和 TransferHttpCacheModule。
这三个模块都与服务端到客户端的状态传输有关:
ServerTransferStateModule:在服务端导入,用于实现将状态从服务端传输到客户端
BrowserTransferStateModule:在客户端导入,用于实现将状态从服务端传输到客户端
TransferHttpCacheModule:用于实现服务端到客户端的请求传输缓存,防止客户端重复请求服务端已完成的请求
使用这几个模块,可以解决 http请求在服务端和客户端分别请求一次 的问题。
比如在 home.component.ts 中有如下代码:
1 2 3 4 5 6 7 8 9 10 11 12 13 14 15 16 17 18 19 20 21 22 23 24 25 26 | import { Component, OnDestroy, OnInit } from '@angular/core';
import { HttpClient } from '@angular/common/http';
import { Observable } from 'rxjs/Observable';
@Component({
selector: 'app-home',
templateUrl: './home.component.html',
styleUrls: ['./home.component.scss']
})
export class HomeComponent implements OnInit, OnDestroy {
constructor(public http: HttpClient) {
}
ngOnInit() {
this.poiSearch(this.keyword, '北京市').subscribe((data: any) => {
console.log(data);
});
}
ngOnDestroy() {
}
poiSearch(text: string, city?: string): Observable<any> {
return this.http.get(encodeURI(`http:
}
}
|
登录后复制
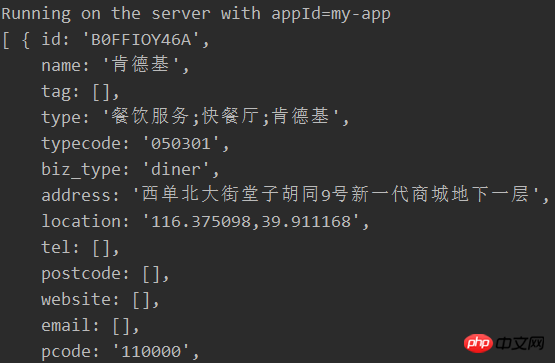
代码运行之后,
服务端请求并打印:
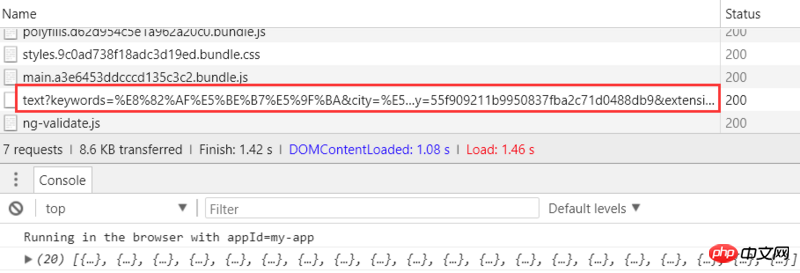
客户端再一次请求并打印:
方法1:使用 TransferHttpCacheModule
使用 TransferHttpCacheModule 很简单,代码不需要改动。在 app.module.ts 中导入之后,Angular自动会将服务端请求缓存到客户端,换句话说就是服务端请求到数据会自动传输到客户端,客户端接收到数据之后就不会再发送请求了。
方法2:使用 BrowserTransferStateModule
该方法稍微复杂一些,需要改动一些代码。
调整 home.component.ts 代码如下:
1 2 3 4 5 6 7 8 9 10 11 12 13 14 15 16 17 18 19 20 21 22 23 24 25 26 27 28 29 30 31 32 33 34 35 36 37 38 39 40 | import { Component, OnDestroy, OnInit } from '@angular/core';
import { makeStateKey, TransferState } from '@angular/platform-browser';
import { HttpClient } from '@angular/common/http';
import { Observable } from 'rxjs/Observable';
const KFCLIST_KEY = makeStateKey('kfcList');
@Component({
selector: 'app-home',
templateUrl: './home.component.html',
styleUrls: ['./home.component.scss']
})
export class HomeComponent implements OnInit, OnDestroy {
constructor(public http: HttpClient,
private state: TransferState) {
}
ngOnInit() {
const kfcList:any[] = this.state.get(KFCLIST_KEY, null as any);
if (!this.kfcList) {
this.poiSearch(this.keyword, '北京市').subscribe((data: any) => {
console.log(data);
this.state.set(KFCLIST_KEY, data as any);
});
}
}
ngOnDestroy() {
if (typeof window === 'object') {
this.state.set(KFCLIST_KEY, null as any);
}
}
poiSearch(text: string, city?: string): Observable<any> {
return this.http.get(encodeURI(`http:
}
}
|
登录后复制
使用 const KFCLIST_KEY = makeStateKey('kfcList') 创建储存传输数据的 StateKey
在 HomeComponent 的构造函数中注入 TransferState
在 ngOnInit 中根据 this.state.get(KFCLIST_KEY, null as any) 判断数据是否存在(不管是服务端还是客户端),存在就不再请求,不存在则请求数据并通过 this.state.set(KFCLIST_KEY, data as any) 存储传输数据
在 ngOnDestroy 中根据当前是否客户端来决定是否将存储的数据进行删除
客户端与服务端渲染对比
最后,我们分别通过这三个原因来进行对比:
帮助网络爬虫(SEO)
提升在手机和低功耗设备上的性能
迅速显示出首页
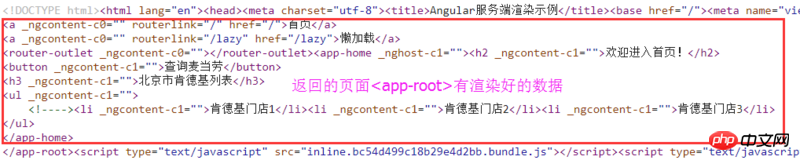
帮助网络爬虫(SEO)
客户端渲染:
服务端渲染:
从上面可以看到,服务端提前将信息渲染到返回的页面上,这样网络爬虫就能直接获取到信息了(网络爬虫基本不会解析javascript的)。
提升在手机和低功耗设备上的性能
这个原因通过上面就可以看出,对于一些低端的设备,直接显示页面总比要解析javascript性能高的多。
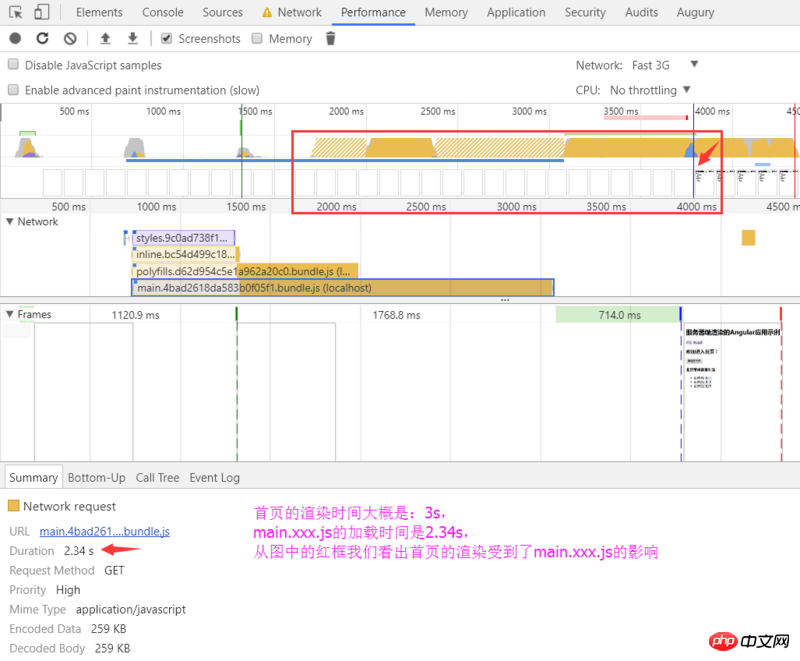
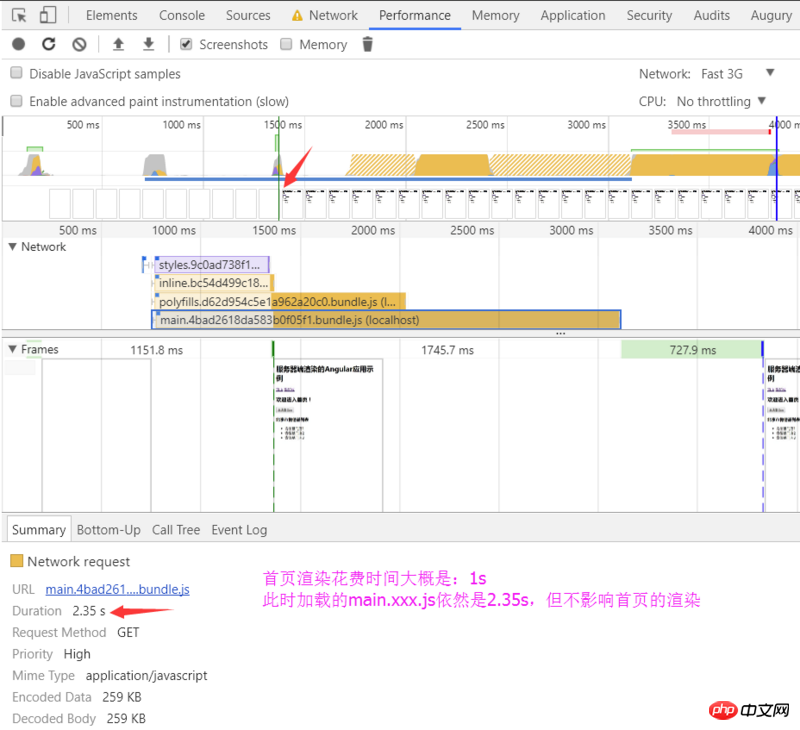
迅速显示出首页
同样在 Fast 3G 网络条件下进行测试
客户端渲染:
服务端渲染:
牢记几件事情
对于服务器软件包,您可能需要将第三方模块包含到nodeExternals白名单中
window, document, navigator 以及其它的浏览器类型 - 不存在于服务端 - 如果你直接使用,在服务端将无法正常工作。 以下几种方法可以让你的代码正常工作:
1 2 3 | - 尽量**限制**或**避免**使用`setTimeout`。它会减慢服务器端的渲染过程。确保在组件的`ngOnDestroy`中删除它们
- 对于RxJs超时,请确保在成功时 _取消_ 它们的流,因为它们也会降低渲染速度。
|
登录后复制
1 2 3 | constructor(element: ElementRef, renderer: Renderer2) {
this.renderer.setStyle(element.nativeElement, 'font-size', 'x-large');
}
|
登录后复制
相关推荐:
Angular开发实践(五):深入解析变化监测
Angular开发实践(四):组件之间的交互
以上是Angular开发实践(六):服务端渲染 的详细内容。更多信息请关注PHP中文网其他相关文章!