重复使用Vue构建的分页组件
这次给大家带来重复使用Vue构建的分页组件,重复使用Vue构建分页组件的注意事项有哪些,下面就是实战案例,一起来看一下。
基本结构
分页组件应该允许用户访问第一个和最后一个页面,向前和向后移动,并直接切换到近距离的页面。
大多数应用程序在用户每次更改页面时都会发出API请求。我们需要确保组件允许这样做,但是我们不希望在组件内发出这样的请求。这样,我们将确保组件在整个应用程序中是可重用的,并且请求都是在操作或服务层中进行的。我们可以通过使用用户单击的页面的数字触发事件来实现此目的。
有几种可能的方法来实现API端点上的分页。对于这个例子,我们假设API告诉我们每个页面的结果数、页面总数和当前页面。这些将是我们的动态 props 。
相反,如果API只告诉记录的总数,那么我们可以通过将结果的数量除以每一页的结果数来计算页数: totalResults / resultsPerPage 。
我们想要渲染一个按钮到 第一页 、 上一页 、 页面数量范围 、 下一页 和 最后一页 :
[first] [next] [1] [2] [3] [previous] [last]
比如像下图这样的一个效果:

尽管我们希望渲染一个系列的页面,但并不希望渲染所有可用页面。让我们允许在我们的组件中设置一个最多可见按钮的 props 。
既然我们知道了我们想要的组件要做成什么,需要哪些数据,我们就可以设置HTML结构和所需要的 props 。
<template id="pagination">
  <ul class="pagination">
    <li>
      <button type="button">« First</button>
    </li>
    <li>
      <button type="button">«</button>
    </li>
    <!-- 页数的范围 -->
    <li>
      <button type="button">Next »</button>
    </li>
    <li>
      <button type="button">»</button>
    </li>
  </ul>
</template>
Vue.component('pagination', {
  template: '#pagination',
  props: {
    maxVisibleButtons: {
      type: Number,
      required: false,
      default: 3
    },
    totalPages: {
      type: Number,
      required: true
    },
    total: {
      type: Number,
      required: true
    },
    currentPage: {
      type: Number,
      required: true
    }
  }
})上面的代码注册了一个 pagination 组件,如果调用这个组件:
<p id="app">
  <pagination></pagination>
</p>
这个时候看到的效果如下:

注意,为了能让组件看上去好看一点,给组件添加了一点样式。
事件监听
现在我们需要通知父组件,当用户单击按钮时,用户点击了哪个按钮。
我们需要为每个按钮添加一个事件监听器。 v-on 指令 允许侦听DOM事件。在本例中,我将使用 v-on 的快捷键 来侦听单击事件。
为了通知父节点,我们将使用 $emit 方法 来发出一个带有页面点击的事件。
我们还要确保分页按钮只有在页面可用时才唯一一个当前状态。为了这样做,将使用 v-bind 将 disabled 属性的值与当前页面绑定。我们还是使用 :v-bind 的快捷键 : 。
为了保持我们的 template 干净,将使用 computed 属性 来检查按钮是否被禁用。使用 computed 也会被缓存,这意味着只要 currentPage 不会更改,对相同计算属性的几个访问将返回先前计算的结果,而不必再次运行该函数。
<template id="pagination">
  <ul class="pagination">
    <li>
      <button type="button" @click="onClickFirstPage" :disabled="isInFirstPage">« First</button>
    </li>
    <li>
      <button type="button" @click="onClickPreviousPage" :disabled="isInFirstPage">«</button>
    </li>
    <li v-for="page in pages">
      <button type="button" @click="onClickPage(page.name)" :disabled="page.isDisabled"> {{ page.name }}</button>
    </li>
    <li>
      <button type="button" @click="onClickNextPage" :disabled="isInLastPage">Next »</button>
    </li>
    <li>
      <button type="button" @click="onClickLastPage" :disabled="isInLastPage">»</button>
    </li>
  </ul>
</template>
Vue.component('pagination', {
  template: '#pagination',
  props: {
    maxVisibleButtons: {
      type: Number,
      required: false,
      default: 3
    },
    totalPages: {
      type: Number,
      required: true
    },
    total: {
      type: Number,
      required: true
    },
    currentPage: {
      type: Number,
      required: true
    }
  },
  computed: {
    isInFirstPage: function () {
      return this.currentPage === 1
    },
    isInLastPage: function () {
      return this.currentPage === this.totalPages
    }
  },
  methods: {
    onClickFirstPage: function () {
      this.$emit('pagechanged', 1)
    },
    onClickPreviousPage: function () {
      this.$emit('pagechanged', this.currentPage - 1)
    },
    onClickPage: function (page) {
      this.$emit('pagechanged', page)
    },
    onClickNextPage: function () {
      this.$emit('pagechanged', this.currentPage + 1)
    },
    onClickLastPage: function () {
      this.$emit('pagechanged', this.totalPages)
    }
  }
})在调用 pagination 组件时,将 totalPages 和 total 以及 currentPage 传到组件中:
<p id="app">
  <pagination :total-pages="11" :total="120" :current-page="currentPage"></pagination>
</p>
let app = new Vue({
  el: '#app',
  data () {
    return {
      currentPage: 2
    }
  }
})运行上面的代码,将会报错:

不难发现,在 pagination 组件中,咱们还少了 pages 。从前面介绍的内容,我们不难发现,需要计算出 pages 的值。
Vue.component('pagination', {
  template: '#pagination',
  props: {
    maxVisibleButtons: {
      type: Number,
      required: false,
      default: 3
    },
    totalPages: {
      type: Number,
      required: true
    },
    total: {
      type: Number,
      required: true
    },
    currentPage: {
      type: Number,
      required: true
    }
  },
  computed: {
    isInFirstPage: function () {
      return this.currentPage === 1
    },
    isInLastPage: function () {
      return this.currentPage === this.totalPages
    },
    startPage: function () {
      if (this.currentPage === 1) {
        return 1
      }
      if (this.currentPage === this.totalPages) {
        return this.totalPages - this.maxVisibleButtons + 1
      }
      return this.currentPage - 1
    },
    endPage: function () {
      return Math.min(this.startPage + this.maxVisibleButtons - 1, this.totalPages)
    },
    pages: function () {
      const range = []
      for (let i = this.startPage; i <= this.endPage; i+=1) {
        range.push({
          name: i,
          isDisabled: i === this.currentPage
        })
      }
      return range
    }
  },
  methods: {
    onClickFirstPage: function () {
      this.$emit('pagechanged', 1)
    },
    onClickPreviousPage: function () {
      this.$emit('pagechanged', this.currentPage - 1)
    },
    onClickPage: function (page) {
      this.$emit('pagechanged', page)
    },
    onClickNextPage: function () {
      this.$emit('pagechanged', this.currentPage + 1)
    },
    onClickLastPage: function () {
      this.$emit('pagechanged', this.totalPages)
    }
  }
})这个时候得到的结果不再报错,你在浏览器中将看到下图这样的效果:

添加样式
现在我们的组件实现了最初想要的所有功能,而且添加了一些样式,让它看起来更像一个分页组件,而不仅像是一个列表。
我们还希望用户能够清楚地识别他们所在的页面。让我们改变表示当前页面的按钮的颜色。
为此,我们可以使用对象语法将HTML类绑定到当前页面按钮上。当使用对象语法绑定类名时,Vue将在值发生变化时自动切换类。
虽然 v-for 中的每个块都可以访问父作用域范围,但是我们将使用 method 来检查页面是否处于 active 状态,以便保持我们的 templage 干净。
Vue.component('pagination', {
  template: '#pagination',
  props: {
    maxVisibleButtons: {
      type: Number,
      required: false,
      default: 3
    },
    totalPages: {
      type: Number,
      required: true
    },
    total: {
      type: Number,
      required: true
    },
    currentPage: {
      type: Number,
      required: true
    }
  },
  computed: {
    isInFirstPage: function () {
      return this.currentPage === 1
    },
    isInLastPage: function () {
      return this.currentPage === this.totalPages
    },
    startPage: function () {
      if (this.currentPage === 1) {
        return 1
      }
      if (this.currentPage === this.totalPages) {
        return this.totalPages - this.maxVisibleButtons + 1
      }
      return this.currentPage - 1
    },
    endPage: function () {
      return Math.min(this.startPage + this.maxVisibleButtons - 1, this.totalPages)
    },
    pages: function () {
      const range = []
      for (let i = this.startPage; i <= this.endPage; i+=1) {
        range.push({
          name: i,
          isDisabled: i === this.currentPage
        })
      }
      return range
    }
  },
  methods: {
    onClickFirstPage: function () {
      this.$emit('pagechanged', 1)
    },
    onClickPreviousPage: function () {
      this.$emit('pagechanged', this.currentPage - 1)
    },
    onClickPage: function (page) {
      this.$emit('pagechanged', page)
    },
    onClickNextPage: function () {
      this.$emit('pagechanged', this.currentPage + 1)
    },
    onClickLastPage: function () {
      this.$emit('pagechanged', this.totalPages)
    },
    isPageActive: function (page) {
      return this.currentPage === page;
    }
  }
})接下来,在 pages 中添加当前状态:
<li v-for="page in pages">
  <button type="button" @click="onClickPage(page.name)" :disabled="page.isDisabled" :class="{active: isPageActive(page.name)}"> {{ page.name }}</button>
</li>这个时候你看到效果如下:

但依然还存在一点点小问题,当你在点击别的按钮时, active 状态并不会随着切换:

继续添加代码改变其中的效果:
let app = new Vue({
  el: '#app',
  data () {
    return {
      currentPage: 2
    }
  },
  methods: {
    onPageChange: function (page) {
      console.log(page)
      this.currentPage = page;
    }
  }
})在调用组件时:
<p id="app">
  <pagination :total-pages="11" :total="120" :current-page="currentPage" @pagechanged="onPageChange"></pagination>
</p>
这个时候的效果如下了:

到这里,基本上实现了咱想要的分页组件效果。
无障碍化处理
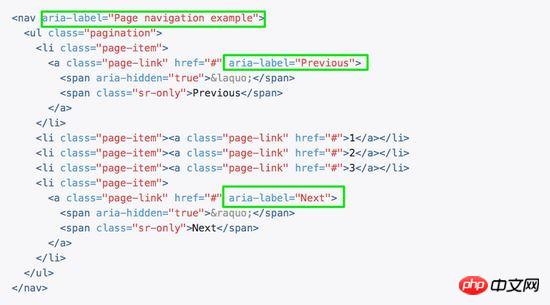
熟悉Bootstrap的同学都应该知道,Bootstrap中的组件都做了无障碍化的处理,就是在组件中添加了WAI-ARIA相关的设计。比如在分页按钮上添加 aria-label 相关属性:

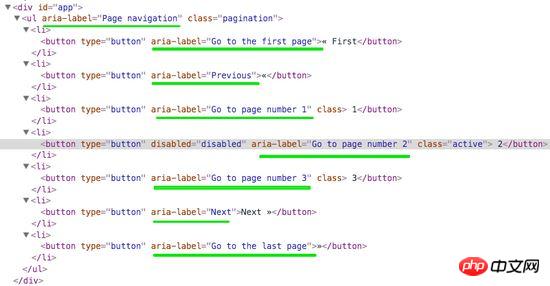
在我们这个组件中,也相应的添加有关于WAI-ARIA相关的处理:
<template id="pagination">
  <ul class="pagination" aria-label="Page navigation">
    <li>
      <button type="button" @click="onClickFirstPage" :disabled="isInFirstPage" aria-label="Go to the first page">« First</button>
    </li>
    <li>
      <button type="button" @click="onClickPreviousPage" :disabled="isInFirstPage" aria-label="Previous">«</button>
    </li>
    <li v-for="page in pages">
      <button type="button" @click="onClickPage(page.name)" :disabled="page.isDisabled" :aria-label="`Go to page number ${page.name}`"> {{ page.name }}</button>
    </li>
    <li>
      <button type="button" @click="onClickNextPage" :disabled="isInLastPage" aria-label="Next">Next »</button>
    </li>
    <li>
      <button type="button" @click="onClickLastPage" :disabled="isInLastPage" aria-label="Go to the last page">»</button>
    </li>
  </ul>
</template>这样有关于 aria 相关的属性就加上了:

相信看了本文案例你已经掌握了方法,更多精彩请关注php中文网其它相关文章!
推荐阅读:
以上是重复使用Vue构建的分页组件的详细内容。更多信息请关注PHP中文网其他相关文章!

热AI工具

Undresser.AI Undress
人工智能驱动的应用程序,用于创建逼真的裸体照片

AI Clothes Remover
用于从照片中去除衣服的在线人工智能工具。

Undress AI Tool
免费脱衣服图片

Clothoff.io
AI脱衣机

AI Hentai Generator
免费生成ai无尽的。

热门文章

热工具

记事本++7.3.1
好用且免费的代码编辑器

SublimeText3汉化版
中文版,非常好用

禅工作室 13.0.1
功能强大的PHP集成开发环境

Dreamweaver CS6
视觉化网页开发工具

SublimeText3 Mac版
神级代码编辑软件(SublimeText3)

热门话题
 如何安装Win10旧版本组件DirectPlay
Dec 28, 2023 pm 03:43 PM
不少用户在玩win10的的一些游戏的时候总是会遇到一些问题,比如说卡屏和花屏等等情况,这个时候我们是可以采用打开directplay这个功能来解决的,而且功能的操作方法也很简单。win10旧版组件directplay怎么安装1、在搜索框里面输入“控制面板”然后打开2、查看方式选择大图标3、找到“程序和功能”4、点击左侧的启用或关闭win功能5、选择旧版这里的勾选上就可以了
 Angular组件及其显示属性:了解非block默认值
Mar 15, 2024 pm 04:51 PM
Angular框架中组件的默认显示行为不是块级元素。这种设计选择促进了组件样式的封装,并鼓励开发人员有意识地定义每个组件的显示方式。通过显式设置CSS属性 display,Angular组件的显示可以完全控制,从而实现所需的布局和响应能力。
 如何使用 JavaScript 实现表格分页功能?
Oct 20, 2023 pm 06:19 PM
如何使用JavaScript实现表格分页功能?随着互联网的发展,越来越多的网站都会使用表格来展示数据。在一些数据量较大的情况下,需要将数据进行分页展示,以提升用户体验。本文将介绍如何使用JavaScript实现表格分页功能,并提供具体的代码示例。一、HTML结构首先,我们需要准备一个HTML结构来承载表格和分页按钮。我们可以使用<tab
 如何打开win10旧版组件的设置
Dec 22, 2023 am 08:45 AM
win10旧版组件是需要用户自己去设置里面打开的,因为很多的组件平时都是默认关闭的状态,首先我们需要进入到设置里面,操作很简单,跟着下面的步骤来就可以了win10旧版组件在哪里打开1、点击开始,然后点击“win系统”2、点击进入控制面板3、再点击下面的程序4、点击“启用或关闭win功能”5、在这里就可以选择你要的打开了
 MyBatis分页插件原理详解
Feb 22, 2024 pm 03:42 PM
MyBatis是一个优秀的持久层框架,它支持基于XML和注解的方式操作数据库,简单易用,同时也提供了丰富的插件机制。其中,分页插件是使用频率较高的插件之一。本文将深入探讨MyBatis分页插件的原理,并结合具体的代码示例进行说明。一、分页插件原理MyBatis本身并不提供原生的分页功能,但可以借助插件来实现分页查询。分页插件的原理主要是通过拦截MyBatis
 Vue组件实战:分页组件开发
Nov 24, 2023 am 08:56 AM
Vue组件实战:分页组件开发介绍在Web应用程序中,分页功能是必不可少的一个组件。一个好的分页组件应该展示简洁明了,功能丰富,而且易于集成和使用。在本文中,我们将介绍如何使用Vue.js框架来开发一个高度可定制化的分页组件。我们将通过代码示例来详细说明如何使用Vue组件开发。技术栈Vue.js2.xJavaScript(ES6)HTML5和CSS3开发环
 Vue中如何处理组件的动态加载和切换
Oct 15, 2023 pm 04:34 PM
Vue中处理组件的动态加载和切换Vue是一个流行的JavaScript框架,它提供了各种灵活的功能来处理组件的动态加载和切换。在本文中,我们将讨论一些Vue中处理组件动态加载和切换的方法,并提供具体的代码示例。动态加载组件是指根据需要在运行时动态加载组件。这样可以提高应用程序的性能和加载速度,因为只有当需要时才会加载相关的组件。Vue提供了async和awa
 构建流畅无阻:如何正确配置Maven镜像地址
Feb 20, 2024 pm 08:48 PM
构建流畅无阻:如何正确配置Maven镜像地址在使用Maven构建项目时,配置正确的镜像地址是非常重要的。正确配置镜像地址可以加快项目构建的速度,避免网络延迟等问题。本文将介绍如何正确配置Maven镜像地址,并给出具体的代码示例。为什么需要配置Maven镜像地址Maven是一个项目管理工具,可以自动化构建项目、管理依赖、生成报告等。在Maven构建项目时,通常


