

如何使用vue配置多页面
这次给大家带来如何使用vue配置多页面,使用vue配置多页面的注意事项有哪些,下面就是实战案例,一起来看一下。
1.安装环境
①安装node.js 并添加入环境变量PATH
②安装淘宝NPM镜像
$ npm install -g cnpm --registry=https://registry.npm.taobao.org
③安装webpack
npm install webpack -g
④安装vue-cli脚手架
npm install -g vue-cli
⑤创建项目模板 vue init wepack vue-multipage-demo
⑥cmd进入到要放项目的文件夹
⑦安装 cnpm install
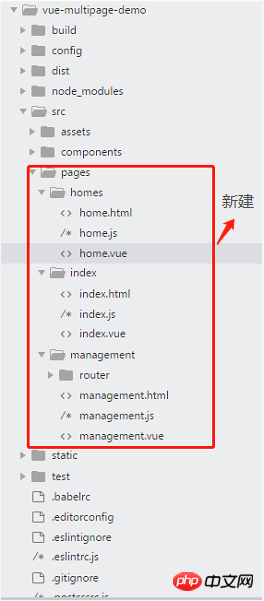
2.目录结构调整

3.配置文件修改
①添加依赖 glob (返回目录中的所有子文件)
npm install glob
②修改build文件夹中的utils.js文件
//新增代码
var glob = require('glob');
// 页面模板
var HtmlWebpackPlugin = require('html-webpack-plugin');
// 取得相应的页面路径,因为之前的配置,所以是src文件夹下的pages文件夹
var PAGE_PATH = path.resolve(dirname, '../src/pages');
// 用于做相应的merge处理
var merge = require('webpack-merge');
//多入口配置
// 通过glob模块读取pages文件夹下的所有对应文件夹下的js后缀文件,如果该文件存在
// 那么就作为入口处理
exports.entries = function () {
 var entryFiles = glob.sync(PAGE_PATH + '/*/*.js')
 var map = {}
 entryFiles.forEach((filePath) => {
  var filename = filePath.substring(filePath.lastIndexOf('\/') + 1, filePath.lastIndexOf('.'))
  map[filename] = filePath
 })
 return map
}
//多页面输出配置
// 与上面的多页面入口配置相同,读取pages文件夹下的对应的html后缀文件,然后放入数组中
exports.htmlPlugin = function () {
 let entryHtml = glob.sync(PAGE_PATH + '/*/*.html')
 let arr = []
 entryHtml.forEach((filePath) => {
  let filename = filePath.substring(filePath.lastIndexOf('\/') + 1, filePath.lastIndexOf('.'))
  let conf = {
   // 模板来源
   template: filePath,
   // 文件名称
   filename: filename + '.html',
   // 页面模板需要加对应的js脚本,如果不加这行则每个页面都会引入所有的js脚本
   chunks: ['manifest', 'vendor', filename],
   inject: true
  }
  if (process.env.NODE_ENV === 'production') {
   conf = merge(conf, {
    minify: {
     removeComments: true,
     collapseWhitespace: true,
     removeAttributeQuotes: true
    },
    chunksSortMode: 'dependency'
   })
  }
  arr.push(new HtmlWebpackPlugin(conf))
 })
 return arr
}③修改webpack.base.conf.js文件
function resolve (dir) {
 return path.join(dirname, '..', dir)
}
const createLintingRule = () => ({
 test: /\.(js|vue)$/,
 loader: 'eslint-loader',
 enforce: 'pre',
 include: [resolve('src'), resolve('test')],
 options: {
 formatter: require('eslint-friendly-formatter'),
 emitWarning: !config.dev.showEslintErrorsInOverlay
 }
})
module.exports = {
 context: path.resolve(dirname, '../'),
//注释代码开始
 // entry: {
 // app: './src/main.js'
 // },
//注释代码结束
//新增代码开始
 entry: utils.entries(),
//新增代码结束
 output: {
 path: config.build.assetsRoot,
 filename: '[name].js',
 publicPath: process.env.NODE_ENV === 'production'
  ? config.build.assetsPublicPath
  : config.dev.assetsPublicPath
 },
 resolve: {
 extensions: ['.js', '.vue', '.json'],
 alias: {
  'vue$': 'vue/dist/vue.esm.js',
  '@': resolve('src'),
 }
 },
 module: {
 rules: [
  ...(config.dev.useEslint ? [createLintingRule()] : []),
  {
  test: /\.vue$/,
  loader: 'vue-loader',
  options: vueLoaderConfig
  },
  {
  test: /\.js$/,
  loader: 'babel-loader',
  include: [resolve('src'), resolve('test'), resolve('node_modules/webpack-dev-server/client')]
  },
  {
  test: /\.(png|jpe?g|gif|svg)(\?.*)?$/,
  loader: 'url-loader',
  options: {
   limit: 10000,
   name: utils.assetsPath('img/[name].[hash:7].[ext]')
  }
  },
  {
  test: /\.(mp4|webm|ogg|mp3|wav|flac|aac)(\?.*)?$/,
  loader: 'url-loader',
  options: {
   limit: 10000,
   name: utils.assetsPath('media/[name].[hash:7].[ext]')
  }
  },
  {
  test: /\.(woff2?|eot|ttf|otf)(\?.*)?$/,
  loader: 'url-loader',
  options: {
   limit: 10000,
   name: utils.assetsPath('fonts/[name].[hash:7].[ext]')
  }
  }
 ]
 },
 node: {
 // prevent webpack from injecting useless setImmediate polyfill because Vue
 // source contains it (although only uses it if it's native).
 setImmediate: false,
 // prevent webpack from injecting mocks to Node native modules
 // that does not make sense for the client
 dgram: 'empty',
 fs: 'empty',
 net: 'empty',
 tls: 'empty',
 child_process: 'empty'
 }
}④修改webpack.dev.conf.js文件
 plugins: [
 new webpack.DefinePlugin({
  'process.env': require('../config/dev.env')
 }),
 new webpack.HotModuleReplacementPlugin(),
 new webpack.NamedModulesPlugin(), // HMR shows correct file names in console on update.
 new webpack.NoEmitOnErrorsPlugin(),
 // https://github.com/ampedandwired/html-webpack-plugin
 //多页面输出配置
 //注释代码开始
  // new HtmlWebpackPlugin({
  // filename: 'index.html',
  // template: 'index.html',
  // inject: true
  // }),
 //注释代码结束
 // copy custom static assets
 new CopyWebpackPlugin([
  {
  from: path.resolve(dirname, '../static'),
  to: config.dev.assetsSubDirectory,
  ignore: ['.*']
  }
 ])
 //新增代码开始
 ].concat(utils.htmlPlugin())
 //新增代码结束
})⑤修改webpack.prod.conf.js文件
   'use strict'
 const path = require('path')
 const utils = require('./utils')
 const webpack = require('webpack')
 const config = require('../config')
 const merge = require('webpack-merge')
 const baseWebpackConfig = require('./webpack.base.conf')
 const CopyWebpackPlugin = require('copy-webpack-plugin')
 const HtmlWebpackPlugin = require('html-webpack-plugin')
 const ExtractTextPlugin = require('extract-text-webpack-plugin')
 const OptimizeCSSPlugin = require('optimize-css-assets-webpack-plugin')
 const UglifyJsPlugin = require('uglifyjs-webpack-plugin')
 const env = process.env.NODE_ENV === 'testing'
  ? require('../config/test.env')
  : require('../config/prod.env')
 const webpackConfig = merge(baseWebpackConfig, {
  module: {
  rules: utils.styleLoaders({
   sourceMap: config.build.productionSourceMap,
   extract: true,
   usePostCSS: true
  })
  },
  devtool: config.build.productionSourceMap ? config.build.devtool : false,
  output: {
  path: config.build.assetsRoot,
  filename: utils.assetsPath('js/[name].[chunkhash].js'),
  chunkFilename: utils.assetsPath('js/[id].[chunkhash].js')
  },
  plugins: [
  // http://vuejs.github.io/vue-loader/en/workflow/production.html
  new webpack.DefinePlugin({
   'process.env': env
  }),
  new UglifyJsPlugin({
   uglifyOptions: {
   compress: {
    warnings: false
   }
   },
   sourceMap: config.build.productionSourceMap,
   parallel: true
  }),
  // extract css into its own file
  new ExtractTextPlugin({
   filename: utils.assetsPath('css/[name].[contenthash].css'),
   // Setting the following option to `false` will not extract CSS from codesplit chunks.
   // Their CSS will instead be inserted dynamically with style-loader when the codesplit chunk has been loaded by webpack.
   // It's currently set to `true` because we are seeing that sourcemaps are included in the codesplit bundle as well when it's `false`,
   // increasing file size: https://github.com/vuejs-templates/webpack/issues/1110
   allChunks: true,
  }),
  // Compress extracted CSS. We are using this plugin so that possible
  // duplicated CSS from different components can be deduped.
  new OptimizeCSSPlugin({
   cssProcessorOptions: config.build.productionSourceMap
   ? { safe: true, map: { inline: false } }
   : { safe: true }
  }),
  // generate dist index.html with correct asset hash for caching.
  // you can customize output by editing /index.html
  // see https://github.com/ampedandwired/html-webpack-plugin
  //注释代码开始
  // new HtmlWebpackPlugin({
  // filename: process.env.NODE_ENV === 'testing'
  //  ? 'index.html'
  //  : config.build.index,
  // template: 'index.html',
  // inject: true,
  // minify: {
  //  removeComments: true,
  //  collapseWhitespace: true,
  //  removeAttributeQuotes: true
  //  // more options:
  //  // https://github.com/kangax/html-minifier#options-quick-reference
  // },
   // necessary to consistently work with multiple chunks via CommonsChunkPlugin
  // chunksSortMode: 'dependency'
  // }),
  //注释代码结束
  // keep module.id stable when vendor modules does not change
  new webpack.HashedModuleIdsPlugin(),
  // enable scope hoisting
  new webpack.optimize.ModuleConcatenationPlugin(),
  // split vendor js into its own file
  new webpack.optimize.CommonsChunkPlugin({
   name: 'vendor',
   minChunks (module) {
   // any required modules inside node_modules are extracted to vendor
   return (
    module.resource &&
    /\.js$/.test(module.resource) &&
    module.resource.indexOf(
    path.join(dirname, '../node_modules')
    ) === 0
   )
   }
  }),
  // extract webpack runtime and module manifest to its own file in order to
  // prevent vendor hash from being updated whenever app bundle is updated
  new webpack.optimize.CommonsChunkPlugin({
   name: 'manifest',
   minChunks: Infinity
  }),
  // This instance extracts shared chunks from code splitted chunks and bundles them
  // in a separate chunk, similar to the vendor chunk
  // see: https://webpack.js.org/plugins/commons-chunk-plugin/#extra-async-commons-chunk
  new webpack.optimize.CommonsChunkPlugin({
   name: 'app',
   async: 'vendor-async',
   children: true,
   minChunks: 3
  }),
  // copy custom static assets
  new CopyWebpackPlugin([
   {
   from: path.resolve(dirname, '../static'),
   to: config.build.assetsSubDirectory,
   ignore: ['.*']
   }
  ])
  //修改代码开始
  ].concat(utils.htmlPlugin())
  //修改代码结束
 })
 if (config.build.productionGzip) {
  const CompressionWebpackPlugin = require('compression-webpack-plugin')
  webpackConfig.plugins.push(
  new CompressionWebpackPlugin({
   asset: '[path].gz[query]',
   algorithm: 'gzip',
   test: new RegExp(
   '\\.(' +
   config.build.productionGzipExtensions.join('|') +
   ')$'
   ),
   threshold: 10240,
   minRatio: 0.8
  })
  )
 }
 if (config.build.bundleAnalyzerReport) {
  const BundleAnalyzerPlugin = require('webpack-bundle-analyzer').BundleAnalyzerPlugin
  webpackConfig.plugins.push(new BundleAnalyzerPlugin())
 }
module.exports = webpackConfig相信看了本文案例你已经掌握了方法,更多精彩请关注php中文网其它相关文章!
推荐阅读:
以上是如何使用vue配置多页面的详细内容。更多信息请关注PHP中文网其他相关文章!

热AI工具

Undresser.AI Undress
人工智能驱动的应用程序,用于创建逼真的裸体照片

AI Clothes Remover
用于从照片中去除衣服的在线人工智能工具。

Undress AI Tool
免费脱衣服图片

Clothoff.io
AI脱衣机

AI Hentai Generator
免费生成ai无尽的。

热门文章
热工具

记事本++7.3.1
好用且免费的代码编辑器

SublimeText3汉化版
中文版,非常好用

禅工作室 13.0.1
功能强大的PHP集成开发环境

Dreamweaver CS6
视觉化网页开发工具

SublimeText3 Mac版
神级代码编辑软件(SublimeText3)
热门话题


 crystaldiskmark是什么软件?-crystaldiskmark如何使用?
Mar 18, 2024 pm 02:58 PM
crystaldiskmark是什么软件?-crystaldiskmark如何使用?
Mar 18, 2024 pm 02:58 PM
CrystalDiskMark是一款适用于硬盘的小型HDD基准测试工具,可以快速测量顺序和随机读/写速度。接下来就让小编为大家介绍一下CrystalDiskMark,以及crystaldiskmark如何使用吧~一、CrystalDiskMark介绍CrystalDiskMark是一款广泛使用的磁盘性能测试工具,用于评估机械硬盘和固态硬盘(SSD)的读写速度和随机I/O性能。它是一款免费的Windows应用程序,并提供用户友好的界面和各种测试模式来评估硬盘驱动器性能的不同方面,并被广泛用于硬件评
 Linux系统中GDM的工作原理及配置方法
Mar 01, 2024 pm 06:36 PM
Linux系统中GDM的工作原理及配置方法
Mar 01, 2024 pm 06:36 PM
标题:Linux系统中GDM的工作原理及配置方法在Linux操作系统中,GDM(GNOMEDisplayManager)是一种常见的显示管理器,用于控制图形用户界面(GUI)登录和用户会话管理。本文将介绍GDM的工作原理和配置方法,以及提供具体的代码示例。一、GDM的工作原理GDM是GNOME桌面环境下的显示管理器,负责启动X服务器并提供登录界面,用户输
 foobar2000怎么下载?-foobar2000怎么使用
Mar 18, 2024 am 10:58 AM
foobar2000怎么下载?-foobar2000怎么使用
Mar 18, 2024 am 10:58 AM
foobar2000是一款能随时收听音乐资源的软件,各种音乐无损音质带给你,增强版本的音乐播放器,让你得到更全更舒适的音乐体验,它的设计理念是将电脑端的高级音频播放器移植到手机上,提供更加便捷高效的音乐播放体验,界面设计简洁明了易于使用它采用了极简的设计风格,没有过多的装饰和繁琐的操作能够快速上手,同时还支持多种皮肤和主题,根据自己的喜好进行个性化设置,打造专属的音乐播放器支持多种音频格式的播放,它还支持音频增益功能根据自己的听力情况调整音量大小,避免过大的音量对听力造成损害。接下来就让小编为大
 网易邮箱大师怎么用
Mar 27, 2024 pm 05:32 PM
网易邮箱大师怎么用
Mar 27, 2024 pm 05:32 PM
网易邮箱,作为中国网民广泛使用的一种电子邮箱,一直以来以其稳定、高效的服务赢得了用户的信赖。而网易邮箱大师,则是专为手机用户打造的邮箱软件,它极大地简化了邮件的收发流程,让我们的邮件处理变得更加便捷。那么网易邮箱大师该如何使用,具体又有哪些功能呢,下文中本站小编将为大家带来详细的内容介绍,希望能帮助到大家!首先,您可以在手机应用商店搜索并下载网易邮箱大师应用。在应用宝或百度手机助手中搜索“网易邮箱大师”,然后按照提示进行安装即可。下载安装完成后,我们打开网易邮箱账号并进行登录,登录界面如下图所示
 百度网盘app怎么用
Mar 27, 2024 pm 06:46 PM
百度网盘app怎么用
Mar 27, 2024 pm 06:46 PM
在如今云存储已经成为我们日常生活和工作中不可或缺的一部分。百度网盘作为国内领先的云存储服务之一,凭借其强大的存储功能、高效的传输速度以及便捷的操作体验,赢得了广大用户的青睐。而且无论你是想要备份重要文件、分享资料,还是在线观看视频、听取音乐,百度网盘都能满足你的需求。但是很多用户们可能对百度网盘app的具体使用方法还不了解,那么这篇教程就将为大家详细介绍百度网盘app如何使用,还有疑惑的用户们就快来跟着本文详细了解一下吧!百度云网盘怎么用:一、安装首先,下载并安装百度云软件时,请选择自定义安装选
 BTCC教学:如何在BTCC交易所绑定使用MetaMask钱包?
Apr 26, 2024 am 09:40 AM
BTCC教学:如何在BTCC交易所绑定使用MetaMask钱包?
Apr 26, 2024 am 09:40 AM
MetaMask(中文也叫小狐狸钱包)是一款免费的、广受好评的加密钱包软件。目前,BTCC已支持绑定MetaMask钱包,绑定后可使用MetaMask钱包进行快速登入,储值、买币等,且首次绑定还可获得20USDT体验金。在BTCCMetaMask钱包教学中,我们将详细介绍如何注册和使用MetaMask,以及如何在BTCC绑定并使用小狐狸钱包。MetaMask钱包是什么?MetaMask小狐狸钱包拥有超过3,000万用户,是当今最受欢迎的加密货币钱包之一。它可免费使用,可作为扩充功能安装在网络
 了解Linux Bashrc:功能、配置与使用方法
Mar 20, 2024 pm 03:30 PM
了解Linux Bashrc:功能、配置与使用方法
Mar 20, 2024 pm 03:30 PM
了解LinuxBashrc:功能、配置与使用方法在Linux系统中,Bashrc(BourneAgainShellruncommands)是一个非常重要的配置文件,其中包含了系统启动时自动运行的各种命令和设置。Bashrc文件通常位于用户的家目录下,是一个隐藏文件,它的作用是为用户自定义设置Bashshell的环境。一、Bashrc的功能设置环境
 教你使用 iOS 17.4「失窃设备保护」新进阶功能
Mar 10, 2024 pm 04:34 PM
教你使用 iOS 17.4「失窃设备保护」新进阶功能
Mar 10, 2024 pm 04:34 PM
Apple在周二推出了iOS17.4更新,为iPhone带来了一系列新功能和修复。这次更新包括了全新的表情符号,同时欧盟用户也能够下载其他应用商店。此外,更新还加强了对iPhone安全性的控制,引入了更多的「失窃设备保护」设置选项,为用户提供更多选择和保障。"iOS17.3首次引入了“失窃设备保护”功能,为用户的敏感资料增加了额外的安全保障。当用户不在家等熟悉地点时,该功能要求用户首次输入生物特征信息,并在一小时后再次输入信息才能访问和更改某些数据,如修改AppleID密码或关闭失窃设备保护功能
