

通过使用vue制作滑动堆叠组件(详细教程)
探探的堆叠滑动组件起到了关键的作用,下面就来看看如何用vue写一个探探的堆叠组件,感兴趣的朋友一起看看吧
效果图如下所示:

前言
嗨,说起探探想必各位程序汪都不陌生(毕竟妹子很多),能在上面丝滑的翻牌子,探探的的堆叠滑动组件起到了关键的作用,下面就来看看如何用vue写一个探探的堆叠组件
一. 功能分析
简单使用下探探会发现,堆叠滑动的功能很简单,用一张图概括就是:
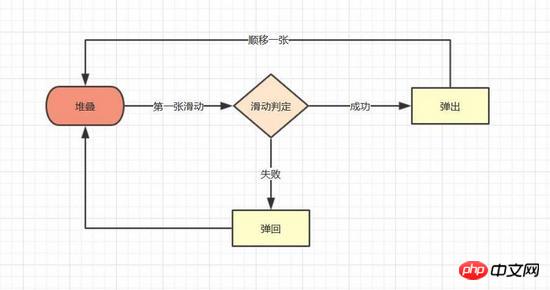
简单归纳下里面包含的基本功能点:
图片的堆叠
图片第一张的滑动
条件成功后的滑出,条件失败后的回弹
滑出后下一张图片堆叠到顶部
体验优化
根据触摸点的不同,滑动时首图有不同角度偏移
偏移面积判定是否成功滑出
二. 具体实现
有了归纳好的功能点,我们实现组件的思路会更清晰
1. 堆叠效果
堆叠图片效果在网上有大量的实例,实现的方法大同小异,主要通过在父层设定perspective 及perspective-origin ,来实现子层的透视,子层设定好translate3d Z轴数值即可模拟出堆叠效果,具体代码如下
// 图片堆叠dom
 <!--opacity: 0 隐藏我们不想看到的stack-item层级-->
 <!--z-index: -1 调整stack-item层级"-->
<ul class="stack">
 <li class="stack-item" style="transform: translate3d(0px, 0px, 0px);opacity: 1;z-index: 10;"><img src="1.png" alt="01"></li>
 <li class="stack-item" style="transform: translate3d(0px, 0px, -60px);opacity: 1;z-index: 1"><img src="2.png" alt="02"></li>
 <li class="stack-item" style="transform: translate3d(0px, 0px, -120px);opacity: 1;z-index: 1"><img src="3.png" alt="03"></li>
 <li class="stack-item" style="transform: translate3d(0px, 0px, -180px);opacity: 0;z-index: -1"><img src="4.png" alt="04"></li>
 <li class="stack-item" style="transform: translate3d(0px, 0px, -180px);opacity: 0;z-index: -1"><img src="5.png" alt="05"></li>
</ul>
<style>
.stack {
 width: 100%;
 height: 100%;
 position: relative;
 perspective: 1000px; //子元素视距
 perspective-origin: 50% 150%; //子元素透视位置
 -webkit-perspective: 1000px;
 -webkit-perspective-origin: 50% 150%;
 margin: 0;
 padding: 0;
 }
 .stack-item{
 background: #fff;
 height: 100%;
 width: 100%;
 border-radius: 4px;
 text-align: center;
 overflow: hidden;
 }
 .stack-item img {
 width: 100%;
 display: block;
 pointer-events: none;
 }
</style>上面只是一组静态代码,我们希望得到的是vue组件,所以需要先建立一个组件模板stack.vue,在模板中我们可以使用v-for,遍历出stack节点,使用:style 来修改各个item的style,代码如下
<template>
<ul class="stack">
<li class="stack-item" v-for="(item, index) in pages" :style="[transform(index)]">
<img :src="item.src">
</li>
</ul>
</template>
<script>
export default {
props: {
// pages数据包含基础的图片数据
pages: {
type: Array,
default: []
}
},
data () {
return {
// basicdata数据包含组件基本数据
basicdata: {
currentPage: 0 // 默认首图的序列
},
// temporaryData数据包含组件临时数据
temporaryData: {
opacity: 1, // 记录opacity
zIndex: 10, // 记录zIndex
visible: 3 // 记录默认显示堆叠数visible
}
}
},
methods: {
// 遍历样式
transform (index) {
if (index >= this.basicdata.currentPage) {
let style = {}
let visible = this.temporaryData.visible
let perIndex = index - this.basicdata.currentPage
// visible可见数量前滑块的样式
if (index <= this.basicdata.currentPage + visible - 1) {
style['opacity'] = '1'
style['transform'] = 'translate3D(0,0,' + -1 * perIndex * 60 + 'px' + ')'
style['zIndex'] = visible - index + this.basicdata.currentPage
style['transitionTimingFunction'] = 'ease'
style['transitionDuration'] = 300 + 'ms'
} else {
style['zIndex'] = '-1'
style['transform'] = 'translate3D(0,0,' + -1 * visible * 60 + 'px' + ')'
}
return style
}
}
}
}
</script>关键点
:style 可以绑定对象的同时,也可以绑定数组和函数,这在遍历的时候很有用
最基本的dom结构已经构建完毕,下一步是让首张图片“动”起来
2. 图片滑动
图片滑动效果,在很多场景中都有出现,其原理无非是监听touchs事件,得到位移,再通过translate3D改变目标位移,因此我们要实现的步骤如下
对stack进行touchs事件的绑定
监听并储存手势位置变化的数值
改变首图css属性中translate3D的x,y值
#### 具体实现
在vue框架中,不建议直接操作节点,而是通过指令v-on对元素进行绑定,因此我们将绑定都写在v-for遍历里,通过index进行判断其是否是首图,再使用:style修改首页的样式,具体代码如下:
<template>
<ul class="stack">
<li class="stack-item" v-for="(item, index) in pages"
:style="[transformIndex(index),transform(index)]"
@touchstart.stop.capture="touchstart"
@touchmove.stop.capture="touchmove"
@touchend.stop.capture="touchend"
@mousedown.stop.capture="touchstart"
@mouseup.stop.capture="touchend"
@mousemove.stop.capture="touchmove">
<img :src="item.src">
</li>
</ul>
</template>
<script>
export default {
props: {
// pages数据包含基础的图片数据
pages: {
type: Array,
default: []
}
},
data () {
return {
// basicdata数据包含组件基本数据
basicdata: {
start: {}, // 记录起始位置
end: {}, // 记录终点位置
currentPage: 0 // 默认首图的序列
},
// temporaryData数据包含组件临时数据
temporaryData: {
poswidth: '', // 记录位移
posheight: '', // 记录位移
tracking: false // 是否在滑动,防止多次操作,影响体验
}
}
},
methods: {
touchstart (e) {
if (this.temporaryData.tracking) {
return
}
// 是否为touch
if (e.type === 'touchstart') {
if (e.touches.length > 1) {
this.temporaryData.tracking = false
return
} else {
// 记录起始位置
this.basicdata.start.t = new Date().getTime()
this.basicdata.start.x = e.targetTouches[0].clientX
this.basicdata.start.y = e.targetTouches[0].clientY
this.basicdata.end.x = e.targetTouches[0].clientX
this.basicdata.end.y = e.targetTouches[0].clientY
}
// pc操作
} else {
this.basicdata.start.t = new Date().getTime()
this.basicdata.start.x = e.clientX
this.basicdata.start.y = e.clientY
this.basicdata.end.x = e.clientX
this.basicdata.end.y = e.clientY
}
this.temporaryData.tracking = true
},
touchmove (e) {
// 记录滑动位置
if (this.temporaryData.tracking && !this.temporaryData.animation) {
if (e.type === 'touchmove') {
this.basicdata.end.x = e.targetTouches[0].clientX
this.basicdata.end.y = e.targetTouches[0].clientY
} else {
this.basicdata.end.x = e.clientX
this.basicdata.end.y = e.clientY
}
// 计算滑动值
this.temporaryData.poswidth = this.basicdata.end.x - this.basicdata.start.x
this.temporaryData.posheight = this.basicdata.end.y - this.basicdata.start.y
}
},
touchend (e) {
this.temporaryData.tracking = false
// 滑动结束,触发判断
},
// 非首页样式切换
transform (index) {
if (index > this.basicdata.currentPage) {
let style = {}
let visible = 3
let perIndex = index - this.basicdata.currentPage
// visible可见数量前滑块的样式
if (index <= this.basicdata.currentPage + visible - 1) {
style['opacity'] = '1'
style['transform'] = 'translate3D(0,0,' + -1 * perIndex * 60 + 'px' + ')'
style['zIndex'] = visible - index + this.basicdata.currentPage
style['transitionTimingFunction'] = 'ease'
style['transitionDuration'] = 300 + 'ms'
} else {
style['zIndex'] = '-1'
style['transform'] = 'translate3D(0,0,' + -1 * visible * 60 + 'px' + ')'
}
return style
}
},
// 首页样式切换
transformIndex (index) {
// 处理3D效果
if (index === this.basicdata.currentPage) {
let style = {}
style['transform'] = 'translate3D(' + this.temporaryData.poswidth + 'px' + ',' + this.temporaryData.posheight + 'px' + ',0px)'
style['opacity'] = 1
style['zIndex'] = 10
return style
}
}
}
}
</script>3. 条件成功后的滑出,条件失败后的回弹
条件的触发判断是在touchend/mouseup后进行,在这里我们先用简单的条件进行判定,同时给予首图弹出及回弹的效果,代码如下
<template>
<ul class="stack">
<li class="stack-item" v-for="(item, index) in pages"
:style="[transformIndex(index),transform(index)]"
@touchmove.stop.capture="touchmove"
@touchstart.stop.capture="touchstart"
@touchend.stop.capture="touchend"
@mousedown.stop.capture="touchstart"
@mouseup.stop.capture="touchend"
@mousemove.stop.capture="touchmove">
<img :src="item.src">
</li>
</ul>
</template>
<script>
export default {
props: {
// pages数据包含基础的图片数据
pages: {
type: Array,
default: []
}
},
data () {
return {
// basicdata数据包含组件基本数据
basicdata: {
start: {}, // 记录起始位置
end: {}, // 记录终点位置
currentPage: 0 // 默认首图的序列
},
// temporaryData数据包含组件临时数据
temporaryData: {
poswidth: '', // 记录位移
posheight: '', // 记录位移
tracking: false, // 是否在滑动,防止多次操作,影响体验
animation: false, // 首图是否启用动画效果,默认为否
opacity: 1 // 记录首图透明度
}
}
},
methods: {
touchstart (e) {
if (this.temporaryData.tracking) {
return
}
// 是否为touch
if (e.type === 'touchstart') {
if (e.touches.length > 1) {
this.temporaryData.tracking = false
return
} else {
// 记录起始位置
this.basicdata.start.t = new Date().getTime()
this.basicdata.start.x = e.targetTouches[0].clientX
this.basicdata.start.y = e.targetTouches[0].clientY
this.basicdata.end.x = e.targetTouches[0].clientX
this.basicdata.end.y = e.targetTouches[0].clientY
}
// pc操作
} else {
this.basicdata.start.t = new Date().getTime()
this.basicdata.start.x = e.clientX
this.basicdata.start.y = e.clientY
this.basicdata.end.x = e.clientX
this.basicdata.end.y = e.clientY
}
this.temporaryData.tracking = true
this.temporaryData.animation = false
},
touchmove (e) {
// 记录滑动位置
if (this.temporaryData.tracking && !this.temporaryData.animation) {
if (e.type === 'touchmove') {
this.basicdata.end.x = e.targetTouches[0].clientX
this.basicdata.end.y = e.targetTouches[0].clientY
} else {
this.basicdata.end.x = e.clientX
this.basicdata.end.y = e.clientY
}
// 计算滑动值
this.temporaryData.poswidth = this.basicdata.end.x - this.basicdata.start.x
this.temporaryData.posheight = this.basicdata.end.y - this.basicdata.start.y
}
},
touchend (e) {
this.temporaryData.tracking = false
this.temporaryData.animation = true
// 滑动结束,触发判断
// 简单判断滑动宽度超出100像素时触发滑出
if (Math.abs(this.temporaryData.poswidth) >= 100) {
// 最终位移简单设定为x轴200像素的偏移
let ratio = Math.abs(this.temporaryData.posheight / this.temporaryData.poswidth)
this.temporaryData.poswidth = this.temporaryData.poswidth >= 0 ? this.temporaryData.poswidth + 200 : this.temporaryData.poswidth - 200
this.temporaryData.posheight = this.temporaryData.posheight >= 0 ? Math.abs(this.temporaryData.poswidth * ratio) : -Math.abs(this.temporaryData.poswidth * ratio)
this.temporaryData.opacity = 0
// 不满足条件则滑入
} else {
this.temporaryData.poswidth = 0
this.temporaryData.posheight = 0
}
},
// 非首页样式切换
transform (index) {
if (index > this.basicdata.currentPage) {
let style = {}
let visible = 3
let perIndex = index - this.basicdata.currentPage
// visible可见数量前滑块的样式
if (index <= this.basicdata.currentPage + visible - 1) {
style['opacity'] = '1'
style['transform'] = 'translate3D(0,0,' + -1 * perIndex * 60 + 'px' + ')'
style['zIndex'] = visible - index + this.basicdata.currentPage
style['transitionTimingFunction'] = 'ease'
style['transitionDuration'] = 300 + 'ms'
} else {
style['zIndex'] = '-1'
style['transform'] = 'translate3D(0,0,' + -1 * visible * 60 + 'px' + ')'
}
return style
}
},
// 首页样式切换
transformIndex (index) {
// 处理3D效果
if (index === this.basicdata.currentPage) {
let style = {}
style['transform'] = 'translate3D(' + this.temporaryData.poswidth + 'px' + ',' + this.temporaryData.posheight + 'px' + ',0px)'
style['opacity'] = this.temporaryData.opacity
style['zIndex'] = 10
if (this.temporaryData.animation) {
style['transitionTimingFunction'] = 'ease'
style['transitionDuration'] = 300 + 'ms'
}
return style
}
}
}
}
</script>4. 滑出后下一张图片堆叠到顶部
重新堆叠是组件最后一个功能,同时也是最重要和复杂的功能。在我们的代码里,stack-item的排序依赖绑定:style的transformIndex和transform函数,函数里判定的条件是currentPage,那是不是改变currentPage,让其+1,即可完成重新堆叠呢?
答案没有那么简单,因为我们滑出是动画效果,会进行300ms的时间,而currentPage变化引起的重排,会立即变化,打断动画的进行。因此我们需要先修改transform函数的排序条件,后改变currentPage。
#### 具体实现
修改transform函数排序条件
让currentPage+1
添加onTransitionEnd事件,在滑出结束后,重新放置stack列表中
代码如下:
<template>
<ul class="stack">
<li class="stack-item" v-for="(item, index) in pages"
:style="[transformIndex(index),transform(index)]"
@touchmove.stop.capture="touchmove"
@touchstart.stop.capture="touchstart"
@touchend.stop.capture="touchend"
@mousedown.stop.capture="touchstart"
@mouseup.stop.capture="touchend"
@mousemove.stop.capture="touchmove"
@webkit-transition-end="onTransitionEnd"
@transitionend="onTransitionEnd"
>
<img :src="item.src">
</li>
</ul>
</template>
<script>
export default {
props: {
// pages数据包含基础的图片数据
pages: {
type: Array,
default: []
}
},
data () {
return {
// basicdata数据包含组件基本数据
basicdata: {
start: {}, // 记录起始位置
end: {}, // 记录终点位置
currentPage: 0 // 默认首图的序列
},
// temporaryData数据包含组件临时数据
temporaryData: {
poswidth: '', // 记录位移
posheight: '', // 记录位移
lastPosWidth: '', // 记录上次最终位移
lastPosHeight: '', // 记录上次最终位移
tracking: false, // 是否在滑动,防止多次操作,影响体验
animation: false, // 首图是否启用动画效果,默认为否
opacity: 1, // 记录首图透明度
swipe: false // onTransition判定条件
}
}
},
methods: {
touchstart (e) {
if (this.temporaryData.tracking) {
return
}
// 是否为touch
if (e.type === 'touchstart') {
if (e.touches.length > 1) {
this.temporaryData.tracking = false
return
} else {
// 记录起始位置
this.basicdata.start.t = new Date().getTime()
this.basicdata.start.x = e.targetTouches[0].clientX
this.basicdata.start.y = e.targetTouches[0].clientY
this.basicdata.end.x = e.targetTouches[0].clientX
this.basicdata.end.y = e.targetTouches[0].clientY
}
// pc操作
} else {
this.basicdata.start.t = new Date().getTime()
this.basicdata.start.x = e.clientX
this.basicdata.start.y = e.clientY
this.basicdata.end.x = e.clientX
this.basicdata.end.y = e.clientY
}
this.temporaryData.tracking = true
this.temporaryData.animation = false
},
touchmove (e) {
// 记录滑动位置
if (this.temporaryData.tracking && !this.temporaryData.animation) {
if (e.type === 'touchmove') {
this.basicdata.end.x = e.targetTouches[0].clientX
this.basicdata.end.y = e.targetTouches[0].clientY
} else {
this.basicdata.end.x = e.clientX
this.basicdata.end.y = e.clientY
}
// 计算滑动值
this.temporaryData.poswidth = this.basicdata.end.x - this.basicdata.start.x
this.temporaryData.posheight = this.basicdata.end.y - this.basicdata.start.y
}
},
touchend (e) {
this.temporaryData.tracking = false
this.temporaryData.animation = true
// 滑动结束,触发判断
// 简单判断滑动宽度超出100像素时触发滑出
if (Math.abs(this.temporaryData.poswidth) >= 100) {
// 最终位移简单设定为x轴200像素的偏移
let ratio = Math.abs(this.temporaryData.posheight / this.temporaryData.poswidth)
this.temporaryData.poswidth = this.temporaryData.poswidth >= 0 ? this.temporaryData.poswidth + 200 : this.temporaryData.poswidth - 200
this.temporaryData.posheight = this.temporaryData.posheight >= 0 ? Math.abs(this.temporaryData.poswidth * ratio) : -Math.abs(this.temporaryData.poswidth * ratio)
this.temporaryData.opacity = 0
this.temporaryData.swipe = true
// 记录最终滑动距离
this.temporaryData.lastPosWidth = this.temporaryData.poswidth
this.temporaryData.lastPosHeight = this.temporaryData.posheight
// currentPage+1 引发排序变化
this.basicdata.currentPage += 1
// currentPage切换,整体dom进行变化,把第一层滑动置零
this.$nextTick(() => {
this.temporaryData.poswidth = 0
this.temporaryData.posheight = 0
this.temporaryData.opacity = 1
})
// 不满足条件则滑入
} else {
this.temporaryData.poswidth = 0
this.temporaryData.posheight = 0
this.temporaryData.swipe = false
}
},
onTransitionEnd (index) {
// dom发生变化后,正在执行的动画滑动序列已经变为上一层
if (this.temporaryData.swipe && index === this.basicdata.currentPage - 1) {
this.temporaryData.animation = true
this.temporaryData.lastPosWidth = 0
this.temporaryData.lastPosHeight = 0
this.temporaryData.swipe = false
}
},
// 非首页样式切换
transform (index) {
if (index > this.basicdata.currentPage) {
let style = {}
let visible = 3
let perIndex = index - this.basicdata.currentPage
// visible可见数量前滑块的样式
if (index <= this.basicdata.currentPage + visible - 1) {
style['opacity'] = '1'
style['transform'] = 'translate3D(0,0,' + -1 * perIndex * 60 + 'px' + ')'
style['zIndex'] = visible - index + this.basicdata.currentPage
style['transitionTimingFunction'] = 'ease'
style['transitionDuration'] = 300 + 'ms'
} else {
style['zIndex'] = '-1'
style['transform'] = 'translate3D(0,0,' + -1 * visible * 60 + 'px' + ')'
}
return style
// 已滑动模块释放后
} else if (index === this.basicdata.currentPage - 1) {
let style = {}
// 继续执行动画
style['transform'] = 'translate3D(' + this.temporaryData.lastPosWidth + 'px' + ',' + this.temporaryData.lastPosHeight + 'px' + ',0px)'
style['opacity'] = '0'
style['zIndex'] = '-1'
style['transitionTimingFunction'] = 'ease'
style['transitionDuration'] = 300 + 'ms'
return style
}
},
// 首页样式切换
transformIndex (index) {
// 处理3D效果
if (index === this.basicdata.currentPage) {
let style = {}
style['transform'] = 'translate3D(' + this.temporaryData.poswidth + 'px' + ',' + this.temporaryData.posheight + 'px' + ',0px)'
style['opacity'] = this.temporaryData.opacity
style['zIndex'] = 10
if (this.temporaryData.animation) {
style['transitionTimingFunction'] = 'ease'
style['transitionDuration'] = 300 + 'ms'
}
return style
}
}
}
}
</script>ok~ 完成了上面的四步,堆叠组件的基本功能就已经实现,快来看看效果吧

堆叠滑动效果已经出来了,但是探探在体验上,还增加了触碰角度偏移,以及判定滑出面积比例
角度偏移的原理,是在用户每次进行touch时,记录用户触碰位置,计算出最大的偏移角度,在滑动出现位移时,线性增加角度以至最大的偏移角度。
使用在stack中具体要做的是:
touchmove中计算出所需角度和方向
touchend及onTransitionEnd中将角度至零
判定滑出面积比例,主要通过偏移量计算出偏移面积,从而得到面积比例,完成判断
完整的代码和demo可以在 github 上查看源码,这里就不贴出来了
谢谢大家看完这篇文章,喜欢可以在github上给个:star:️ ,最后祝大家在探探上都能找到前女友:green_heart:
上面是我整理给大家的,希望今后会对大家有帮助。
相关文章:
以上是通过使用vue制作滑动堆叠组件(详细教程)的详细内容。更多信息请关注PHP中文网其他相关文章!

热AI工具

Undresser.AI Undress
人工智能驱动的应用程序,用于创建逼真的裸体照片

AI Clothes Remover
用于从照片中去除衣服的在线人工智能工具。

Undress AI Tool
免费脱衣服图片

Clothoff.io
AI脱衣机

Video Face Swap
使用我们完全免费的人工智能换脸工具轻松在任何视频中换脸!

热门文章
热工具

记事本++7.3.1
好用且免费的代码编辑器

SublimeText3汉化版
中文版,非常好用

禅工作室 13.0.1
功能强大的PHP集成开发环境

Dreamweaver CS6
视觉化网页开发工具

SublimeText3 Mac版
神级代码编辑软件(SublimeText3)
热门话题


 PPT制作胶卷移动效果的具体方法
Mar 26, 2024 pm 04:00 PM
PPT制作胶卷移动效果的具体方法
Mar 26, 2024 pm 04:00 PM
1、启动PPT,新建一个空白文档,选择所有的文本框将其删除。2、执行插入-形状命令,在文档中拖拽出一个长方形,形状颜色填充为黑色。3、拖拽长方形将其拉长,执行插入-形状命令,拖拽出小正方形,设置填充颜色为白色。4、依次复制粘帖小正方形,使上下均匀分布在胶卷两侧,ctrl+a选择所有的之后,右键单击选择组合。5、执行插入-图片命令,在弹出的对话框中找到需插入的图片,点击打开,调整图片大小和位置。6、重复步骤5依次将其余的图片进行插入并设置,形成一个胶卷图片的形式。7、选择胶卷,执行动画-添加动画命
 番茄小说封面怎么制作
Feb 23, 2024 pm 01:55 PM
番茄小说封面怎么制作
Feb 23, 2024 pm 01:55 PM
番茄小说封面怎么制作?番茄小说中是可以制作专属的小说封面,但是多数的小伙伴不知道番茄小说当中的封面该如何的制作,接下来就是小编为玩家带来的番茄小说封面制作方法图文教程,感兴趣的玩家快来一起看看吧!番茄小说使用教程番茄小说封面怎么制作1、首先打开番茄小说APP,进入到作品管理页面创建新书,选择下图箭头所示的【封面模板】;2、然后进入到封面模板页面,选择喜爱的封面模板;3、最后选择封面完成之后点击右上角【确认】即可。
 创建手机端Excel表格操作指南
Feb 18, 2024 pm 02:41 PM
创建手机端Excel表格操作指南
Feb 18, 2024 pm 02:41 PM
手机Excel表格制作教程随着移动设备的普及和技术的不断进步,手机成为了我们日常生活和工作中不可或缺的工具之一。在手机上使用Excel表格,可以方便地进行数据记录、计算和分析,提高工作效率。本文将为大家分享手机Excel表格制作的基本操作和技巧。一、选择合适的应用程序目前市面上有很多可供选择的手机Excel应用程序,例如GoogleSheets、Micro
 手机屏幕不好滑动干涩怎么办
Dec 04, 2023 pm 03:51 PM
手机屏幕不好滑动干涩怎么办
Dec 04, 2023 pm 03:51 PM
手机屏幕不好滑动干涩的解决办法:1、给屏幕加湿;2、定期清洁屏幕;3、增加手指的滑动力度;4、使用手机膜;5、更换保护套;6、保持手部湿润;7、贴膜时处理干净;8、使用润滑剂;9、使用手套;10、调整屏幕亮度;11、更换手机。详细介绍:1、给屏幕加湿,在屏幕旁边放置一个加湿器或者喷一些水,让空气中的湿度增加,从而减少屏幕的干燥感;2、定期清洁屏幕,使用专业的屏幕清洁剂等等。
 如何使用CSS制作倒计时效果的实现步骤
Oct 26, 2023 am 10:36 AM
如何使用CSS制作倒计时效果的实现步骤
Oct 26, 2023 am 10:36 AM
如何使用CSS制作倒计时效果的实现步骤倒计时效果是网页开发中常见的一个功能,可以为用户呈现倒计时的动态效果,给人以紧迫感和期待感。本文将介绍如何使用CSS来实现倒计时效果,并给出详细的实现步骤和代码示例。实现步骤如下:步骤一:HTML结构搭建首先,在HTML中创建一个div容器,用于包裹倒计时的内容。例如:<divclass="countd
 我来教你!PPT制作动画效果的方法!
Mar 20, 2024 pm 06:40 PM
我来教你!PPT制作动画效果的方法!
Mar 20, 2024 pm 06:40 PM
制作PPT的时候使用一些动画效果会比没有使用动画效果的显得活泼可爱,加上动画效果大家也许就喜欢看这个PPT,所以我们必须要学会PPT制作动画效果的方法。接下来,我将为大家详细介绍如何在PPT中添加动画效果。请继续往下阅读,认真学习这些步骤,相信对你会有所帮助!首先,打开我们自己制作的PPT,您会注意到这个PPT目前没有任何动画效果(如下图红色箭头所示)。2.然后,我们需要给图片添加动画效果,我们先选中图片,再单击菜单栏上边的【动画】按钮,(如下图红色圈出部分所示)。3.接下来,我们点击动画里边的
 怎么制作word封面
Mar 19, 2024 pm 06:50 PM
怎么制作word封面
Mar 19, 2024 pm 06:50 PM
一篇毕业论文一定要有封面、有目录、有结尾等等,这才能说明一篇论文是完整的。上期小编已经给小伙伴们分享了word怎么制作目录啦,这期给大家分享word封面的制作方法,不会制作的赶紧快来吧!1.首先,我们打开自己想要制作封面的word文档,如下图所示:2.然后,我们点击菜单栏上【章节】按钮,选择封面页,这个功能相当于一个封面库,你可以在里面自行挑选合适精美的封面,如下图红色圈出部分所示:3.点击后,你可以看到各种类型的封面,比如商务类型,适合公司合同、文档;简历类型,适合找工作投简历的朋友等等,还可
 JavaScript 如何实现图片的上下滑动切换效果并加入淡入淡出动画?
Oct 20, 2023 am 11:19 AM
JavaScript 如何实现图片的上下滑动切换效果并加入淡入淡出动画?
Oct 20, 2023 am 11:19 AM
JavaScript如何实现图片的上下滑动切换效果并加入淡入淡出动画?在网页开发中,经常需要实现图片的切换效果,可以通过JavaScript来实现上下滑动切换,并且加入淡入淡出的动画效果,下面我们来具体了解一下。首先,我们需要一个包含多张图片的容器,可以使用HTML中的div标签来承载图片。例如,我们创建一个id为"image-container"的div来
