这篇文章主要介绍了Vue实现带进度条的文件拖动上传功能,本文通过实例代码给大家介绍的非常详细,具有参考借鉴价值,需要的朋友可以参考下
1. 基本界面
<!doctype html>
<html lang="en">
<head>
<meta charset="UTF-8">
<meta name="viewport"
content="width=device-width, user-scalable=no, initial-scale=1.0, maximum-scale=1.0, minimum-scale=1.0">
<meta http-equiv="X-UA-Compatible" content="ie=edge">
<link href="https://cdn.bootcss.com/bootstrap/4.0.0/css/bootstrap.min.css" rel="external nofollow" rel="stylesheet">
<script src="https://cdn.bootcss.com/vue/2.5.13/vue.min.js"></script>
<style>
.dropbox {
border: .25rem dashed #007bff;
min-height: 5rem;
}
</style>
<title>Document</title>
</head>
<body>
<p id="app" class="m-5">
<p class="dropbox p-3">
<h2 class="text-center">把要上传的文件拖动到这里</h2>
</p>
</p>
<script>
new Vue({
el: '#app',
data: {},
methods: {},
mounted: function () {}
});
</script>
</body>
</html>
2. 检测拖动事件
首先让页面支持文件拖拽,在 Vue 的 mounted() 函数中添加代码:
mounted: function () {
 var dropbox = document.querySelector('.dropbox');
 dropbox.addEventListener('dragenter', this.onDrag, false);
 dropbox.addEventListener('dragover', this.onDrag, false);
 dropbox.addEventListener('drop', this.onDrop, false);
}当把文件拖动到浏览器的拖动区域时,会触发三种事件:
文件第一次进入拖动区时,触发 dragenter 事件
文件在拖动区来回拖拽时,不断触发 dragover 事件
文件已经在拖动区,并松开鼠标时,触发 drop 事件
实现拖动上传,我们只需要关心 drop 事件。不过另外两个事件也需要监听,目的是阻止浏览器默认行为。如果不阻止,那么把文件拖到浏览器时,浏览器就会自动下载这个文件(默认行为),drop 事件触发不出来。
事件的监听函数添加在 Vue 的 methods 对象中:
methods: {
 uploadFile: function (file) {
  console.log(file);
 },
 onDrag: function (e) {
  e.stopPropagation();
  e.preventDefault();
 },
 onDrop: function (e) {
  e.stopPropagation();
  e.preventDefault();
  var dt = e.dataTransfer;
  for (var i = 0; i !== dt.files.length; i++) {
   this.uploadFile(dt.files[i]);
  }
 }
},onDrop() 函数中,通过 e.dataTransfer.files 可以拿到用户拖动到浏览器的文件的基本信息,uploadFile() 函数现在只这些信息打印了出来,可以了解到,拖动到浏览器的每个文件都是一个 File 对象:

3. 处理拖动事件
现在,我们要给 uploadFile() 函数增加功能,实现拖动文件时,拖动区出现文件名和一个上传进度条。
首先在 Vue 的 data 对象中定义 files 属性,用来保存所有拖动到浏览器中文件的名称。然后在uploadFile() 函数每当被调用时,把文件名和上传进度保存到 files 中:
data: {
 files: []
},
methods: {
 uploadFile: function (file) {
  var item = {
   name: file.name,
   uploadPercentage: 67
  };
  this.files.push(item);
 },
}上传进度的功能在后面再介绍,先写一个固定值。
相应地,在HTML代码中,用 v-for 关键字显示 files 的每一项:
<p class="dropbox p-3">
<h2 class="text-center">把要上传的文件拖动到这里</h2>
<p class="border m-2 d-inline-block p-4" style="width:15rem" v-for="file in files">
<h5 class="mt-0">{{ file.name }}</h5>
<p class="progress">
<p class="progress-bar progress-bar-striped"
:style="{ width: file.uploadPercentage+'%' }"></p>
</p>
</p>
</p>而且,“把要上传的文件拖动到这里” 的提示只在拖动区没有文件的时候才显示:
<h2 v-if="files.length===0" class="text-center">把要上传的文件拖动到这里
这样,拖动效果就有了:

4. 文件上传
接下来实现真正的文件上传,继续往 uploadFile() 函数添加代码:
uploadFile: function (file) {
 var item = {
  name: file.name,
  uploadPercentage: 67
 };
 this.files.push(item);
 var fd = new FormData();
 fd.append('myFile', file);

 var xhr = new XMLHttpRequest();
 xhr.open('POST', 'upload.php', true);
 xhr.send(fd);
},这里用到了 FormData,把要上传的文件附在了 FormData 上,并通过AJAX方式发送给PHP端。PHP端代码:
if (isset($_FILES['myFile'])) {
 move_uploaded_file($_FILES['myFile']['tmp_name'], 'uploads/' . $_FILES['myFile']['name']);
 echo 'OK';
} else {
 echo 'No file specified';
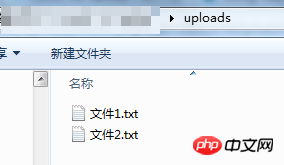
}现在刷新下页面,把电脑上的两个文件拖到浏览器中,PHP端会接收并保存文件到 uploads 目录:

提示:如果拖放时遇到PHP返回了No file specified,或者 $_FILES 为 NULL 的情况时,有可能是PHP限制了POST请求最大字节,或者限制了上传文件的体积。这时候需要调整下php.ini中的这两个配置:
post_max_size = 20M // POST请求的最大字节数
upload_max_filesize = 20M // 上传文件的最大体积
进度条的展示
基本的上传功能完成了,最后我们来完成进度条。每当AJAX请求发送了一段时间的数据时,都会生成一个 progress 事件,我们可以监听 progress 事件来知道当前的上传进度:
uploadFile: function (file) {
  ...
  xhr.upload.addEventListener('progress', function (e) {
    item.uploadPercentage = Math.round((e.loaded * 100) / e.total);
  }, false);
  xhr.send(fd);
},e.loaded 代表当前AJAX发送了多少字节,e.total 代表AJAX总共要发送多少字节。通过这两个属性可以计算上传进度的百分比。
这样,一个带进度条的文件拖动上传功能就完成了。
附:完整代码
<!doctype html>
<html lang="en">
<head>
<meta charset="UTF-8">
<meta name="viewport"
content="width=device-width, user-scalable=no, initial-scale=1.0, maximum-scale=1.0, minimum-scale=1.0">
<meta http-equiv="X-UA-Compatible" content="ie=edge">
<link href="https://cdn.bootcss.com/bootstrap/4.0.0/css/bootstrap.min.css" rel="stylesheet">
<script src="https://cdn.bootcss.com/vue/2.5.13/vue.min.js"></script>
<style>
.dropbox {
border: .25rem dashed #007bff;
min-height: 5rem;
}
</style>
<title>Document</title>
</head>
<body>
<p id="app" class="m-5">
<p class="dropbox p-3">
<h2 v-if="files.length===0" class="text-center">把要上传的文件拖动到这里</h2>
<p class="border m-2 d-inline-block p-4" style="width:15rem" v-for="file in files">
<h5 class="mt-0">{{ file.name }}</h5>
<p class="progress">
<p class="progress-bar progress-bar-striped"
:style="{ width: file.uploadPercentage+'%' }"></p>
</p>
</p>
</p>
</p>
<script>
new Vue({
el: '#app',
data: {
files: []
},
methods: {
uploadFile: function (file) {
var item = {
name: file.name,
uploadPercentage: 0
};
this.files.push(item);
var fd = new FormData();
fd.append('myFile', file);
var xhr = new XMLHttpRequest();
xhr.open('POST', 'upload.php', true);
xhr.upload.addEventListener('progress', function (e) {
item.uploadPercentage = Math.round((e.loaded * 100) / e.total);
}, false);
xhr.send(fd);
},
onDrag: function (e) {
e.stopPropagation();
e.preventDefault();
},
onDrop: function (e) {
e.stopPropagation();
e.preventDefault();
var dt = e.dataTransfer;
for (var i = 0; i !== dt.files.length; i++) {
this.uploadFile(dt.files[i]);
}
}
},
mounted: function () {
var dropbox = document.querySelector('.dropbox');
dropbox.addEventListener('dragenter', this.onDrag, false);
dropbox.addEventListener('dragover', this.onDrag, false);
dropbox.addEventListener('drop', this.onDrop, false);
}
});
</script>
</body>
</html>上面是我整理给大家的,希望今后会对大家有帮助。
相关文章:
在element ui中有关对话框el-dialog关闭事件(详细教程)
以上是在Vue中如何实现带进度条的文件拖动上传功能的详细内容。更多信息请关注PHP中文网其他相关文章!


