

HTML5和JS实现本地图片裁剪并上传功能

这篇文章主要为大家详细介绍了HTML5本地图片裁剪并上传的相关资料,具有一定的参考价值,感兴趣的小伙伴们可以参考一下
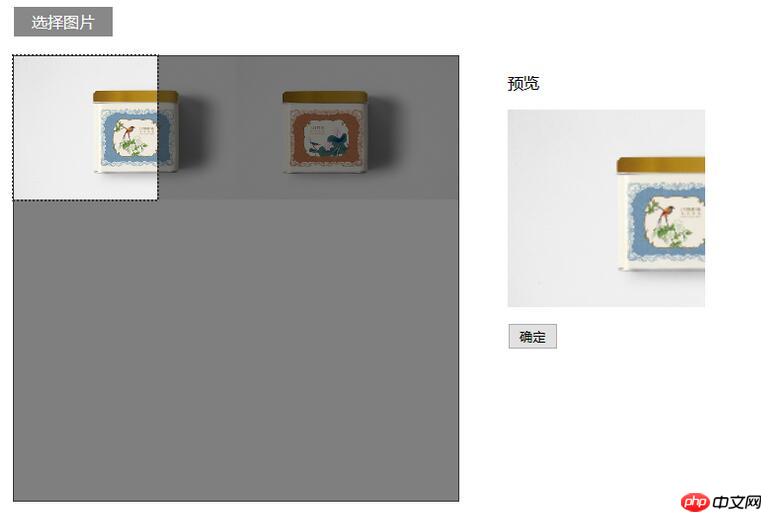
最近做了一个项目,这个项目中需要实现的一个功能是:用户自定义头像(用户在本地选择一张图片,在本地将图片裁剪成满足系统要求尺寸的大小)。这个功能的需求是:头像最初剪切为一个正方形。如果选择的图片小于规定的头像要求尺寸,那么这整张图片都会作为头像。如果大于规定的尺寸,那么用户可以选择要裁剪的区域。用户点击确定按钮,就将裁剪得到的图片数据发送到服务器,在后端将图片数据保存成一个文件。
要完成上述功能,涉及到的知识有:ajax,canvas和html5中的files接口。我将实现这个功能的代码封装到了4个模块中,分别是ajax.js,preview.js,shear.js和customerImg.js。
ajax.js:用于发送ajax请求。
preview.js:用于图片预览
shear.js:用于裁剪图片
customer.js:自定义头像。在这个模块中药引入ajax.js,preview.js和shear.js
我使用webpack进行打包。我还使用了jquery和jquery-ui。
我从这个项目中抽离出了这个功能。下面是这个功能的详细代码。
1.HTML代码
<p class="m-warp" id="warp">
  <p class="item">
   <input type="file" name="img" id="img" hidden>
   <label for="img">选择图片</label>
  </p>
  <p class="item clearfix">
   <p class="col col-1">
    <p class="preview" id="preview">
     <p class="mask"></p>
     <canvas class="cvsMove" id="cvsMove"></canvas>
    </p>
   </p>

   <p class="thum col-2 col">
    <p>预览</p>
    <img src="" id="thum">
    <p class="f-text-l f-marTop-20">
     <button class="shear" id="submit">确定</button>
    </p>
   </p>
  </p>
</p>2.CSS代码
.clearfix:after{
content: "";
display: block;
clear: both;
height: 0;
overflow: hidden;
visibility: hidden;
}
img{
vertical-align: middle;
max-width:100%
}
.m-warp{
width: 800px;
}
.item{
margin-top: 20px;
}
.col{
float: left;
}
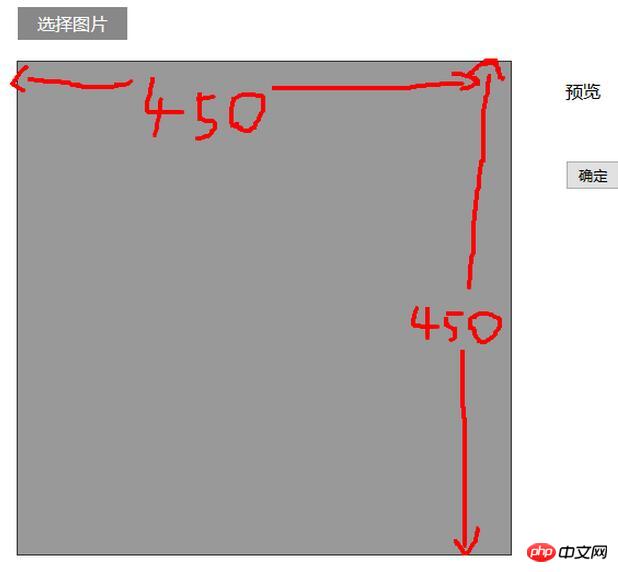
.col-1{
position: relative;
width: 450px;
height: 450px;
outline: 1px solid #333;
}
.preview{
display: inline-block;
}
.col-2{
width: 300px;
margin-left: 50px;
}
label{
display: block;
text-align: center;
width: 100px;
font-size: 16px;
color: #fff;
background-color: #888888;
height: 30px;
line-height: 30px;
}
.mask{
position: absolute;
z-index: 1;
top:0;
left: 0;
bottom: 0;
right: 0;
background-color: rgba(0,0,0,.4);
}
.cvsMove{
position: absolute;
z-index: 2;
outline: 2px dotted #333;
cursor: move;
display: none;
}有了css和html的运行结果如下:
3.js代码
customerImg.js
var $ = require('jquery');
var ajax = require('./ajax.js');
var preview = require('./preview.js');
var shear = require('./shear.js');
/**
* 自定义头像
* @constructor
*/
function CustomerImg() {
this.isSupport = null;
this.previewBox = null;
this.warp = null;
}
/**
* 入口
* @param warp 操作区域 jquery节点
*/
CustomerImg.prototype.start = function (warp) {
var info,me,warpBox;
me = this;
this.isSupport = this.__isSupport();
if(!this.isSupport) {
info = $('<p>你的浏览器不支持自定义头像,可更换高版本的浏览器自定义头像</p>');
$('body').html(info);
return this;
}
//判断操作区域示范存在
if(warp && warp.length > 0){
this.warp = warp;
}else{
return this;
}
//预览
preview.start(warp,shear.start.bind(shear,warp));
this.previewBox = warp.find('#preview');
//确定
warp
.find('#submit')
.unbind('click')
.on('click',me.__submit.bind(me));
};
/**
* 提交
* @private
*/
CustomerImg.prototype.__submit = function () {
var cvsMove,data,fd;
cvsMove = this.previewBox.find('#cvsMove');
data = cvsMove[0].toDataURL('image/jpg',1);
fd = {
'customerImg':data
};
ajax.upload(fd);
};
/**
* 判断是否支持自定义头像
* @returns {boolean}
* @private
*/
CustomerImg.prototype.__isSupport = function () {
var canvas,context;
canvas= document.createElement('canvas');
if(typeof FileReader === 'function'&& canvas.getContext && canvas.toDataURL){
return true;
}else{
return false;
}
};
var customerImg = new CustomerImg();
module.exports = customerImg;preview.js
/**
* Created by star on 2017/3/7.
*/
var $ = require('jquery');
/**
* 预览类
* @constructor
*/
function Preview() {
this.boxElem = null;
this.callback = null;
this.type = null;
}
/**
* 入口
* @param boxElem 操作区域
* @param callback 预览结束的回调函数
*/
Preview.prototype.start = function (boxElem,callback) {
var chooseFile,me;
me = this;
if(! boxElem || boxElem.length <= 0) return this;
this.boxElem = boxElem;
if(typeof callback === 'function'){
this.callback = callback;
}
if(this.__isSupport()){
chooseFile = boxElem.find('input[type="file"]');
chooseFile
.on('change',me.fileChange.bind(me))
}
};
/**
* 选择图片的事件处理程序
* @param event
*/
Preview.prototype.fileChange = function (event) {
var target,reader,file,me,type;
target = event.target;
me = this;
file = target.files[0];
type = file.type;
this.type = type;
if(type !== 'image/png' && type !== 'image/jpg' && type !== 'image/jpeg'){
alert('文件格式不正确');
return this;
}
reader = new FileReader();
if(file){
reader.readAsDataURL(file);
}
reader.onload = function () {
me.show(reader);
}
};
/**
* 显示从本地选择的图片
* @param reader fileReader对象
*/
Preview.prototype.show = function (reader) {
var preView,img,me;
preView = this.boxElem.find('#preview');
img = preView.find('#preImg');
me = this;
if(img.length <= 0){
preView.append($('<img id="preImg">'));
}
img = preView.find('#preImg');
//确保图片加载完成后再执行回调
img.on('load',function () {
if(me.callback){
me.callback(me.type);
}
});
img.attr('src',reader.result);
};
/**
* 是否支持预览
* @returns {boolean}
* @private
*/
Preview.prototype.__isSupport = function () {
return typeof FileReader === 'function';
};
var preview = new Preview();
module.exports = preview;shear.js
var $ = require('jquery');
//由于要使用jquery-ui,所以将$暴露到window上。
window.$ = $;
require('./jquery-ui.min.js');
/**
* 切割
* @constructor
*/
function Shear() {
this.previewBox = null;
this.cvsMove = null;
this.maxW = 200;
this.maxH = 200;
this.thum = null;
this.fileType = 'image/jpeg';
}
/**
* 入口
* @param previewBox 预览元素的父元素
* @param fileType 裁剪的图片的类型 如:'image/jpg'
* @returns {Shear}
*/
Shear.prototype.start = function (previewBox,fileType) {
if(!arguments.length) return this;
var me = this;
this.previewBox = previewBox;
if(fileType){
this.fileType = fileType;
}
this.thum = this.previewBox.find('#thum');
this.cvsMove = this.previewBox.find('#cvsMove');
this.showCanvas();
return this;
};
/**
* 显示出canvas
*/
Shear.prototype.showCanvas = function () {
var preImg,h,w,me,cvsH,cvsW,rateH,rateW,naturalH,naturalW,preview;
me = this;
preImg = this.previewBox.find('#preImg');
preview = this.previewBox.find('#preview');
naturalH = preImg[0].naturalHeight;
naturalW = preImg[0].naturalWidth;
//将canvas显示出来
this.cvsMove.show();
//将canvas置于(0,0)
this.cvsMove
.css({
"left":'0',
'top':'0'
});
h = preImg.height();
w = preImg.width();
//规定裁剪出的图片尺寸为200px*200px
//要保证裁剪的图片不变形
if(h < this.maxH || w < this.maxW){
this.cvsMove[0].width = cvsW = Math.min(h,w);
this.cvsMove[0].height = cvsH = Math.min(h,w);
}else{
this.cvsMove[0].width= cvsW = this.maxW;
this.cvsMove[0].height= cvsH = this.maxH;
}
rateH = h/naturalH;
rateW = w/naturalW;
this.__drawImg(preImg,0,0,cvsW/rateW,cvsH/rateH,0,0,cvsW,cvsH);
//使用jquery-ui中的功能使canvas可以移动
this.cvsMove.draggable(
{
containment: "parent",
drag:function (event,ui) {
var left,top;
left = ui.position.left;
top = ui.position.top;
//canvas每次移动都有从新绘制图案
me.__drawImg(preImg,left/rateW,top/rateH,cvsW/rateW,cvsH/rateH,0,0,cvsW,cvsH);
}
}
)
};
/**
* 在canvas上显示图片
* @param myImg 要显示的图片节点
* @param sx 图片的起点在原图片上的x坐标
* @param sy 图片的起点在原图上的y坐标
* @param sW 在原图上的宽度
* @param sH 在原图上的高度
* @param dx 起点在canvas上的x坐标
* @param dy 起点在canvas上的y坐标
* @param dW 在canvas上的宽度
* @param dH 在canvas上的高度
* @private
*/
Shear.prototype.__drawImg = function (myImg,sx,sy,sW,sH,dx,dy,dW,dH) {
var cxt,thum,me;
me = this;
cxt = this.cvsMove[0].getContext('2d');
cxt.drawImage(myImg[0],sx,sy,sW,sH,dx,dy,dW,dH);
thum = this.thum;
//将canvas上的图案显示到右侧
thum
.attr('src',this.cvsMove[0].toDataURL(me.fileType,1))
.width(this.maxW)
.height(this.maxH)
};
var shear = new Shear();
module.exports = shear;ajax.js
var $ = require('jquery');
function Ajax() {

}
/**
 * 上传图片数据
 */
Ajax.prototype.upload = function (data) {
 $.ajax({
  type:'POST',
  data:data,
  dataType:'json',
  url:'/test/PHP/upload.php',
  success:function (result) {
   if(result.status){
    location.reload();
   }else{
    alert(result.msg);
   }
  }
 });
};
var ajax = new Ajax();
module.exports = ajax;最后在另一个文件中,调用customerImg对象的start方法
var $ = require('jquery');
var customerImg =require('./customerImg.js');
customerImg.start($('#warp'));
webpack的配置文件如下:
var webpack = require('webpack');
module.exports = {
 entry:{
  'customerImg':'./js/test.js',
  'jQuery':['jquery']
 },
 output:{
  filename:'[name].js',
  library:'jQuery',
  libraryTarget:'umd'
 },
 plugins:[
  new webpack.optimize.CommonsChunkPlugin({
   name:'jQuery',
   filename:'jquery.js'
  })
 ]
};效果:
4.php代码
if(!empty($_POST) && isset($_POST['customerImg'])){
 $img = $_POST['customerImg'];
 $imgdata = explode(',', $img);
 $uniName = md5 ( uniqid ( microtime ( true ), true ) );
 $a = file_put_contents('./../uploads/'.$uniName.'.jpg', base64_decode($imgdata[1]));
}以上就是本文的全部内容,希望对大家的学习有所帮助,更多相关内容请关注PHP中文网!
相关推荐:
以上是HTML5和JS实现本地图片裁剪并上传功能的详细内容。更多信息请关注PHP中文网其他相关文章!

热AI工具

Undresser.AI Undress
人工智能驱动的应用程序,用于创建逼真的裸体照片

AI Clothes Remover
用于从照片中去除衣服的在线人工智能工具。

Undress AI Tool
免费脱衣服图片

Clothoff.io
AI脱衣机

AI Hentai Generator
免费生成ai无尽的。

热门文章
热工具

记事本++7.3.1
好用且免费的代码编辑器

SublimeText3汉化版
中文版,非常好用

禅工作室 13.0.1
功能强大的PHP集成开发环境

Dreamweaver CS6
视觉化网页开发工具

SublimeText3 Mac版
神级代码编辑软件(SublimeText3)
热门话题


 h5项目怎么运行
Apr 06, 2025 pm 12:21 PM
h5项目怎么运行
Apr 06, 2025 pm 12:21 PM
运行 H5 项目需要以下步骤:安装 Web 服务器、Node.js、开发工具等必要工具。搭建开发环境,创建项目文件夹、初始化项目、编写代码。启动开发服务器,使用命令行运行命令。在浏览器中预览项目,输入开发服务器 URL。发布项目,优化代码、部署项目、设置 Web 服务器配置。
 H5页面制作究竟指什么
Apr 06, 2025 am 07:18 AM
H5页面制作究竟指什么
Apr 06, 2025 am 07:18 AM
H5 页面制作是指使用 HTML5、CSS3 和 JavaScript 等技术,创建跨平台兼容的网页。其核心在于浏览器解析代码,渲染结构、样式和交互功能。常见技术包括动画效果、响应式设计和数据交互。为避免错误,应使用开发者工具调试;而性能优化和最佳实践则包括图像格式优化、减少请求和代码规范等,以提高加载速度和代码质量。
 如何使用地理位置API处理用户位置隐私和权限?
Mar 18, 2025 pm 02:16 PM
如何使用地理位置API处理用户位置隐私和权限?
Mar 18, 2025 pm 02:16 PM
本文讨论了使用GeOlocation API管理用户位置隐私和权限,并强调要求权限,确保数据安全性并遵守隐私法律的最佳实践。
 如何将HTML5拖放API用于交互式用户界面?
Mar 18, 2025 pm 02:17 PM
如何将HTML5拖放API用于交互式用户界面?
Mar 18, 2025 pm 02:17 PM
本文介绍了如何使用HTML5拖放API来创建交互式用户界面,详细介绍了使元素可拖动的步骤,处理关键事件并通过自定义反馈来增强用户体验。它还讨论了一个常见的陷阱
 h5怎么制作点击图标
Apr 06, 2025 pm 12:15 PM
h5怎么制作点击图标
Apr 06, 2025 pm 12:15 PM
制作 H5 点击图标的步骤包括:在图像编辑软件中准备方形源图像。在 H5 编辑器中添加交互性,设置点击事件。创建覆盖整个图标的热点。设置点击事件的操作,如跳转页面或触发动画。导出 H5 文档为 HTML、CSS 和 JavaScript 文件。将导出的文件部署到网站或其他平台。
 H5页面制作是否需要持续维护
Apr 05, 2025 pm 11:27 PM
H5页面制作是否需要持续维护
Apr 05, 2025 pm 11:27 PM
H5页面需要持续维护,这是因为代码漏洞、浏览器兼容性、性能优化、安全更新和用户体验提升等因素。有效维护的方法包括建立完善的测试体系、使用版本控制工具、定期监控页面性能、收集用户反馈和制定维护计划。
 H5页面制作适合哪些应用场景
Apr 05, 2025 pm 11:36 PM
H5页面制作适合哪些应用场景
Apr 05, 2025 pm 11:36 PM
H5(HTML5)适合应用于轻量级应用,如营销活动页面、产品展示页面和企业宣传微网站。它优势在于跨平台性和丰富的交互性,但局限性在于复杂的交互和动画、本地资源访问和离线功能。
 html下一页功能
Apr 06, 2025 am 11:45 AM
html下一页功能
Apr 06, 2025 am 11:45 AM
<p>可以通过 HTML 创建下一页功能,步骤包括:创建容器元素、分割内容、添加导航链接、隐藏其他页面、添加脚本。该功能允许用户浏览分段的内容,每次只显示一页,适用于展示大量数据或内容。</p>
