这篇文章主要介绍了CSS实现多行多列的布局的实例代码,需要的朋友可以参考下
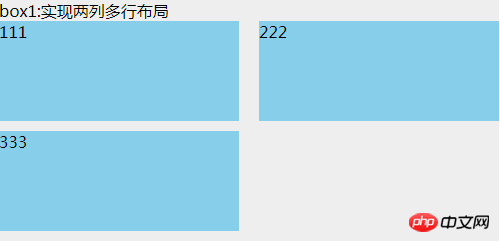
1.两列多行:

HTML:
<p class="box1">
    box1:实现两列多行布局
    <ul>
        <li>111</li>
        <li>222</li>
        <li>333</li>
    </ul>
</p>CSS:
.box1 {
  width: 500px;
  background: #EEEEEE;
}
.box1 ul {
  clear: both;
  overflow: hidden;
}
.box1 ul li {
  width: 48%;
  height: 100px;
  margin-bottom: 10px;
  background: skyblue;
  float: left;
}
.box1 ul li:nth-child(even) {
  margin-left: 4%;
}这用到了nth-child(),兼容ie9及以上的浏览器,中间的空隙就是两个并排p宽度之和,100%减去后剩下的宽度;
既然提到了nth-child(),那么就要说一下nth-of-type(),也是只兼容ie9及以上的浏览器。它与nth-child的区别是:
<p class="box">
    <h1></h1>
    <h1></h1>
    <p></p>
    <p></p>
    <p></p>
</p>如果要让第二个p标签背景为红色,那么,p:nth-child(4)这个能实现效果;而p:nth-of-type(2),就能实现。所以nth-of-type不管p标签前面有多少内容,都只认p的第二个元素。而nth-child却是找它父级的第几个元素。在这种情况下nth-of-type的优点就体现出来了。
2.多行多列

HTML:
<p class="box2">
    box2:多行多列
    <ul>
        <li>
            <p class="com">
                111
            </p>
        </li>
        <li>
            <p class="com">
                222
            </p>
        </li>
        <li>
            <p class="com">
                333
            </p>
        </li>
        <li>
            <p class="com">
                444
            </p>
        </li>
    </ul>
</p>CSS:
.box2 {
  background: #EEEEEE;
  margin-top: 20px;
  width: 500px;
}
.box2 ul {
  overflow: hidden;
  margin-left: -10px;
  background: #EEEEEE;
}
.box2 ul li {
  width: 33.3333%;
  height: 50px;
  float: left;
  padding-left: 10px;
  box-sizing: border-box;
  margin-bottom: 10px;
}
.box2 ul li .com {
  height: inherit;
  background: skyblue;
}这里实现的原理是:子级使用padding-left(元素间的间隙)和box-sizing:border-box,父级使用margin-left负值,这个值和子级padding-left是一样的。li里面加p只是为了让效果明显,不然给li加上背景,由于box-sizing:border-box的存在,li看起来就是没效果全部连在一起的。
如果要实现2列,4列,5列等多列,只需修改li的宽度(平均分配)就行了。
这种做法兼容ie8及以上的浏览器,在ie7下,每个li的宽度大概比正常的少2%左右,比如3列,正常显示的话,每个li宽度是33.333%,但是ie7下需设置31.333%,才能基本正常显示。。。这具体的原因没深究,后面有时间再来补这个坑 ×××
3.圣杯布局:

HTML:
<p class="box3">
    <p class="header">圣杯布局(使用浮动)顶部</p>
    <p class="container">
        <p class="center">
            中间自适应宽度,注意这个center是在left的p前面
        </p>
        <p class="left">
            左部固定宽度
        </p>
        <p class="right">
            右部固定宽度
        </p>
    </p>
    <p class="footer">圣杯布局底部</p>
</p>CSS:
.box3 {
  background: #EEEEEE;
  color: white;
  margin-top: 20px;
}
.box3 .header {
  width: 100%;
  background: #008000;
  height: 50px;
}
.box3 .container {
  clear: both;
  overflow: hidden;
  padding: 0 130px 0 100px;
}
.box3 .container .left {
  width: 100px;
  float: left;
  background: #008B8B;
  height: 100px;
  margin-left: -100%;
  position: relative;
  left: -100px;
}
.box3 .container .center {
  background: #00BFFF;
  height: 100px;
  float: left;
  width: 100%;
}
.box3 .container .right {
  width: 130px;
  float: left;
  background: #FA8072;
  height: 100px;
  margin-left: -130px;
  position: relative;
  right: -130px;
}
.box3 .footer {
  width: 100%;
  background: #222222;
  height: 30px;
}圣杯布局最主要的是中间那并列的3个p,上下两个p,我只是拿来充数的。。。
实现过程大致如下:1.这三个p的HTML摆放的先后顺序是有讲究的,center这个显示在中间的p,在html里是排在最前面的,然后是left,最后是right。
2.在container没有设置padding,left这个p和right这个p都没设置margin与相对定位relative之前,三个p都float:left。这时候页面上显示的是center独占一行,然后是left这个p,然后是right这个p
3.然后left这个p设置margin-left:-100%。这样left就能从第二排蹦到第一排最左边并覆盖center这个p。
4.right这个p设置margin-left: -130px;这个值是它自己宽度的大小。然后right这个p也蹦到第一排最右边并覆盖center这个p。
5.这个时候container设置padding,这个padding的大小是left与right这两个p分别的宽度,然后left与right这两个p分别再设置相对定位,移动自己宽度的距离,就正常显示了。
这种布局方式ie7都兼容,ie6没有测试过。。。
4.仿圣杯布局

HTML:
<p class="box4">
    <p class="header">圣杯布局2(使用定位)顶部</p>
    <p class="container">
        <p class="left">
            左部固定宽度
        </p>
        <p class="center">
            中间自适应宽度,无需考虑顺序
        </p>
        <p class="right">
            右部固定宽度
        </p>
    </p>
    <p class="footer">圣杯布局2底部</p>
</p>CSS:
.box4 {
  background: #EEEEEE;
  color: white;
  margin-top: 20px;
}
.box4 .header {
  width: 100%;
  background: #008000;
  height: 50px;
}
.box4 .container {
  clear: both;
  overflow: hidden;
  padding: 0 130px 0 100px;
  position: relative;
}
.box4 .container .left {
  width: 100px;
  background: #008B8B;
  height: 100px;
  position: absolute;
  top: 0px;
  left: 0px;
}
.box4 .container .center {
  background: #00BFFF;
  height: 100px;
  width: 100%;
}
.box4 .container .right {
  width: 130px;
  background: #FA8072;
  height: 100px;
  position: absolute;
  top: 0px;
  right: 0px;
}
.box4 .footer {
  width: 100%;
  background: #222222;
  height: 30px;
}这种方式实现的思路是:左右两边绝对定位,然后中间的p设置padding,也能达到同样的效果。也不用在意中间的三个p的排版顺序,我一直都在用这种方式。
也兼容ie7,ie6没测试过
5.双飞翼布局

HTML:
<p class="box5">
    <p class="header">双飞翼布局顶部</p>
    <p class="container">
        <p class="center">
            <p class="center-in">
                中间自适应宽度,注意这个center是在left的p前面
            </p>
        </p>
        <p class="left">
            左部固定宽度
        </p>
        <p class="right">
            右部固定宽度
        </p>
    </p>
    <p class="footer">双飞翼布局底部</p>
</p>CSS:
.box5 {
  background: #EEEEEE;
  color: white;
  margin-top: 20px;
}
.box5 .header {
  width: 100%;
  background: #008000;
  height: 50px;
}
.box5 .container {
  clear: both;
  overflow: hidden;
}
.box5 .container .left {
  width: 100px;
  float: left;
  background: #008B8B;
  height: 100px;
  margin-left: -100%;
}
.box5 .container .center {
  background: #00BFFF;
  height: 100px;
  float: left;
  width: 100%;
}
.box5 .container .center .center-in {
  margin: 0 130px 0 100px;
}
.box5 .container .right {
  width: 130px;
  float: left;
  background: #FA8072;
  height: 100px;
  margin-left: -130px;
}
.box5 .footer {
  width: 100%;
  background: #222222;
  height: 30px;
}双飞翼布局和圣杯布局看起来都差不多,但是最大的不同就是:双飞翼布局中center中间的这个p里面还有一个p,主要通过这个p的margin值来达到布局的目的。然后left和right这两个p都不用再设置相对定位relative。其它的都基本一样
兼容ie7,ie6未测试过。
还有许多多行多列的布局方式,比如css3的flex,inline-block等等。。只要有思路,再难的布局都能实现。
以上就是本文的全部内容,希望对大家的学习有所帮助,更多相关内容请关注PHP中文网!
相关推荐:
以上是关于CSS如何实现多行多列布局的方法的详细内容。更多信息请关注PHP中文网其他相关文章!


