

在微信小程序中如何使用swiper组件
这篇文章主要介绍了微信小程序swiper组件用法,结合实例形式分析了微信小程序中swiper组件的功能、使用方法,并附带完整源码供读者下载参考,需要的朋友可以参考下
本文实例讲述了微信小程序swiper组件用法。分享给大家供大家参考,具体如下:
关于视图容器swiper的详细内容可参考官方文档
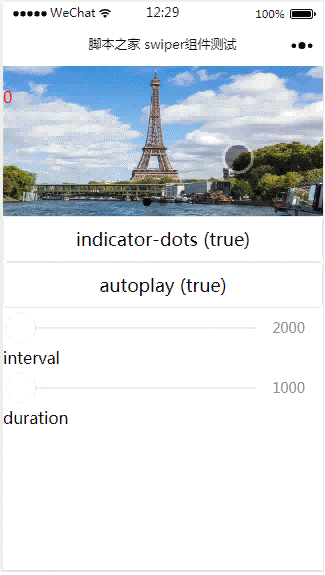
先来看看运行效果:
index.js:
Page({
 data: {
  imgUrls: ['http://img02.tooopen.com/images/20150928/tooopen_sy_143912755726.jpg',
'http://img06.tooopen.com/images/20160818/tooopen_sy_175866434296.jpg',
'http://img06.tooopen.com/images/20160818/tooopen_sy_175833047715.jpg'
  ],
  indicatorDots: false,
  autoplay: false,
  interval: 5000,
  duration: 1000
 },
 changeIndicatorDots: function (e) {
  this.setData({
   indicatorDots: !this.data.indicatorDots
  })
 },
 changeAutoplay: function (e) {
  this.setData({
   autoplay: !this.data.autoplay
  })
 },
 intervalChange: function (e) {
  this.setData({
   interval: e.detail.value
  })
 },
 durationChange: function (e) {
  this.setData({
   duration: e.detail.value
  })
 }
})index.wxml:
<swiper indicator-dots="{{indicatorDots}}"
autoplay="{{autoplay}}" interval="{{interval}}" duration="{{duration}}">
  <block wx:for="{{imgUrls}}" wx:key="{{index}}">
    <swiper-item>
      <image src="{{item}}" class="slide-image" width="355" height="150" ></image>
      <text class="textindex">{{index}}</text>
    </swiper-item>
  </block>
</swiper>
<button bindtap="changeIndicatorDots"> indicator-dots ({{indicatorDots}})</button>
<button bindtap="changeAutoplay"> autoplay ({{autoplay}})</button>
<slider bindchange="intervalChange" show-value min="2000" max="5000"/> interval
<slider bindchange="durationChange" show-value min="1000" max="2000"/> durationindex.wxss:
.slide-image{
  display: inline;
}
.textindex{
  position: absolute;
  top :20px;
  color: red;
}上面是我整理给大家的,希望今后会对大家有帮助。
相关文章:
以上是在微信小程序中如何使用swiper组件的详细内容。更多信息请关注PHP中文网其他相关文章!

热AI工具

Undresser.AI Undress
人工智能驱动的应用程序,用于创建逼真的裸体照片

AI Clothes Remover
用于从照片中去除衣服的在线人工智能工具。

Undress AI Tool
免费脱衣服图片

Clothoff.io
AI脱衣机

Video Face Swap
使用我们完全免费的人工智能换脸工具轻松在任何视频中换脸!

热门文章
热工具

记事本++7.3.1
好用且免费的代码编辑器

SublimeText3汉化版
中文版,非常好用

禅工作室 13.0.1
功能强大的PHP集成开发环境

Dreamweaver CS6
视觉化网页开发工具

SublimeText3 Mac版
神级代码编辑软件(SublimeText3)
热门话题


 闲鱼微信小程序正式上线
Feb 10, 2024 pm 10:39 PM
闲鱼微信小程序正式上线
Feb 10, 2024 pm 10:39 PM
闲鱼官方微信小程序悄然上线,在小程序中可以发布闲置与买家/卖家私信交流、查看个人资料及订单、搜索物品等,有用好奇闲鱼微信小程序叫什么,现在快来看一下。闲鱼微信小程序叫什么答案:闲鱼,闲置交易二手买卖估价回收。1、在小程序中可以发布闲置、与买家/卖家私信交流、查看个人资料及订单、搜索指定物品等功能;2、在小程序的页面中有首页、附近、发闲置、消息、我的5项功能;3、想要使用的话必要要开通微信支付才可以购买;
 微信小程序实现图片上传功能
Nov 21, 2023 am 09:08 AM
微信小程序实现图片上传功能
Nov 21, 2023 am 09:08 AM
微信小程序实现图片上传功能随着移动互联网的发展,微信小程序已经成为了人们生活中不可或缺的一部分。微信小程序不仅提供了丰富的应用场景,还支持开发者自定义功能,其中包括图片上传功能。本文将介绍如何在微信小程序中实现图片上传功能,并提供具体的代码示例。一、前期准备工作在开始编写代码之前,我们需要先下载并安装微信开发者工具,并注册成为微信开发者。同时,还需要了解微信
 实现微信小程序中的下拉菜单效果
Nov 21, 2023 pm 03:03 PM
实现微信小程序中的下拉菜单效果
Nov 21, 2023 pm 03:03 PM
实现微信小程序中的下拉菜单效果,需要具体代码示例随着移动互联网的普及,微信小程序成为了互联网开发的重要一环,越来越多的人开始关注和使用微信小程序。微信小程序的开发相比传统的APP开发更加简便快捷,但也需要掌握一定的开发技巧。在微信小程序的开发中,下拉菜单是一个常见的UI组件,实现了更好的用户操作体验。本文将详细介绍如何在微信小程序中实现下拉菜单效果,并提供具
 实现微信小程序中的图片滤镜效果
Nov 21, 2023 pm 06:22 PM
实现微信小程序中的图片滤镜效果
Nov 21, 2023 pm 06:22 PM
实现微信小程序中的图片滤镜效果随着社交媒体应用的流行,人们越来越喜欢在照片中应用滤镜效果,以增强照片的艺术效果和吸引力。在微信小程序中也可以实现图片滤镜效果,为用户提供更多有趣和创造性的照片编辑功能。本文将介绍如何在微信小程序中实现图片滤镜效果,并提供具体的代码示例。首先,我们需要在微信小程序中使用canvas组件来加载和编辑图片。canvas组件可以在页面
 使用微信小程序实现轮播图切换效果
Nov 21, 2023 pm 05:59 PM
使用微信小程序实现轮播图切换效果
Nov 21, 2023 pm 05:59 PM
使用微信小程序实现轮播图切换效果微信小程序是一种轻量级的应用程序,具有简单、高效的开发和使用特点。在微信小程序中,实现轮播图切换效果是常见的需求。本文将介绍如何使用微信小程序实现轮播图切换效果,并给出具体的代码示例。首先,在微信小程序的页面文件中,添加一个轮播图组件。例如,可以使用<swiper>标签来实现轮播图的切换效果。在该组件中,可以通过b
 闲鱼微信小程序叫什么
Feb 27, 2024 pm 01:11 PM
闲鱼微信小程序叫什么
Feb 27, 2024 pm 01:11 PM
闲鱼官方微信小程序已经悄然上线,它为用户提供了一个便捷的平台,让你可以轻松地发布和交易闲置物品。在小程序中,你可以与买家或卖家进行私信交流,查看个人资料和订单,以及搜索你想要的物品。那么闲鱼在微信小程序中究竟叫什么呢,这篇教程攻略将为您详细介绍,想要了解的用户们快来跟着本文继续阅读吧!闲鱼微信小程序叫什么答案:闲鱼,闲置交易二手买卖估价回收。1、在小程序中可以发布闲置、与买家/卖家私信交流、查看个人资料及订单、搜索指定物品等功能;2、在小程序的页面中有首页、附近、发闲置、消息、我的5项功能;3、
 实现微信小程序中的滑动删除功能
Nov 21, 2023 pm 06:22 PM
实现微信小程序中的滑动删除功能
Nov 21, 2023 pm 06:22 PM
实现微信小程序中的滑动删除功能,需要具体代码示例随着微信小程序的流行,开发者们在开发过程中经常会遇到一些常见功能的实现问题。其中,滑动删除功能是一个常见、常用的功能需求。本文将为大家详细介绍如何在微信小程序中实现滑动删除功能,并给出具体的代码示例。一、需求分析在微信小程序中,滑动删除功能的实现涉及到以下要点:列表展示:要显示可滑动删除的列表,每个列表项需要包
 实现微信小程序中的图片旋转效果
Nov 21, 2023 am 08:26 AM
实现微信小程序中的图片旋转效果
Nov 21, 2023 am 08:26 AM
实现微信小程序中的图片旋转效果,需要具体代码示例微信小程序是一种轻量级的应用程序,为用户提供了丰富的功能和良好的用户体验。在小程序中,开发者可以利用各种组件和API来实现各种效果。其中,图片旋转效果是一种常见的动画效果,可以为小程序增添趣味性和视觉效果。在微信小程序中实现图片旋转效果,需要使用小程序提供的动画API。下面是一个具体的代码示例,展示了如何在小程
