本篇文章给大家分享的内容是关于Redis集群搭建教程的总结,内容很详细,有需要的朋友可以参考一下,希望可以帮助到大家。
本文收集并整理了Redis集群搭建的网文、网站、自己的经验。水平有限,只分享环境搭建。本文分为以下几个部分:
Redis 安装
Rvm 安装更换源
Rvm Ruby 安装、使用、卸载
RubyGems 升级、更换源、安装redis
集群配置
成果测试
请大家按照以上步骤来查看此文
说明:
仅限学习使用,若用于线上,本人不承担任何责任。
如有问题,请在下方留言。
文中有些命令没有带sudo,是因为我用的root权限。
wget http://download.redis.io/releases/redis-4.0.10.tar.gz
tar xzf redis-4.0.10.tar.gz
cd redis-4.0.10
make PREFIX=/usr/local/redis install
注:如果不想将Redis作为一个服务,到这就已经安装完了
Create a directory where to store your Redis config files and your data:(有道词典:创建一个目录来存储Redis配置文件和数据:)

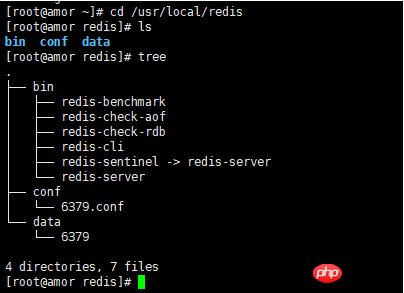
# 这只是一个目录结构,大家不要着急为什么自己没有,往下看,一步一步来
[root@amor ~]# cd /usr/local/redis
[root@amor redis]# tree
.
├── bin  # 编译安装指定目录后自动生成目录及文件
│   ├── redis-benchmark
│   ├── redis-check-aof
│   ├── redis-check-rdb
│   ├── redis-cli
│   ├── redis-sentinel -> redis-server
│   └── redis-server
├── conf # 自己建立的存储配置文件的目录及自己创建的单个Redis配置文件
│   └── 6379.conf
└── data # 自己建立的存储Redis数据的目录及单个Redis服务数据存储目录
    └── 6379

4 directories, 7 files
注意:cp /usr/src/redis-4.0.10/src/redis-trib.rb /usr/local/redis/bin/ 后面创建集群要用到
Copy the init script that you'll find in the Redis distribution under the utils directory into /etc/init.d. We suggest calling it with the name of the port where you are running this instance of Redis. For example:(有道词典:将在utils目录下的Redis发行版中找到的init脚本复制到/etc/init.d中我们建议使用正在运行这个Redis实例的端口的名称来调用它。例如:)
sudo cp utils/redis_init_script /etc/init.d/redis_6379
Edit the init script.(有道词典:编辑init脚本。)
#!/bin/sh
# chkconfig 2345 90 25                         # linux 开机启动设置 2345 运行级别 90 启动优先级(参考 memcached head /etc/rc.d/rc3.d/S90memcached ) 25 关闭优先级 (参考memcached)
# Simple Redis init.d script conceived to work on Linux systems
# as it does use of the /proc filesystem.

### BEGIN INIT INFO
# Provides:     redis_6379
# Default-Start:        2 3 4 5
# Default-Stop:         0 1 6
# Short-Description:    Redis data structure server
# Description:          Redis data structure server. See https://redis.io
### END INIT INFO

REDISPORT=6379
EXEC=/usr/local/redis/bin/redis-server         # 修改为自己的可执行文件所在目录
CLIEXEC=/usr/local/redis/bin/redis-cli         # 修改为自己的可执行文件所在目录

PIDFILE=/var/run/redis_${REDISPORT}.pid        # 默认就好
CONF="/usr/local/redis/conf/${REDISPORT}.conf" # 修改为自己的配置文件存放目录
···省略···
esac开始修改redis.conf
Make sure to modify REDISPORT accordingly to the port you are using. Both the pid file path and the configuration file name depend on the port number.(有道词典:请确保根据您正在使用的端口对重新分配进行相应的修改。pid文件路径和配置文件名都取决于端口号。)
Set daemonize to yes (by default it is set to no). (需要修改为 yes)
Set the pidfile to /var/run/redis_6379.pid (modify the port if needed). (默认即可)
Change the port accordingly. In our example it is not needed as the default port is already 6379. (默认即可,设置集群的时候需要拷贝配置文件并且重新设置端口)
Set your preferred loglevel. (默认即可)
Set the logfile to /var/log/redis_6379.log (默认好像为空,需要修改)
Set the dir to /var/redis/6379 (very important step!) (redis数据保存目录,需要修改位置自定义路径)
sudo cp redis.conf /usr/local/redis/conf/6379.conf (修改成自己定义的目录。参考上述目录结构 redis.conf 在你们redis解压目录中的src目录下)
sudo mkdir /usr/local/redis/data/6379 (修改成自己定义的目录。参考上述目录结构)
Edit the configuration file, making sure to perform the following changes:(有道词典:编辑配置文件,确保执行以下更改:)
注:上面的意思是让你们修改 /usr/local/redis/conf/6379.conf,用vim 打开,搜索上述关键词即可,参考以下设置(如果所有的步骤都是粘贴复制的走下来的,直接修改成下面这样:0.0):
port 6379
daemonize yes
pidfile /var/run/redis_6379.pid
loglevel notice
logfile "/var/log/redis_6379.log"
dir /usr/local/redis/data/6379
Finally add the new Redis init script to all the default runlevels using the following command:(有道词典:最后,使用以下命令将新的Redis init脚本添加到所有默认的运行级别:)
# ubuntu
sudo update-rc.d redis_6379 defaults
# centos
chkconfig --add redis_6379
You are done! Now you can try running your instance with:
sudo /etc/init.d/redis_6379 start

/etc/init.d/redis-server stop
/etc/init.d/redis-server start
/etc/init.d/redis-server restart
sudo /etc/init.d/redis_6379 start
/usr/local/redis/bin/redis-server redis.conf  # 注意此处缺省:配置文件路径
redis-cli -h 127.0.0.1 -p 6379 shutdown
注:如果只是停止本地redis 请执行: redis-cli shutdown
kill -9 进程号
pkill redis
curl -sSL https://rvm.io/mpapis.asc | gpg2 --import -
curl -L get.rvm.io | bash -s stable
rvm user gemsets # 建立用户配置目录,更换源的时候需要向 db 文件写入配置信息
echo "ruby_url=https://cache.ruby-china.org/pub/ruby" > ~/.rvm/user/db # 更换源
rvm list known
rvm install 2.6
rvm use 2.6
yum -y remove ruby # 卸载centos yum 安装的 1.8 版本
ruby --version
rvm uninstall ruby # 此处带不带版本自己测试
gem install rubygems-update
rubygems-update
gem sources --add https://gems.ruby-china.com/ --remove https://rubygems.org/
gem sources -l
gem install redis
注:下面的内容是我自己参考这篇博文加上我熟悉Redis安装后自己的配置过程。大家可以参考NrwLm - Redis 集群搭建详细指南。
cd /usr/local/redis/conf
cp 6379.conf redis.conf.default  # 用作集群其他配置文件的蓝本
sudo vim redis.conf.default
修改内容如下
bind 192.168.2.123  # 绑定当前机器 IP
cluster-enabled yes # 取消注释,启动集群模式
cluster-config-file nodes-6379.conf # 取消注释,修改为 /usr/local/redis/data/6379/nodes-6379.conf  (如果遇到需要重新建立集群,不将此项修改为指定路径而和启动配置文件放在一起,会导致建立集群时,删除重建conf 文件)
cluster-node-timeout 15000 # 取消注释
appendonly yes # 将 no 修改为 yes
cd /usr/local/redis/conf
echo 9001.conf 9002.conf 9003.conf 9004.conf 9005.conf 9006.conf | xargs -n 1 cp -v redis.conf.default
sed -i 's/6379/9001/g'  9001.conf
sed -i 's/6379/9002/g'  9002.conf
sed -i 's/6379/9003/g'  9003.conf
sed -i 's/6379/9004/g'  9004.conf
sed -i 's/6379/9005/g'  9005.conf
sed -i 's/6379/9006/g'  9006.conf


cd /usr/local/redis/data
mkdir -p 9001 9002 9003 9004 9005 9006
# 后期可能需要删除该文件件下的文件,用于重建集群,所以,删除命令也写一下
rm -rf 900*/*
/usr/local/redis/bin/redis-server /usr/local/redis/conf/9001.conf
/usr/local/redis/bin/redis-server /usr/local/redis/conf/9002.conf
/usr/local/redis/bin/redis-server /usr/local/redis/conf/9003.conf
/usr/local/redis/bin/redis-server /usr/local/redis/conf/9004.conf
/usr/local/redis/bin/redis-server /usr/local/redis/conf/9005.conf
/usr/local/redis/bin/redis-server /usr/local/redis/conf/9006.conf

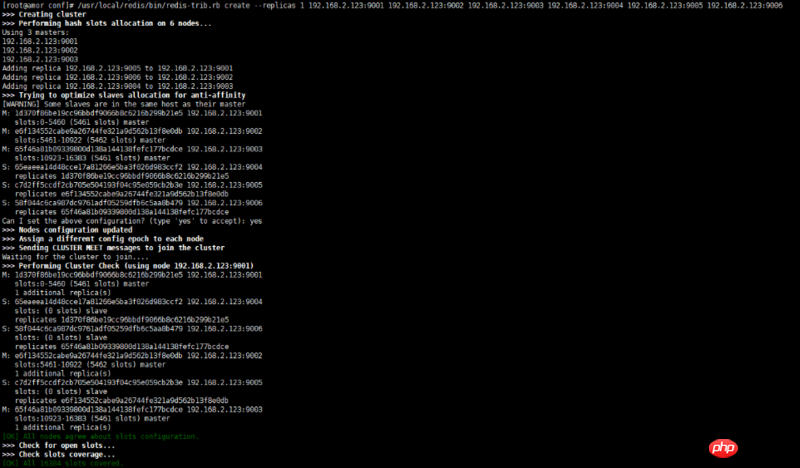
/usr/local/redis/bin/redis-trib.rb create --replicas 1 192.168.2.123:9001 192.168.2.123:9002 192.168.2.123:9003 192.168.2.123:9004 192.168.2.123:9005 192.168.2.123:9006

执行命令: /usr/local/redis/bin/redis-cli -c -h 192.168.2.123 -p 9001
<img src="/static/imghw/default1.png" data-src="https://img.php.cn//upload/image/755/105/520/1532744572918545.png" class="lazy" title="1532744572918545.png" alt="1611963180-5b5af612befea_articlex.png">
如果遇到timeout 请查看自己的防火墙,安装宝塔的尤其注意,请先去安全里面放行 9001:9006 的端口
redis集群 Waiting for the cluster to join 一直等待,redis集群不仅需要开通redis客户端连接的端口,而且需要开通集群总线端口,集群总线端口为redis客户端连接的端口 + 1000
redis /usr/bin/env: ruby: 没有那个文件或目录
执行这个命令 rvm get stable --auto-dotfiles,或者执行 nvm list 有详细的错误说明(查了资料说,线上不要用rvm安装ruby)

这是我自己的解决方案
# 把这个添加到 /etc/profile 文件中(放到最后就行)
rvm use ruby-2.6.0-preview2
相关推荐:
以上是Redis集群搭建教程的总结的详细内容。更多信息请关注PHP中文网其他相关文章!


