CSS 网格布局(Grid)的两种方式介绍(附代码)
CSS 网格布局(Grid)能够将网页分成具有简单属性的行和列,可以直接使用 CSS 来定位和调整网格内的每个元素,也不需要为了实现某种布局进行多层嵌套,总而言之,css网格布局非常好用,下面我们就来看一看这篇文章给大家讲述的css网格布局的内容。
1、CSS 网格布局(Grid)
CSS Grid 布局由两个核心组成部分是父元素和子元素,父元素 是实际的 grid(网格),子元素是 grid(网格) 内的内容。
下面是一个父元素和六个子元素
   <div class="box">
        <div class="item div1">1</div>
        <div class="item div2">2</div>
        <div class="item div3">3</div>
        <div class="item div4">4</div>
        <div class="item div5">5</div>
        <div class="item div6">6</div>
    </div>
要把父元素元素变成一个 grid(网格),只要简单地把其 display 属性设置为 grid
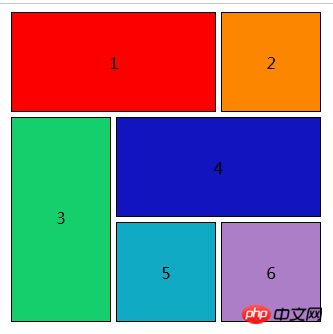
效果图:

下面进行网格布局:
 .box {
            width: 350px;
            height: 350px;
            /* background: #ccc; */
            margin: 0 auto;
            grid-gap: 5px;
            display: grid;
            grid-template-columns: 100px 100px 100px;
            grid-template-rows: 100px 100px 100px;
        }

        .item {
            border: 1px solid black;
            box-sizing: border-box;
        }

        .div1 {
            grid-column-start: 1;
            grid-column-end: 3;
            /*(div1从占据从第一条网格线开始,到第三条网格线结束)*/
            line-height: 100px;
            text-align: center;
            background: rgb(252, 0, 0);
            /* grid-column: 1/3;(这是缩写的形式) */
        }

        .div2 {
            line-height: 100px;
            text-align: center;
            background: rgb(252, 134, 0);
        }

        .div3 {
            grid-row-start: 2;
            grid-row-end: 4;
            /* grid-row: 2/4;(这是缩写的形式) */
            line-height: 200px;
            text-align: center;
            background: rgb(21, 207, 108);
        }

        .div4 {
            grid-column-start: 2;
            grid-column-end: 4;
            line-height: 100px;
            text-align: center;
            background: rgb(18, 21, 189);
            /* grid-column: 2/4;(这是缩写的形式) */
        }

        .div5 {
            line-height: 100px;
            text-align: center;
            background: rgb(16, 170, 197);
        }

        .div6 {
            line-height: 100px;
            text-align: center;
            background: rgb(172, 126, 199);
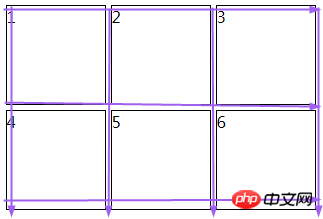
}上面代码中的网格线(如图箭头所指的地方就是一根网格线):

2、响应式网格布局
和上面的差不多(添加了以下的内容)
使用grid-template-columns 属性创建一个 12 列的网格,每个列都是一个单位宽度(总宽度的 1/12 )
使用 grid-template-rows 属性创建 3 行
使用 grid-gap 属性在网格中的网格项之间添加一个间隙。
代码如下:
       <div class="container">
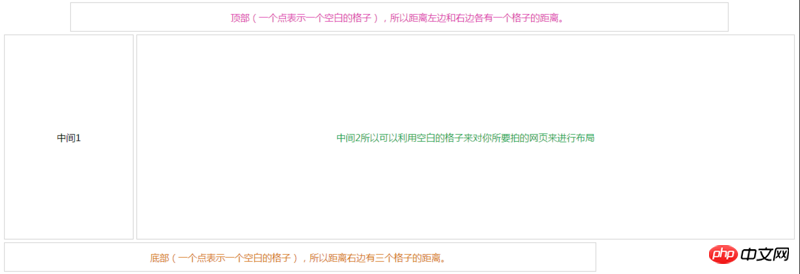
        <div class="header">顶部(一个点表示一个空白的格子),所以距离左边和右边各有一个格子的距离。</div>
        <div class="menu">中间1</div>
        <div class="content">中间2所以可以利用空白的格子来对你所要拍的网页来进行布局</div>
        <div class="footer">底部(一个点表示一个空白的格子),所以距离右边有三个格子的距离。</div>
</div>添加 grid-template-areas
这个属性被称为网格区域,也叫模板区域,能够让我们轻松地进行布局实验。
效果图:
代码如下:
        .container {
            display: grid;
            grid-template-columns: repeat(12, 1fr);
            grid-template-rows: 50px 350px 50px;
            grid-gap: 5px;
            grid-template-areas: ". h h h h h h h h h h ." " m m c c c c c c c c c c" "f f f f f f f f f . . .";
        }

        .container>p {
            border: 1px solid #ccc;
            box-sizing: border-box;
        }

        .header {
            text-align: center;
            line-height:50px;
            grid-area: h;
            color:rgb(219, 52, 169);
        }

        .menu {
            grid-area: m;
            text-align: center;
            line-height:350px;
        }

        .content {
            text-align: center;
            line-height:350px;
            grid-area: c;
            color:rgb(25, 158, 69);
        }

        .footer {
            color:rgb(212, 112, 18);
            text-align: center;
            line-height:50px;
            grid-area: f;
}相关文章推荐:
以上是CSS 网格布局(Grid)的两种方式介绍(附代码)的详细内容。更多信息请关注PHP中文网其他相关文章!

热AI工具

Undresser.AI Undress
人工智能驱动的应用程序,用于创建逼真的裸体照片

AI Clothes Remover
用于从照片中去除衣服的在线人工智能工具。

Undress AI Tool
免费脱衣服图片

Clothoff.io
AI脱衣机

AI Hentai Generator
免费生成ai无尽的。

热门文章

热工具

记事本++7.3.1
好用且免费的代码编辑器

SublimeText3汉化版
中文版,非常好用

禅工作室 13.0.1
功能强大的PHP集成开发环境

Dreamweaver CS6
视觉化网页开发工具

SublimeText3 Mac版
神级代码编辑软件(SublimeText3)

热门话题
 vue中怎么用bootstrap
Apr 07, 2025 pm 11:33 PM
在 Vue.js 中使用 Bootstrap 分为五个步骤:安装 Bootstrap。在 main.js 中导入 Bootstrap。直接在模板中使用 Bootstrap 组件。可选:自定义样式。可选:使用插件。
 HTML,CSS和JavaScript的角色:核心职责
Apr 08, 2025 pm 07:05 PM
HTML定义网页结构,CSS负责样式和布局,JavaScript赋予动态交互。三者在网页开发中各司其职,共同构建丰富多彩的网站。
 bootstrap怎么写分割线
Apr 07, 2025 pm 03:12 PM
创建 Bootstrap 分割线有两种方法:使用 标签,可创建水平分割线。使用 CSS border 属性,可创建自定义样式的分割线。
 了解HTML,CSS和JavaScript:初学者指南
Apr 12, 2025 am 12:02 AM
WebDevelovermentReliesonHtml,CSS和JavaScript:1)HTMLStructuresContent,2)CSSStyleSIT和3)JavaScriptAddSstractivity,形成thebasisofmodernWebemodernWebExexperiences。
 bootstrap怎么调整大小
Apr 07, 2025 pm 03:18 PM
要调整 Bootstrap 中元素大小,可以使用尺寸类,具体包括:调整宽度:.col-、.w-、.mw-调整高度:.h-、.min-h-、.max-h-
 bootstrap按钮怎么用
Apr 07, 2025 pm 03:09 PM
如何使用 Bootstrap 按钮?引入 Bootstrap CSS创建按钮元素并添加 Bootstrap 按钮类添加按钮文本
 bootstrap怎么设置框架
Apr 07, 2025 pm 03:27 PM
要设置 Bootstrap 框架,需要按照以下步骤:1. 通过 CDN 引用 Bootstrap 文件;2. 下载文件并将其托管在自己的服务器上;3. 在 HTML 中包含 Bootstrap 文件;4. 根据需要编译 Sass/Less;5. 导入定制文件(可选)。设置完成后,即可使用 Bootstrap 的网格系统、组件和样式创建响应式网站和应用程序。
 bootstrap怎么插入图片
Apr 07, 2025 pm 03:30 PM
在 Bootstrap 中插入图片有以下几种方法:直接插入图片,使用 HTML 的 img 标签。使用 Bootstrap 图像组件,可以提供响应式图片和更多样式。设置图片大小,使用 img-fluid 类可以使图片自适应。设置边框,使用 img-bordered 类。设置圆角,使用 img-rounded 类。设置阴影,使用 shadow 类。调整图片大小和位置,使用 CSS 样式。使用背景图片,使用 background-image CSS 属性。


